background image

.f

e

R

N

O

I

T

P

I

R

C

S

E

D

S

E

A

F

O

N

R

E

T

S

E

T

H

G

I

L

T

N

O

R

F

T

F

E

L

S

I

A

F

O

N

R

E

T

N

I

T

H

G

I

L

T

N

O

R

F

T

F

E

L

A

T

M

R

E

P

I

W

T

N

O

R

F

D

I

A

F

O

N

R

E

T

N

I

T

H

G

I

L

T

N

O

R

F

T

H

G

I

R

D

E

A

F

O

N

R

E

T

S

E

T

H

G

I

L

T

N

O

R

F

T

H

G

I

R

R

A

O

I

D

A

R

R

A

C

R

L

I

H

C

T

I

W

S

T

H

G

I

L

D

A

E

H

E

L

B

A

T

O

V

I

P

L

I

H

C

T

I

W

S

R

E

P

I

W

N

E

E

R

C

S

D

N

I

W

P

L

F

I

H

C

T

I

W

S

T

H

G

I

L

K

R

O

W

R

A

E

R

A

L

F

I

H

C

T

I

W

S

T

H

G

I

L

K

R

O

W

T

N

O

R

F

L

V

M

R

O

T

O

M

K

N

A

T

N

E

E

R

C

S

D

N

I

W

G

A

C

R

O

T

C

E

N

N

O

C

Y

L

P

P

U

S

R

E

W

O

P

L

A

R

E

N

E

G

C

S

I

R

R

E

T

A

E

H

V

U

A

C

R

O

T

C

E

N

N

O

C

Y

L

P

P

U

S

R

E

W

O

P

L

A

R

E

N

E

G

D

L

A

R

E

K

A

E

P

S

D

U

O

L

T

H

G

I

R

D

P

F

T

H

G

I

L

G

N

I

N

R

A

W

T

H

G

I

L

R

A

E

R

T

H

G

I

R

P

T

M

R

E

P

I

W

R

A

E

R

S

P

F

T

H

G

I

L

G

N

I

N

R

A

W

T

H

G

I

L

R

A

E

R

T

F

E

L

S

L

A

R

E

K

A

E

P

S

D

U

O

L

T

F

E

L

A

L

P

P

M

A

L

F

O

O

R

R

F

M

T

H

G

I

L

D

A

E

H

E

L

B

A

T

O

V

I

P

S

A

R

E

T

H

G

I

L

L

O

B

M

Y

S

S

I

H

T

R

O

F

S

D

N

A

T

S

H

T

R

A

E

E

G

N

A

R

O

A

W

O

L

L

E

Y

G

E

T

I

H

W

B

E

U

L

B

T

H

G

I

L

H

K

N

I

P

C

N

W

O

R

B

M

Y

E

R

G

D

K

C

A

L

B

N

N

E

E

R

G

E

D

E

R

R

E

U

L

B

F

E

L

P

R

U

P

V

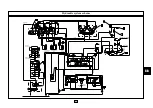
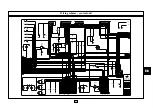
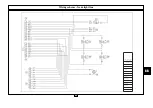
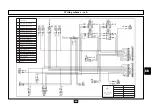
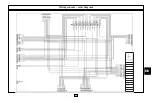
Wiring scheme - cab

GB

49

Содержание AL 150

Страница 1: ......

Страница 2: ......

Страница 3: ...D WITH THE RIGHT TOOLS FOR THE JOB 3 MAKE SUREYOU KNOWTHE STANDARDS REGARDING THIS SECTOR OF WORKAND THE ON SITE REGULATIONS 4 OBSERVE THE HIGHWAYCODE DURING ON ROAD TRANSFERS THE DESCRIPTIONS AND DIAGRAMS IN THIS PUBLICATION ARE INDI CATIVE AHLMANN BAUMASCHINEN GMBH FOLLOWS A POLICY OF CONSTANTPRODUCT IMPROVEMENTAND THEREFORE RESERVES THE RIGHT TO MODIFYTHIS PUBLICATION WITHOUT PRIOR NOTICE ARTIC...

Страница 4: ...uld you need to use it for work that requires special equipment we advise you to get in touch with your Ahlmann Distributor to ensure that modifications comply with machine technical specifications and safety standards Machine modifications unauthorised by the manufacturer could compromise compliance with such safety standards The machine should be checked periodically according to use contact you...

Страница 5: ... components A cooler installed next to the engine water radiator keeps the hydraulic fluid at standard operating temperature SUMMARY SAFETYSTANDARDS Page 4 CONTROLS Page 11 INSTRUMENTS Page 17 ACCESSORIES Page 20 START UPANDWORK Page 22 TOWING Page 23 VEHICLERECOVERY Page 24 TRASPORT Page 24 LIFT Page 25 ON ROAD TRANSFER Page 26 ROPS FOPS PROTECTION STRUCTURE Page 27 RATING PLATESANDADHESIVE STICK...

Страница 6: ...is manual refers to situations which may occur during normal machine use and maintenance work and gives various ways of dealing with such situations The manual also contains safety information concerning other dangers Whatever the work being carried out the applicable private and public work site safety regulations are those which comply with standards in force in the country or professional secto...

Страница 7: ...nce prone areas etc Inspect the work zone before using the machine and carefully evaluate the risks Check out and weigh up all possible risks before driving the vehicle in a new work zone Holes obstacles rubble and other risk factors may cause serious physical injury Be ready in case of an emergency Always keep a first aid kit nearby and a fire extinguisher on board the vehicle within the driver s...

Страница 8: ...g the machine on a trailer position the speed selector at on site speed Keep the loading bucket at least 20 cm from the ground Using the digging gear to sweep the ground to level dug out material or push objects side on gear stress is absolutely forbidden Stop the engine even during brief pauses Never leave the driver s cab with the engine running When getting in and out of the driver s seat the l...

Страница 9: ...rious injury Before carrying out maintenance work on the machine proceed as follows 1 Bring the machine to a halt on a flat horizontal surface 2 Set the loader gear down on the ground 3 Stop the engine 4 Pull the handbrake lever 5 Lock the loader gear controls into place 6 Chock the wheels to keep the vehicle perfectly still Should maintenance adjustment work require that the loader gear be raised...

Страница 10: ...n inflammable vapours ventilate it properly before utilising the machine Always keep a fire extinguisher within reach in the cab Make sure that it is serviced regularly in compliance with the maker s instructions Periodically clean the vehicle Remove all possibly inflammable deposits Inspect for leaks replace damaged hoses piping and connecting pieces After repair work has been completed clean the...

Страница 11: ...S B B 20 20 Preventing burns Battery electrolyte can cause serious burns The battery contains sulphuric acid Avoid contact with skin eyes and clothing Treatment EXTERNAL rinse with water INTERNAL drink lots of water or milk Then drink milk of magnesia one beaten egg or some vegetable oil Seek medical advice immediately EYES rinse with water for 15 minutes and seek medical advice immediately When b...

Страница 12: ...cing inwards palm facing outwards Move Stop and wait Stop Emergency stop Move one hand back and forth Move hands back and forth Come forward Reverse Lift the load or loader Lower the load or loader equipment slowly equipment slowly Lift the load or loader equipment Lower the load or loader equipment Turn the vehicle to the left Turn the vehicle to the right turn load to the left turn load to the r...

Страница 13: ... Opening from the inside To open the left door from the inside pull the handle indicated in the picture To open the emergency door right from the inside rotate upwards the handle indicated in the picture Open door release To release the left door from its open position pull the handle indicated in the picture To open the emergency door right from the inside rotate the knob clockwise as shown in th...

Страница 14: ...rmany only B C E E Speed and directional selector switch Located on the steering column on the left of the steering wheel this control has three positions Selector in position 2 Neutral Selector in position 1 Forward gear Selector in position 3 Reverse gear Different speed can be selected by rotating the selector knob 1 Work gear 2 Automatic work gear 3 Transfer gear 4 Automatic transfer gear Note...

Страница 15: ...s 3 Right hand flashing indicators on Dipped headlights high beam control Located on the right hand side of the steering wheel this control has three positions Pos 1 Dipped headlights Pos 2 High beam Pos 3 High beam flash momentary click shift operation Front windshield wiper washer control Located on the right hand side of the steering wheel this control has four positions Pos J Intermittence on ...

Страница 16: ...ote Loader gear manoeuvre speed depends on how far the lever is inclined Switches on right hand side dashboard 1 This switch disables hydraulic system of the manipulator 2 General lighting switch 3 Manipulator switch button 4 Plug anti pitch device on request 5 Plug lift blocking valves on request SENSO DI MARCIA Switches on right hand side dashboard 6 Front work light switch Pos 0 lights off Pos ...

Страница 17: ...ese control switches may also be used for any other loader gear with hydraulic device Loader control locking switch Located on the dashboard on the right side This switch disables the loader control When the machine is stopped it is absolutely necessary to position this switch in the control locking position Never disobey this safety regulation Parking brake lever Located to the left of the seat t...

Страница 18: ...andle and give it a half turn to obtain the suspension desired 2 Seat position back forth Pull the seat lock control upwards slide the seat forwards or rearwards until the desired position is reached then release the control lever making sure that it is locked in place 3 Seat tilt Pull the lever upwards until the desired position is obtained Then release the lever Engine hood release handle Locate...

Страница 19: ...ating and ventilation controls Heating and ventilation controls are located on the right hand side of the cab INSTRUMENTS Central dashboard 1 4 2 1 2 3 4 5 6 7 8 9 10 1 1 12 1 First gear warning light 2 Second gear warning light 3 Third gear warning light 4 Fourth gear warning light 5 Neutral gear warning light 6 Forward gear warning light 7 Reverse gear warning light 8 Bucket positioner warning l...

Страница 20: ... L8 J17 J16 NEGATIVO NEGATIVO NEGATIVO NEGATIVO POSITIVO NEGATIVE NEGATIVE NEGATIVE POSITIVE NEGATIVE NC SPIA LIVELLO OLIO FRENI ROSSA SPIA IND DI DIREZIONE VERDE SPIA FILTRO ARIA ROSSA SPIA LUCI ABBAGLIANTI BLU FUNZIONE CONNESSA DRIVING BEAMS LAMP BLUE FUNCTION AIR CLEANER LAMP RED DIRECTION INDICATOR LAMP GREEN BRAKE OIL LEVEL LAMP RED SPIA RISERVA CARBURANTE GIALLO SPIA PRESS OLIO MOTORE ROSSO ...

Страница 21: ...l Simultaneously operates all directional indicators on the machine and the warning light in the switch at the same time Warning lights can be operated even if you do not turn on the ignition 3 Brake pedal Located on the cab floor on the left of the steering column 4 Accelerator pedal Located on the cab floor to the right of the steering column Inclination of this pedal determines the Diesel rotat...

Страница 22: ...e ACCESSORIES Located on the left side of the cab and behind the driver seat this useful compartment may be used for vehicle document storage First Aid Box To be installed on the vehicle before driving Always keep a first aid box handy Make sure that it is complete and ready to be used If not replace it immediately 1 Cab light Located on the roof it is controlled by a switch integrated into the li...

Страница 23: ...ear view mirrors Before driving the vehicle make sure that the rear view mirrors are positioned properly IMPORTANT Do not position the mirrors right up against the windshield as this could damage the wipers if used The wheel chocks are housed in two supports located on the front mudguards of the vehicle Take the wheel chocks out of their supports by pulling their handles then wedge them under the ...

Страница 24: ...n key turn back to pos 2 for other 30 seconds then start the starter once again for max 30 sec e Once the engine has been started warm it up before working or driving Bleeding air trapped in the fuel line Air bubbles may form in the fuel supply system after prolonged engine idleness after work on the fuel filter and fuel feed lines or if the fuel tank is allowed to run dry Air may be present in th...

Страница 25: ...must be in the right position An arm indicator which helps position the bucket horizontally on the ground has been installed for this purpose To ensure maximum bucket efficiency just follow the above rules forcing the machine beyond its own performance levels is unnecessary and ineffectual Use the vehicle with the bucket down as much as possible This position improves machine stability and gives b...

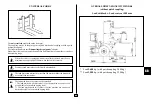
Страница 26: ...cle recovery is a delicate operation performed at the operator s risk The Manufacturer declines all liability for damage and accident that occur Stage 1 Chock the trailer wheels Fit the trailer bed widening gear if applicable Stage 2 Raise the loader bucket 20 cm above the trailer ramps Load the vehicle onto the bed with maximum caution use the lowest speed possible then place the speed selector a...

Страница 27: ... located on the right hand side of the joint Then stop the engine and disconnect key Stage 1 Lower the loader bucket onto the ground and lock the loader controls inside the driver s cab by using the lock pin Stage 2 Insert the central articulated joint locking pin Then stop the engine and disconnect key Stage 3 Use the 4 points indicated 2 front and 2 rear with the appropriate stickers to lift the...

Страница 28: ...loader booms Stage 2 Install the loader bucket teeth protection Stage 3 Lock the loader controls by using the special lever Stage 4 Adjust rear view mirrors correctly position the pivotable headlight on top of the cab and turn it on Stage 5 Lower the hand brake and start the engine Before driving the vehicle check tire wear and pressure Always wear the seat belt before driving the vehicle When on ...

Страница 29: ...bolted to the frame The structure is fastened to the frame as shown in the assembly drawing below 10 12 16 73 8 25 6 150 18 22 5 25 28 COPPIA DI SERRAGGIO 550 Nm P N 000 8 218 P N 947 0 661 P N 846 9 731 P N 847 K 191 P N 847 K 131 P N 120 1 024 P N 947 0 251 P N 010 4 122 6 25 12 16 73 8 10 18 22 5 25 28 22 5 25 18 P N 846 9 731 P N 847 K 191 P N 847 K 131 P N 120 1 024 P N 947 0 251 P N 000 8 21...

Страница 30: ...vre the structure and that there are no people in the radius of operation of the lifting equipment In order to lift the structure and position it beneath the vehicle lifting equipment of adequate capacity must be employed Sling the protection structure using the lifting eyebolts foreseen for the purpose Make sure that all the lifting accessories cables slings grates etc are suited to the weight to...

Страница 31: ... 2 Wear helmet 3 Fasten seat belt 4 Read Manual before operating 5 Warning for towing the vehicle 6 Safety rod on lifting cylinder 7 Reflective film 8 Keep out of moving arm radius 9 Do not lift 10 Lifting point 11 Warning Battery acid 12 Do not lift 13 Do not tread 14 Warning various warnings 15 Do not open when engine is running 16 Acoustic power LwA 103 17 Acoustic power LpA 74 18 Fire Extingui...

Страница 32: ...ME SULL USO E MANUTENZIONE 676 A 231 1 2 3 4 7 8 11 12 10 14 15 21 COD 826 C 561 COD 826 C 581 COD 826 C 591 20 19 18 17 I GB D F E CONTIENE ANTIGELO WITH ANTIFREEZE ENTHÄLT FROST SCHUTZMITTEL AVEC ANTIGEL CONTIENE ANTICONGELANTE 826 B 221 NL BEVAT ANTIVRIES I GB D F E GASOLIO FUEL DIESELKRAFTSTOFF GAZOLE COMBUSTIBLE DIESEL 826 B 211 NL DIESEL 826 B 371 826 B 411 PER CHIUDERE LA PORTIERA AZIONARE ...

Страница 33: ...t the bucket down Unless specifically stated otherwise all maintenance work must be carried out with the engine OFF and the ignition keys removed It is good practice to let the engine cool down before starting work Before lubricating clean the nipples Clean the outer edges of plugs and filler holes before pouring in oil No dirt or dust must get into parts or circuits Locking bar working Locking ba...

Страница 34: ...5 0 0 5 0 0 5 0 0 0 1 0 0 0 1 0 0 0 1 0 0 0 1 0 0 0 1 0 0 0 2 0 0 0 2 0 0 0 2 0 0 0 2 0 0 0 2 L E V E L L I O E N I G N E K C E H C L E V E L R E T A W R O T A I D A R E N I G N E K C E H C L I O C I L U A R D Y H K C E H C S S E N T H G I T R O F S L E E H W D N A S T L O B K C E H C R E T L I F R I A Y R D K C E H C E R U S S E R P E R I T K C E H C Y R E T T A B K C E H C S T U N S T L O B L L ...

Страница 35: ...e released Let the system cool then remove the cap down first then rotate the cap as far as the first notch and wait until pressure is completely released Then remove the cap 3 Check hydraulic oil Check the level with the engine OFF and cold The level must be between the min and max notches with the operating arm laying on the ground 4 Tighten wheel nuts Check the wheel nuts tightening torque 55 6...

Страница 36: ...th the grill flaps at a distance of 3 cm Before replacing the cartridge carry out the following checks a Check the plastic flaps for wear Replace the seals if damaged b Check the condition of the cartridge by inserting a light inside This will reveal any holes replace if there are any c Check the hoses between filter and engine Note Change the cartridge every 10 cleanings or once a year Secondary ...

Страница 37: ...water level and top up if necessary the electrolyte should just cover the electrodes Should the vehicle remain idle for a long period dismantle the battery and keep it in a dry place Dislodge fuel feeding pipe support no 2 nuts M8 to remove battery double battery on request Battery knife switch The battery knife switch is located in the vehicle cab under the parking brake lever If the vehicle is l...

Страница 38: ...el filler cap is on the right position remove the cap Oil should just be at the level of the hole Top up by introducing the oil via the filler hole when this is in the upper position Note The level must be checked with the vehicle perfectly horizontal every 200 working hours 15 Check transfer box oil Check that the level reaches the plug as shown in the picture If necessary top up via the same Not...

Страница 39: ...e check the level topping up if necessary ogni 500 ore di lavoro 20 Replace hydraulic oil Change after the first 1 000 working hours and then every 2 000 hours To change the oil remove the filler plug and then release the oil via the lower drain plug Make use of the hydraulic oil drainage kit in compliance with environment friendly Din standards Make sure that all hydraulic cylinders are closed an...

Страница 40: ...et the oil drain completely Turn the wheel bringing the plug into its upper position Introduce new oil until it flows out of the hole Screw the plug again 24 Replace differential oil Remove the plug indicated in the picture to aid oil outflow and ensure complete emptying Pour oil into the plug hole until it flows out Screw the plug again Front axle Rear axle 1 2 25 Engine radiator cleaning After r...

Страница 41: ...gal blower cleaning The compressor rotor its volute and the oil return pipe from the multistage centrifugal blower to the oil sump must be cleaned every 2 000 working hours by a Perkins authorised workshop every 2000 working hours ...

Страница 42: ...D D T X A N O D D T X A N O D h c a e L I O R A E G N O I T C U D E R C I L C Y C I P E 7 0 8 0 D 4 3 1 C 2 M D R O F 4 C N O S I L L A D T X A N O D D T X A N O D D T X A N O D D T X A N O D D T X A N O D L I O C I L U A R D Y H 9 0 1 0 2 1 D 4 3 1 C 2 M D R O F 4 C N O S I L L A D T X A N O D D T X A N O D D T X A N O D D T X A N O D D T X A N O D L I O S E K A R B 1 1 1 A F F U S A O P I T F T ...

Страница 43: ...Q R O T 2 6 T H T I T L U M A R T O R L A S R E V I N U D I U L F S R O T C A R T L I O C I L U A R D Y H 9 0 1 0 2 1 R T X A I T N O P O E G 2 2 4 D I U L F L I B O M D I U L F E U Q R O T 2 6 T H T I T L U M A R T O R L A S R E V I N U D I U L F S R O T C A R T L I O E K A R B 1 1 1 D I U L F S S I M S A R T 0 0 2 F T A F F U S A O P I T F T A A F T A A R T O R N O R X E D F T A K N A T L E U F ...

Страница 44: ...values marked with an asterisk should be tested on inspection bench Pressure values refer to a flow rate of 2 3 litres Note Setting values where not specified must be considered with a tolerance of 5 bar Tightening torque table Assembly notes The screws must be lubricated with engine oil Should one or more screws be fixed tightening must be progressive and alternate until desired torque is achieve...

Страница 45: ...S IN EF CF 27 22 L R P T LS T P 1 2 3 4 2 2A 5 6A 4 9 10 11 12 13 SERBATOIO TANK FRONT REAR AVANTI INDIETRO BREAKING SYSTEM IMPIANTO FRENANTE 3 12 VITE SPURGO R B L N P P T Y 14 OPT OPT P T A1 B1 A2 B2 A3 B3 230 bar 300 A bar 300 A bar 240 A bar OPT Benna Sollevamento Attrezzatura Assale Posteriore Rear Axle Assale Anteriore Front Axle Bucket Lift Attachment Entrata In GB ...

Страница 46: ... 2 HYDROSTATIC ENGINE A6VM 80EZ 2A HYDROSTATIC ENGINE A6VM 107HA 3 COMPLETE RADIATOR 4 UNIDIRECTIONALVALVE 5 HYDRAULICOILFILTER 6 2 SECTION DISTRIBUTOR 6A 3 SECTION DISTRIBUTOR 7 THROTTLINGVALVE 8 HYDRAULIC POWER STEERING 9 MANIPULATOR HC RLC 1385 10 BRAKE PUMPWITH SERVO CONTROL 11 ACCUMULATOR 12 UNIDIRECTIONALVALVE 13 ELECTROVALVE 14 INCH PEDALVALVE Hydraulic system scheme 44 GB ...

Страница 47: ...etta 45 S D N A T S L O B M Y S S I H T H T R A E R O F T R A H C S R U O L O C E G N A R O A E T I H W B K N I P C Y E R G D N E E R G E E U L C F W O L L E Y G E U L B T H G I L H N W O R B M K C L A B N D E R R E L P R U P V GB ...

Страница 48: ...line 46 S D N A T S L O B M Y S S I H T H T R A E R O F T R A H C S R U O L O C E G N A R O A E T I H W B K N I P C Y E R G D N E E R G E E U L C F W O L L E Y G E U L B T H G I L H N W O R B M K C L A B N D E R R E L P R U P V GB ...

Страница 49: ... 15 F9B 20Amp 30 20Amp F9A K10A D19 K8A D17 K2A D2 D23 K7A K12A D16 D9 D6 D18 D5 D6 3 2 1 5 4 k6 Flasher units 15 20Amp F11B F11A 30 20Amp K11A D22 D11 D21 D12 K4A 20Amp F8C 20Amp F11C 20Amp F6B F6C 20Amp K5B 30 20Amp F8B 30 20Amp F8A 15 20Amp F7C 20Amp 15 F10A 15 20Amp F7A 15 F10B 20Amp 2 1 5 k1 4 3 timer Check D7 K3B 15 F7B 20Amp K9B 15 20Amp F10C J1 D20 D1 K9A D18 D3 K3A D8 9 1 6 5 8 7 2 4 3 30...

Страница 50: ...ine 48 S D N A T S L O B M Y S S I H T H T R A E R O F T R A H C S R U O L O C E G N A R O A E T I H W B K N I P C Y E R G D N E E R G E E U L C F W O L L E Y G E U L B T H G I L H N W O R B M K C L A B N D E R R E L P R U P V GB ...

Страница 51: ...O M K N A T N E E R C S D N I W G A C R O T C E N N O C Y L P P U S R E W O P L A R E N E G C S I R R E T A E H V U A C R O T C E N N O C Y L P P U S R E W O P L A R E N E G D L A R E K A E P S D U O L T H G I R D P F T H G I L G N I N R A W T H G I L R A E R T H G I R P T M R E P I W R A E R S P F T H G I L G N I N R A W T H G I L R A E R T F E L S L A R E K A E P S D U O L T F E L A L P P M A L ...

Страница 52: ...rear line 50 S D N A T S L O B M Y S S I H T H T R A E R O F T R A H C S R U O L O C E G N A R O A E T I H W B K N I P C Y E R G D N E E R G E E U L C F W O L L E Y G E U L B T H G I L H N W O R B M K C L A B N D E R R E L P R U P V GB ...

Страница 53: ...ine 51 S D N A T S L O B M Y S S I H T H T R A E R O F T R A H C S R U O L O C E G N A R O A E T I H W B K N I P C Y E R G D N E E R G E E U L C F W O L L E Y G E U L B T H G I L H N W O R B M K C L A B N D E R R E L P R U P V GB ...

Страница 54: ...m 52 S D N A T S L O B M Y S S I H T H T R A E R O F T R A H C S R U O L O C E G N A R O A E T I H W B K N I P C Y E R G D N E E R G E E U L C F W O L L E Y G E U L B T H G I L H N W O R B M K C L A B N D E R R E L P R U P V GB ...

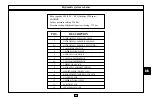
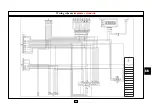
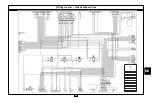
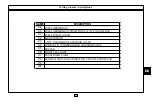
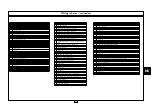
Страница 55: ... 21WAY M CONNECTOR 68 BATTERY DISCONNECTION SWITCH 22 CONTROL PANEL 69 SYSTEM PROTECTION M AXIFUSE 23 BRAKE LIQUID LEVEL SENSOR 70 STARTING DEVICE RELAY PROTECTION M AXIFUSE 24 CENTRAL UNIT CONNECTION X2 1 1WAY M CONNECTOR 71 STARTING DEVICE RELAY 25 SIDE DASHBOARD LINE 9 WAY CONNECTOR 72 WATER TEM PERATURE WARNING LIGHT SENSOR 26 73 COLD START SENSOR 27 SIDE DASHBOARD LINE CONNECTION 2 WAY POWER ...

Страница 56: ...X 90 FUSECARRIERBOX CONNECTION 5 WAYF CONNECTOR 91 FUELLEVELFLOATER 92 BOOM SENSOR 93 ANTI PITCH DEVICESOLENOID VALVE 94 HYDRAULICCYLINDERBLOCK SOLENOID VALVE 95 BUZZER 96 FRONT LEFT LIGHT 97 FRONT RIGHT LIGHT 98 CENTRALUNIT X10 CONNECTION 9 WAYM CONNECTOR 99 100 GB ...

Страница 57: ...D VALVE FOR SECOND GEAR 10 ON REQUEST 11 CLOGGED HYDRAULIC OIL FILTER SENSOR WARNING LIGHT 12 HYDRAULIC OIL TEMPERATURE SENSOR 13 ON REQUEST 7 way X4 Connector 1 START UP RELAYEXCITATION 2 ON REQUEST 3 GROUND 4 WATER TEMPERATURE WARNINGLIGHT SENSOR 5 GENERATOR WARNINGLIGHT 6 COLD START SENSOR ENGINE STOP SOLENOID 7 MOTOR OIL PRESSURE SENSOR 13 way X5 Connector 1 RIGHT DIRECTIONAL INDICATOR 2 HIGH ...

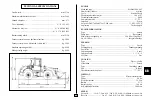
Страница 58: ...mpression ratio 17 25 1 Injection Direct Set power DIN 70020 6271 at 2 200 r p m 75 kW 102 CV Aspiration Turbocharged ENGINE LUBRICATION Type Forced Pump type Rotor pump Min pressure at peak r p m 280 kPa 2 5 kgf cm2 No 1 oil filter Integral cartridge FEEDING Type Diesel Feeding pump Diaphragm pump Fuel filter 2 Injection pump Lucas Injection order 1 3 4 2 Air filter Dry COOLING Type Water cooled ...

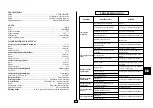
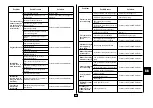
Страница 59: ...up Limescale deposits in radiator Contact yourAhlmann Distributor Set correct belt tension Alternator belt loose Contact yourAhlmann Distributor Water pump faulty Radiator cap valve stuck Replace cap Water temperature probe malfunctioning The engine overheats Contact yourAhlmann Distributor Flat battery Charge or replace battery Battery cable terminals loose or corroded Check them over clean and c...

Страница 60: ...e cause Solution Oil level too low or wrong oil type Check level or change oil Oil draw piping not airtight Checkdrawpiping Pump faulty check working pressure Hydrostatic motor faulty check oil draw flow rate Inefficient oil water exchanger Contact yourAhlmann Distributor Extreme in tank oil overheating Replace it Air inlet valve clogged Check diesel engine r p m Max rated r p m unattainable Secon...

Страница 61: ...59 GB Problem Possible cause Solution O Ring seals worn Contact yourAhlmann Distributor Oil leakage at cylinders between rod and piston ...

Страница 62: ...hen the vehicle is moved Transfer speed must not exceed 15 km h when loaded Theloadbarycentremustnotbemorethan500mmfromeitherthehorizontal or vertical fork teeth plane The indicated load values must not be exceeded The load marked with this symbol is for the machine use on not even ground 60 of articulated tipping load The load marked with this symbol is for the machine use on an even hard surface...

Страница 63: ...61 GB NOTES THIS MANUAL IS THE PROPERTY OF AHLMANN BAUMASCHINEN GMBH COPYING OF THE TEXTAND ILLUSTRATIONS EITHER INWHOLE OR IN PART IS FORBIDDEN Technical office July 2002 ...

Отзывы:

Похожие инструкции для AL 150