aguri AGR520 SERIES Скачать руководство пользователя страница 44

44


DVR Dash Cam AGR520

The AGR520 incorporates a built-in DVR dash cam that will automatically record the view in 

front of your vehicle as well as recording all audio within range of the built-in microphone. 
The DVR dash cam is set to start recording automatically as soon as your device is 

powered on, however you must ensure that an SD card has been installed first. Your device 

comes as standard with an 8GB SD card, but the device will support up to a 32GB SD card 

if you would like to increase the memory size. 
To access DVR ‘Playback’ and ‘Settings’, press the DVR dash cam icon on the main menu 

to launch the DVR app. 
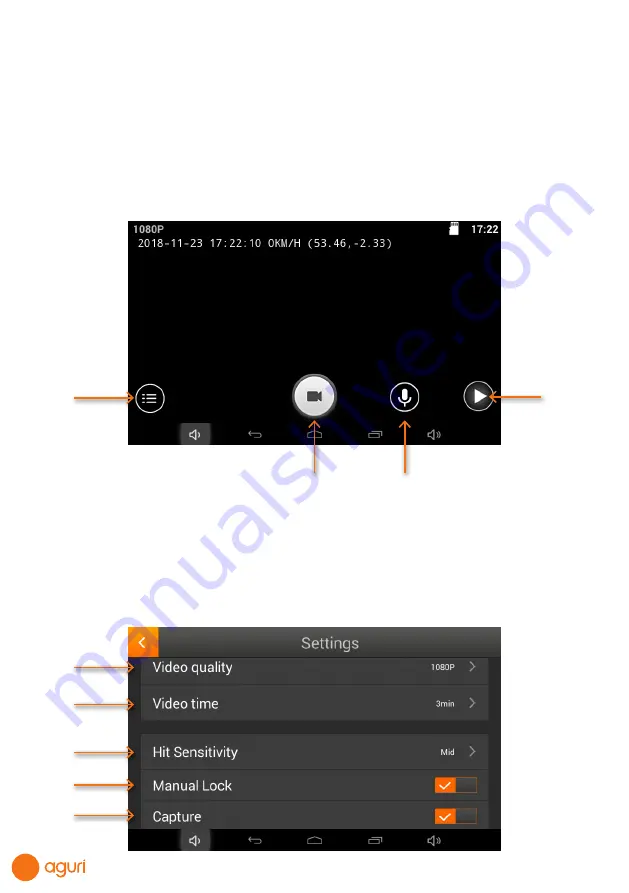
1. DVR settings
2. Record button

Use to switch On and Off

3. Switch Microphone On or Off

Use to switch On and Off

4. Playback button

Playback and review video and camera footage you have recorded and saved

Settings

1

1

2

3

4

5

4

2

3

Содержание AGR520 SERIES

Страница 1: ...unctions you need assistance with Alternatively visit our website www aguriworld co uk and speak to a member of our team on our easy to use Live Chat service WARNING Never perform a Factory data reset...

Страница 2: ...le Truck Edition 33 Tunnel category settings Truck Edition 34 Brightness Volume Language voice settings 35 Select map view 2D or 3D MPH KMH select speed distance unit type Location Icon select an icon...

Страница 3: ...cket 1 x Dash mounting disc Copyright Copyright 2016 Aguri Limited All rights reserved Product specifications and features are for reference only and are subject to change without prior notice Declara...

Страница 4: ...ower on off 2 Power charging status LED 3 Headphone external speaker socket 4 Micro SD card slot 5 USB socket 6 5 Touch screen LCD 7 Built in GPS antenna 1 6 2 3 1 7 3 2 4 4 5 1 Built in DVR dash cam...

Страница 5: ...Pin required to press Safe to use if hardware reboot is required 3 Built in GPS antenna 4 7 Touch screen LCD 5 Micro USB Power socket 6 Video in socket for reversing camera 7 Headphone external speak...

Страница 6: ...en display a menu of the main features of the device User note If the DVR dash cam is set to automatically start recording as soon as the device is powered on the DVR app will also launch at this poin...

Страница 7: ...atellite lock the first time you use it We recommend you stay in a stationary position in a location where the unit has a clear view of the sky to ensure the fastest results Subsequent start ups will...

Страница 8: ...ge start location or to add a Via location point Press to view your chosen location on the map Press the Calculate button to continue As you enter information the unit may start to predict and display...

Страница 9: ...own menu Press the Calculate button to continue Truck and Motorhome Caravan editions If you are in Truck or Motorhome Caravan mode you will see the following screen which displays the vehicle you are...

Страница 10: ...ble For more information please follow the detailed instructions provided below User note Whilst all Aguri satellite navigation systems have been designed to provide safe and efficient routing they ar...

Страница 11: ...create safe appropriate routes for you From the Main menu press the Navigate button to launch the navigation software Once the map is displayed tap the centre of the screen to enter the navigation me...

Страница 12: ...n to add a new vehicle Press to select the vehicle you are currently using if you have stored more than one Slide the screen from side to side to see more options Press the OK button to save your sele...

Страница 13: ...ase do not attempt to operate your Aguri navigation system whilst driving Whilst this navigation system has been designed to provide the most appropriate route for you vehicle it is not a substitute f...

Страница 14: ...e required 9 Speed limit display displays the speed limit of the road you are travelling on 10 Displays your speed of travel 11 Name or number of the road your are currently travelling on 12 GPS compa...

Страница 15: ...ve the Truck or Motorhome Caravan edition your navigation device will alert to a number of hazards and other legal restrictions that relate directly to the type of vehicle you are driving Double bend...

Страница 16: ...the quickest route Press Shortest distance to calculate the shortest route to your destination Not recommended for use in Truck or Motorhome Caravan mode Press Avoid motorways to create a route avoidi...

Страница 17: ...ill give you the distance to your destination along with the estimated time the journey will take and the estimated time of arrival The summary screen will be displayed for approximately 10 seconds an...

Страница 18: ...n is used the screen will display Set office then Cancel and OK Press OK to proceed You can set Office using one of the following options Find address Find by POI Find using Recent routes and Save usi...

Страница 19: ...nt location or the last location the device was used at to create the start point of your Multi stop route To change this address or location press the Change button You can find the address you requi...

Страница 20: ...you have made your changes press Done to save Using a Multi stop route To use a saved Multi stop route press the middle of the screen to access the Navigate menu Press the Multi stop icon and then pre...

Страница 21: ...vigation View showing your current position along with a mini summary screen If during your journey you want to cancel a current stage and go to the next stage then press the mini summary box and the...

Страница 22: ...and distances to each address or location Press the Aguri logo at the top left hand corner of the screen to proceed with your journey Adding and saving a Favourite location The unit can store up to 1...

Страница 23: ...tination your estimated arrival time your estimated journey time and any Route settings you may have selected Navigation will begin automatically within 10 seconds if you do not touch the screen or yo...

Страница 24: ...uld like to remove from the list until a pop up window appears The window will display the address you are about to delete with the options Cancel and OK Press OK to delete the destination or Cancel t...

Страница 25: ...ions available Once you have found the option you require press it once to select it All POIs available within this category will be displayed in distance order from the new location displayed Once yo...

Страница 26: ...the small drop down menu icon found at the top right hand corner of the display Press Simulation to show a simulation of the route that has been calculated Press Guide to see a description of the cal...

Страница 27: ...ge address bar to search for a new location A new window will be displayed showing the search options available You can choose to search for POIs near to a particular City a specific address or from y...

Страница 28: ...ed at the top right hand corner of the screen Once the calculation is complete the summary screen will be displayed confirming the address you wish to navigate to your start point your distance to the...

Страница 29: ...ou know the road number or name you want to avoid then select this option Press Avoid road and the unit will show you details of your route and a list of the road names and numbers to be used Use the...

Страница 30: ...Car mode tap the middle of the screen to access the navigation menu and swipe the screen from right to left to access the next set of menu options About Environmental settings or Low Emission Zones L...

Страница 31: ...he vehicle length here Width Enter the vehicle width here Weight Enter the vehicle weight here User note When entering information on a caravan the maximum values for height length width and weight mu...

Страница 32: ...e Width Enter the vehicle width here Weight Enter the vehicle weight here Weight per axle Enter the vehicle weight per axle here Enter truck type Truck The standard setting for a fixed axle truck Trai...

Страница 33: ...of category C D and E C5000D Carriage where the total net explosive mass per transport unit exceeds 5000 kg Passage forbidden through tunnels of category C D and E does not exceed 5000kg Passage forbi...

Страница 34: ...ss OK Once you have adjusted both the Day and Night brightness select Auto and then OK to save the setting If you do not select Auto the screen will not switch between day and night automatically Volu...

Страница 35: ...ng at all You can also separately select whether to receive audible alerts Make your selection and press the Return button to save and exit Hazard restriction alerts Truck Motorhome Caravan Edition on...

Страница 36: ...ght bends but if only one is sign posted you will only receive an alert for that particular bend Junction No Choose whether to have junction numbers displayed on the map when navigating 2D or 3D Selec...

Страница 37: ...e or iPhone See more detailed instructions later in this manual As our Live Digital Traffic service uses your Smart Phone or iPhone s internet connection on the move it will need to use your data pack...

Страница 38: ...software version installed on your device Press once to check for software updates and to download and install updates as necessary Map version Displays current map version installed on your device Pr...

Страница 39: ...n with your fingers 2 2D 3D Switch between 2D and 3D on screen map views 3 Increase or reduce map view magnification The map on the screen can be magnified or reduced by pressing the or buttons 4 Repo...

Страница 40: ...other features while the dash cam continues to record in the background Please ensure that when you exit the DVR dash cam app you do so using the Menu Home button and not the Back Exit button or you w...

Страница 41: ...nd GPS data recorded plus any photographs saved After pressing the Playback button select Video You will then see a list of folders in date order Each file contains the video and GPS track footage rec...

Страница 42: ...visable to remove the SD card immediately to ensure that the video recorded of the event is not lost Shock sensor sensitivity Your device is designed to save any video footage it thinks is related to...

Страница 43: ...top information bar to indicate that the DVR is recording Delete file for record When set to On the DVR app will automatically start to record over the oldest footage on the SD card once the SD card i...

Страница 44: ...ure that an SD card has been installed first Your device comes as standard with an 8GB SD card but the device will support up to a 32GB SD card if you would like to increase the memory size To access...

Страница 45: ...or DVR Wi Fi and internet connection The device incorporates built in Wi Fi so that you can wirelessly update the maps on your device download useful apps and browse the internet Connecting to Wi Fi C...

Страница 46: ...you would any other internet browser you would find on a PC Tablet or Smart Phone Updating the maps and the Speedshield speed trap database To update the maps and the Speedshield speed trap database y...

Страница 47: ...ou will need to do this before you can download any new Apps to the device User note If you have already created and added a Google account to the device to enable you to wirelessly update the unit s...

Страница 48: ...ile 3G or 4G internet connection The device will use your phone s internet connection to send and receive data such as traffic flow information and if you use the mobile speed trap sharing system will...

Страница 49: ...something similar that represents your Smart Phone Select this to enable the connection 7 Your device will now ask you to enter your phone s Mobile Hotspot password The password should automatically b...

Страница 50: ...ilable Wi Fi connections including your iPhone or the name you have given to your iPhone Select this to enable the connection 7 Your device will now ask you to enter your iPhone s Personal Hotspot pas...

Страница 51: ...e shown both the original route and the recalculated route including the distance and estimated travel time for each so you can determine which route to take Using the Mobile speed trap sharing featur...

Страница 52: ...are version 1 2 11 or later installed on your device to enable you to add your own POIs Please refer to the user manual for instructions on how to update the software on your device if you are not fam...

Страница 53: ...the screen to return to the main Menu 6 To check that your POIs have been added successfully press Navigate from the main Menu to launch the navigation software and once loaded tap on the centre of th...

Страница 54: ...POI You can search for a POI around your current location or press and hold on the address to change it and search for POIs around a different location The address of each POI will automatically be p...

Страница 55: ...blem with your Aguri satellite navigation system Try visiting the FAQ section of our website or contact us using LiveChat at www aguriworld co uk If you are still experiencing problems your Aguri sate...

Страница 56: ...56 www aguriworld co uk...

Отзывы: