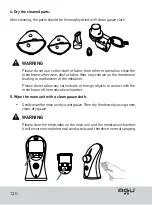
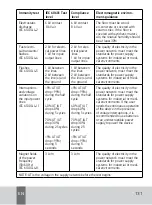
background image

123

EN

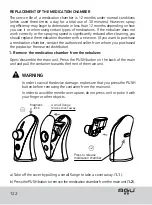
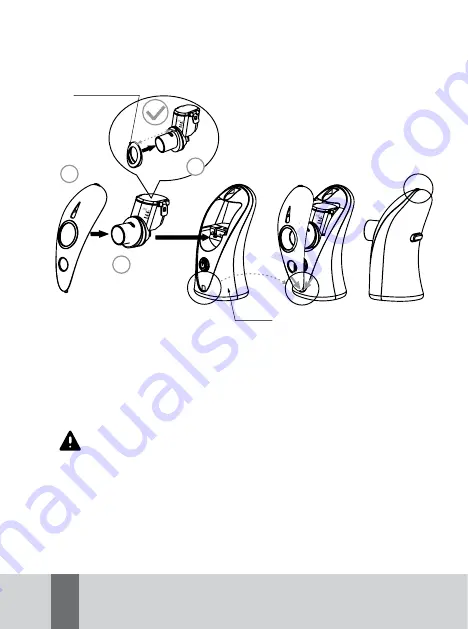
2. Installation of the medication chamber.

Install the medication chamber correctly as shown in the picture.

Insert until it 

clicks

2.2

2.3

Main unit

2.1

Liquid condenser 

a) Install the liquid condenser (

2.1

).

b) Attach the chamber to the main unit (

2.2

).

c) Close the cover of the main unit (

2.3

). 

Please make sure that the medication chamber is installed correctly, other-

wise, due to a bad connection, there may be problems with the device. 

Please keep the contacts of the main unit and medication chamber clean, 

otherwise, the problems in the operation of the device may arise. 

Please rinse the medication chamber before use. 

Содержание Tomchi N8

Страница 1: ...NEBULIZER MESH AGU N8 DE BEDIENUNGSANLEITUNG FR MODE D EMPLOI EN USER MANUAL RU agu baby com...

Страница 2: ...umfang 7 5 Hauptkennwerte 9 6 Zubeh r und komponenten 13 7 Sicherheitsanweisungen 14 8 Betriebsvorbereitung 16 9 Arbeitsweise und Prinzip 18 10 M gliche St rungen und deren Beseitigung 33 11 Verordnun...

Страница 3: ...Regime f r Medikamente zu w hlen Die Kennwerte der Vernebelung variieren abh ngig vom verwendeten Medikament Die Geschwindigkeit der Vernebelung kann in Abh ngigkeit von den Mitteln variieren WARNUNG...

Страница 4: ...ischen Regeln der Zollunion 020 2011 Elektromagnetische Vertr glichkeit der Betriebsmittel Klassifizieren Ausr stung mit interner Stromversorgung Ger t des Typs BF IP22 Nicht geeignet f r die Verwendu...

Страница 5: ...ng zwischen elektrischen und elektronischen Ger ten zu vermeiden verwenden Sie das Ger t nicht in der N he von Mobiltelefonen oder Mikrowellenofen Warnung Hinweis Vor Gebrauch beachten Sie die Bedienu...

Страница 6: ...t 24 Monate vorausgesetzt das Produkt wird f r Vernebelung der Salzl sung dreimal t glich f r 10 Minuten bei Raumtemperatur 23 C verwendet Die L nge der Betriebsdauer kann abh ngig von der Nutzungsumg...

Страница 7: ...r bei dem Sie das Produkt gekauft hat Haupteinheit Schutzklappe Beh lter f r Medikamente ml 6 4 2 ml 6 4 2 Batterien AA 1 5Vx2 optional Spitze Mundst ck Transporttasche Micro USB Kabel optional Inhala...

Страница 8: ...8 Teilbezeichnungen Abdeckung vom Batteriefach Netzkabelanschluss Beh lter f r Medikamente Entriegelungstaste des Beh lters f r Medikamente Elektrode Ein Aus Taste Netzanzeige...

Страница 9: ...ie Lebensdauer des Ger ts kann von der Umgebung in der es benutzt wird abh ngen Haupteinheit 24 Monate Medikamentenbeh lter 12 Monate Betriebsstellung Vertikal Bei einer Neigung von 40 f r 15 Sekunden...

Страница 10: ...ent endet Dies hilft eine Besch digung der Membran zu verhindern TECHNISCHE DATEN HINWEIS Die Testergebnisse spiegeln die Kaskadenmessung der Einwikung in Abh ngigkeit von der Gr e der Partikel wider...

Страница 11: ...22 47 Erholung 1 27 66 0 71 MMAD m 1 53 0 04 Kumulativer Wert f r MMAD durch vier Tests 2 34 Geometrische Standardabweichung 1 7 0 02 Kumulativer Wert f r GSD durch vier Tests 0 93 Einatembare Fraktio...

Страница 12: ...est 4 Mittelwert 1 21 30 100 00 100 00 100 00 100 00 100 00 6 75 2 27 2 14 80 97 77 97 49 97 63 98 03 97 73 4 50 1 51 3 9 80 96 50 95 69 96 27 96 38 96 21 9 50 3 19 4 6 00 93 63 92 10 93 22 93 09 93 0...

Страница 13: ...fer bei dem Sie das Produkt gekauft hat Haupteinheit Schutzklappe Beh lter f r Medikamente ml 6 4 2 ml 6 4 2 Alkali Batterien AA 1 5Vx2 optional Spitze Mundst ck Transporttasche Micro USB Kabel option...

Страница 14: ...densa tor und die Spitze mit destilliertem Wasser absp len Trocknen Sie die Teile sofort und lagern Sie sie an einem sauberen Ort Sehen Sie Seite 24 28 Vor der ersten Verwendung sollte die Inhalations...

Страница 15: ...der Wasser enth lt Kein Wasser auf der Haupteinheit des Verneblers versch tten Bewahren Sie das Ger t f r Kinder unzug nglich auf Kinder sollten das Ger t nur unter Aufsicht von Erwachsenen benutzen P...

Страница 16: ...ie das Deckel auf die Haupteinheit ein 1 3 Einf gen vor dem Klicken Magnetverschluss 1 1 1 2 1 3 Kondensatbeh lter Haupteinheit ein Stellen Sie sicher dass der Beh lter f r die Medikamente richtig ein...

Страница 17: ...efestigen Sie das Mundst ck oder die Maske f r die Inhalation Befestigen Sie die Spitze fest an der Haupteinheit Bitte reinigen und trocknen Sie die Teile des Verneblers vor dem Gebrauch Sehen Sie Sei...

Страница 18: ...verwenden Wie legen die Batterien ein 1 ffnen Sie das Batteriefach und legen Sie 2 AA Alkali Batterien ein a ffnen Sie die Abdeckung vom Batteriefach b Legen Sie die Batterien so ein dass die Polari t...

Страница 19: ...e Anzeige f r niedrigen Ladezustand st ndig leuchtet orange funktioniert der Vernebler aufgrund einer leeren Batterie nicht Ersetzen Sie die Alkali Batterien ACHTUNG Verwenden Sie keine verschiedenen...

Страница 20: ...n Vorsprung ziehen um den Deckel zu entfernen 1 1 dr cken Sie die PUSH Taste um den Beh lter f r Medikament von der Haup teinheit abzuschalten 1 2 ACHTUNG Bitte um Sch den des Verneblers zu vermeiden...

Страница 21: ...Haupteinheit getrennt ist 3 Bringen Sie den Beh lter f r Medikamente wieder an der Haupteinheit an Stellen Sie den Beh lter f r Medi kamente ein bis er einrastet ACHTUNG Stellen Sie sicher dass der B...

Страница 22: ...rhan den ist leer oder nicht angeschlossen 1 2 ACHTUNG Wenn Sie das Ger t mit einem leeren Beh lter f r Medikamente einschal ten wird die Betriebsanzeige f r kurze Zeit gr n und dann erlischt Danach b...

Страница 23: ...len Sie jedoch sicher dass das Medikament mit der Membranen in Kontakt ist Andernfalls schaltet sich das Ger t automa tisch in 15 Sekunden aus Stellen Sie jedoch sicher dass das Medikament in Kontakt...

Страница 24: ...fel der lebensmittelgeeigneten Zitronens ure ca 2 5 3 0 g zu und r hren Sie um Gie en Sie die zube reitete Zitronens urel sung in den Beh lter f r Medikamente bis zu 4 ml und schlie en Sie den Deckel...

Страница 25: ...das Wasser aus Um R ckst nde der Zitronen s urel sung zu entfernen sp len Sie den Au enteil der Membran Wieder holen Sie die Reinigung mit destilliertem Wasser mindestens dreimal 2 Zerlegen Sie den V...

Страница 26: ...keine Baumwolllappen oder Stoffe aus anderen Materialien f r Reinigung der Membran Andernfalls k nnen Staub oder Gewebefasern auf der Membran verblei ben was zu Fehlfunktionen des Verneblers f hren k...

Страница 27: ...ellt eine normale elektrische Leitf higkeit und damit eine normale Vernebelung 6 Befestigen Sie den Beh lter f r Medikamente an der Haupteinheit und schlie en Sie die Abdeckung der Haupteinheit Bewahr...

Страница 28: ...ie besch digt werden k nnen Trocknen Sie die Teile gr ndlich WIE ERSETZEN DEN BEH LTER F R MEDIKAMENTE Unter Normalbedingungen ist die Betriebsdauer des Beh lters f r Medikamen te 12 Monate Wenn Sie d...

Страница 29: ...e PUSH Taste dr cken bevor Sie den Beh lter aus der Haupteinheit entnehmen Um Bruch der Membran zu vermeiden dr cken Sie nicht auf sie und steckten nicht mit dem Finger oder anderen Gegenst nden Magne...

Страница 30: ...upteinheit ein 2 2 c Schlie en Sie die Abdeckung der Haupteinheit 2 3 Stellen Sie sicher dass der Beh lter f r die Medikamente richtig einge stellt ist andernfalls kann es zu einer schlechten Verbindu...

Страница 31: ...h r in der Transporttasche 1 Zerlegen Sie den Vernebler Bitte trennen Sie das Mundst ck oder die Maske f r die Inhalation wie in der Abbildung dargestellt 2 Stellen Sie die Schutzklappe ein Bitte stel...

Страница 32: ...rnebler der noch Wasser oder Medikamente enth lt Fl s sigkeiten k nnen auslaufen und das Ger t verschmutzen oder besch digen Lagern Sie den Vernebler nicht an einem Ort mit hoher Temperatur oder Feuch...

Страница 33: ...akte auf dem Beh l ter f r Medikamente sind mit Medikamenten oder Wasser verstopft Reinigen Sie die Kontakte von Medi kamenten oder Wasserresten und starten Sie die Vernebelung neu Sehen Sie Seite 26...

Страница 34: ...em Beh lter f r Medikamente sind mit Medikamenten oder Wasser verstopft Reinigen Sie die Kontakte von Medi kamenten oder Wasserresten und starten Sie das Ger t neu Sehen Sie Seite 26 Kontakte am Verne...

Страница 35: ...m Beh l ter f r Medikamente sind mit Medikamenten oder Wasser verschmutzt Reinigen Sie die Kontakte von Medi kamenten oder Wasserresten und starten Sie das Ger t neu Sehen Sie Seite 28 Kontakte am Ver...

Страница 36: ...10 C bis 40 C mit der relativen Luft feuchtigkeit 15 93 betrieben werden Das Ger t muss bei der Temperatur von 20 bis 70 bei der maximalen rela tiven Luftfeuchtigkeit nicht weniger als 93 bewahrt werd...

Страница 37: ...Gesundheitssch den Zwecks Umweltschutz darf dieses Ger t nicht zusammen mit Hausm ll entsorgt werden Die Entsorgung muss entsprechend der gesetzlichen Vorschriften erfolgen Das Ger t muss entsprechend...

Страница 38: ...t wird Strahlungstest Konformit t Elektromagnetische Umgebungsbedingungen HF Strahlung CISPR 11 Gruppe 1 Hohe Frequenzen werden nur verwendet um ihre internen Funktionen bereitzustellen Aus diesem Gru...

Страница 39: ...Normen des ffentlichen Stromversor gungssystems der kommer ziellen oder Krankenhausum gebung entsprechen berspannungen IEC 61000 4 5 1kV Leitung zu Leitung 2kV Leitung en zur Erde 1kV Leitung zu Leit...

Страница 40: ...mpli ance Niveau Elektromagnetische Umgebungsbedingungen Leitungsf hig keit HF IEC 61000 4 6 HF Strahlung IEC 61000 4 3 3 V q m 150 KHz 80 MHz 3 V m 80 MHz 2 5 GHz 3 V q m 3 V m Tragbare und mobile HF...

Страница 41: ...zus tzliche Ma nahmen wie z B Umorientierung oder Verlagerung des Ger tes AGU N8 erforderlich sein b Im Frequenzbereich von 150 kHz 80 MHz sollten die Feldst rken weniger als 3 V m betragen Empfohlene...

Страница 42: ...l schen lassen Herstellerangaben und Erkl rungen elektromagnetische Ausstrahlung Das Ger t ist f r den Einsatz in der nachstehend angegebenen elektromagneti schen Umgebung bestimmt Die K ufer oder die...

Страница 43: ...Normen des ffentlichen Stromversorgungs systems der kommerziellen oder Krankenhausumgebung entspre chen berspannun gen IEC 61000 4 5 1kV Leitung zu Leitung 2kV Leitung en zur Erde 1kV Leitung zu Leitu...

Страница 44: ...Compli ance Niveau Elektromagnetische Umgebungsbedingungen Leitungsf hig keit HF IEC 61000 4 6 HF Strahlung IEC 61000 4 3 3 V q m 150 KHz 80 MHz 3 V m 80 MHz 2 5 GHz 3 V q m 3 V m Tragbare und mobile...

Страница 45: ...aler Leistung k nnen zus tzliche Ma nahmen wie z B Umorientierung oder Verlagerung des Ger tes AGU N8 erforderlich sein b Im Frequenzbereich von 150 kHz 80 MHz sollten die Feldst rken weniger als 3 V...

Страница 46: ...Senders anwendbaren Gleichung gesch tzt werden wobei P die maximale Ausgangsleistung des Senders in Watt W gem dem Sender hersteller ist HINWEIS 1 Bei 80 MHz und 800 MHz gilt der Abstand f r den h her...

Страница 47: ...uren dass das Geh use ge ffnet bzw das Ger t zerlegt wurde bei den Versuchen das Ger t au erhalb von offiziellen Servicezentren zu reparieren beim Eindringen von Feuchtigkeit ins Geh use bzw bei der E...

Страница 48: ...romnetz usw ACHTUNG Befolgen Sie streng die Gebrauchsanweisungen um einen zuverl ssigen und dauerhaften Betrieb des Ger ts zu gew hrleisten Funktioniert das Ger t nicht ordnungsgem wenden Sie sich an...

Страница 49: ...49 DE...

Страница 50: ...stiques techniques g n rales 57 6 Accessoires et l ments constitutifs 61 7 Consignes de s curit 62 8 Instructions avant utilisation 64 9 Principe et mode de fonctionnement 66 10 Incidents de fonctionn...

Страница 51: ...t selon la prescription du m decin Le choix du mode de diffusion d pend du type de m dicament La vitesse de diffusion varie selon les m dicaments ATTENTION Comme tout appareil lectronique cet appareil...

Страница 52: ...hnique de l Union douani re TP TC 020 2011 Compatibilit lec tromagn tique des quipements techniques Classification Appareil avec une source d alimentation int rieure Appareil du type BF IP22 Ne pas ut...

Страница 53: ...cro onde pour viter tout risque de fonctionnement incorrect caus par des perturbations lectromagn tiques entre les appareils lectroniques et lectriques Remarque Attention Veuillez consulter le mode d...

Страница 54: ...riode d exploitation La p riode d exploitation de l appareil est de 24 mois condition de l utiliser 3 fois par jour pendant 10 minutes pour diffuser la solution saline la temp rature ambiante 23 C La...

Страница 55: ...vendu l appareil Bloc principal Couvercle de protection R servoir de m dicaments ml 6 4 2 ml 6 4 2 Piles AA 1 5Vx2 optionnel Embout tui de transport C ble Micro USB optionnel Masque d inhalation S Ma...

Страница 56: ...ion des pi ces Couvercle du compartiment piles Port USB du c ble d alimentation R servoir de m dicaments Bouton de d saccouplement du r servoir de m dicaments lectrodes Bouton allumer teindre indicate...

Страница 57: ...r jour pendant 10 minutes temp rature ambiante 23 C La dur e de vie de l appareil peut d pendre de l environne ment dans lequel il est utilis Unit principale 24mois R cipientpourlesm dicaments 12mois...

Страница 58: ...ie selon les types de solution ou si le m dicament se termine Cela permet d viter l endommagement de la membrane CARACT RISTIQUES TECHNIQUES REMARQUE Les r sultats du test refl tent la mesure en casca...

Страница 59: ...de m dicaments m 42607 41 122 47 Reconstitution 1 27 66 0 71 MMAD g 1 53 0 04 Valeur cumul e selon MMAD de 4 tests 2 34 D viation standard g om trique GSD 1 7 0 02 Valeur cumul e selon GSD de 4 tests...

Страница 60: ...Valeur moyenne 1 21 30 100 00 100 00 100 00 100 00 100 00 6 75 2 27 2 14 80 97 77 97 49 97 63 98 03 97 73 4 50 1 51 3 9 80 96 50 95 69 96 27 96 38 96 21 9 50 3 19 4 6 00 93 63 92 10 93 22 93 09 93 01...

Страница 61: ...qui vous a vendu l appareil Bloc principal Couvercle de protection R servoir de m dicaments ml 6 4 2 ml 6 4 2 Piles AA 1 5Vx2 optionnel Embout tui de transport C ble Micro USB optionnel Masque d inhal...

Страница 62: ...aments le condensateur silicone et l embout S cher toutes les pi ces et garder les dans un endroit propre Voir page 70 74 Avant la premi re utilisation il faut laver le masque l eau distill e et s che...

Страница 63: ...reste de l eau ou du m dicament vitez tout contact du bloc principal avec de l eau Conservez l appareil l abri des enfants L enfant peut se servir de l appa reil sous contr le des adultes Caract rist...

Страница 64: ...bloc principal 1 2 c Fixez le panneau sur le bloc principal 1 3 Ins rer jusqu ce que cliqu Serrure magn tique 1 1 1 2 1 3 ondenseur d eau Le bloc principal REMARQUE Assurez vous que le r servoir de m...

Страница 65: ...65 FR 2 Fixez l embout ou le masque d inhalation Fixer solidement l embout au bloc principal Veuillez nettoyer et s cher les pi ces du n buliseur avant son utilisation Voir page 70 74...

Страница 66: ...u une source d alimentation 5V pour mettre en service votre appareil Comment mettre des piles 1 Ouvrez le compartiment piles et placez 2 piles alcalines a Ouvrez le couvercle du compartiment piles b P...

Страница 67: ...r de pile faible est toujours orange le n buliseur ne fonc tionne pas cause des piles totalement d charg es et il faut changer les piles alcalines ATTENTION N utilisez pas des piles de type diff rent...

Страница 68: ...ir de m dicaments du bloc principal 1 2 ATTENTION Afin d viter l endommagement du n buliseur assurez vous d avoir appuy sur le bouton PUSH avant de retirer le r servoir de m dicaments Afin d viter l e...

Страница 69: ...l 3 Remettre en place en place le r servoir de m dicaments dans le bloc principal Fixez le r servoir jusqu un clic distinctif ATTENTION Assurez vous que le r servoir est bien fix une fixation incorrec...

Страница 70: ...servoir s allume bleu et clignote 1 fois chaque seconde en l absence de m dicament vide ou d sassembl 1 2 ATTENTION Si on allume l appareil sans remplir le r servoir de m dicaments l in dicateur d al...

Страница 71: ...l endommagement de la membrane Passer la page 79 pour voir des instructions de d pannage Pendant l inhalation on peut placer le n buliser un angle diff rent mais il faut s assurer que le m dicament re...

Страница 72: ...pient propre ou un verre et versez 100 ml d eau potable Ajoutez une demi cuil l re th d acide citrique environ 2 5 3 0 g et m langez bien Versez la solution d acide citrique pr par e dans le r cipient...

Страница 73: ...nt jusqu la marque de 6 ml fermez le couvercle et secouez le r cipient au moins 5 fois Ouvrez le couvercle et videz l eau Pour liminer les r sidus d acide citrique rincez l ext rieur de la membrane l...

Страница 74: ...our essuyer la membrane la poussi re ou le fibre risquent de rester sur la membrane ce qui endommagera le n buliseur vitez tout contact de membrane avec des coton tiges ou autres objets trangers 5 Ess...

Страница 75: ...que cliqu 1 2 Le bloc principal 7 D sinfection ATTENTION Dans le cas des maladies infectieuses il faut d sinfecter l appareil chaque fois apr s son utilisation et st riliser toutes les pi ces Vous po...

Страница 76: ...it de diffusion peut baisser plus t t la p riode d exploitation d pend du type de m dicament et de la mani re dont vous vous en servez Si le n buliseur ne fonctionne pas correctement et la vitesse de...

Страница 77: ...a membrane ne la serrez pas et n y mettez pas le doigt ou autres objets trangers Magnetisch sperren Dr cken Sie zum Loslassen Medikamentenbecher 1 1 1 2 Ein kleiner Vorsprung zum Entfernen der Platte...

Страница 78: ...1 b Fixez le r servoir au bloc principal 2 2 c Fermez le couvercle du bloc principal 2 3 Veuillez vous assurer que le r servoir de m dicaments est fix normale ment sinon un assemblage incorrect peut c...

Страница 79: ...ssous Ensuite il faut placer les accessoires dans l tui de transport 1 D sassemblez le n buliseur Veuillez d sassembler l embout et le masque comme c est indiqu sur l image 2 Fixez le couvercle de pro...

Страница 80: ...TENTION Veuillez ne pas transporter le n buliseur qui contient du m dicament ou de l eau Les liquides peuvent couler et endommager ou salir l appareil Ne conservez pas le n buliseur dans des endroits...

Страница 81: ...es Nettoyez les lectrodes et red marrez l appareil Voir page 72 Apr s le branche ment de l appareil l indicateur d ali mentation s allume pour une seconde et puis s teint Le r servoir de m dicament es...

Страница 82: ...reil Voir page 64 Il n y a plus de m dicament Rajoutez du m dicament dans le r servoir de m dicaments Voir page 67 Le m dicament ne passe pas sur la membrane pendant plus de 15 secondes Placez le n bu...

Страница 83: ...areil dans une plage de temp rature entre 10 et 40 une humidit relative maximum de 15 93 Conservez l appareil dans une plage de temp rature entre 20 et 70 une humidit relative maximum de 93 vitez tout...

Страница 84: ...humaine En vue de la protection de l environnement l appareil ne doit pas tre jet avec les d chets domestiques m nagers La mise au rebut doit tre conforme la r glementation locale L appareil doit tre...

Страница 85: ...de rayonnement Conformit Indications du milieu relativement lectromagn tique Rayonne ment haute fr quence CISPR 11 Groupe 1 Le rayonnement haute fr quence n est utilis que pour le fonctionnement int...

Страница 86: ...de l nergie lectrique doit correspondre aux standards du syst me d alimentation en lectricit des milieux industriels ou m dicaux Sauts IEC 61000 4 2 1 kilovolt entre lignes 2 kilovolt entre ligne s et...

Страница 87: ...aux indications Essai de compatibilit Niveau d essai IEC 60601 Niveau de conformit Indications du milieu relativement lectromagn tique Conductibi lit haute fr quence IEC 61000 4 6 Rayonne ment haute f...

Страница 88: ...de son emplacement b Dans la plage de 150 kHz 80 Hz les valeurs de force lectromagn tique ne doivent pas d passer 3 V Distance minimale recommand e entre les quipements de radiocommuni cation transpor...

Страница 89: ...ions et d clarations du producteur rayonnement lectroma gn tique L appareil est con u pour tre utilis dans le milieu lectromagn tique indiqu ci dessous Les acheteurs et les utilisateurs de l appareil...

Страница 90: ...me d alimentation en lectricit des milieux industriels ou m dicaux Sauts IEC 61000 4 2 1 kilovolt entre lignes 2 kilovolt entre ligne s et terre 1 kilovolt entre lignes 2 kilovolt entre ligne s et ter...

Страница 91: ...e milieu qui correspond aux indications Essai de r sis tance aux perturbations Niveau d essai IEC 60601 Niveau de conformit Exigences concernant le milieu lectromagn tique Conductibi lit haute fr quen...

Страница 92: ...appareil AGU N8 Si l appareil ne fonctionne pas correctement il faut entreprendre d autres mesures p ex la r gulation de l orientation de l appa reil AGU N8 ou de son emplacement b Dans la plage de 15...

Страница 93: ...ominale maximale de rayon nement n y sont pas indiqu es la distance minimale d m peut tre calcul e l aide de la formule o P puissance maximale de l metteur en watt W d apr s les donn es du producteur...

Страница 94: ...es traces est autoris e humidit de trace de centre de maintenance dans le bo tier ou un milieu agressif ou de toute autre effraction dans la construction de l appareil ainsi que dans d autres cas de v...

Страница 95: ...nt fiable et long terme de l appareil Si l appareil ne fonctionne pas correctement contactez le vendeur Pour la r paration et l entretien veuillez contacter un service apr s vente sp cialis Le fabrica...

Страница 96: ...ications 103 6 Components 107 7 Safe operation instructions 108 8 Preparation for work 110 9 Operating principles and procedures 112 10 Troubleshooting 126 11 Storage transportation and operation cond...

Страница 97: ...ons to choose the right type dosage and regime Spray characteristics vary depending on the drug used The nebulization rate may vary depending on the medicine WARNING As with any electronic device this...

Страница 98: ...on Technical Regulation 020 2011 on Electromagnetic Compatibility of Technical Products Classification Equipment with internal power source Product of type BF IP22 Not suitable for use in the presence...

Страница 99: ...the device caused by electromagnetic interference between electrical and electronic equipment do not use the device near mobile phones or microwave ovens Warning Note Attention Read the instruction be...

Страница 100: ...d The life of the device is 24 months if the device is used to nebulize the saline solu tion 3 times a day for 10 minutes each time at room temperature 23 C The length of the operating period may vary...

Страница 101: ...he authorized seller from whom you purchased the device Main unit Protective cover Medication chamber ml 6 4 2 ml 6 4 2 Batteries AA 1 5Vx2 optional Tip mouthpiece Carrying bag Micro USB cable optiona...

Страница 102: ...102 Main components Battery cover Micro USB socket Medication chamber Push button press to remove medication chamber Electrode contacts I O button power indicator...

Страница 103: ...o 40 inclination within 15 seconds Lack of medicine indi cator The lack of drugs indicator flashes slowly blue about 1 Hz for 15 seconds and then the power turns off automatically Warranty The warrant...

Страница 104: ...FICATIONS TECHNICAL DATA NOTE The test results reflect cascade impact measurement of the sprayed particles Productivity may vary depending on different types of medicines such as suspensions or soluti...

Страница 105: ...4 Inactive volume in the medication chamber g 42607 41 122 47 Recovery 27 66 0 71 MMAD m 1 53 0 04 Cum val MMAD for four tests 2 34 Geometric Standard Deviation GSD 1 7 0 02 Cum val GSD for four tests...

Страница 106: ...value 1 21 30 100 00 100 00 100 00 100 00 100 00 6 75 2 27 2 14 80 97 77 97 49 97 63 98 03 97 73 4 50 1 51 3 9 80 96 50 95 69 96 27 96 38 96 21 9 50 3 19 4 6 00 93 63 92 10 93 22 93 09 93 01 24 75 8 3...

Страница 107: ...he seller from whom you purchased the device Main unit Protective cover Medication chamber ml 6 4 2 ml 6 4 2 Alkaline batteries AA 1 5Vx2 optional Tip mouthpiece Carrying bag Micro USB cable optional...

Страница 108: ...ely dry the parts and store them in a clean place See page 116 119 Before the first use the inhalation mask should be rinsed with distilled water and dried The tip and mask can be reused after disinfe...

Страница 109: ...ice away from children Children should only use the device under adult supervision Product characteristics Compact and light Low energy consumption and a little medicine residue The nebulizer can func...

Страница 110: ...the main unit 1 2 c Instal the cover into the main unit 1 3 Insert until it clicks Magnetic lock 1 1 1 2 1 3 Liquid condenser Main unit Make sure that the medication chamber is installed correctly ot...

Страница 111: ...111 EN 2 Attach the mouthpiece or inhalation mask Tightly attach the tip to the main unit Please clean and dry the parts of the nebulizer before use See page 116...

Страница 112: ...as a power source for this product How to install batteries 1 Open the battery compartment and install 2 AA alkaline batteries a Open the battery compartment cover b Insert the batteries so that the...

Страница 113: ...dicator lights constantly orange color the nebulizer does not work because of low battery Replace alkaline batteries immediately WARNING Do not use different types of batteries The battery life may va...

Страница 114: ...by pulling a small flange to take a cover away 1 1 b press the PUSH button to remove the medication chamber from the main unit 1 2 WARNING Please in order to avoid damaging the nebulizer be sure to pr...

Страница 115: ...G Please in order to avoid leak age of the drug from the cham ber make sure that the lid of the chamber is securely closed Always fill the chamber with the drug when it is removed from the main unit 3...

Страница 116: ...ght green The backlight of the medication chamber should constantly light blue 1 1 b Medication indicator with a blue light blue light flash with 1Hz if no medication empty depleted 1 2 WARNING If you...

Страница 117: ...malfunctions please go to page 124 During inhalation the nebulizer can be kept at any angle however make sure that the medicine is in contact with the membrane otherwise the device will turn off auto...

Страница 118: ...solu tion into the medicine cup to a level of 4 ml and close the medicine cup lid Use crystalline or powdered citric acid to prepare the solution Press and hold the ON OFF button for 5 seconds The dev...

Страница 119: ...ed water at least 3 times 2 Disassemble the nebulizer Remove the inhalation mask or mouthpiece from the nebulizer 2 1 Remove the cover 2 2 Remove the medication chamber from the nebulizer 2 3 WARNING...

Страница 120: ...rane leading to malfunction of the nebulizer Please do not allow any cotton buds or foreign objects to contact with the membrane of the medication chamber 5 Wipe the main unit with a clean gauze cloth...

Страница 121: ...be disinfected every time after use and all parts should be sterilized You can use alcohol or other common disinfectant sprays based on alcohol for disinfection Make sure that there are no remaining...

Страница 122: ...orized seller from whom you purchased the product or the nearest distributor 1 Remove the medication chamber from the nebulizer Open dissemble the main unit Press the PUSH button on the back of the ma...

Страница 123: ...1 b Attach the chamber to the main unit 2 2 c Close the cover of the main unit 2 3 Please make sure that the medication chamber is installed correctly other wise due to a bad connection there may be...

Страница 124: ...cessories in the carrying bag 1 Disassemble the nebulizer Please remove the mouthpiece or inhalation mask as shown in the picture 2 Install the protective cover Please install the protective cover as...

Страница 125: ...lease do not transport a nebulizer that still contains medicines or water Liquids can leak as well as stain or damage the device Do not store the nebulizer in a place with high temperature humidity or...

Страница 126: ...amber are contami nated Clean the electrodes and restart the power See page 118 After turning on the power indicator lights up for 15 sec onds and then turns off imme diately The medication chamber is...

Страница 127: ...ulizer Connect it correctly and restart the device See page 109 Out of drugs Add the drugs to the medication chamber See page 113 The drugs do not enter the membrane for more than 15 seconds Placethen...

Страница 128: ...n be operated at a temperature of 10 C to 40 C with a relative humidity of 15 93 Store the device at a temperature of 20 C to 70 C with a maximum relative humidity of not more than 93 Do not subject t...

Страница 129: ...and human health The device should not be disposed of with domestic household waste for the environment protection The product should be disposed of in accor dance with local regulations The device sh...

Страница 130: ...re used only to provide internal functions of the device That is why the level of HF emanation is very low and it is un likely that it will interfere with near by electronic equipment HF emanation CIS...

Страница 131: ...ust meet the standards for power supply systems for industrial or medi cal environments Interruptions and voltage variations on the input power lines IEC 61000 4 11 5 UT UT drop 95 during the half cyc...

Страница 132: ...any part of the device includ ing cables than the recommended minimum distance calculated with the appropriate equation for the frequency of the transmitter of such equipment d 1 2 P d 1 2 P 80 MHz 80...

Страница 133: ...EVICE The recommended minimum distance between portable and mobile radio equipment and the device The device is intended for use in an electromagnetic environment in which the level of emitted high fr...

Страница 134: ...ctromagnetic environment specified below The customer or the user of the device should assure that it is used in such an environment Emissions test Compliance Electromagnetic environment guidance RF e...

Страница 135: ...ine s 2kV line s to earth 1 kV line s to line s 2 kV line s to earth Mains power quality should be that of a typical commer cial or hospital environment interruptions and voltage varia tions on power...

Страница 136: ...luding cables than the recommended separation distance calculated from the equation applicable to the frequency of the transmitter Recommended separation distance d 1 2 d 1 2 80 MHz to 800 MHz d 2 3 8...

Страница 137: ...ING Recommended separation distances between portable and mobile RF communica tions equipment and the device The device is intended for use in an electromagnetic environment in which radiated RF distu...

Страница 138: ...MHz the separation distance for the higher frequency range applies NOTE 2 These guidelines may not apply in all situations Electromagnetic prop agation is affected by absorption and reflection from s...

Страница 139: ...s of ingress of moisture into the case or effect of corrosives or of any other outside interfer ence with the device design are observed on the device case and also in other cases of violation by the...

Страница 140: ...reliable and long term opera tion of the device Apply to the sales assistance in case the device does not work properly For the repair and maintenance apply to a specialized service department The ma...

Страница 141: ...141 EN...

Страница 142: ...142 1 143 2 144 3 146 4 148 5 150 6 154 7 155 8 157 9 159 10 174 11 177 12 178 13 179 14 189 AGU N8 RU...

Страница 143: ...143 RU AGU N8...

Страница 144: ...144 CE 93 42 EEC WEEE 020 2011 BF IP22 2 12 80 2 15...

Страница 145: ...145 RU...

Страница 146: ...146 AGU N8 24 3 10 23 C 0 35...

Страница 147: ...147 RU...

Страница 148: ...148 ml 6 4 2 ml 6 4 2 AA 1 5Vx2 USB S M 4...

Страница 149: ...149 RU...

Страница 150: ...150 AGU N8 Active Vibrating Mesh 65 54 113 96 3V DC 1 5V alkaline battery 2 Micro USB 5V DC 1A 113 0 35 MMAD 3 6 8 0 5 3 0 10 20 10 2 2 AA LR6 3 10 23 24 12 40 15 1 15...

Страница 151: ...151 RU 24 6 micro USB S M 14 10 40 C 50 104 F 15 93 20 70 C 4 158 F 93 S M 23 5 0 5 Micro USB 15 MMAD EN 13544 1...

Страница 152: ...152 4 3 2 3 4 2 AGU N8 M1 g 7392 59 122 47 2 297 90 15 18 3 1746 5 31 84 42607 41 122 47...

Страница 153: ...0 100 00 100 00 100 00 6 75 2 27 2 14 80 97 77 97 49 97 63 98 03 97 73 4 50 1 51 3 9 80 96 50 95 69 96 27 96 38 96 21 9 50 3 19 4 6 00 93 63 92 10 93 22 93 09 93 01 24 75 8 31 5 3 50 85 04 84 55 84 75...

Страница 154: ...154 ml 6 4 2 ml 6 4 2 AA 1 5Vx2 Micro USB S M 4...

Страница 155: ...155 RU 161 165 161 165 164 165 I O 170...

Страница 156: ...156 15...

Страница 157: ...157 RU 1 a 1 1 b 1 2 c 1 3 1 1 1 2 1 3...

Страница 158: ...158 2 161 165...

Страница 159: ...159 RU 5 1 2 a...

Страница 160: ...160 3 2 AA LR6 6 3 10 2 30 I O 1 2 I O 1 a 2...

Страница 161: ...161 RU 1 1 1 1 2 a 1 1 PUSH 1 2 PUSH...

Страница 162: ...162 2 0 5 8 3...

Страница 163: ...163 RU 0 9 170 1 1 1 2 1 a I O 1 1 1 1 2 1 15 1 15 30...

Страница 164: ...164 2 C I O 170 15 15...

Страница 165: ...165 RU 3 1 15 1 1 100 100 2 5 3 0 5 3...

Страница 166: ...166 6 5 3 2 2 1 2 2 2 3 164 2 2 2 3 2 1...

Страница 167: ...167 RU 3 4 5...

Страница 168: ...168 6 1 2 1 2 7...

Страница 169: ...169 RU 100 3 12 30 12...

Страница 170: ...170 1 PUSH PUSH 1 1 1 2 a C 1 1 PUSH 1 2...

Страница 171: ...171 RU 2 2 2 2 3 2 1 a 2 1 2 2 2 3...

Страница 172: ...172 1 2 3...

Страница 173: ...173 RU...

Страница 174: ...174 153 15 C 146 163 155 163 1 158 157 146 155 163 155 155 Micro USB 155...

Страница 175: ...175 RU 155 158 155 163 163 158 Micro USB 155 158 15 146 160...

Страница 176: ...176 158 159 163 163 158 agu baby com...

Страница 177: ...177 RU 20 70 c 75 10 40 15 93 20 70 93 2...

Страница 178: ...178 2012 19 EU WEEE Waste Electrical and Electronic Equipment...

Страница 179: ...179 RU CISPR 11 1 CISPR 11 61000 3 2 61000 3 3...

Страница 180: ...180 60601 61000 4 2 6 6 6 6 30 61000 4 4 2 1 2 1 61000 4 5 1 2 1 2 61000 4 11 5 UT UT 95 40 UT UT 60 5 70 UT UT 30 25 5 UT UT 95 5 5 UT UT 95 40 UT UT 60 5 70 UT UT 30 25 5 UT UT 95 5...

Страница 181: ...181 RU 50 60 61000 4 8 3 3 UT 60601 61000 4 6 61000 4 3 3 150 80 3 80 2 5 3 3 d 1 2 P d 1 2 P 80 800 d 2 3 P 800 2 5 d b...

Страница 182: ...182 1 80 800 2 a FM AGU N8 AGU N8 AGU N8 150 80 3...

Страница 183: ...183 RU 150 80 d 1 2 P 80 800 d 1 2 P 80 2 5 d 2 3 P 0 01 0 12 0 12 0 23 0 1 0 38 0 38 0 73 1 1 2 1 2 2 3 10 3 8 3 8 7 3 100 12 12 23 d P 1 80 800 2...

Страница 184: ...184 CISPR 11 1 CISPR 11 B 61000 3 2 A 61000 3 3 60601 ESD 61000 4 2 6 8 6 8 30...

Страница 185: ...185 RU 61000 4 4 2 1 2 1 61000 4 5 1 2 1 2 61000 4 11 5 UT 95 UT 0 5 40 UT 60 UT 5 70 UT 30 UT 25 5 UT 95 UT 5 5 UT 95 UT 0 5 40 UT 60 UT 5 70 UT 30 UT 25 5 UT 95 UT 5 50 60 61000 4 8 3 A 3 A UT...

Страница 186: ...186 60601 61000 4 6 IEC 61000 4 3 3 150 to 80 3 80 2 5 3 3 d 1 2 d 1 2 80 800 d 2 3 800 2 5 P d b...

Страница 187: ...187 RU 1 80 800 2 a FM AGU N8 AGU N8 AGU N8 150 80 3...

Страница 188: ...188 150 to 80 d 1 2 80 800 d 1 2 800 2 5 d 2 3 0 01 0 12 0 12 0 23 0 1 0 38 0 38 0 73 1 1 2 1 2 2 3 10 3 8 3 8 7 3 100 12 12 23 d P 1 80 800 2...

Страница 189: ...189 RU 24 6 micro USB S M...

Страница 190: ...190 micro USB S M...

Страница 191: ......

Страница 192: ......

Страница 193: ...K ufer gepr Les composants et le fonctionnement de l appareil sont test s en pr sence de l acheteur The set completeness and operation of the device are tested in the presence of the buyer siegel des...

Страница 194: ...ATE GRUND CAUSE DE L APPEL REASON EMPFEHLUNGEN RECOMMANDATIONS RECOMMENDATIONS DATUM DATE DATE GRUND CAUSE DE L APPEL REASON EMPFEHLUNGEN RECOMMANDATIONS RECOMMENDATIONS Anmeldung bei Service und Wart...

Страница 195: ...Autorisierter Vertreter in der EU Repr sentant autoris dans L UE Authorized Representative in the EU MedNet GmbH Borkstrasse 10 48163 M nster Germany Made in China agu baby com...

Страница 196: ...AGU is the registered trademark by Montex Swiss AG Tramstrasse 16 CH 9442 Berneck Switzerland...

Отзывы: