background image

14

DE

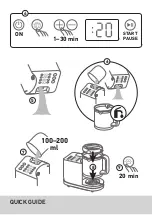
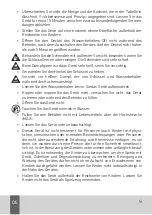
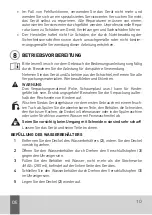
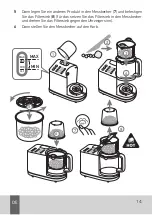
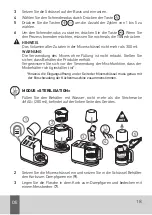
Dann legen Sie ein anderes Produkt in den Messbecher (

7

) und befestigen 

Sie das Filtersieb (

8

) (für das setzen Sie das Filtersieb in den Messbecher 

und drehen Sie das Filtersieb gegen den Uhrzeigersinn).

Dann stellen Sie den Messbecher auf den Korb.

MAX

280

100

MIN

MAX

ml

1

2

3

4

5

6

8

7

Содержание 0724982

Страница 1: ...FOOD PROCESSOR AGU FP8 agu baby com DE KURZANLEITUNG BEDIENUNGSANLEITUNG EN QUICK GUIDE USER MANUAL RU...

Страница 2: ...lade 11 Gasket 12 Blade locking ring 13 Spatula 14 Tweezers 15 User manual 3 2 11 12 10 9 14 5 6 4 8 7 13 1 1 2 ILLUMINATED TOUCH PANEL 16 Descaling mode 17 Keep warm mode 18 Delayed appliance start 1...

Страница 3: ...QUICK GUIDE 1 2 1 FILLING THE WATER CONTAINER 2 3 4 5 MAX 280 100 MIN MAX ml 2 2 PLACING THE BLENDER COVER 2 3 INSTALLING and REMOVING THE BLADE 1 1 2 2 3 4...

Страница 4: ...QUICK GUIDE 3 1 STEAM COOKING 5 8 START PAUSE ON 1 30 min 4 7 2 3 ooking one product ooking two products at a time 6 HI LO 1 MAX 280 100 MIN MAX ml...

Страница 5: ...QUICK GUIDE 3 2 BLENDING and CHOPPING 3 3 STERILIZING MAX 300 ml 1 ON x1 5 START PAUSE 3 HI 2 1 MAX 280 4 3 2 LO...

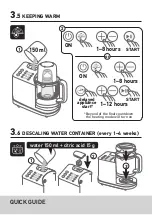
Страница 6: ...QUICK GUIDE 3 4 WARMING 1 100 ml 6 7 3 1 30 min ON 5 START PAUSE 2 6 5 ON 1 20 min 4 delayed appliance start 1 12 hours START Beyond of the final countdown the heating mode will turn on START or...

Страница 7: ...M 3 6 DESCALING WATER CONTAINER every 1 4 weeks 3 water 150 ml citric acid 15 g 2 delayed appliance start ON 1 8 hours 2 Beyond of the final countdown the heating mode will turn on 1 8 hours START STA...

Страница 8: ...QUICK GUIDE START PAUSE ON 1 30 min 4 5 20 min 9 8 7 100 200 ml 6...

Страница 9: ...eibung 7 7 Sicherheitsanweisungen 8 8 Betriebsvorbereitung 10 9 Arbeitsweise und Prinzip 12 10 Reinigung des Ger ts 23 11 M gliche St rungen und deren Beseitigung 25 12 Verordnungen der Lagerung Bef r...

Страница 10: ...rmehaltung Eigenschaften der K chenmaschine AGU FP8 Erweiterter Satz der Zubeh re LED Touchscreen Niedriger Ger uschpegel doppelter Sicherheitsschalter f r den sicheren Gebrauch das Ger t schaltet sic...

Страница 11: ...er gef hrlichen Stoffe in Elektro und Elektronikger ten Das Ger t entspricht den Hauptanforderungen TR ZU 020 2011 Elektromagnetische Vertr glichkeit der Betriebs mittel ber elektromagnetische Vertr g...

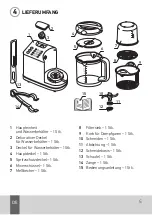
Страница 12: ...f r Wasserbeh lter 1 Stk 3 Deckel f r Wasserbeh lter 1Stk 4 Hauptdeckel 1 Stk 5 Spritzschutzdeckel 1 Stk 6 Mixersch ssel 1 Stk 7 Me becher 1 Stk 8 Filtersieb 1 Stk 9 Korb f r Dampfgaren 1 Stk 10 Schn...

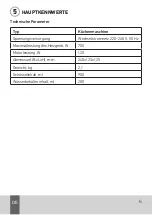
Страница 13: ...rameter 5 Typ K chenmaschine Spannungsversorgung Wechselstromnetz 220 240 V 50 Hz Maximalleistung des Heizger t W 700 Motorleistung W 120 Abmessunf B L H mm 240x123x125 Gewicht kg 2 1 Sch sselinhalt m...

Страница 14: ...e 1 Power Taste Speisung ein 2 Start Pause 3 Erh hen die Zeit 4 Reduzieren die Zeit 5 Selbstreinigungsmodus 6 Modus W rmehaltung 7 Zeitvorwahl Taste 8 Dampfgarer 2 Leistungsmodi 9 Mixer Zerkleinerer 1...

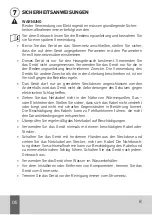
Страница 15: ...nicht die Anforderungen des Schutzes gegen elektrischen Schlag treffen Ziehen Sie das Netzkabel nicht in der N he von W rmequellen Gas oder Elektroherden Stellen Sie sicher dass sich das Kabel nicht v...

Страница 16: ...Ger t aufbewahren Kippen oder wippen Sie das Ger t nicht versuchen Sie nicht das Ger t zu leeren oder w hrend des Betriebs zu f llen ffnen Sie das Ger t nicht Tauchen Sie das Ger t niemals in Wasser F...

Страница 17: ...UNG Das Verpackungsmaterial Folie Schaumplast usw kann f r Kinder gef hrlich sein Erstickungsgefahr Bewahren Sie die Verpackung au er halb der Reichweite von Kindern auf Wischen Sie das Ger tegeh use...

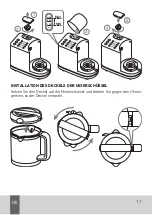
Страница 18: ...11 DE INSTALLATION DES DECKELS DER MIXERSCH SSEL Setzen Sie den Deckel auf die Mixersch ssel und drehen Sie gegen den Uhrzei gersinn so der Deckel verrastet MAX 280 100 MIN MAX ml 1 2 3 4 5...

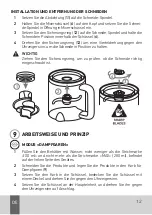
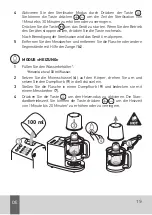
Страница 19: ...osition zu halten WICHTIG Ziehen Sie den Sicherungsring um zu pr fen ob die Schneide richtig eingeschraubt ist ARBEITSWEISE UND PRINZIP MODUS DAMPFGAREN 1 F llen Sie den Beh lter mit Wasser nicht weni...

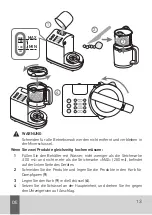
Страница 20: ...den Beh lter mit Wasser nicht weniger als die Strichmarke 100 ml und nicht mehr als die Strichmarke MAX 280 ml befindet auf der linken Seite des Ger tes 2 Schneiden Sie die Produkte und legen Sie die...

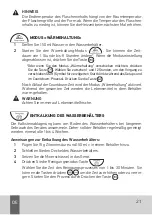
Страница 21: ...den Messbecher 7 und befestigen Sie das Filtersieb 8 f r das setzen Sie das Filtersieb in den Messbecher und drehen Sie das Filtersieb gegen den Uhrzeigersinn 6 Dann stellen Sie den Messbecher auf de...

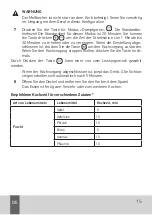
Страница 22: ...en ist dr cken Sie die Taste um den Kochvorgang zu starten Wenn Sie den Kochvorgang stoppen wollen dr cken Sie die Taste noch mals Durch Dr cken der Taste kann einer von zwei Leistungsmodi gew hlt wer...

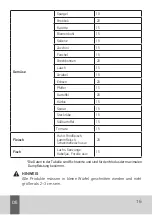
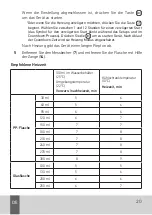
Страница 23: ...0 K rbis 15 Spinat 15 Steckr be 15 S kartoffel 15 Tomate 15 Fleisch Huhn Rindfleisch Lammfleisch Schweinefleisch usw 20 Fisch Lachs Seezunge Kabeljau Forelle usw 15 Die Daten in der Tabelle sind Richt...

Страница 24: ...ausreichender Wassermenge um das D mpfen zu schlie en nicht mehr als die Strichmarke MAX 280 ml befindet auf der linken Seite des Ger tes dr cken Sie die Taste um das Dampfgaren fortzusetzen Wenn der...

Страница 25: ...cht erlaubt Stellen Sie sicher dass Beh lter die Produkte enth lt Vergewissern Sie sich vor der Verwendung der Mischfunktion dass der Mixbeh lter richtig installiert ist Hinweis die Eingangs ffnung an...

Страница 26: ...tfernen Sie den Messbecher und entfernen Sie die Flasche oder andere Gegenst nde mit Hilfe der Zange 14 MODUS HEIZUNG 1 F llen Sie den Wasserbeh lter Hinweis etwa 100 ml Wasser 2 Setzen Sie die Mixers...

Страница 27: ...um zu starten Ger t Nach Ablauf der Countdown Zeit wird sie Heizung Modus eingeschaltet Nach Heizung gibt das Ger t einen langen Piepton ab 5 Entfernen Sie den Messbecher 7 und entfernen Sie die Flasc...

Страница 28: ...Prozess Dr cken Sie die Taste Nach Ablauf der Countdown Zeit wird der Modus W rmehaltung aktiviert W hrend der gesamten Zeit werden die Lebensmittel in dem Beh lter warm gehalten WARNUNG Achten Sie i...

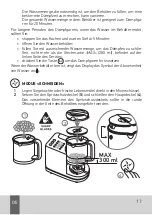
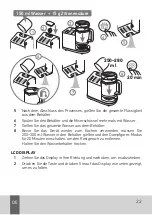
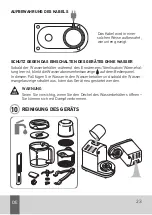
Страница 29: ...r zum Kochen verwenden m ssen Sie 250 300 ml Wasser in den Beh lter gie en und den Dampfgarer Modus f r 20 Minuten einschalten um den Restgeruch zu entfernen Halten Sie den Wasserbeh lter trocken LCD...

Страница 30: ...des Erw rmens Sterilisation W rmehal tung leer ist blinkt die Wasserabwesenheitsanzeige auf dem Bedienpanel In diesem Fall f gen Sie Wasser in den Wasserbeh lter und sobald die Wasser mangelanzeige s...

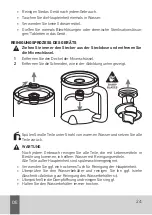
Страница 31: ...hneiden wie in der Abbildung unten gezeigt Sp len Sie alle Teile unter Strahl von warmen Wasser und setzen Sie alle Teile zur ck WARTUNG Nach jedem Gebrauch reinigen Sie alle Teile die mit Lebensmitte...

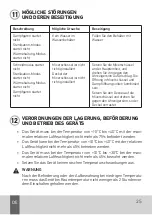
Страница 32: ...ollten kombiniert sein Setzen Sie den Deckel auf die Mixersch ssel und drehen Sie gegen den Uhrzeigersinn so der Deckel verrastet VERORDNUNGEN DER LAGERUNG BEF RDERUNG UND BETRIEB DES GER TS Das Ger t...

Страница 33: ...nie 2014 35 EU ber Niederspannungs anlage der Richtlinie 2011 65 EU ber Beschr nkung der Verwendung bestimmter gef hrlicher Stoffe in Elektro und Elektronikger ten Deutsche Lebensmittel Produkte des t...

Страница 34: ...ie den Anweisungen um die sichere und langfristige Arbeit des Ger ts zu gew hrleisten Wenn das Ger t nicht ordnungsgem funktioniert wenden Sie sich an den Kundendienst Der Hersteller beh lt sich das R...

Страница 35: ...s 31 6 Device description 33 7 Safe operation instructions 34 8 Preparation for work 36 9 Operating principles and procedures 38 10 Device cleaning 49 11 Troubleshooting 51 12 Storage transportation a...

Страница 36: ...tures of Food processor AGU FP8 an extended set of accessories Illuminated touch panel low noise level a double safety switch for safe use the device does not turn on without a water tank and with an...

Страница 37: ...s in elec trical and electronic equipment The product meets the basic requirements TP 020 2011 Electromagnetic compatibility of technical equip ment concerning electromagnetic compatibility of technic...

Страница 38: ...corative lid for water container 1 pc 3 Water tank screw cap 1 pc 4 Bowl cover 1 pc 5 Splash cover 1 pc 6 Blender bowl 1 pc 7 Measuring cup 1 pc 8 Strainer 1 pc 9 Steaming basket 1 pc 10 Blade 1 pc 11...

Страница 39: ...cations 5 Type Food processor Power source Alternating current system AC 220 240 V 50 Hz Maximum heater power W 700 Motor power W 120 Dimensions LxWxH mm 240x123x125 Weight kg 2 1 Bowl volume ml 900 W...

Страница 40: ...buttons 1 Power button Power on 2 Start Pause 3 Increase time 4 Reduce time 5 Self cleaning mode 6 Keep warm 7 Delayed appliance start 8 Steamer ON 2 power modes 9 Blender ON Chopper ON 10 Heating mo...

Страница 41: ...in contact with sharp objects Damage to the cord can lead to malfunctions that do not correspond to the warranty conditions Periodically check the electrical cord for possible damage Never use the dev...

Страница 42: ...ce and knowledge unless such peoples are supervised or instructed on the use of this device by the person in charge of their safety It is necessary to look after children in order to prevent their pla...

Страница 43: ...e removable parts container blades cooking basket lids in soapy water or in a dishwasher or under a stream of warm water with a mild detergent Be careful when handling blades they are very sharp Dry t...

Страница 44: ...nto the blade spindle 2 Hold the blender bowl 6 upside down and insert the blade spindle into the hole inside the blender bowl 3 Place the blade locking ring 12 on the blade spindle holding the blade...

Страница 45: ...the mark MAX 280 ml on the left side of the device 2 Cut the foods and place it into the steaming basket 9 3 Place the steaming basket 9 into the bowl 6 cover the bowl with bowl cover 4 and turn it c...

Страница 46: ...Then place another foods in the measuring cup 7 and secure the strain er 8 place it in the measuring cup and turn it counterclockwise 6 After that place the measuring cup over the basket ATTENTION The...

Страница 47: ...leted the device beeps All visual indi cators turn off after 5 minutes automatically 8 Open the bowl cover and remove the basket by using the spatula The food is ready for use or for further cooking M...

Страница 48: ...me min Fruits Apple 5 Orange 10 Peach 10 Pear 5 Pineapple 15 Plum 10 Vegetables Asparagus 10 Broccoli 20 Carrot 15 Cauliflower 15 Celery 15 Courgette 15 Fennel 15 French beans 20 Leek 15 Onion 15 Peas...

Страница 49: ...ing to the room temperature or the nature of foods The entire volume of water in the container is suitable for cooking on steam for 20 minutes For longer periods of steaming when the water in the cont...

Страница 50: ...tons to select the number of cycles from 1 to 5 6 To start the blender mode press If you want to pause the process you need to press this button again NOTE The volume of all ingredients inside the ble...

Страница 51: ...ress the buttons to increase or decrease the sterilization time from 1 minute to 30 minutes Then press to start the device If you want to suspend the device during operation press this button again Af...

Страница 52: ...start the device If you want to delay heating then press the delayed appliance start button Select from 1 to 12 hours for a delayed start the delayed start icon will flash during setup and during the...

Страница 53: ...120 ml 6 7 150 ml 7 7 180 ml 7 8 210 ml 7 8 240 ml 7 8 270 ml 7 8 300 ml 8 9 Glass bottle 100 ml 5 5 130 ml 5 6 200 ml 6 6 250 ml 6 7 NOTE The final temperature of the product in the bottle may vary...

Страница 54: ...during prolonged use of the device Therefore the container should be cleaned regularly once every 1 4 weeks Instruction on water container descaling 1 Add 15 g of citric acid and 150 ml of water to t...

Страница 55: ...wards you and raise it upward 2 Press the button and push the display downward as shown below to close it CABLE STORAGE The cable should be stored as shown in the figure 7 8 6 3 4 5 2 1 150 ml of wate...

Страница 56: ...is case add water to the water container and as soon as the lack of water indicator turns off the device can be restarted ATTENTION Be careful when opening the lid of the water container you can burn...

Страница 57: ...ll the parts back ATTENTION Clean all parts that come into contact with food in hot water with the addi tion of detergent after each use All parts except the main unit can be washed in a dishwasher If...

Страница 58: ...nder bowl and the steam outlet have to be aligned Install the bowl cover on the blender bowl again and turn it counterclockwise so that the cover locks into place STORAGE TRANSPORTATION AND OPERATION...

Страница 59: ...electromagnetic compatibility the Directive 2014 35 EU concerning the low voltage equipment and the Directive 2011 65 EU on the restriction of the use of certain hazardous substances in electrical and...

Страница 60: ...ions specified in this instruction manual are strictly observed The warranty is valid subject to availability of a warranty card filled out by a duly authorized representative confirming the date of s...

Страница 61: ...54 RU 1 55 2 55 3 56 4 57 5 58 6 59 7 60 8 62 9 64 10 75 11 77 12 77 13 78 14 78 15 79 AGU FP8 RU...

Страница 62: ...55 RU AGU FP8 AGU FP8 2 2 1 8 AGU FP8 900 C 2014 30 EU EMC 2014 35 EU LVD 1 2...

Страница 63: ...56 RU 2011 65 EU RoHS WEEE 2011 65 EU 020 2011 004 2011 3...

Страница 64: ...57 RU 4 15 8 4 14 5 9 3 13 2 1 6 11 12 10 7 1 1 2 1 3 1 4 1 5 1 6 1 7 1 8 1 9 1 10 1 11 1 12 1 13 1 14 1 15 1...

Страница 65: ...58 RU 5 220 240 50 700 120 240x123x125 2 1 900 280...

Страница 66: ...59 RU 6 5 6 8 9 10 11 1 3 4 2 7 13 12 1 2 3 4 5 6 7 8 2 9 10 11 12 13...

Страница 67: ...60 RU 7...

Страница 68: ...61 RU 9 15 3 5 MAX...

Страница 69: ...62 RU 1 2 2 3 3 MAX 280 4 3 5 2 8...

Страница 70: ...63 RU MAX 280 100 MIN MAX ml 1 2 3 4 5...

Страница 71: ...64 RU 1 11 2 6 3 12 6 4 12 1 100 MAX 280 2 9 3 9 6 4 4 9 4 1 2 3...

Страница 72: ...65 RU MAX 280 100 MIN MAX ml 1 100 MAX 280 2 9 3 9 6 4 1 2 3 4...

Страница 73: ...66 RU 5 7 8 6 MAX 280 100 MIN MAX ml 1 2 3 4 5 6 8 7...

Страница 74: ...67 RU 7 20 1 30 5 8 5 10 10 5 15 10...

Страница 75: ...68 RU 10 20 15 15 15 15 15 20 15 15 20 15 20 15 15 15 15 15 20 15 2 3 20...

Страница 76: ...69 RU 5 MAX 280 1 2 5 4 3 4 5 1 5 MAX 300 1 2 3 4...

Страница 77: ...70 RU 6 300 1 MAX 280 2 9 3 7 4 MAX 280 2 3 4 5 1...

Страница 78: ...71 RU 1 30 6 5 14 1 100 2 6 9 3 9 7 4 1 20 e 1 12 100 1 2 3 4 5...

Страница 79: ...72 RU 5 7 14 100 25 22 10 PP 30 5 6 60 5 6 90 6 6 120 6 7 150 7 7 180 7 8 210 7 8 240 7 8 270 7 8 300 8 9 100 5 5 130 5 6 200 6 6 250 6 7...

Страница 80: ...73 RU 1 150 2 1 8 e 1 12 1 4 1 15 150 2 3 4 1 30 5 6 7 8 250 280 20...

Страница 81: ...74 RU 20 250 280 150 15 3 4 5 7 8 6 2 1...

Страница 82: ...75 RU 1 2 10...

Страница 83: ...76 RU...

Страница 84: ...77 RU 10 40 c 75 10 40 65 10 30 65 2 11 12...

Страница 85: ...8 RU 2012 19 EU WEEE Waste Electrical and Electronic Equipment AGU FP8 2014 30 EU 2014 35 EU 2011 65 EU German food 1 2005 LFGB 30 31 10 2011 BfR 2007 766 DGCCRF 10 2011 14 2011 020 2011 004 2011 13 1...

Страница 86: ...79 RU agu baby com 15...

Страница 87: ...Hersteller Manufacturer Montex Swiss AG Tramstrasse 16 CH 9442 Berneck Switzerland factory in China agu baby com...

Страница 88: ...AGU is the registered trademark by Montex Swiss AG Tramstrasse 16 CH 9442 Berneck Switzerland...

Отзывы: