background image

4

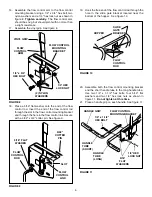
ASSEMBLY INSTRUCTIONS

TOOLS REQUIRED FOR ASSEMBLY

(1)

Pliers

(1)

Hammer

(2)

7/16" Open or Boxed End Wrenches

1.

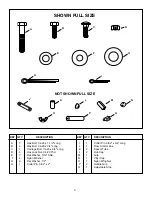
Remove the spreader, the loose parts and the hard-
ware  package  from  the  carton.  Lay  out  parts  and
hardware  and  identify  using  the  illustrations  on
pages 2 and 3.

2.

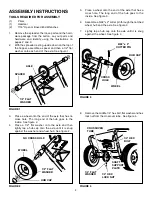
With the spreader resting upside down on the top of
the hopper, assemble a spacer and then a 1/2" flat
washer onto each end of the axle. See figure 1.

FIGURE 2

FIGURE 1

FIGURE 3

5.

Place a wheel onto the end of the axle that has a
cross  hole.  The  long  end  of  the  hub  goes  to  the
inside. See figure 3.

6.

Assemble a 5/32" x 2" cotter pin through the notched
wheel hub and the axle. See figure 3.

7.

Lightly tap a hub cap onto the axle until it is snug
against the wheel. See figure 3.

FIGURE 4

3.

Place a wheel onto the end of the axle that has no
cross  hole.  The  long  end  of  the  hub  goes  to  the
inside. See figure 2.

4.

Place  a  1/2"  flat  washer  onto  the  axle  and  then
lightly  tap  a  hub  cap  onto  the  axle  until  it  is  snug
against the washer and wheel hub. See figure 2.

AXLE

SPACER

1/2" FLAT

WASHER

1/2" FLAT 
WASHER

HUB CAP

WHEEL

NO CROSS HOLE

HUB CAP

5/32" x 2"

COTTER PIN

WHEEL

CROSS

HOLE

CROSSOVER
TUBE

1/4" HEX 
BOLT

1/4" HEX
LOCK NUT

1/4" FLAT 
WASHER

SHAFT 
SUPPORT
PLATE

8.

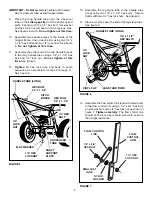
Remove the middle 1/4" hex bolt, flat washer and hex
lock nut from the crossover tube.  See figure 4.

Содержание 45-02142

Страница 1: ...and Instructions Carefully 100 LB PUSH BROADCAST SPREADER PRINTED IN U S A FORM NO 48319 REV 11 03 OWNERS MANUAL Model No 45 02142 Assembly Operation Maintenance Repair Parts the fastest way to purch...

Страница 2: ...ion when handling and when applying lawn or garden chemicals 4 Read the chemical label instructions and cautions for handling and applying the chemicals purchased for spreading 5 Keep all nuts bolts a...

Страница 3: ...20 Thd E 7 Flat Washer 5 16 SAE F 4 Nylon Washer G 3 Flat Washer 1 2 H 1 Cotter Pin 5 32 x 2 KEY QTY DESCRIPTION I 1 Cotter Pin 3 32 x 3 4 Long J 1 Flow Control Link K 2 Spacer Tube L 2 Hub Cap M 1 G...

Страница 4: ...ure 3 6 Assemble a 5 32 x 2 cotter pin through the notched wheel hub and the axle See figure 3 7 Lightly tap a hub cap onto the axle until it is snug against the wheel See figure 3 FIGURE 4 3 Place a...

Страница 5: ...LTS 1 4 LOCK NUT VINYL CAP LEG STAND TUBE FLOW CONTROL LINK FLOW CONTROL ARM 1 4 HEX LOCK NUT 1 4 x 3 4 HEX BOLT SMALLEST HOLE NYLON WASHER IMPORTANT Do Not asssemble handle tube to same side of cross...

Страница 6: ...through the slot in the flow control mounting bracket and through the hole in the flow control link Secure with a 3 32 x 3 4 cotter pin See figure 9 20 Assemble both the flow control mounting bracket...

Страница 7: ...h to hold flow control mounting bracket in place d Set adjustable stop at 5 Pull flow control arm against stop Verify that closure plate has opened about half way e If closure plate does not open half...

Страница 8: ...o heavy application at a walking speed of 3 mph or 100 ft in 23 seconds A variation in speed will require an adjustment of the flow rate to maintain the same coverage The faster you walk the wider the...

Страница 9: ...fore storing LUBRICATE See figure 15 5 Lightly apply automotive grease as needed to the sprocket and gear 6 Oil the nylon bushings on the vertical sprocket shaft and on the axle at least once a year o...

Страница 10: ...23 3 5 6 13 46 10 11 12 19 19 20 21 21 33 26 38 27 36 31 49 18 35 35 B A D E D 17 14 28 48 37 37 43 44 34 41 42 8 11 11 45 39 50 50 24 24 15 15 22 53 53 7 32 40 40 9 9 9 9 9 9 9 9 9 7 7 7 7 7 7 7 7 51...

Страница 11: ...2 Bushing Delrin 3 8 I D 56 47063 1 Pin Cotter 5 32 x 2 48319 1 Owner s Manual REF PART QTY DESCRIPTION NO NO 1 44624 1 Hopper 2 43882 4 Rivet Stainless 3 62482 1 Ass y Guide Closure 4 44588 1 Tube F...

Страница 12: ...REPAIR PARTS Agri Fab Inc 303 West Raymond Sullivan IL 61951 217 728 8388 www agri fab com the fastest way to purchase parts www speedepart com...

Отзывы: