


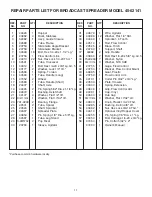

9
MAINTENANCE & STORAGE
1.
Do not store spreader with any material in hopper.
2.
Clean your spreader after use. Flush thoroughly with
water.
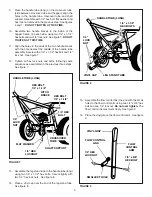
3.
If for any reason the axle, gear and sprocket assembly
is disassembled, be sure to mark position of parts as
they are removed. The positions of the drive wheel and
sprocket in relation to the slotted plastic gear deter-
mine which direction the spreader plate will spin. Be
sure to reassemble them in their original positions.
(Refer to figure 5 on page 4.) With the reassembly of
the gear and sprocket, use shim washers (Ref. no. 21
on page 10) as needed for minimum backlash. Add
grease to gear and sprocket.
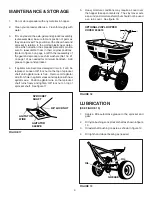
4.
If agitator wire becomes damaged or worn it can be
replaced. Loosen 3/8" lock nut on the top of sprocket
shaft until agitator wire is free. Remove old agitator
wire from hole in agitator sleeve and replace with new
agitator wire. Position agitator wire so that sprocket
shaft turns freely and tighten 3/8" lock nut on top of
sprocket shaft. See figure 17.
5.
Heavy moisture conditions may require a cover over
the hopper to keep contents dry. The vinyl cover acts
as a wind and moisture shield, but should not be used
as a rain cover. See figure 18.
BROADCAST
BROADCAST
S PREADE
R
S PREADE
R
OPTIONAL VINYL HOPPER
COVER #44619
FIGURE 18
FIGURE 19
LUBRICATION
(SEE FIGURE 19)
1.
Apply a little automotive grease to the sprocket and
gear.
2.
Oil nylon bushings on sprocket shaft as shown in figure
19.
3.
Oil axle/shaft bushing on axle as shown in figure 19.
4.
Oil right hand wheel bearing as needed.
GREASE
OIL
OIL
SPROCKET
SHAFT
AGITATOR
WIRE
3/8" LOCKNUT
AGITATOR
SLEEVE
FIGURE 17


