Agri-Fab 45-02141 Скачать руководство пользователя страница 5

5

9.

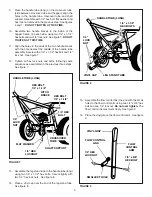
Place the handle tube (long) on the crossover tube,
(side between crossover tube and hopper), align the
holes  in  the  handle  tube,  crossover  tube,  and  shaft
support. Assemble with 1/4" hex bolt, flat washer and
hex lock nut removed in the previous step.  See figures
6 and 7. 

 DO NOT TIGHTEN AT THIS TIME.

10. Assemble  two  handle  braces  to  the  inside  of  the

hopper frame, one each side, using two 1/4" x 1-1/2"
hex bolts and two 1/4" lock nuts. See figure 7.  

DO NOT

TIGHTEN AT THIS TIME.

11. Align the holes in the ends of the two handle braces

with  the  hole  nearest  the  middle  of  the  handle  tube
assembly. Secure with a 1/4" x 1-1/2" hex bolt and 1/4"
lock nut.  See figure 7.

12. Tighten  all  hex  lock  nuts  and  bolts,  following  same

sequence as assembled in the previous three steps.
See figure 7.

FIGURE 9

13. Assemble the leg stand tube to the handle tube (long)

using two 1/4" x 1-1/2" hex bolts.  Secure tightly with
two 1/4" hex lock nuts.  See figure 8.

14. Place a vinyl cap over the end of the leg stand tube.

See figure 8.

FIGURE 7

FIGURE 8

15. Assemble the flow control link (the end with the small

hole) to the flow control arm using one 1/4" x 5/8" hex
bolt and one 1/4" lock nut. 

Do not over tighten.

 The

flow control link must pivot freely. See figure 9.

16. Place the vinyl grip on the flow control arm.  See figure

9.

1/4" HEX 
BOLT

1/4" HEX 
LOCKNUT

FLAT WASHER

HANDLE TUBE (LONG)

HEX BOLT 
1/4" x 1-1/2"

HEX BOLT 
1/4" x 1-1/2"

HITCH 
BRACE

1/4" 
LOCK 
NUT

CROSSOVER
TUBE

SHAFT SUPPORT

HANDLE TUBE (LONG)

1/4" x 1-1/2"
HEX BOLTS 

1/4" 
LOCK 
NUT

VINYL CAP

LEG STAND TUBE

FLOW CONTROL

LINK

VINYL GRIP

FLOW

CONTROL

ARM

1/4" x 5/8"
HEX BOLT

SMALLEST HOLE

1/4" HEX 
LOCK NUT

Содержание 45-02141

Страница 1: ...afe Operation and Instructions Carefully BROADCAST SPREADER 100 PUSH PRINTED IN U S A FORM NO 47290 REV 12 01 OWNERS MANUAL Model No 45 02141 Assembly Operation Maintenance Repair Parts BROADCAST BROA...

Страница 2: ...handling and applying the chemicals purchased for spreading 5 Keep all nuts bolts and screws tight to be sure equipment is in safe working condition 6 Follow maintenance and lubrication instructions...

Страница 3: ...asher 1 2 G 9 Hex Lock Nut 1 4 20 Thd H 1 Cotter Pin 5 32 x 2 KEY QTY DESCRIPTION I 1 Cotter Pin 3 32 x 3 4 Long J 1 Flow Control Link K 1 Extension Spring L 2 Spacer Tube M 2 Hub Cap N 1 Grip O 1 Vin...

Страница 4: ...ng end of the hub goes to the inside See figure 5 6 Assemble a 5 32 x 2 cotter pin through the notched wheel hub and the axle See figure 5 7 Lightly tap a hub cap onto the axle until it is snug agains...

Страница 5: ...e sequence as assembled in the previous three steps See figure 7 FIGURE 9 13 Assemble the leg stand tube to the handle tube long using two 1 4 x 1 1 2 hex bolts Secure tightly with two 1 4 hex lock nu...

Страница 6: ...e in flow control link Secure with a 3 32 x 3 4 cotter pin See figure 11 FIGURE 10 FIGURE 11 20 Hook free end of flow control rod through hole in slide gatebracketlocatednearbottomofhopper Seefigure 1...

Страница 7: ...ff position and push flow control mounting bracket toward hopper until closure plate locatedinbottomofhopper iscompletelyclosed Tighten 1 4 hex lock nuts assembled in step 21 See figure 14 HAND KNOB N...

Страница 8: ...e minor adjustment settings may be necessary to compen sate for this condition The rate chart is calculated for light and heavy application The faster you walk the wider the broadcast width A variatio...

Страница 9: ...oosen 3 8 lock nut on the top of sprocket shaft until agitator wire is free Remove old agitator wire from hole in agitator sleeve and replace with new agitator wire Position agitator wire so that spro...

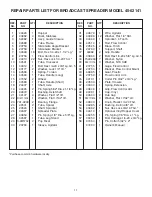
Страница 10: ...23 3 5 6 13 46 10 11 12 19 19 20 21 21 33 26 56 27 36 30 31 49 55 18 35 35 B A D E D 17 14 28 48 37 37 43 44 34 41 42 8 38 38 47 45 39 39 50 50 24 24 15 15 22 53 53 7 7 32 40 40 40 9 9 9 9 9 9 54 9 9...

Страница 11: ...19 1 Optional Vinyl Hopper Cover 56 46055 1 Pin Spring 1 8 Dia x 1 Lg 57 44950 1 Bolt Carriage 1 4 20 x 3 4 Lg 58 47063 1 Pin Cotter 5 32 x 2 47290 1 Owner s Manual REF PART QTY DESCRIPTION NO NO 1 44...

Страница 12: ...mal maintenance 5 AGRI FAB does not extend any warranty for products sold or exported outside of the United States of America its possessions and territories except those sold through AGRI FAB s autho...

Отзывы: