background image

4

ASSEMBLY INSTRUCTIONS

TOOLS REQUIRED FOR ASSEMBLY

(1)

Pliers

(2)

7/16" Wrenches

(2)

1/2"  Wrenches

(2)

9/16" Wrenches

REMOVAL OF PARTS FROM CARTON

Remove all parts and hardware packages from the carton.
Lay  out  all  parts  and  hardware  and  identify  using  the
illustrations on pages 2 and 3.

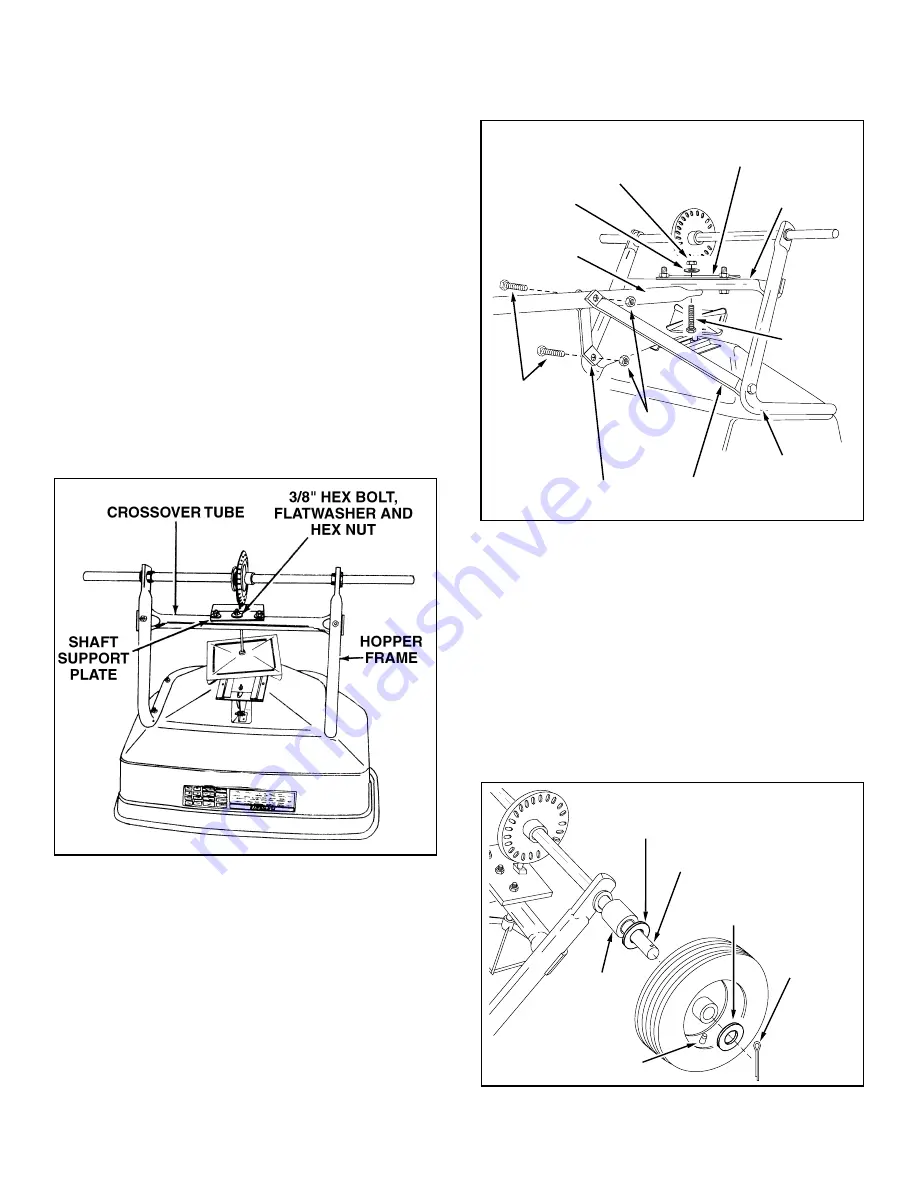
1.Turn the spreader upside down as shown in figure 1,

so that it rests on the hopper.

2.Remove the 3/8" hex bolt, flat washer and hex lock nut

from the center of the crossover tube and shaft support
plate. See figure 1.

FIGURE 1

3.Assemble  the  two  hitch  braces  to  the  inside  of  the

hopper frame, one on each side, using two 1/4" x 1-3/4"
hex bolts and two 1/4" hex lock nuts. See figure 2. 

DO

NOT TIGHTEN AT THIS TIME.

4.Assemble short end of hitch tube to the crossover tube

(on opposite side from shaft support plate). Fasten to
the center hole in the crossover tube using the 3/8" hex
bolt, flat washer and hex lock nut removed in figure 1.
See figure 2. 

DO NOT TIGHTEN AT THIS TIME.

FIGURE 2

6.

Tighten all

  hex  nuts  and  bolts,  following  the  same

sequence as assembled in figures 1 and 2. 

DO NOT

COLLAPSE TUBE WHEN TIGHTENING.

7.Assemble a spacer and a 1-5/8" flat washer onto the

end of the axle that has the small hole. See figure 3.

8.Turn the idler wheel (no hole in hub) so that the air valve

faces out. Place onto the axle and secure with a 1-5/8"
dia. flat washer and a 1/8" x 1-1/2" cotter pin. Use the
extra washer if needed to take up play. See figure 3.

5.Align the holes in the ends of the two hitch braces with

the nearest hole in the hitch tube. Fasten with a 1/4" x
1-3/4" hex bolt and a 1/4" hex lock nut. See figure 2. 

DO

NOT TIGHTEN AT THIS TIME.

3/8" HEX

LOCK NUT

3/8" FLAT

WASHER

1/4" x 1-3/4"

HEX BOLT

1/4" HEX

LOCK NUT

3/8" HEX

BOLT

CROSSOVER

TUBE

HITCH BRACES

HITCH

TUBE

HOPPER

FRAME

SHAFT SUPPORT

PLATE

SMALL HOLE

SPACER

1-5/8" DIA.
FLAT WASHER

1-5/8" DIA.
FLAT WASHER

1/8" x 1-1/2"
COTTER PIN

AIR VALVE

FIGURE 3

For Agri Fab Discount Parts Call 606-678-9623 or 606-561-4983

www.mymowerparts.com

Содержание 45-02112

Страница 1: ...48317 4 02 xxxxxxxxxxxxxxxxxxxxxxxxxxxxxxxxxxxxx xxxxxxxxxxxxxxxxxxxxxxxxxxxxxxxxxxxxxxxxxx xxxxxxxxxxxxxxxxxxxxxxxxxxxxxxxxxxxxxxxxxxx xxxxxxxxxxxxxxxxxxxxxxxxxxxxxxxxxxxxxxxxx xxxxx xxxxx xxxxxx xx...

Страница 2: ...sit on spreader attachment frame Never allow children to operate the tractor or spreader attachment and do not allow adults to operate without proper instructions Always begin with the transmission i...

Страница 3: ...A 6 Hex Bolt 1 4 20 x 1 3 4 B 2 Hex Bolts 3 8 16 x 1 1 4 C 2 Hex Bolt 1 4 20 x 3 4 D 1 Carriage Bolt 1 4 20 x 3 4 E 8 Hex Lock Nuts 1 4 20 Thread F 2 Hex Lock Nuts 3 8 16 Thread G 2 Lock Washers 3 8 I...

Страница 4: ...lock nut removed in figure 1 See figure 2 DO NOT TIGHTEN AT THIS TIME FIGURE 2 6 Tighten all hex nuts and bolts following the same sequence as assembled in figures 1 and 2 DO NOT COLLAPSE TUBE WHEN T...

Страница 5: ...h tube and secure with the hair cotter pin See figure 5 FIGURE 5 14 Assemble the flow control link end with small hole to the flow control arm using a 1 4 x 3 4 hex bolt a nylon washer and a 1 4 hex l...

Страница 6: ...end of the slot in the top of the flow control mounting bracket Secure with the 1 4 x 3 4 carriage bolt a nylon washer a 5 16 flat washer and the nylon wing nut See figure 11 FLOW CONTROL ROD FLOW CO...

Страница 7: ...gainst stop Verify that closure plate has opened about half way e If closure plate does not open half way it may be closed too far at OFF Adjust position of flow control mounting bracket until closure...

Страница 8: ...ter you drive the wider the broadcast width 6 Always start the tractor in motion before opening closure plate 7 Always shut the closure plate before turning or stop ping the tractor 8 If fertilizer is...

Страница 9: ...more often as needed 7 Oil right hand idler wheel bearing at least once a year or more often as needed FIGURE 15 MAINTENANCE GREASE OIL OIL SPROCKET SHAFT AGITATOR WIRE 3 8 HEX NUT AGITATOR SLEEVE STO...

Страница 10: ...9 23 A A 33 59 27 26 28 3 19 36 34 9 46 9 57 9 40 16 14 7 17 37 24 50 12 13 E 9 29 30 5 9 54 9 4 9 35 B 6 52 44 47 58 58 8 42 32 7 D 45 54 48 29 40 37 60 25 B 1 39 10 54 41 54 51 39 9 54 39 38 31 2 55...

Страница 11: ...23766 1 Sleeve Agitator 31 43878 1 Wire Agitator REF PART QTY DESCRIPTION NO NO 32 43070 5 Washer Flat 3 8 33 41576 2 Bolt Hex 3 8 16 x 1 3 4 Lg 34 44469 1 Rod Flow Control 35 23525 2 Brace Hitch 36 2...

Страница 12: ...d any warranty for products sold or exported outside of the United States of America its possessions and territories except those sold through AGRI FAB s authorized channels of export distribution WHA...

Отзывы: