


AGRETO Animal Scale
© AGRETO electronics GmbH
Seite:12
6.8
Mounting the door lever
required mounting material
size
pieces
hex bolt
M8x20
2
washer
M8
5
spring washer
M8
3
nut
M8
3
fillister head screw
M10x25
1
washer
M10
1
stop nut
M10
1
hex bolt
M12x25
1
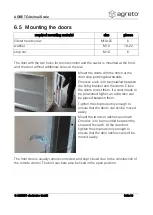
Attach the mounting bracket on the left-
hand side of the scale with two M8
screws. The standing component must
point inward.
Attach the lever to the outside of the
mounting bracket. The short part of the
lever must face inward. The rounded
head screw must point from inside to
outside.
Содержание Swis721 LT BT Standart
Страница 1: ...User Manual AGRETO Animal Scale 23 1 2019...