


UHV-24/UHV-24p Ionization Gauge
DRAFT
17
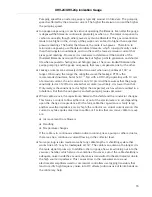
Maintenance: Filament Replacement
Agilent’s nude gauges are equipped with dual filaments. The filament assembly is easily
replaced if it is damaged or broken. The replacement filament kit contains two filament
assemblies and an Allen wrench.
Tungsten Filament Replacement
This procedure replace the tungsten filament (Part No. 9710018).
To remove and change the damaged filament:
1. Carefully loosen all six set screws and pull the old filament support brackets out.
CAUTION
Handle the gauge only by its ceramic base to prevent damage
to the delicate wires. Wear nylon gloves to prevent placing
fingerprints on the gauge. The oil from fingerprints extends
pumpdown time.
2. Insert the long filament support bracket into its collar so that the filament is located
0.050 to 0.070" from the grid structure.
3. Tighten the set screws.
4. Insert the short filament support brackets into their collars, pushing them in as far as they
will go before tightening the set screws. This ensures proper tension on the filament.
Содержание UHV-24
Страница 2: ...D R A F T 1 6 1 4 Copyright 2014 Agilent Inc UHV 24 UHV 24p Ionization Gauge...
Страница 4: ...UHV 24 UHV 24p Ionization Gauge This page intentionally left blank D R A F T 1 6 1 4...
Страница 6: ...UHV 24 UHV 24p Ionization Gauge This page intentionally left blank D R A F T...
Страница 10: ...UHV 24 UHV 24p Ionization Gauge This page intentionally left blank...
Страница 20: ...UHV 24 UHV 24p Ionization Gauge 20 D R A F T Table 2 Gas Correction Factor Table...
Страница 21: ...UHV 24 UHV 24p Ionization Gauge D R A F T 21 Table B 0 Gas Correction Factor Table Continued...
Страница 22: ...UHV 24 UHV 24p Ionization Gauge This page intentionally left blank D R A F T...
Страница 26: ...UHV 24 UHV 24p Ionization Gauge This page intentionally left blank...
Страница 27: ......


