


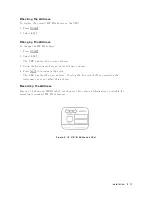


Connecting
the
Analyzer
to
an
External
Monitor
CRT
Use
the
three
rear
panel
outputs
(R
GB)
to
driv
e
an
external
monitor
(see
c
hapter
1
for
sp ecic
video
output
c
haracteristics).
Connect
the
three
BNC
analyzer
outputs
(R
GB)
to
the
corresp onding
monitor
inputs.
If
y
ou
use
a
mono
c
hrome
monitor,
op erate
the
analyzer
in
mono
c
hrome
mo
de
and
connect
only
the
green
(G)
output
to
the
monitor.
LCD
The
analyzer
can
driv
e
b oth
its
in
ternal
display
and
an
external
monitor
simultaneously
.
Connect
the
V
GA
output
to
the
corresp onding
monitor
input.
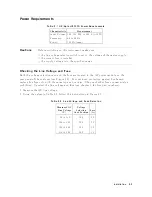
External
Monitor
Requirements:
V
GA
Compatible
640
(horizontal)
x
480
(v
ertical)
resolution
59.83
Hz
v
ertical
refresh
rate
16.716
mS
v
ertical
time
31.41
kHz
horizontal
refresh
rate
31.840
S
horizontal
time
75
ohm
video
input
imp edance
video
analog
amplitude
0.7
Vp-p
negagive
true
TTL
logic
for
v
ertical
and
horizontal
sync
hronization
Setting
the
HP-IB
Address
In
remote
mo
de,
a
con
troller
comm
unicates
through
the
HP-IB,
iden
tifying
eac
h
instrumen
t
on
the
bus
b
y
its
HP-IB
address.
Because
of
this,
eac
h
instrumen
t
on
an
HP-IB
must
ha
v
e
a
unique
address
(0
through
29
are
a
v
ailable).
F
actory
Setting
The
factory
sets
the
analyzer
to
address
16.
The
cen
tral
pro cessing
unit
(CPU)
reads
this
address
from
the
rm
w
are
when
the
instrumen
t
is
rst
turned
on
and
stores
it
in
memory
.
The
address
c
hanges
only
when
the
v
alue
in
memory
c
hanges,
either
through
a
fron
t
panel
en
try
,
or
when
y
ou
c
hange
the
rm
w
are.
With
a
rm
w
are
c
hange,
the
address
again
defaults
to
16.
2-16
Installation
Содержание 8757D
Страница 8: ......
Страница 13: ...Figure 1 2 HP 8757D Scalar Network Analyzer and Accessories Supplied General Information 1 5 ...
Страница 27: ...General Information 1 19 ...
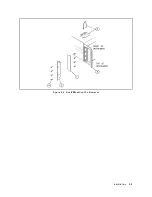
Страница 39: ...Figure 2 4 Rack Mounting the Analyzer Installation 2 9 ...
Страница 41: ...Figure 2 5 Analyzer to HP Agilent 8350 Sweep Oscillator Interconnections Installation 2 11 ...
Страница 42: ...Figure 2 6 Analyzer to HP Agilent 8340 and 8341 Series Synthesizer Interconnections 2 12 Installation ...
Страница 43: ...Figure 2 7 Analyzer to HP Agilent 8360 Series Synthesizer Interconnections Installation 2 13 ...
Страница 44: ...Figure 2 8 Analyzer to HP Agilent 83750 Series Synthesizer Interconnections 2 14 Installation ...
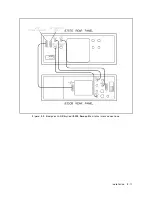
Страница 45: ...Figure 2 9 Rear Panel Display Connectors Installation 2 15 ...
Страница 49: ...Figure 2 11 HP IB Connectors Signals and Pin Configuration Installation 2 19 ...
Страница 52: ......
Страница 55: ......
Страница 56: ......
Страница 57: ......
Страница 58: ......
Страница 59: ......
Страница 60: ......
Страница 61: ......
Страница 62: ......
Страница 63: ......
Страница 64: ......
Страница 65: ......
Страница 66: ......
Страница 67: ......
Страница 68: ......
Страница 69: ......
Страница 70: ......
Страница 71: ......
Страница 72: ......
Страница 73: ......
Страница 74: ......
Страница 75: ......
Страница 76: ......
Страница 77: ......
Страница 78: ......


