background image

AgfaPhoto OPTIMA 108 / OPTIMA 145

AgfaPhoto OPTIMA 108 / OPTIMA 145

45

AgfaPhoto OPTIMA 108 / OPTIMA 145

AgfaPhoto OPTIMA 108 / OPTIMA 145

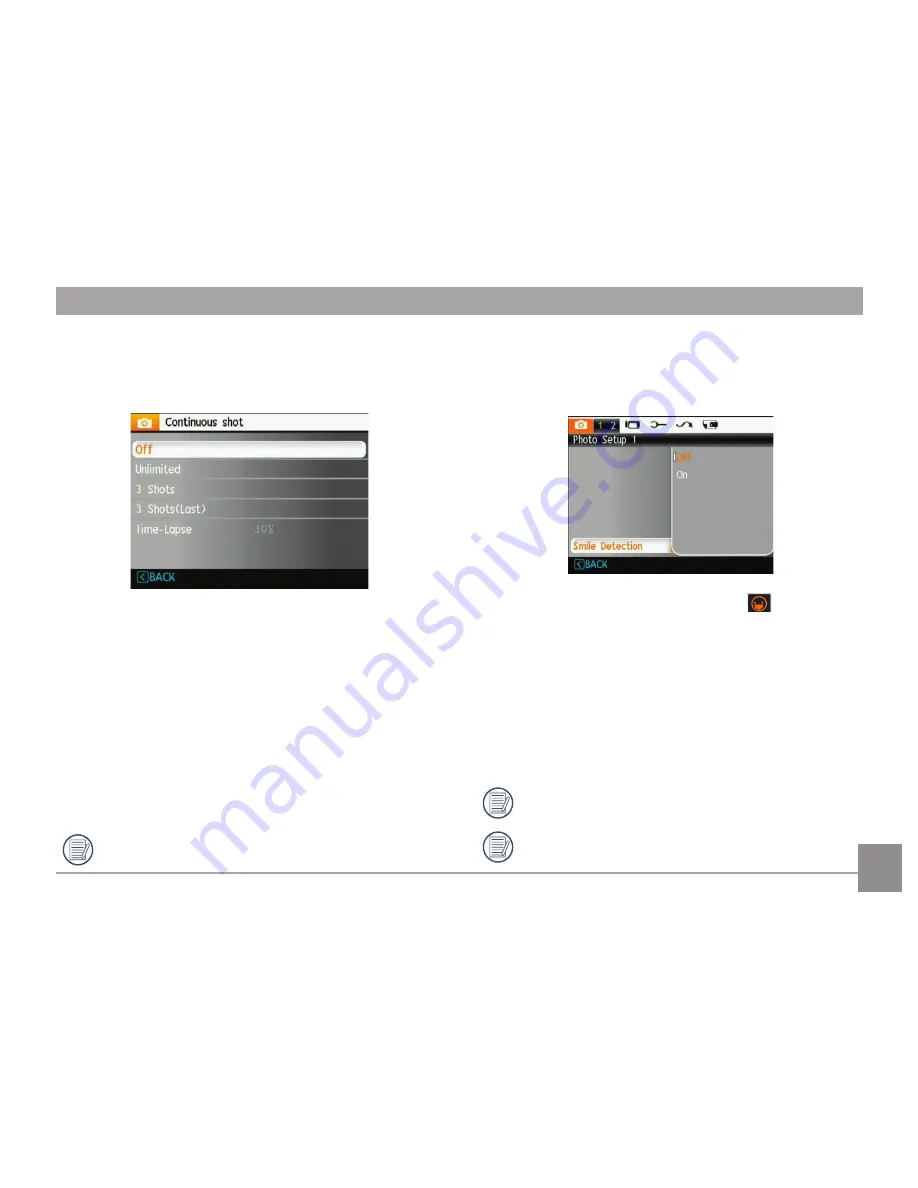
Continuous Shot

Use ths settng to perform contnuous shootng. After 
enterng ths mode, you can shoot multple mages by 
pressng and holdng down the shutter button.

There are five avalable optons:

•  Off: Turn off the Contnuous Shot functon.

•  Unlimited: Press and hold the shutter button to shoot 

contnuously untl you release the shutter button, or 
run out of space on the memory card.

•  3 shot: Capture up to 3 consecutve pctures.
•  3 shots (Last): Capture pctures contnuously untl the 

Shutter button s released. Only the last 3 shots wll 
be recorded. 

•  Time-Lapse: Automatcally capture pctures n a 

predefined nterval.

The flash s dssabled n ths mode n order to enable 
quck successon of shots.

Smile Detection

Wth the camera's new "Smle Detecton" feature, whch 
automatcally detects and captures a person smlng, you'll 
never mss a smle.

1.  When smle detecton s enabled, the ( 

 ) con wll 

dsplay on the LCD screen. 

2.  Pont the camera towards the subject, when the camera 

dentfies a human face, a whte focusng frame wll 
appear around the face on the screen. Press the shutter 
button completely, then release. The camera wll “wat 
for” a smlng face.

3.  When the subject smles, the camera wll automatcally 

release the shutter and capture the photo.

4.  If you want to stop smle shootng functon, please 

press Shutter button. 

A face must be detected by the camera n order for 
smle detecton to functon correctly.

For optmal detecton results, the subject should be 
framed to occupy most of the screen space.

Содержание Optima 108

Страница 1: ...OPTIMA 108 OPTIMA 145 User manual ...

Страница 2: ... environment and customer protection CE marked cameras are intended for sales in Europe This symbol crossed out wheeled bin WEEE Annex IV indicates separate collection of electrical and electronic waste in the European countries Please do not throw the equipment into the waste Please recycle and dispose of properly Declaration of Conformity Model Name OPTIMA 108 OPTIMA 145 Trade Name AgfaPhoto Res...

Страница 3: ...he battery may cause them to leak become hot ignite or burst Always observe the precautions given below Do not expose the battery to water and take particular care to keep the terminals dry Do not heat the battery or throw them into a fire Do not attempt to deform disassemble or modify the battery Keep the battery out of reach of small children In cold locations battery performance deteriorates an...

Страница 4: ...age the batteries Do not use or store the camera in dusty dirty or sandy areas as its components may be damaged Thank you for purchasing this AgfaPhoto digital camera Please read this manual carefully and keep it in a safe place for future reference Copyright Copyright 2011 plawa feinwerktechnik GmbH Co KG All rights reserved No part of this publication may be reproduced transmitted transcribed st...

Страница 5: ...h a slightly damp soft cloth About this manual This manual provides you with instructions on how to use your AgfaPhoto digital camera Every effort has been made to ensure that the contents of this manual are accurate however plawa feinwerktechnik GmbH Co KG reserves the right to make changes without notice Symbols used in this manual Throughout this manual the following symbols are used to help yo...

Страница 6: ...tery and SD SDHC Card 11 Turning On and Off 13 Use Mode button 14 Set Time date time 15 Setting the Language 15 Setting the Date and Time 16 About the LCD Screen 17 BASIC OPERATION 18 Shooting in Auto Mode 18 Using the Zoom Function 18 Flash 19 Self timer 19 Macro Mode 20 Using quick recording 20 Advanced Functions Menu 21 Size 22 Quality 22 WB White Balance 23 Color 23 ISO 24 Exposure Compensatio...

Страница 7: ...Mode 30 Panorama Mode 31 Manual Scene Mode SCN 32 Landscape 33 Sport 33 Beach 33 Sunset 33 Fireworks 33 Night Landscape 33 Night Portrait 33 Gathering 33 Children 33 Indoor 33 Snow 33 ID 33 Museum 33 Photo frame 33 Travel shooting 34 Text 34 Leaf 34 Glass 34 Fish eye 34 Sketch 34 Stabilization Mode 35 Face Detection 36 Blink Detection 36 PLAYBACK 37 Viewing Photos and Videos 37 Thumbnail View 39 U...

Страница 8: ...e Menu 48 Expo Metering Exposure Metering 49 Continuous AF 49 DIS 50 Playback Menu 51 Protect 51 Delete 52 DPOF Digital Print Order Format 53 Resize 54 Rotate 54 Red eye Reduction 55 Trim 55 HDR High Dynamic Range 56 Display Setup 57 Slideshow 57 Wallpaper Settings 58 Menu Wallpaper 58 Setup Menu 60 Beep 60 LCD Brightness 64 Power Saver 62 Date Time 62 Zone 62 Language 63 File and Software 63 Form...

Страница 9: ...145 FW Version Firmware version 65 Transmission 66 Video System 66 Connecting to a PC 67 Setting the USB Mode 67 Transferring Files to your PC 67 APPENDICES 69 Specifications 69 Error Messages 73 Troubleshooting 75 Customer Care 77 ...

Страница 10: ...age should contain the camera model you purchased along with the following items If anything is missing or ap pears to be damaged please contact your vendor Unpacking USB Cable Warranty Card CD ROM Wrist Strap Power Adapter Rechargeable Lithium ion battery ...

Страница 11: ... AgfaPhoto OPTIMA 108 OPTIMA 145 AgfaPhoto OPTIMA 108 OPTIMA 145 Camera Views Front View Back View Right View 1 2 3 4 5 6 7 8 9 10 11 12 15 14 13 ...

Страница 12: ...p shooting button Left button 3 Lens 15 Function OK Button 4 Microphone 16 USB AV Port 5 LCD Screen 17 Wrist Strap Anchor 6 Zoom Button 18 Power Button 7 Status Indicator 19 Recording Button 8 Mode Selection Button 20 Shutter Button 9 Playback Button 21 Card Slot Battery Compartment 10 Menu Button 22 Tripod Socket 11 Disp Up Button 23 Speaker 12 Flash Mode Right Button 18 19 20 21 22 23 17 16 ...

Страница 13: ...ra 2 Use the USB cable to connect the camera to the power adapter 3 Insert the power adapter into the power socket Charging the Battery Leave the battery charging until the charger light turns green To maximize battery life the first charge should be at least 4 hours The charger is for indoor use only ...

Страница 14: ...OPTIMA 108 OPTIMA 145 11 AgfaPhoto OPTIMA 108 OPTIMA 145 Insert the Battery and SD SDHC Card Not included 2 Insert the enclosed batteries into the battery slot in the correct direction 1 Open the battery compartment ...

Страница 15: ...12 AgfaPhoto OPTIMA 108 OPTIMA 145 12 AgfaPhoto OPTIMA 108 OPTIMA 145 4 Close the battery compartment 3 Insert an SD SDHC card not included into the memory card slot as shown write protec tion buckle ...

Страница 16: ...he battery compartment and gently push the card to release it Pull the card out carefully Turning On and Off Press the Power button to turn the camera on To turn off the camera press the Power button again After the camera is turned on the camera will default to the the shooting mode last used Press the Mode button and use the Left Right button to switch among different shooting modes When the cam...

Страница 17: ...s in automatic mode Manual mode Switch to take still pictures in manual mode where many camera settings can be configured ASCN mode Switch to have the camera automatically select the best scene type for still pictures Panorama mode Switch to capture a sequence of shots and stitch them together into a panoramic photo Scene mode Switch to take still pictures in 20 different scene types to choose fro...

Страница 18: ...he General Setup menu Language Date Time To access the General Setup menu do the following 1 Press the Power button to turn the camera on 2 Press the button then switch among the settings menus by using the Left Right button and select General Setup Setting the Language 1 Select language with the Down button press the or right button to enter the setting 2 Use the Up Down Left Right buttons to sel...

Страница 19: ...145 Setting the Date and Time 1 Select date time with the Up Down button then press the or right button to enter the setting 2 Press the Left Right button to highlight each field and use the Up Down button to adjust the value 3 Press the button to confirm the setting ...

Страница 20: ...rink large quantities of water and induce vomiting Then seek medical assistance immediately About the LCD Screen When you turn the camera on various icons will appear on the LCD screen to indicate the current camera settings and status To learn more about the displayed icons see LCD Screen display on page 25 LCD Screen notes Extremely high precision technology has been used to manufacture the LCD ...

Страница 21: ...ting in Auto Mode AUTO Auto mode is the easiest mode to take photos with While operating in this mode the camera automatically optimizes the camera s settings for best results To start shooting do the following 1 Press the power button to turn the camera on 2 Press the Mode button and select Automatic mode AUTO 3 Compose your picture on the LCD screen and press the Shutter button halfway to focus ...

Страница 22: ... show both your subject and the night scenery Flash Red eye reduction The camera emits a brief flash before the picture is taken to reduce red eye effects Flash Auto Camera flash fires automatically based on existing light conditions To enable the self timer function press the Down Self timer button to enter the self timer selection interface press the Left Right button to switch among three self ...

Страница 23: ...oting modes Macro On Select this to focus on subjects 5cm from the lens Macro Off Select this option to disable Macro Macro Mode Using quick recording In Shooting mode press the Recording shortcut button to enter the recording mode directly and make recordings After finishing a recording press the Recording shortcut button or Shutter button again you can store the video and return to the shooting ...

Страница 24: ...t lighting conditions Set the advanced functions as per the following steps 1 Pull up the Advanced Function Menus by pressing the button 2 Press the Down button to enter the advanced function selection screen then press the Left Right button to select the function that needs to be changed or adjusted 3 Press the Up button to enter the advanced function setting interface 4 Press the Left Right butt...

Страница 25: ...arger sizes without degrading the image quality The larger the pictures are the bigger the file sizes are and the less pictures you can store on a memory card Quality The quality setting adjusts the compression ratio of the images Higher quality settings give better photos but will take up more memory space There are three options for picture quality Quality Best Quality Fine Quality Normal ...

Страница 26: ...hen the camera is in the Manual mode The color options include Color Auto Color Vivid Color Black White Color Sepia WB White Balance The White Balance allows you to adjust the color temperature from different light sources to ensure faithful color reproduction The WB setting is only available when the camera is in the Manual mode The options of White Balance include WB Auto WB Daylight WB Cloudy W...

Страница 27: ...lue is from EV 2 0 to EV 2 0 ISO The ISO function allows you to set the sensitivity of the camera sensor based on the brightness of the scene To improve the performance in darker environments a higher ISO value is required On the other hand a lower ISO value is needed when in bright conditions The ISO setting is only available when the camera is in the Manual mode Pictures at higher ISO will natur...

Страница 28: ... Mode Display Mode AUTO 1 2 3 4 5 6 7 8 9 10 11 12 13 14 8 15 16 17 18 19 20 21 8 1 Shooting Mode Icons Auto mode Manual mode ASCN mode Panorama mode Scene mode Stabilization mode Portrait mode 2 AF Mode Single AF Multi AF 3 Expo Metering Spot Center AiAE 4 Image Size 5 Image Quality ...

Страница 29: ...e Adjustable only in Manual mode 12 ISO Value Adjustable only in Manual mode 13 Histogram 14 Focus Frame 15 Continuous Shot 16 Face Detection 17 Picture Color Adjustable only in Manual mode 18 White Balance Adjustable only in Manual mode 19 Macro mode 20 Self timer Self time 2 sec Self time 10 sec 21 Flash Mode Flash Forced off Flash Forced flash Flash Red Eye Slow Synchro Flash Slow Synchro Flash...

Страница 30: ... 8 Memory Card Built in Memory 9 Battery Status 10 WT Ratio Displayed only when zoom is activated 11 Zoom Scale 12 Exposure Value 13 Recording Status Icon Recording standby Recording For optimal video shooting it is recommended that an SD card be used Shooting videos without an SD card may result in image noise and image jitter HD recording time is limited to below 29min AgfaPhoto OPTIMA 145 Durin...

Страница 31: ...6 7 9 10 11 13 12 8 1 Playback Mode icon 2 DPOF file 3 File protection 4 Picture Number 5 Memory Card Built in Memory 6 Battery Status 7 Image Zoom 8 Zoom Magnification Area Indicator 9 Field of view indicator 10 Memory Space this picture Total number of pictures 11 Recording Date and Time 12 OK PLAY 13 HDR ...

Страница 32: ...a steadily and aim at the subject The optimum scene mode will be identified automatically 3 Press the Shutter button halfway down to focus 4 Press the Shutter button all the way down to take the picture Icon Mode name Icon Mode name Landscape Mode Night Landscape Mode Portrait Mode Macro Mode Night Portrait Auto Mode Backlit Portrait Landscape Mode For landscapes ASCN will automatically adjust the...

Страница 33: ...ait When the sun or any other light source is behind you ASCN will automatically adjust the foreground exposure to produce good pictures Night Landscape Mode For night scenes ASCN will automatically increase the ISO value to compensate for low light Macro Mode To capture fine detail for close ups ASCN will automatically adjust the focus Auto Mode The camera will automatically adjusts the exposure ...

Страница 34: ...ight stitching after 2 seconds 3 After the first shot is taken two target icons will appear on the left and right side of the LCD screen Pan the camera and the circle icon on the screen will move towards the square frame icon When the circle icon and square frame become green after overlapping the camera will capture the next picture automatically Repeat the same step for the third picture to fini...

Страница 35: ... the Mode button and use the Left Right button to enter the Scene Selection mode menu then press the button to enter the Scene Selection mode The following image will appear on the LCD screen Manual Scene Mode SCN Select a scene using the Up Down Left Right button and press the button Icon Mode Name Icon Mode Name Landscape Sport Beach Sunset Fireworks Night Landscape Night Portrait Gathering Chil...

Страница 36: ...tacular images The use of a tripod is recommended Night landscape For night scenes The use of tripod is recommended Night portrait For portraits against night scenery Gathering For taking pictures of large groups or in areas with uneven lighting Children For children and pets Flash is disabled for eye protection Indoor For indoors Reduce blur and improve color accuracy Snow For snow scenes Reprodu...

Страница 37: ...mage quality and image size Please refer to the Advanced Functions Menu section on page 21 for detailed instructions Travel shooting Produces background image blur that emphasizes the motion of the main subject Text For capturing documents printed material and presentation boards Leaf For plants Capture brilliant shots of greenery and blossoms Glass For objects behind transparent glass Fish eye Cr...

Страница 38: ...slow shutter speed Press the Mode button and use the Left Right button to select Stabilization mode then press the button to enter Stabilization mode Use stabilization mode in dark environments or when using a slow shutter speed Shooting in a windy or unstable environment such as a moving vehicle may cause blurred images Stabilization mode ...

Страница 39: ...atically detect faces and display a rectangular focus frame around them The focus frame will turn green to indicate that the face or faces are in focus Press the shutter button the rest of the way to take the picture Blink Detection is enabled automatically under normal shooting conditions When shooting if a human face is detected with closed eyes the blink detection icon will appear on the screen...

Страница 40: ...croll through the photos or video clips stored in the internal memory or memory card 3 To play a selected video clip press the button to enter the movie playback mode During video playback the operating instructions will ap pear on the screen Press the Left Right button and press the button for confirmation 1 2 3 4 5 6 The operating instruction icons are as follows 1 Return to the first frame and ...

Страница 41: ...AgfaPhoto OPTIMA 108 OPTIMA 145 38 AgfaPhoto OPTIMA 108 OPTIMA 145 When playing a stored video press the Up Down arrow button to adjust the playback volume Press and hold the Down button to mute the volume ...

Страница 42: ...is currently being displayed When in Playback mode press the to display thumbnail images of photos and videos on the screen 1 Use the Zoom button to switch between 3x3 4x4 and the Date Folder thumbnail display 2 When displaying 3x3 and 4x4 thumbnails use the Up Down Left Right button to select a picture or video for viewing press the button to return to the original size 3 When displaying date fol...

Страница 43: ...utton to enter the Playback mode 2 Use the Left Right navigation buttons to select a photo to magnify 3 Press one end of the Zoom button to zoom in 4 Use the Zoom buttons to zoom in and out The zoom magnification area scale and the total photo area scale will display on the screen 5 Use the navigation buttons to pan across the image 6 Press the button to return the image to its original size Movie...

Страница 44: ... videos 1 Press the button to enter the Playback Mode 2 Select a picture or video clip you want to delete with the Left Right button 3 Press the Down Delete button and the delete screen will appear 4 Select Yes or Back with the Up Down button and press the button to confirm the setting Erased photos video clips cannot be recovered Please refer to page 52 for instructions on the Delete Menu options...

Страница 45: ...ss the Down button 2 Press the Up Down buttons to select the function 3 Press the or Right button to go to the submenu 4 Press Up Down button to select an option or press Left button to return to the menu 5 Press the button to confirm the setting and return to the previous page After selecting a function you can press the Up button to return to the Still Picture menu for other Photo Setup or Camer...

Страница 46: ...pears on the center of the LCD screen to focus on the subject Multi AF The camera will focus correctly on multiple parts of the object AF assist Beam This option can turn the AF assist on or off The AF assist can improve focusing when the camera is in a dark environ ment In low light conditions it is not recommended to turn off the AF assist lamp otherwise the camera may not focus correctly ...

Страница 47: ...tering Use this setting to select the size of the area for the exposure to be obtained Three options are available Spot Center AiAE Artificial Intelligence AE Continuous AF After Continuous AF is turned on the camera will adjust focus automatically in response to any camera or subject movement ...

Страница 48: ... flash is dissabled in this mode in order to enable quick succession of shots Smile Detection With the camera s new Smile Detection feature which automatically detects and captures a person smiling you ll never miss a smile 1 When smile detection is enabled the icon will display on the LCD screen 2 Point the camera towards the subject when the camera identifies a human face a white focusing frame ...

Страница 49: ...ital zoom function When disabled only the optical zoom is enabled Slow Shutter Use the Slow shutter mode to c ontrol over the duration of the exposure The slow shutter mode is available only in manual mode Manual To take a long exposure time between 2 30 sec The use of tripod is recommended when using prolonged exposure times ...

Страница 50: ...nt Include a Date Time stamp in the photo image Off Date Date Time Quick Review This setting refers to the brief photo review immediately after taking a picture The picture stays on the LCD screen for an adjustable period of time Four options are available Off 1 sec 2 sec 3 sec ...

Страница 51: ...p pages using the Left Right button select the page with the function you want to adjust and press the Down button 2 Press the Up Down arrow button to select the function to be set and press the or Right button to enter the submenu 3 Press Up Down button to select an option or press Left button to return to the menu 4 Press the button to confirm the setting and return to the previous page Refer to...

Страница 52: ... AF When Continuous AF is turned on the camera will adjust focus automatically in response to any camera or subject movement Expo Metering Exposure Metering Set the metering mode for various lighting conditions Three options are available Spot Center AiAE Artificial Intelligence AE ...

Страница 53: ...50 AgfaPhoto OPTIMA 108 OPTIMA 145 50 AgfaPhoto OPTIMA 108 OPTIMA 145 DIS Using this function will ensure maximum stability of the screen when recording ...

Страница 54: ...se refer to the following sections for detailed instructions on the various menu options Protect To prevent any pictures or videos from being accidentally erased use this setting to lock one or all of the files To protect unprotect a picture or video 1 Use the Up Down arrow button and select Protect then press the or Right button to enter the submenu ...

Страница 55: ...ect to unlock them then press the Up Down button and select Back to return to the playback menu 4 A key icon will appear on the top of the screen to indicate that the picture video is protected Selecting reset will unprotect all previously protected photos and videos Delete There are two ways to delete files Delete One 1 In the Delete Option select One and then press the button 2 Using the Left Ri...

Страница 56: ... to confirm then press the Up Down button to select item Yes to delete the file or Cancel to return to the menu and then press to confirm The indicator means a file is protected File protection must be removed first before a file can be deleted Deleting files will cause the DPOF settings to be reset DPOF Digital Print Order Format DPOF allows you to define a selection of pictures that you want to ...

Страница 57: ...icture and video cannot be rotated Revolved file will replace the original one Resize This setting allows you to resize a picture to a specified resolution and saves it as a new picture 1 Select the Resize setting from the Playback menu as described previously 2 Use the Left Right navigation buttons to select a picture to resize 3 Use the Up Down navigation buttons to select a resolution 1024X768 ...

Страница 58: ...s possible and the eyes should be as large as possible If there is no red eyes in the image press button after selecting Yes such prompt will appear on the screen red eye is not detected Trim The Trim setting allows you select an area of the photo you want to keep and then save it as a new photo To trim a picture 1 Select the Trim setting from the menu 2 Using the Left Right buttons locate the pho...

Страница 59: ... to more accurately represent the actual scene 1 Select HDR setting in the menu as described previously 2 Press the Left and Right button to find a picture you want to optimize and then select Confirm to perform HDR optimization or select Return to go back to Playback menu 3 After HDR optimizing the image will be saved as another file with the icon as a prompt the original file will still remain i...

Страница 60: ...d pictures as a slideshow 1 Select Slide Show menu then press the or Right button to enter the slide show setup interface 2 Press the Up Down button to select playback effect playback interval or repeat interval and press the or Right button to enter and adjust settings press the button to confirm settings 3 Use the Up Down navigation buttons and select Start to run the slideshow or Cancel to retu...

Страница 61: ...e LCD screen 1 Press the Down button to select the Wallpaper Setting menu 2 Press the or Right button to enter the wallpaper setup interface Menu Wallpaper Use the Up Down button to select the Menu Wallpaper option Press the button to confirm the setting or press the Left button to return to the last page and press to exit the menu User AgfaPhoto Sparkling ...

Страница 62: ... select the Startup Screen option press to confirm or press the Left button to return to last page and press to exit the menu User AgfaPhoto Set back to default Use the Up Down button to select Back To Default press to confirm or press the Left button to return to last page and press to exit the menu Yes No ...

Страница 63: ...ress the Right button to enter the submenu After selecting a function option you can press the Up button to return to the menu for other Camera Setup pages Or you can press the Down button to switch to the next menu page Refer to the following pages for more details about each setting Beep Use this setting to adjust the beep volume when buttons are pressed and change the tones for Shutter button s...

Страница 64: ...ume and change tones and press the button to confirm the setting LCD Brightness Use this setting to adjust the brightness of your LCD screen 1 Select the LCD Brightness setting from the Setup menu as described previously 2 Select auto or adjust the brightness level by using the Left Right button and press the button to confirm the setting ...

Страница 65: ...selected item Both items have the following options LCD Off 30 sec 1 min 2 min and ON Camera Off 3 min 5 min 10 min and ON 4 Press the button to confirm Date Time See Setting the Date and Time section on page 16 World Time The World Time setting is a useful function on your overseas trips This feature enables you to display the local time on the LCD screen while you are overseas 1 Select the World...

Страница 66: ...e File and Software menu 2 Use the Up Down navigation buttons to select Yes or No Then press the button to confirm 3 The current media is formatted 4 Please note that when you perform the Format Memory function it only formats the active memory If a memory card is inserted the memory card is active and will be formatted If there is no memory card the internal memory is active and the internal memo...

Страница 67: ...y card When more than 999 images are on the memory card the use of this features will have no effect 1 Select the File Name in the File and Software menu 2 Select the option with the Up Down button and press the button for confirmation Copy to Card Copy internal memory to memory card Use this setting to copy the files stored in the internal memory to the memory card 1 Select the Copy to memory car...

Страница 68: ... Select FW Version in the File and Software menu 2 If SD card contains a new version of firmware please upgrade accordingly as necessary Reset Settings Use this setting to restore the camera to its default settings 1 Select Reset settings in the File and Software menu 2 Use the Up Down navigation buttons to select Yes or No Then press the button to confirm ...

Страница 69: ... Canada Taiwan Japan etc PAL Europe Asia excluding Taiwan Oceania etc Note The TV output will not perform properly if an incorrect video system is selected Use this setting to configure your video system to your current area 1 Select the Video System in the Connection Setup menu 2 Use the Up Down navigation buttons to select NTSC or PAL Then press the button to confirm Video System Transmission ...

Страница 70: ...ons to select PC 3 Press the button to confirm the setting Transferring files to your PC The computer will automatically detect the camera as a removable drive Double click My Computer icon on the desktop to locate the removable drive and to copy the folders and files in the drive to a directory on your PC as you would copy any typical folder or file By using the USB cable you can transfer the cap...

Страница 71: ...ector according to the displayed menu Macintosh Drag the untitled icon to the Trash Untitled 4 Disconnect the camera once the transfer is completed If the USB option is set to PC Turn the camera off and disconnect the USB cable If the USB option is set to PC PTP Remove the camera from the system as described below before turning the camera off and disconnecting the USB cable ...

Страница 72: ...12 1 Megapixels 14 1 Megapixels Image Sensor 12 2 Megapixels 1 2 3 CCD 14 4 Megapixels 1 2 3 CCD Lens Focal Length F 5 0mm Wide 25 0mm Tele 35mm film equivalent 28mm Wide 140mm Tele F number F3 5 Wide F5 2 Tele Construction 10 elements in 10 groups Optical Zoom 5X Focusing Range Normal Wide 60cm Tele 100cm Macro Wide 5cm Anti Handshake DIS Digital Zoom 6X digital zoom Combined Zoom 30X ...

Страница 73: ... 320x240pixels 30fps 15fps Image Compression Best Fine Normal DCF DPOF Ver1 1 Support Yes File Format Still Image Exif 2 2 JPEG Movie Quick Time Motion JPEG Audio G 711 Monaural Shooting Modes Auto mode Manual mode ASCN mode Scene mode Sport Indoor Snow Fireworks Museum Night Landscape Children Leaf Sunset Glass Landscape Night Portrait Beach Text Gathering ID Fish eye Travel shooting Photo frame ...

Страница 74: ...point AF Assist Light On Off Light Metering Method Artificial Intelligence AE AiAE Center weighted Average Spot Fixed to center of frame Exposure Control Method ProgramAE AE lock available Exposure Compensation 2 EV in 1 3 Step increments Shutter Speed 4 1 2000 second Manual 30 s Playback Modes Single Photo Index 9 16 thumbnails Slide Show Movie Slow Motion possible Zoom Approx 2X 8X Audio Histogr...

Страница 75: ...2 7m Recording Media Internal Memory 64MB SD Card SDHC Card Up to 32GB support Other Features ExifPrint Support Multi language Support Jacks USB2 0 1 AV OUT Integrated Proprietary Connector Power Rechargeable Lithium ion Battery D016 3 7V 700mAh Shooting Capability Battery Performance Approx 220 shots based on CIPA Standards Operation Environment Temperature 0 40oC Humidity 0 90 Dimensions W x H x...

Страница 76: ... is not captured correctly The picture is corrupted No picture There are no images in the memory card or in the internal memory Lens error The lens is probably stuck and the camera will power off automatically System error Unexpected error encountered Write protect The write protection switch in the memory card is set to the LOCK position Out of the range When pictures were taken in Panorama mode ...

Страница 77: ...rning Camera recording please wait No other actions allowed to perform during video audio recording Warning Battery exhausted The battery is out of charge This file cannot be played back The picture format cannot be recognized by the camera No connection The camera is not connected to the printer correctly Print error There is a problem with camera or printer Cannot print Check that the printer is...

Страница 78: ...s blurred The lens is dirty appears when taking pictures Use a soft cloth to clean the lens on your camera Use the Image Stabilization mode Images and video files cannot be saved The memory card is full Replace the memory card with a new one Delete unwanted images Unlock the memory card No picture is taken when pressing the Shutter button The memory card is full No available space to store the fil...

Страница 79: ...ion interruption phenomenon in the memory card such as due to too slow storage etc leads that you can not continue to shoot or record Please replace a memory card Please shoot again Too many movies to process The number of pictures or binders in the memory card exceeded the specifications so the playback of data folder can not be displayed Delete needless files Transfer the files in the memory car...

Страница 80: ...port apdc plawa com Manufactured by plawa feinwerktechnik GmbH Co KG Bleichereistraße 18 73066 Uhingen Germany AgfaPhoto is used under license of Agfa Gevaert NV Co KG or Agfa Gevaert NV Neither Agfa Gevaert NV Co KG nor Agfa Gevaert NV manufacture this product or provide any product warranty or support For service support and warranty information contact the distributor or manufac turer All other...

Страница 81: ...rt and warranty information contact the distributor or manufacturer For service support and warranty information contact the distributor or manufacturer All other brands and product names are registered trademarks of their respective owners Product design and technical features can be changed without notice AgfaPhoto Holding GmbH www agfaphoto com Manufactured by plawa feinwerktechnik GmbH Co KG w...

Отзывы: