background image


14 

Display 

Title 

Description 


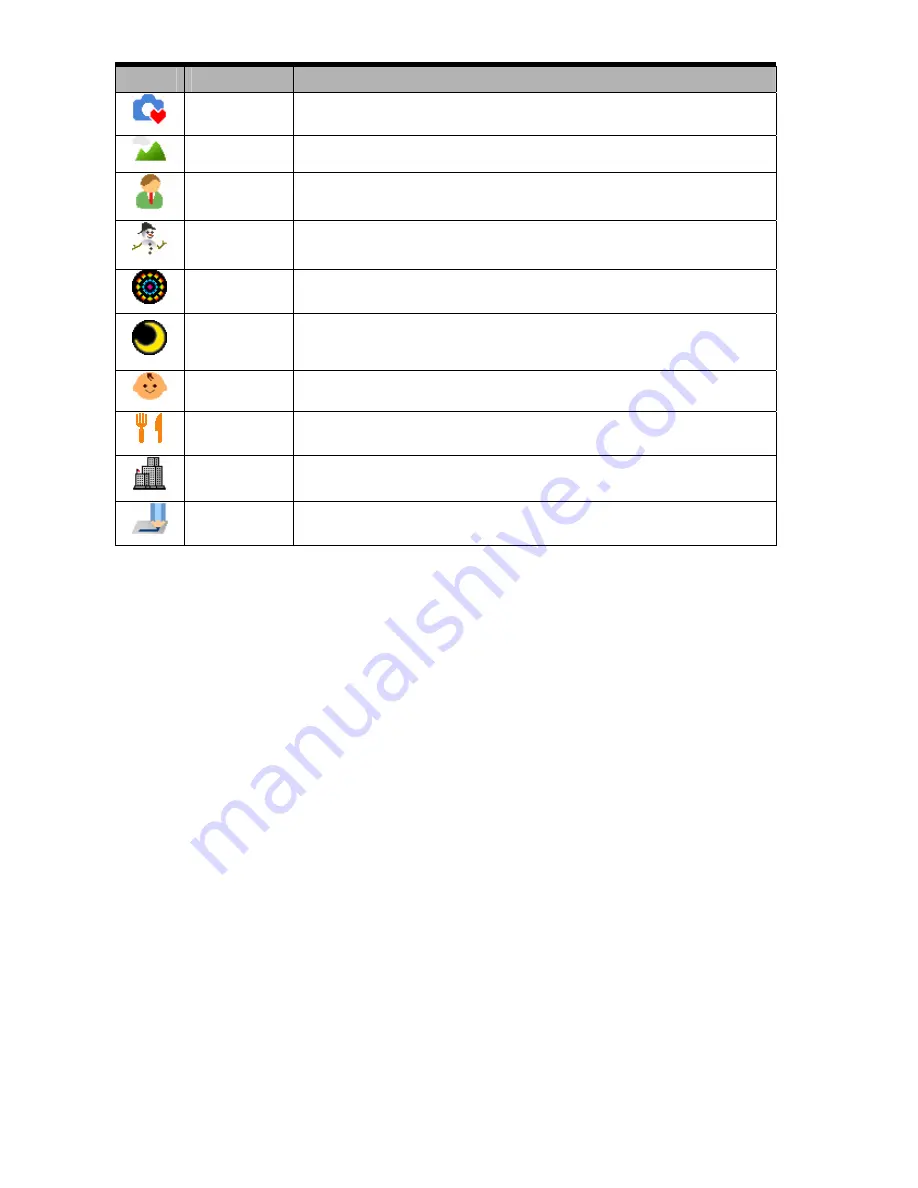
Q Mode 

Allows beginners to take pictures easily. 


Landscape 

Used for the wide scenic views. 


Portrait 

Blurring the background to focus on the subject. 


Snow 

Used for the beach or snow scenes. 


Fireworks 

Slow shutter speed to take fireworks exploding. 


Night Scene 

Shooting the subject while keeping the background night 

scenery. 


Kids 

Take a still image to capture moving kids. 


Food 

Higher saturation makes food more appetizing. 


Building 

Enhance the edges of the subject. 


Text 

Enhance the black & white contrast. 


Содержание DC-733i

Страница 1: ......

Страница 2: ...to take it apart This will invalidate all guarantee claims Using your batteries For best performance and prolonged battery life we recommend the use of AA lithium or rechargeable NiMH batteries Extending battery life The following functions use up a great deal of battery power and should therefore only be used occasionally Excessive use of flash Editing images on the camera display The battery lif...

Страница 3: ...15 of the FCC Rules Operation is subject to the following two conditions 1 this device may not cause harmful interference and 2 this device must accept any interference received including interference that may cause unsatisfactory operation This equipment has been tested and found to comply with the limits for a Class B peripheral pursuant to Part 15 of the FCC Rules These limits are designed to p...

Страница 4: ...TION AND QUALITY 21 USING THE ZOOM FUNCTION 22 USING THE FLASH 23 USING THE MACRO 24 USING THE SELF TIMER BURST 25 RECORDING MOVIE CLIPS 26 SETTING THE MOVIE SIZE 26 RECORDING AUDIO CLIPS 27 PLAYING BACK AUDIO CLIPS 27 RECORDING A VOICE MEMO 28 PLAYING BACK A VOICE MEMO 28 OTHER RECORDING FUNCTIONS 29 SETTING THE METERING 29 SETTING THE WHITE BALANCE 29 SETTING THE ISO 30 SETTING THE EXPOSURE 30 S...

Страница 5: ...HE CAMERA TO A COMPUTER WITH THE USB CABLE 44 SOFTWARE INSTALLATION 45 SYSTEM REQUIREMENTS 45 INSTALLING THE SOFTWARE 46 INSTALLING THE SOFTWARE DRIVER 47 INSTALLING ULEAD PHOTO EXPLORER 8 SE BASIC 47 INSTALLING VIDEOSTUDIO 7 SE VCD 48 USING THE SOFTWARE 48 APPENDIX 49 ABOUT THE FOLDER FILE NAME 49 FOLDER STRUCTURE 49 FILE NAMING 49 TROUBLESHOOTING 50 FUNCTION AVAILABLE LIST 51 SPECIFICATIONS 53 ...

Страница 6: ...ayback delete and edit functions of still images movies and audio files Making Connections This section tells you how to connect this camera to a computer or TV Software Installation This section tells you how to install the software that comes in CD ROM Appendix This section describes the troubleshooting and the camera specification The meanings of the symbols used in this user s manual are expla...

Страница 7: ...ble AV cable Carring case Hand strap 2 x AA batteries Software Installation CD ROM User s manual Attaching the Hand Strap Attach the hand strap to your camera as shown y Do not swing the camera around by the strap C Ca au ut ti io on n ...

Страница 8: ...mer Lamp 2 Flash 3 Microphone 4 Lens 5 LCD Monitor 6 Operation Lamp 7 Zoom Button See also y Thumbnail y Playback Zoom 8 Playback Button 9 Menu Button 10 Mode Button 11 Delete Button 12 Flash Button 13 SET DISP Button 14 Macro Button ...

Страница 9: ...4 15 Strap Ring 16 Shutter Button 17 Power Button 18 Speaker 19 USB AV Terminal 20 Tripod Socket 21 Battery Cover ...

Страница 10: ...eries should be replaced promptly when the low battery indicator appears y Risk of explosion if battery is replaced by an incorrect type dispose of used batteries according to the instructions y Be sure to turn off the camera power before insert or remove batteries y Use only Alkaline or NiMH battery to power this camera Use of any other type battery is not recommended y Replace all batteries at t...

Страница 11: ...t or remove the card while the camera is power on it may be damages the card or data y Do not touch the connection terminals on the back side of the card About Camera Memory This camera is equipped with internal memory If the memory card is not inserted in the camera all images and movie clips recorded by the camera will be stored in the internal memory If the memory card is inserted images and mo...

Страница 12: ...re using the camera Setting the Display Language Turn the power on and set the camera to the Setup Menu page 16 Select Language y Press or to select LANGUAGE then press or the SET button to launch the submenu Select a language y Press or to select a language and press or the SET button to apply the setting Press the MENU button to close the menu 1 3 2 4 ...

Страница 13: ...he value of the cursor located Press or to move the cursor between settings y Holding down or changes the values continuously y For date stamp setting page 31 Apply the setting y After adjusting the settings press the SET or the MENU button to apply the setting y If the batteries are removed for about two days the Date Time setting will be lost In this case make these settings again 1 2 3 4 T Ti i...

Страница 14: ...ding mode page 13 12 Shake warning page 19 2 Flash page 23 13 Shutter speed page 19 3 Zoom indicator page 22 14 Aperture value page 19 4 Shots remaining 15 Exposure page 30 5 Storage media 16 Metering page 29 6 Macro page 24 17 ISO page 30 7 Self timer Burst page 25 18 White balance page 29 8 AEB page 30 19 Sharpness page 31 9 Date stamp page 31 20 Quality page 21 10 Battery page 5 21 Resolution p...

Страница 15: ...ed date time 3 Voice memo page 28 9 Voice memo control page 28 4 File number Total 10 DPOF page 41 5 Storage media 11 Resolution page 21 6 Recording info page 11 y Some information may not display correctly if you display images captured by other camera model C Ca au ut ti io on n ...

Страница 16: ...ing images PLAY mode D Full OSD E Basic OSD y You cannot change the LCD status in the following situation Recording movie clips or audio files Playing movie clips or audio files Playing the slideshow Viewing in thumbnail Trimming a still image y When the LCD status is not in OSD on press Macro or Flash will change the display mode to OSD on automatically C Ca au ut ti io on n T Ti ip ps s ...

Страница 17: ... 5 seconds y Switch between REC mode and PLAY mode page 13 Power Saving Function For saving the battery power the LCD monitor automatically turns off 1 minute after the last control accessed factory preset setting Press any button other than the power button to turn on the LCD monitor You can change the power save setting in Setup menu page 17 After the power saving function has been active for 1 ...

Страница 18: ... the REC mode Set the camera to the REC mode page 13 Launch the mode palette y Press the MODE button o to show the scene mode palette Select a mode y Use the four way control to select a desired mode and press the SET button to confirm the setting Display Title Description Program The camera makes settings suitable for the shooting conditions Movie For recording movie clips Voice REC For recording...

Страница 19: ...n the subject Snow Used for the beach or snow scenes Fireworks Slow shutter speed to take fireworks exploding Night Scene Shooting the subject while keeping the background night scenery Kids Take a still image to capture moving kids Food Higher saturation makes food more appetizing Building Enhance the edges of the subject Text Enhance the black white contrast ...

Страница 20: ...the menu Select an item y Press or o to select a menu item Change the setting y Press or o to change the setting Press the MENU n or the SET o button to save the settings and close the menu REC menu list Still Image Menu Item Available Setting Page Resolution 21 Quality 21 Metering 29 White Balance Auto 29 ISO Auto 30 Exposure 30 Drive Mode Off 25 AEB Off 30 Highlight Off 30 Sharpness 31 Effect Of...

Страница 21: ...C or PLAY menu y The menu displays depends on whether you are in the REC mode or the PLAY mode Open the Setup menu y Press four way control o to select SETUP and then press the SET o button to display the Setup menu Select an item y Press or o to select a menu item and then press or the SET o button to launch the submenu Change the setting y Press or o to select an option and press or the SET o bu...

Страница 22: ...te Time Sets the date time page 8 Select a language for display menus and other information from the following 19 languages page 7 Language English English Deutsch German Italiano Italian Nederlands Dutch Magyar Hungarian Türk Turkish Svenska Swedish ﺮﺑﻲ ﻋ Arabic 한국어 Korean 繁體中文 T Chinese Español Spanish Français French Português Portuguese Čestina Czech Polski Polish Русский Russian Ελληνικά Gree...

Страница 23: ...tored in the internal memory if there is no card inserted y A BUSY PLEASE WAIT message displays and the memory card is starting format y A COMPLETED message displays when finish formatting y All data will be deleted including protected files Be sure to download important files to your computer before formatting To ensure the camera displays battery level correctly set the type to match the batteri...

Страница 24: ... becomes green while in focus then shutter speed o aperture value p and ISO value q are displayed y If the shutter speed is slow or the possibility that image may be blurred the shake warning icon may appear on the LCD monitor To avoid it use a tripod to stabilize the camera when recording images Take a picture y Press the shutter button fully to take a picture y Make sure that your fingers or the...

Страница 25: ... 3M 1M VGA Drive Mode Off 2 sec 10 sec Double Burst Beep Off On Menu Auto Review Off 3 sec 5 sec Rest of settings will not be controlled as below y Quality S Fine y Highlight Off y Metering Multi y Sharpness Normal y White balance Auto y Effect Off y ISO Auto y Date Stamp Date Time y Exposure Auto y Digital Zoom Off Fixed setting y AEB Off y Shutter sound y File No y Start up sound y TV out y Powe...

Страница 26: ...pose For detail operation see page 15 Resolution Values Image Size Print Size 3072 x 2304 3072 x 2048 Printing larger than A4 size 3072 x 1728 2560 x 1920 2048 x 1536 1024 x 768 640 x 480 Printing to postcards or attaching to e mail Larger Smaller Quality Values Compression Purpose Super Fine Shoot higher quality images Fine Shoot normal quality images Normal Shoot for more images Higher Quality L...

Страница 27: ...e the image W zoom out for a wide angle shot T zoom in for a telephoto shot y When the zoom button is pressed the zoom bar appears on the LCD monitor y When the optical zoom o factor is at maximum zooming stops temporarily Press the T again the camera switches to the digital zoom p automatically and zooming continues y The digital zoom p will not activate in movie recording Press shutter button to...

Страница 28: ...n is pressed the flash icon o changes Auto flash Flash fires automatically when shooting conditions require extra lighting Red eye reduction Flash strobes to let the subject s eyes adjust to the flash then fires again to take the actual image Your camera will detect the subject brightness and use the flash only when required Force on Flash fires every time you take a photo regardless of lighting c...

Страница 29: ...when in the maximum wide angle zoomed out setting and 40 cm in the maximum telephoto zoomed in setting Turn the power on and set the camera to the REC mode page 13 Press the macro button n enters the macro mode y The macro icon o displays in the LCD monitor y To leave the macro mode press the macro button n again Press shutter button to take a picture y Distances referred to measure the distance b...

Страница 30: ...ect a drive mode then press the SET button Off Record a single image 2 sec The shutter release will be delay for 2 seconds 10 sec The shutter release will be delay for 10 seconds Double Record two images in a shot after pressing the shutter release button 10 and 12 seconds Burst Keep pressing the shutter button fully to take a continuous shooting Release the shutter button to stop shooting Press s...

Страница 31: ... o to adjust the image size y The White Balance is set and locked to the settings of the first frame y Sound cannot be recorded while pressing the zoom button y The digital zoom cannot be used in Movie mode Finish recording y Press the shutter again to end recording y The camera will stop recording automatically when the memory capacity has been reached Setting the Movie Size Movie Size and Frame ...

Страница 32: ...ding Press the shutter button again to end recording y The camera will stop recording automatically when the memory capacity has been reached Playing Back Audio Clips Turn the power on and set the camera to the PLAY mode page 13 Press or to select the audio clip that you want to playback Start playing back y Press to start playing the audio clip y Press to stop the audio clip or press to pause it ...

Страница 33: ...and press the SET button Press the SET button to start recording for 30 seconds y Press the SET button again to end recording y The voice memo cannot be added to a movie clip or a protected image y You cannot delete only the voice memo When you delete the image the attached voice memo is also deleted Playing Back a Voice Memo Turn the power on and set the camera to the PLAY mode page 13 Press or t...

Страница 34: ...tion Description Automatically corrects white balance Ideal for general photography Adjusts for bright sun conditions or natural light conditions Adjusts for cloudy days or twilight conditions Adjusts for normal indoor lighting conditions Corrects the orange hue of household light bulbs Ideal for indoor photos under tungsten or halogen lighting without a flash Adjusts for fluorescent lighting Corr...

Страница 35: ...alent y Higher ISO speeds increase the image noise To take clean images use as low an ISO speed as possible Setting the Exposure Set the exposure value manually to compensate for unusual lighting conditions such as indirect indoor lighting dark backgrounds and strong backlighting Setting the AEB Sets the auto exposure bracketing AEB to shoots 3 continuous images each with a different exposure sett...

Страница 36: ...Record mode or in Playback mode Option Description Off No effect is added to the image B W Convert image to black white Sepia Recorded image will be stored in a sepia tone Negative Opposite what they were in the original image Mosaic Add mosaic tiles to the images Red The image becomes reddish Green The image becomes greenish Blue The image becomes bluish Setting Date Stamp The Date Stamp function...

Страница 37: ...ls images in a high speed Playing Back Movie Clips Turn the power on and set the camera to the PLAY mode page 13 Press or to select a movie clip that you want to playback Start playing back y Press to start playing the movie clip y Press to stop the movie clip or press to pause it When the movie paused press again to resume y During movie playing back press to fast forward or press to rewind it y ...

Страница 38: ...d and trimmed Magnify the image y Press T n to magnify the image and the central portion of the image is displayed You can use the arrow button p to view different parts of the magnified image y Press the MENU button o to return to the normal size Trim the image y Press the SET button p to set the image trimming Save the image y Press the SET button p again to trim the selected image and save it a...

Страница 39: ...how Turn the power on and set the camera to the PLAY mode page 13 Enter the slide show y Press the MENU button n use the four way control o to select Slide Show and press the SET button o Change the slide show settings y Use the four way control o to set the slideshow interval music effect and repeat y You can set the interval between 1 10 seconds Playing the slide show y Press the SET button o to...

Страница 40: ...SINGLE and then press the SET button o Press or o to select the image you want to delete Press the SET button o to delete the image y Repeat step 4 5 to delete images y To quickly delete the current display image 1 Select the image you want to delete 2 Press the Delete button p to show a confirmation 3 Press the SET button o to delete the current display image y Protected images cannot be deleted ...

Страница 41: ...on toggles the on and off Repeat this step until all images that you want to delete are displayed with an icon Delete images y Press the MENU button then select Yes and press the SET button All selected images will be deleted y To cancel delete press the MENU button in this step Deleting All Files Turn the power on and set the camera to the PLAY mode page 13 Open the menu y Press the MENU button t...

Страница 42: ...ocked the displays on the LCD monitor y Repeat step 4 5 to protect images y To unlock the file press the SET button again in step 5 The will disappear and the file is unlocked Protecting All Files Turn the power on and set the camera to the PLAY mode page 13 Open the menu y Press the MENU button then use the four way control to select Protect and press the SET button y You can open the menu in ful...

Страница 43: ...the SET button y The frame of the selected image turns green Select multiple images y Use the four way control to select the image y Press the SET button toggles the on and off Repeat this step until all images that you want to protect are displayed with an icon Protect images y Press the MENU button then select Yes and press the SET button All selected images will be protected y To cancel protect...

Страница 44: ...egrees in clockwise Press or to select OK and then press the SET button to finish rotating Changing the Image Size Turn the power on and set the camera to the PLAY mode page 13 Press or to select the image you want to resize Open the menu y Press the MENU button then use the four way control to select Resize and press the SET button Press or to select an option and then press the SET button y The ...

Страница 45: ... camera s internal memory to the memory card for convenience Be sure you had inserted a memory card to your digital camera Set the camera to the PLAY mode page 13 Open the menu y Press the MENU button then use the four way control to select Copy to card and press the SET button Press or to select Single then press the SET button y To copy all images to a memory card in a time select All in this st...

Страница 46: ...T button y To set the DPOF setting for all images in a time select All in this step y To reset all DPOF settings to initial default select Reset in this step Press or to select the image you want to print out then press the SET button Set the number of copies y Press or to specify the number of copies y The number of copies can be set from 0 to 30 y To cancel this image DPOF setting set the number...

Страница 47: ...age Completed appears Set the camera to the Setup Menu page 16 Press or to select Startup Image then press or the SET button Press or to select a desired option and press the SET button to apply the setting Off Disable the start up image System Use camera default image My image Use the image that you just specified in step 3 Press the MENU button to close the menu y The start up image will not be ...

Страница 48: ...18 Turn off the camera and the TV Use the supplied AV cable to connect the camera to the TV set Set the TV input signal to Video In y Refer to the documentation included with your TV for more information Display on TV y Everything that would normally appear on the camera s LCD screen such as photo and video clip playback slide shows and image or video capture appears on the TV 3 1 2 4 5 ...

Страница 49: ...rive icon that represents the memory card Copy images from the card into a directory of your choice on the computer s hard disk Connecting the Camera to a Computer with the USB Cable Install the USB software driver included with the bundled CD ROM Connect the supplied USB cable to the computer s USB port and turn on the camera y The LCD screen turns off when the connection to the computer has been...

Страница 50: ...nimum 32 MB RAM y USB port y CD ROM drive y 800x600 pixels 16 bit color display compatible monitor y Power Mac G3 or later y Mac OS 9 0 9 1 9 2 and OS X y Minimum 64 MB RAM y USB port y CD ROM drive y 800x600 pixels 16 bit color display compatible monitor Specifications are subject to change without prior notice Windows Macintosh ...

Страница 51: ...d installs the Adobe Acrobat Reader which enables you to read documents in PDF format y User Manual Opens this user manual y Drivers Installs camera drivers for Windows 98 98SE ME 2000 XP y Browse CD Opens Windows Explorer and enables you to view the contents of the driver and software CD Click the items in the autorun menu to install the software y If the autorun menu does not appear automaticall...

Страница 52: ...on screen instructions to install the drivers Installing Ulead Photo Explorer 8 SE Basic Ulead Photo Explorer 8 SE Basic is a Photo management application that is included on the software installation CD ROM This software requires Windows 98 Second Edition Windows ME Windows 2000 or Windows XP on your computer Install the included software installation CD Rom in you computer s CD ROM drive The aut...

Страница 53: ...vides an efficient way to transfer browse modify and distribute digital media Ulead Photo Explorer 8 0 SE Basic enables you to acquire photos and video or sound clips from various digital devices make modifications send digital media through e mail print photos create slideshow presentations burn your images onto CD or DVD To start the program click Start Programs Ulead Photo Explorer 8 0 SE Basic...

Страница 54: ... begins with DSCI and are followed by a 4 digit number that increases in sequence File numbering starts from 0001 when a new folder is created If the highest folder number is 999 and highest file number exceeds 9999 the camera will display the warning message Folder cannot be created When it appears try one of the following ways y Reset the file number and plug in a new memory card y The folder nu...

Страница 55: ...lash to any mode except off The camera was moving when the image was captured Hold the camera steady when shooting picture Image is blurry or out of focus The subject was beyond the range within which the camera can focus Turn the Macro mode on it the subject is within 15 cm zoom out or 40 cm zoom in Do not use Macro mode when shooting distant subjects Image is not displayed on the LCD monitor A m...

Страница 56: ...z Auto 3 z z z Red eye z z Force on z Slow sync z Button Flash Force off z z z z 7M 3 3 2 16 9 5M 3M 1M Resolution VGA 640 320 3 Movie Size 160 S Fine z Fine 3 Quality Normal Center Multi 3 z z z z z z z z z z z Metering Spot z Auto 3 z z z z z z z z z z z z Daylight Cloudy Tungsten Fluor_H Fluor_L WB Custom Menu ISO Auto 3 z z z z z z z z z z z Mode Function ...

Страница 57: ...z z z z z z z z z Type 1 Type 2 Highlight Type 3 Hard z z z Normal 3 z z z z z z z z z Sharpness Soft Off z z z z z z z z z z z z z B W Sepia Negative Red Green Effect Blue Off 3 Date Date Stamp Date Time z Off z Menu Digital Zoom On 3 3 Factory setting z Default Available Not available Setting is retained even after mode switch or power off Set to OFF after power off Mode Function ...

Страница 58: ...ng Sensitivity Auto ISO 50 ISO 100 ISO 200 ISO 400 White Balance Auto Daylight Cloudy Tungsten Fluorescent H Fluorescent L Custom Exposure Control 2EV to 2EV in 1 3 step Metering Center weighted Multi Spot Burst Depends on the capacity of the memory no limit Self timer 2 sec 10 sec Double Flash Auto Red eye reduction Always on Slow sync Always off Photo Effect Black White Sepia Negative Art Mosaic...

Страница 59: ...e Repair Hotline EU 00800 752 921 00 from a landline only Service Support Hotline Germany 0900 1000 042 1 49 Euro min from a German landline only Online Service support apdc plawa com Manufactured by plawa feinwerktechnik GmbH Co KG plawa feinwerktechnik GmbH Co KG Bleichereistr 18 73066 Uhingen Germany ...

Страница 60: ...nformation about where you can drop off your waste equipment for recycling please contact your local city office your household waste disposal service or the shop where you purchased the product Declaration of Conformity We herewith confirm the following designated product DC 733i has been tested and found to comply with the requirements set up in the council directive on the approximation of the ...

Отзывы: