background image

69

APPENDIX

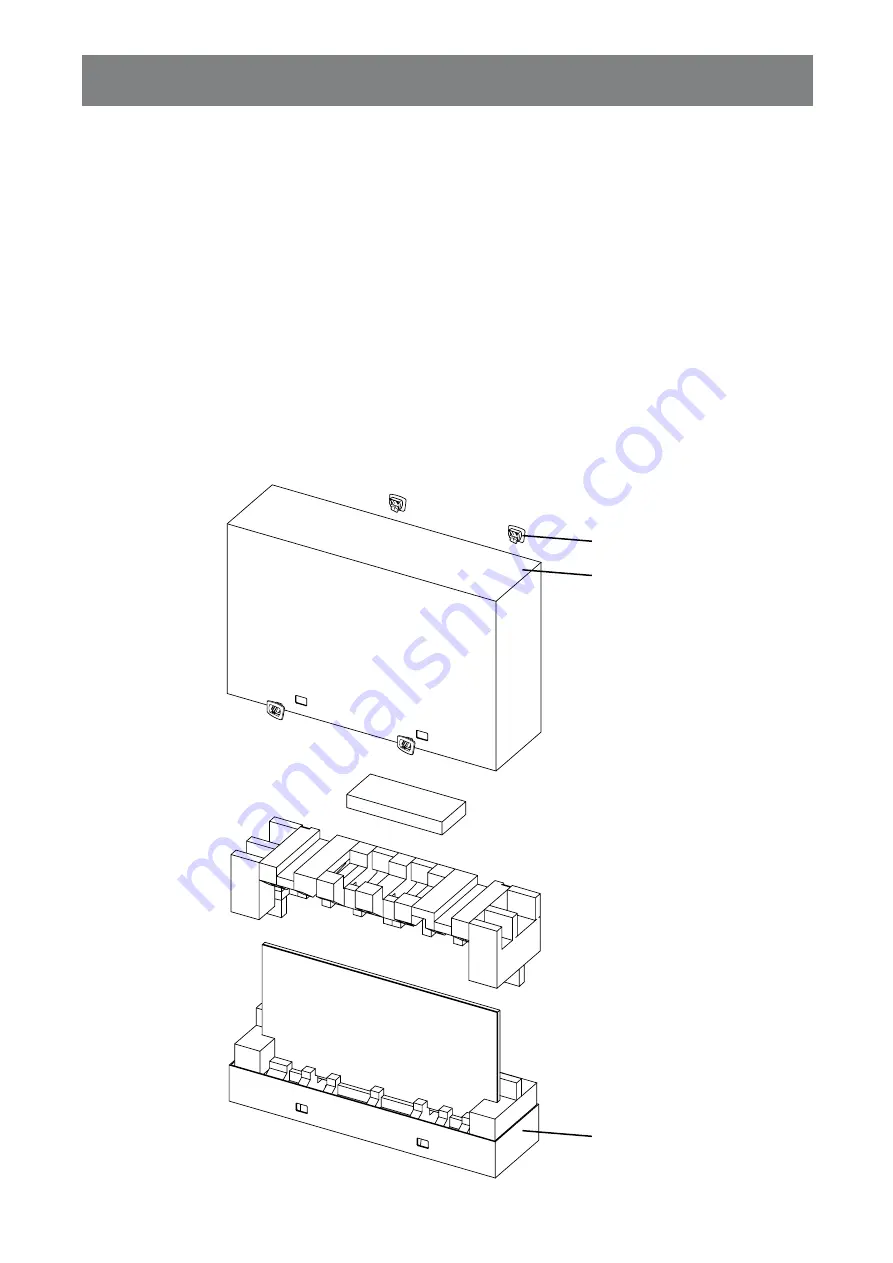
6.6 Transporting the LCD Display

To transport the LCD display for repair or shipment, place the display in its original packaging carton.

1

  Put all the accessories in the box (if necessary). 

2

  Place the lower foam cushion inside the lower box (a).

3

  Place the LCD display down in the lower box (a).

4

  Place the upper foam cushion on top of the LCD display.

5

  Place the accessories box on the designated area (if necessary).

6

  Place the upper box (b) on LCD display.

7

  Secure the upper box to the lower box with the supplied locks (c).

a

b

c

Содержание PN Series

Страница 1: ...displays agneovo com PN 55D PN 55H LED Backlit Display User Manual ...

Страница 2: ...ents 11 1 2 Preparing for the Installation 12 1 3 Installing and Removing Table Stands optional 12 1 4 Wall Mounting Installation 13 1 4 1 VESA Grid 13 1 4 2 Ventilation Requirements for Enclosure Locating 14 1 5 Mounting in Portrait Position 14 1 6 LCD Display Overview 15 1 6 1 Control Panel 15 1 6 2 Input Output Terminals 16 1 7 Remote Control 18 1 7 1 General Functions 18 1 7 2 ID Remote Contro...

Страница 3: ...PLAY 31 3 1 Turning on the Power 31 3 2 Selecting the Input Source Signal 31 3 3 Adjusting the Volume 32 3 4 Changing the Picture Format 32 3 5 Choosing Your Preferred Picture Settings 33 3 6 Choosing Your Preferred Sound Settings 33 3 7 Playing Multimedia Files via Local Area Network 34 3 7 1 Set Up the Network 34 3 7 2 How to Use DLNA DMP 35 3 7 3 How to Use DLNA DMR from PC 36 3 8 Playing Multi...

Страница 4: ...ges 62 6 2 USB Device Compatibility 63 6 3 Supported Resolution 66 6 4 Cleaning 67 6 5 Troubleshooting 68 6 6 Transporting the LCD Display 69 CHAPTER 7 SPECIFICATIONS 70 7 1 Display Specifications 70 7 2 Display Dimensions 71 7 2 1 PN 55D PN 55H Dimensions 71 ...

Страница 5: ... or relocate the receiving antenna Increase the separation between the equipment and receiver Connect the equipment into an outlet on a circuit different from that to which the receiver is connected Consult the dealer or an experienced radio TV technician for help Changes or modifications not expressly approved by the party responsible for compliance could void the user s authority to operate the ...

Страница 6: ...ng conductor of the room s electrical installation should have a reserve short circuit protection device in the form of a fuse with a nominal value no larger than 16 amperes A To completely switch off the equipment the power supply cable must be removed from the power supply socket which should be located near the equipment and easily accessible A protection mark B confirms that the equipment is i...

Страница 7: ... with all applicable legal requirements and to stay well within the EMF standards applicable at the time of producing the products We are committed to develop produce and market products that cause no adverse health effects We confirm that if its products are handled properly for their intended use they are safe to use according to scientific evidence available today We play an active role in the ...

Страница 8: ... BS 1362 5A A S T A or BSI approved type 3 Refit the fuse cover If the fitted plug is not suitable for your socket outlets it should be cut off and an appropriate 3 pin plug fitted in its place If the mains plug contains a fuse this should have a value of 5A If a plug without a fuse is used the fuse at the distribution board should not be greater than 5A Note The severed plug must be destroyed to ...

Страница 9: ... with the letter L or coloured RED Before replacing the plug cover make certain that the cord grip is clamped over the sheath of the lead not simply over the three wires North Europe Nordic Countries Information Placering Ventilation VARNING FÖRSÄKRA DIG OM ATT HUVUDBRYTARE OCH UTTAG ÄR LÄTÅTKOMLIGA NÄR DU STÄLLER DIN UTRUSTNING PÅPLATS Placering Ventilation ADVARSEL SØRG VED PLACERINGEN FOR AT NE...

Страница 10: ...sal organization that serves your household or the store at which you purchased the product Attention users in United States Please dispose of according to all Local State and Federal Laws For the disposal or recycling information contact www mygreenelectronics com or www eiae org End of Life Directives Recycling Your new Public Information Display contains several materials that can be recycled f...

Страница 11: ...ery is to be returned to the selling point For other non EU countries Please contact your local authority for correct method of disposal of the used battery According to EU directive 2006 66 EC the battery can t be disposed improperly The battery shall be separated to collect by local service Turkey RoHS Türkiye Cumhuriyeti EEE Yönetmeliğine Uygundur Ukraine RoHS Обладнання відповідає вимогам Техн...

Страница 12: ...tect your rights as a consumer do not remove any stickers from the LCD display Doing so may affect the determination of the warranty period Cautions When Setting Up Do not place the LCD display near heat sources such as a heater exhaust vent or in direct sunlight Do not cover or block the ventilation holes in the housing Place the LCD display on a stable area Do not place the LCD display where it ...

Страница 13: ... wet hands When turning off the display by detaching the power cord wait 6 seconds before re attaching the power cord for normal operation Do not knock or drop the display during operation or transportation Cleaning and Maintenance To protect your display from possible damage do not put excessive pressure on the LCD panel When moving your display grasp the frame to lift do not lift the display by ...

Страница 14: ... display for extended periods of time It can be several hours or several days Use a screen saver and run it for extended periods of time Use a black and white image and run it for extended periods of time There are millions of micro transistors inside the LCD display It is normal for a few transistors to be damaged and to produce spots This is acceptable and is not considered a failure IMPORTANT A...

Страница 15: ...hain cable Remote control LCD Display RS232 cable Note Remote control is shipped with the supplied AAA batteries For all other regions apply a power cord that conforms to the AC voltage of the power socket and has been approved by and complies with the safety regulations of the particular country You might like to save the package box and packing material for shipping the display Video signal cabl...

Страница 16: ...e Stands optional To install table stands 1 Ensure your display is powered off 2 Spread a protective sheet on a flat surface 3 Grab the carrying handles and place the display face down on the protective sheet 4 After inserting the stand in the guide block tighten the screws on both sides of the display Note The longer side of the stand should face the front of the display To remove table stands 1 ...

Страница 17: ...llation location 400mm 400mm Note Avoid the wall mounting kit to block the ventilation holes on the back of the display Secure the LCD display on a solid wall strong enough to bear its weight Lay a protective sheet on a table which was wrapped around the display when it was packaged beneath the screen surface so as not to scratch the screen face Ensure you have all accessories for mounting this di...

Страница 18: ...low heat to disperse leave space between surrounding objects as shown in the diagram below 100 mm 100 mm 100 mm 100 mm 1 5 Mounting in Portrait Position This display can be installed in portrait position 1 Remove the table stand if attached 2 Rotate 90 degrees counter clockwise 90 90 ...

Страница 19: ...h the audio mute ON OFF Power Turn the display on or put the display to standby 1 8 7 6 4 3 2 Remote control sensor and power status indicator Receive command signals from the remote control Indicate the operating status of the display without OPS Lights green when the display is turned on Lights red when the display is in standby mode Lights amber when the display enters APM mode When SCHEDULE is...

Страница 20: ...remotely control your A V device via this display refer to page 29 for IR Pass Through connection 1 3 4 2 7 DVI IN DVI D video input Main power switch Switch the main power on off RS232C IN RS232C OUT RS232C network output input for the loop through function DisplayPort IN DisplayPort OUT DisplayPort video input output 1 2 3 4 5 6 7 8 9 10 12 13 14 15 16 11 17 18 19 20 21 22 10 5 6 VGA IN D Sub VG...

Страница 21: ... RCA 17 AUDIO OUT Audio output to external AV device 18 USB PORT Connect your USB storage device 19 EXT SPEAKER TERMINAL Audio output to external speakers 20 OPS SLOT Slot for installing the optional OPS module 21 SECURITY LOCK Used for security and theft prevention 22 ...

Страница 22: ...s Navigate through menus and choose items 7 OK Confirm an entry or selection 8 ADJUST Access currently available picture and sound menus 9 MUTE Turn the mute function on off 10 COLOR Red Press to play all songs in the playlist Green Press to sort the playlist Yellow Press to view the USB device Blue No function 11 Number ID SET ENTER Enter text for network setting Set the display ID Refer to 1 7 2...

Страница 23: ...splay you want to control For example Display ID 1 press 0 0 1 Display ID 11 press 0 1 1 The numbers available are from 001 255 Not pressing any button within 10 seconds will exit the ID mode If an error pressing of buttons other than the digits occured wait 1 second after the red LED lights off and then lights up again then press the correct digits again 4 Press the ENTER button to confirm The re...

Страница 24: ...e the remote control within the range which is shown in the following table Operation Angle RC operational distance θ 0º for H V 8m θ 20º for H V 5m θ 45º for H only 2m H V θ Caution The incorrect use of batteries can result in leaks or bursting Be sure to follow these instructions Place AAA batteries matching the and signs on each battery to the and signs of the battery compartment Do not mix bat...

Страница 25: ...r outlet or a power supply 3 Set the Main Power switch to ON Caution Make sure that the LCD display is not connected to the power outlet before making any connections Connecting cables while the power is ON may cause electric shock or personal injury When unplugging the power cord hold the power cord by the plug head Never pull by the cord CHAPTER 2 MAKING CONNECTIONS ...

Страница 26: ...DIO OUT connector of the computer 2 2 2 Using DVI Input Connect one end of a DVI cable to the DVI IN connector of the LCD display and the other end of a DVI cable to the DVI connector of the computer Computer DisplayPort OUT VGA IN Pr Pb Y CVBS PC LINE IN SPEAKER SWITCH DisplayPort OUT VGA IN Pr Pb Y CVBS PC LINE IN SPEAKER SWITCH VGA OUT D Sub 15 pin VGA IN AUDIO OUT AUDIO IN HDMI2 IN DVI IN DVI ...

Страница 27: ...HDMI1 IN HDMI2 IN DVI IN DVI OUT DisplayPort IN DisplayPort OUT HDMI IN Computer HDMI OUT 2 2 4 Using DisplayPort Input Connect one end of a DisplayPort cable to the DisplayPort IN connector of the LCD display and the other end of a DisplayPort cable to the DisplayPort OUT connector of the computer Computer DisplayPort IN DisplayPort OUT VGA IN Pr Pb Y CVBS PC LINE IN SPEAKER SWITCH DisplayPort IN...

Страница 28: ...2 3 1 Using COMPONENT Video Input Connect one end of a component cable to the COMPONENT IN connector of the LCD display and the other end of a component cable to the COMPONENT OUT connectors of the video player DVR VCR VCD For audio input connect one end of an audio cable to the AUDIO IN connectors of the LCD display and the other end of an audio cable to the AUDIO OUT connectors of the video play...

Страница 29: ...or of the video player DVR VCR VCD RJ 45 HDMI1 IN HDMI2 IN DVI IN DVI OUT DisplayPort IN DisplayPort OUT HDMI1 IN HDMI2 IN HDMI OUT DVR VCR VCD 2 4 Connecting Audio Equipment 2 4 1 Connecting External Speakers Press the Speaker Switch and connect the speakers cables to the EXT Speaker Terminal of the LCD display USB EXT SPK TERMINAL EXT Speaker Terminal External Speakers Speaker Switch External ...

Страница 30: ...cting an External Audio Device Connect one end of an audio cable to the AUDIO OUT connector of the LCD display and the other end of an audio cable to the AUDIO IN connector of the audio device AUDIO OUT AUDIO OUT Audio Device AUDIO IN ...

Страница 31: ...ed to keep a minimum space of 0 5mm in which a business card is able to slip between all displays on all sides 0 5 mm 2 5 1 Display Control Connection Connect the RS232C OUT connector of DISPLAY 1 to the RS232C IN connector of DISPLAY 2 DISPLAY 1 PC DISPLAY 2 RS 232C IN RS 232C RS 232C OUT RS 232C IN 2 5 2 Digital Video Connection Connect the DVI OUT VGA OUT connector of DISPLAY 1 to the DVI IN co...

Страница 32: ...able setting is set to Off When using DP 1 1a each display will clone the same content as the source DP 1 2 supports MST up to 4 displays Connect the DVI OUT connector of DISPLAY 1 to the DVI IN connector of DISPLAY 2 DISPLAY 1 DISPLAY 2 DVI IN HDMI DVI OUT DVI IN DVD VCR VCD 2 5 3 Analog Video Connection Connect the DVI OUT VGA OUT connector of DISPLAY 1 to the VGA IN connector of DISPLAY 2 PC DI...

Страница 33: ...This display s remote control sensor will stop working if the IR IN is connected 2 7 IR Pass Through Connection Connect one end of an IR extender cable to the IR OUT connector of the LCD display and the other end of an IR extender cable to the IR IN connector of the video player DVR VCR VCD DVD VCR VCD DVD VCR VCD Remote Control IR OUT IR IN ...

Страница 34: ...CD display with an Ethernet cable 3 Press the button to display the OSD menu 4 Press the or button to select Network settings Press the button to enter its submenu 5 Press the or button to select Network configuration Press the to enter its submenu 6 Press the or button to select DHCP Auto IP Press the button to confirm Note Connecting with a shielded CAT 5 Ethernet cable to comply with the EMC di...

Страница 35: ...wer cord to completely cut off power 3 2 Selecting the Input Source Signal Note After pressing the button a menu with available input sources will be displayed on the screen USB Network HDMI 1 HDMI 2 Display Port Card OPS DVI D YPbPr AV VGA If the selected input source signal is not connected to the LCD display or is turned off the no signal message is displayed on the screen No signal 1 Press the...

Страница 36: ...e or button to choose a picture format then press the button Note The available picture formats include Auto zoom Enlarge the picture to fill the screen Recommended for minimal screen distortion but not for HD or PC Movie expand 16 9 Scale 4 3 format to 16 9 Not recommended for HD or PC Wide screen Shows wide screen format content unstretched Not recommended for HD or PC Unscaled Provide maximum d...

Страница 37: ...nts and types of video Movie Ideal settings for movies Photo Ideal settings for photos Energy saving Settings that conserve the most energy 3 6 Choosing Your Preferred Sound Settings 1 While this display is playing video source press the button 2 Press the or button to choose Sound style then Personal Original Movie Music Game News press the button 3 Press the or button to choose an option then pr...

Страница 38: ...gs on your computer firewall to allow you to run the media server 3 7 1 Set Up the Network 1 Connect your display and the computer to the same home network See illustration below to connect your display to a network 2 Switch on your computer and the router Single display setup Computer RJ 45 RJ 45 ROUTER Multiple display setup Computer RJ 45 RJ 45 RJ 45 ROUTER DISPLAY 1 DISPLAY 2 Note If the appar...

Страница 39: ...isplay and your PC to the same router via RJ 45 2 Run windows media player Set stream handling as public sharing Play Files from Display 1 Press the button choose network and press the button USB Network HDMI 1 HDMI 2 Display Port Card OPS DVI D YPbPr AV VGA 2 Now you can see all the PC s connected to the same router on the screen Choose the right one 3 Press the or button to choose the directory ...

Страница 40: ...w network settings Network configuration Static IP configuration Digital Media Render Network name 3 Set the name of your display Picture Sound Tiling General settings Network settings View network settings Network configuration Static IP configuration Digital Media Render Network name Cancel Clear Done Done PN 55D 4 Press the button choose Network and press the button 5 On your PC go to Network a...

Страница 41: ...oose Sort to arrange the files by album name artist or other fields To clear the list of offline media servers press the button Then choose Clear offline servers and press the button 3 8 Playing Multimedia Files from USB Device 1 Connect your USB device to the USB connector on the LCD display AUDIO OUT USB 2 Press the button Then choose USB and press the button USB Network HDMI 1 HDMI 2 Display Po...

Страница 42: ...or button To pause the track press the or button Press the or button again to resume playback To skip backward or forward 10 seconds press the or button To search backward or forward press the or button press repeatedly to toggle between different speeds To stop the music press the button Music options While you play music press the button then use the or to choose an option Then press the button ...

Страница 43: ...h backward or forward press the or button press repeatedly to toggle between different speeds To stop the video press the button Movie options While playing video press the button then use or to choose an option Then press the button to select an option Subtitles Choose the available subtitle settings Subtitle language Choose the language for subtitles if available Shuffle Enable or disable random...

Страница 44: ...press the or button and then press the button To stop the slideshow press the button Slideshow options While you play a slideshow press the button then press the button to choose an option Shuffle Enable or disable random display of pictures in the slideshow Repeat Choose Repeat to watch a slideshow repeatedly or Play Once to watch once Slideshow Time Choose the displaying time for each photo in t...

Страница 45: ...s Network settings 90 The highlighted item orange indicates the active submenu 1 Press the or button to select the menu item 2 Press the INPUT button to enter the submenu 1 Press the or button to select the menu item 2 Press the or button to enter the submenu 3 Adjust the settings The highlighted item indicates the active submenu For example Picture style Restore style Backlight Colour Sharpness N...

Страница 46: ...e previous menu 5 Close the OSD window Press the MENU button again Press the button again When settings are modified all changes are saved when the user does the following Proceeds to the another menu Exits the OSD menu Waits for the OSD menu to disappear Note Availability of some menu items depend on the input source signal If the menu is not available it is disabled and grayed out ...

Страница 47: ...stal Clear Advanced Game or computer Format and edges See page 45 2 Sound Sound style Restore style Bass Treble Balance Surround mode Audio out Advanced See page 48 Picture Sound Tiling General settings Network settings Picture style Restore style Backlight Colour Sharpness Noise reduction MPEG artifact reducti Digital Crystal Clear Advanced Game or computer Format and edges 1 5 4 3 2 ...

Страница 48: ... comp See page 50 4 General settings Menu language Monitor ID Eco mode Auto search Clock Scheduling Sleep timer EasyLink Auto Adjust Local KB lock RC lock See page 52 5 Network settings View network settings Network configuration Static IP configuration Digital Media Renderer DMR Network name See page 60 ...

Страница 49: ...tore the last selected predefined picture setting Press the button on the control panel or the button on the remote control to select the setting Yes No Backlight Adjust the brightness of this display s backlight Note The default value is 90 Press the button on the control panel or the button on the remote control to adjust the value 0 to 100 Colour Adjust the colour saturation of the picture Note...

Страница 50: ... remote control to select the setting Off On Dynamic contrast Enable superior sharpness especially on lines and contours in the picture Note The default value is Off Press the button on the control panel or the button on the remote control to select the setting Off Minimum Medium Maximum Color enhancement Dynamically enhance the vividness and details of colours Note The default value is Medium Pre...

Страница 51: ...o Custom Note The default value of Cool Normal and Warm setting is 128 Press the button on the control panel or the button on the remote control to adjust the value 0 to 255 Video contrast Adjust video black level and white level Note The default value is 100 Press the button on the control panel or the button on the remote control to adjust the value 0 to 100 Original Setting High Setting Low Set...

Страница 52: ...reen Unscaled 4 3 5 2 Sound Settings Picture Sound Tiling General settings Network settings Sound style Restore style Bass Treble Balance Surround mode Audio out Advanced 1 Press the MENU button on the control panel or the button on the remote control to call out the OSD window 2 Select Sound then press the INPUT button on the control panel or the button on the remote control 3 Press the button on...

Страница 53: ...ence Note The default value is Off Press the button on the control panel or the button on the remote control to select the setting Off On Audio out Adjust audio output volume Note The default value is 25 Press the button on the control panel or the button on the remote control to adjust the value 0 to 60 Advanced Auto volume leveling Enable the reduction of sudden volume changes Note The default v...

Страница 54: ...e screen matrix video wall that consists of up to 100 sets of this display up to 10 sets on the vertical and 10 sets on the horizontal sides If tiling is enabled you can configure the following display settings H monitors V monitors Position Frame comp Note The default value is Off Press the button on the control panel or the button on the remote control to select the setting Off On H monitors Adj...

Страница 55: ... displays V monitors 2 displays 1 2 3 4 H monitors V monitors Position Example2 5 x 5 screen matrix 25 displays H monitors 5 displays V monitors 5 displays 1 2 6 7 3 4 8 9 5 10 11 12 13 14 15 16 17 18 19 20 21 22 23 24 25 H monitors V monitors Position Frame comp If frame compensation is enabled then the display will adjust the image to compensate for the width of the display bezels in order to ac...

Страница 56: ...control to select the setting English German Traditional Chinese French Italian Spanish Russian Polish Turkish Simplified Chinese Portuguese Arabic Japanese Monitor ID Adjust the ID number for controlling the display via the RS232C connection Each display must have a unique ID number when multiple sets of this display are connected Note The default value is 1 Press the button on the control panel ...

Страница 57: ... and year Press the button on the control panel or the button on the remote control to navigate between month day and year fields Cancel Done Time Set current time Press the button on the control panel or the button on the remote control to set hours and minutes Press the button on the control panel or the button button on the remote control to navigate between hours and minutes fields Cancel Done...

Страница 58: ... the button on the control panel or the button button on the remote control to navigate between hours and minutes fields Cancel Done Off time Set time when the schedule is turned off Press the button on the control panel or the button on the remote control to set hours and minutes Press the button on the control panel or the button button on the remote control to navigate between hours and minutes...

Страница 59: ...he button on the remote control then select Save list to to save the playlist Press the button on the remote control to exit Playlist and return to the OSD menu Options Exit Photo images IMG_001 jpg 0002 0005 images IMG_001 jpg IMG_002 jpg IMG_003 jpg IMG_004 jpg Sort Media Type Recursive Parser Save list Save List Sleep timer Switch off the display after a specified time Note The default value is...

Страница 60: ...D display Unlock Enable the keyboard function Lock all Lock all keyboard function Lock but volume Disable all the keyboard function except the or button Lock but power Disable all the keyboard function except the button Lock all expect volume and power Disable all the keyboard function except the or button Note To disable the Local KB lock function press the button and buttons 1 9 9 8 on the remot...

Страница 61: ...o input sources enable ANTI BURN IN function to protect the display from burn in or after image symptoms when the display is not being in use for 30 seconds Note The default value is Off Press the button on the control panel or the button on the remote control to select the setting Off On Smart power Choose a backlight level to optimise dynamic power consumption and picture contrast Note The defau...

Страница 62: ...automatically turn off Note The default value is On Press the button on the control panel or the button on the remote control to select the setting Off On Information OSD When this function is enabled and the display is turned on while in standby mode an information OSD is displayed on the upper left corner of the screen Note The default value is On Press the button on the control panel or the but...

Страница 63: ...tes and a temperature waning message is shown on the screen for 10 seconds In this situation the LCD display is shut down and the Power LED indicator will be blinking red and green The default value is Auto Press the button on the control panel or the button on the remote control to select the setting Off On Auto Network control port Choose the RS232 control from the Card OPS or embedded RS232 in ...

Страница 64: ...ote control to select the setting DHCP Auto IP Static IP Static IP configuration Configure the network parameters such as IP address netmask gateway DNS 1 and DNS 2 Note This function can be only configured when the Network configuration setting is set to Static IP Press the button on the control panel or the button on the remote control to select the item Then press the INPUT button on the contro...

Страница 65: ...ol on the network name field to open the on screen keyboard Use the on screen keyboard to enter the name When done select Done and press the INPUT button on the control panel or the button on the remote control When the setting is complete press the button on the control panel or the button on the remote control to select Done Then press the INPUT button on the control panel or the button on the r...

Страница 66: ... detect the input source signal Check if the input source is turned ON Check if the signal cable is properly connected Check if any pin inside the cable connector is twisted or broken Local KB lock The operation using the control panel buttons has been locked by the user Disable the Local KB lock function Refer to page 56 RC lock The operation using the remote control buttons has been locked by th...

Страница 67: ... v2 AC3 E AC3 Dolby Pulse MPEG 4 ASP 1920x1080 25p 30p 50i 60i 30 H 264 1920x1080 25p 30p 50p 60p 60i 30 MVC 1920x1080i field rate 50 60Hz 1920x1080p frame rate 24 25 30Hz 1280x720p frame rate 50 60Hz 30 ts m2ts mts mt2 MaTS TTS MPEG 2 1920x1080 25p 30p 50i 60i 30 MPEG 1 L1 L2 MPEG 1 2 2 5 L3 AAC HE AAC v1 v2 AC3 E AC3 Dolby Pulse MPEG 4 ASP 1920x1080 25p 30p 50i 60i 30 H 264 1920x1080 25p 30p 50p...

Страница 68: ...t mpd frag MP4 H 264 1920x1080 25p 30p 50p 60p 60i 30 AAC HE AAC v1 v2 AC3 E AC3 WMA WMA PRO MVC 1920x1080i field rate 50 60Hz 1920x1080p frame rate 24 25 30Hz 1280x720p frame rate 50 60Hz 30 mp4 MP4 MPEG 4 ASP 1920x1080 25p 30p 50i 60i 30 AAC HE AAC v1 v2 AC3 E AC3 WMA WMA PRO H 264 1920x1080 30 MVC 1920x1080i field rate 50 60Hz 1920x1080p frame rate 24 25 30Hz 1280x720p frame rate 50 60Hz 30 WMV...

Страница 69: ... Pro wav PC LPCM 192 768 LPCM aif mac aiff mac LPCM 192 768 LPCM aac mp4 m4a AAC 48 1024 AAC HE AAC v1 v2 pls m3u Playlists m4a M4A 48 1024 AAC HE AAC v1 v2 Note Sound or video may not work if the contents have a standard bit rate frame rate above the compatible Frame sec listed in the table above Video content with a Bit rate or Frame rate larger than the rate specified in the table above can cau...

Страница 70: ...Ultra XGA HD1080 1920 1080 60 Hz 148 5 MHz 16 9 HD1080 SDTV Resolution Standard Resolution Active Resolution Refresh Rate Pixel Rate Aspect Ratio Stand for Mode H Pixels V Lines 480i 720 480 29 97 Hz 13 5 MHz 4 3 Modified NTSC Standard 480p 59 94 Hz 27 MHz 576i 720 576 25 Hz 13 5 MHz 4 3 Modified PAL Standard 576p 50 Hz 27 MHz HDTV Resolution Standard Resolution Active Resolution Refresh Rate Pixe...

Страница 71: ... cause fire or electric shock Disconnect the power plug from the wall outlet as a safety precaution before carrying out any type of cleaning or maintenance procedure Front Panel Cleaning Instructions The front of the display has been specially treated Wipe the surface gently using only a cleaning cloth or a soft lint free cloth If the surface becomes dirty soak a soft lint free cloth in a mild det...

Страница 72: ...f the screen The picture format is not set correctly Press the button and select Auto zoom Can hear sound but no picture Improperly connected source signal cable Make sure that both video inputs and sound inputs are correctly connected Can see picture but no sound is heard Improperly connected source signal cable Volume is turned all the way down MUTE function is turned on No external speaker conn...

Страница 73: ...essories in the box if necessary 2 Place the lower foam cushion inside the lower box a 3 Place the LCD display down in the lower box a 4 Place the upper foam cushion on top of the LCD display 5 Place the accessories box on the designated area if necessary 6 Place the upper box b on LCD display 7 Secure the upper box to the lower box with the supplied locks c a b c ...

Страница 74: ... Media Playback 2 0 x 1 Service Port Media Playback OPS Slot Yes Yes Audio Audio In Stereo Audio Jack 3 5 mm x 1 Stereo Audio Jack RCA x 1 Stereo Audio Jack 3 5 mm x 1 Stereo Audio Jack RCA x 1 Audio Out Stereo Audio Jack 3 5 mm x 1 Stereo Audio Jack 3 5 mm x 1 Internal Speakers 10W x 2 10W x 2 Speaker Output RMS 10W x 2 10W x 2 Power Power Supply Internal Internal Power Requirements AC 100 240V 5...

Страница 75: ...0 opening dimension 342 65 Outline dimension Opening dimension 38 85 99 25 107 65 607 25 606 15 406 70 406 70 56 65 684 20 1209 90 Outline dimension 2 3 BEZEL 1 2 BEZEL 1 2 BEZEL 2 3 BEZEL AG Neovo Company Address 5F 1 No 3 1 Park Street Nangang District Taipei 11503 Taiwan Copyright 2019 AG Neovo All rights reserved PN5HC0 PN5DB0_UM_V012 ...

Отзывы: