background image

66

ADJUSTING THE LCD DISPLAY

Item

Function

Operation

Range

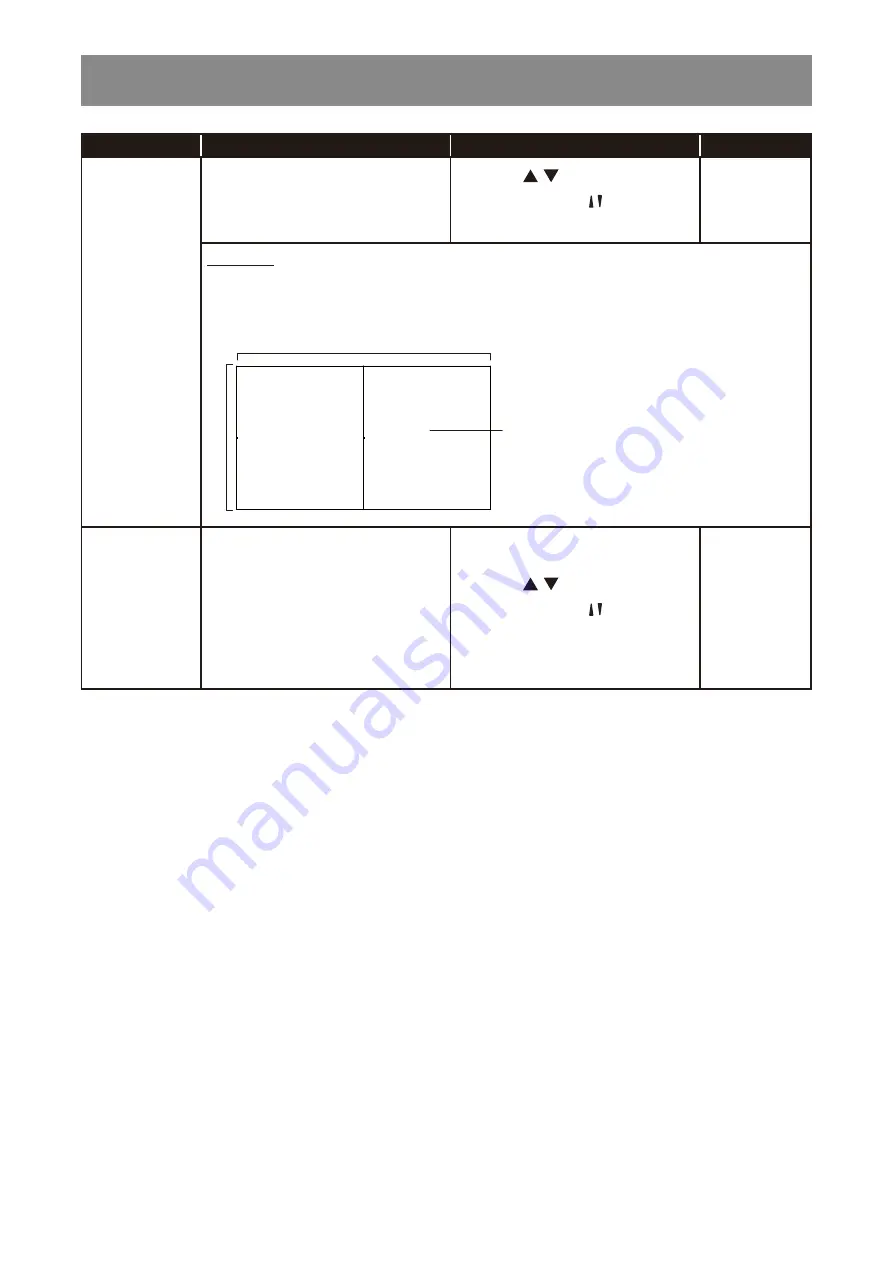
Position

Adjust the position of this display in 
the screen matrix. Please see the 
Example1 for reference.

Press the  /   button on the 
control panel or the  /  button on the 
remote control to adjust the value.

0 to 100

Example1: 1 x 2 screen matrix (2 displays)

•  H monitors = 2 displays
•  V monitors = 1 display

1

2

H monitors

V monitors

Position

Frame Comp.

If frame compensation is enabled, 
then the display will adjust the 
image to compensate for the width 
of the display bezels in order to 
accurately display the image.

•  Frame Comp. H   0~100
•  Frame Comp. V   0~100

Press the  /   button on the 
control panel or the  /  button on the 
remote control to select the setting.

Off
On

Содержание HX-32E

Страница 1: ...User Manual HX 32E HX 42E HX 55E LCD Display ...

Страница 2: ...ling and Removing Table Stands optional 11 1 4 Wall Mounting Installation 12 1 4 1 VESA Grid 13 1 4 2 Ventilation Requirements for Enclosure Locating 13 1 5 Mounting in Portrait Position 14 1 6 LCD Display Overview 15 1 6 1 Control Panel 15 1 6 2 Input Output Terminals 18 1 7 Remote Control 21 1 7 1 General Functions 21 1 7 2 ID Remote Control 22 1 7 3 Inserting the Batteries in the Remote Control...

Страница 3: ...icture Format 44 3 5 Using the Quick Menu 45 3 6 Playing Multimedia Files via Local Area Network 47 3 6 1 Set Up the Network 47 3 6 2 How to Use DLNA DMP 48 3 6 3 How to Use DLNA DMR from PC 49 3 7 Playing Multimedia Files from USB Device 50 3 8 Play Options 52 3 8 1 Playing Music Files 52 3 8 2 Playing Movie Files 53 3 8 3 Playing Photo Files 54 CHAPTER 4 ON SCREEN DISPLAY MENU 55 4 1 Using the O...

Страница 4: ...TABLE OF CONTENTS CHAPTER 7 SPECIFICATIONS 89 7 1 Display Specifications 89 7 2 Display Dimensions 91 ...

Страница 5: ... or relocate the receiving antenna Increase the separation between the equipment and receiver Connect the equipment into an outlet on a circuit different from that to which the receiver is connected Consult the dealer or an experienced radio TV technician for help Changes or modifications not expressly approved by the party responsible for compliance could void the user s authority to operate the ...

Страница 6: ...ng conductor of the room s electrical installation should have a reserve short circuit protection device in the form of a fuse with a nominal value no larger than 16 amperes A To completely switch off the equipment the power supply cable must be removed from the power supply socket which should be located near the equipment and easily accessible A protection mark B confirms that the equipment is i...

Страница 7: ...s We confirm that if its products are handled properly for their intended use they are safe to use according to scientific evidence available today We play an active role in the development of international EMF and safety standards enabling us to anticipate further developments in standardization for early integration in its products Information for U K only WARNING THIS APPLIANCE MUST BE EARTHED ...

Страница 8: ... in accordance with the following code BLUE NEUTRAL N BROWN LIVE L GREEN YELLOW EARTH E The GREEN YELLOW wire must be connected to the terminal in the plug which is marked with the letter E or by the Earth symbol or coloured GREEN or GREEN YELLOW The BLUE wire must be connected to the terminal which is marked with the letter N or coloured BLACK The BROWN wire must be connected to the terminal whic...

Страница 9: ...er For customers in Canada and U S A This product may contain lead and or mercury Dispose of in accordance to local state and federal regulations For additional information on recycling contact www eia org Consumer Education Initiative Waste Electrical and Electronie Equipment WEEE Attention users in European Union private households This marking on the product or on its packaging illustrates that...

Страница 10: ...ling of your waste equipment at the time of disposal will help to conserve natural resources and ensure that it is recycled in a manner that protects human health and the environment Batteries For EU The crossed out wheeled bin implies that used batteries should not be put to the general household waste There is a separate collection system for used batteries to allow proper treatment and recyclin...

Страница 11: ...umer do not remove any stickers from the LCD display Doing so may affect the determination of the warranty period Cautions When Setting Up Do not place the LCD display near heat sources such as a heater exhaust vent or in direct sunlight Do not cover or block the ventilation holes in the housing Place the LCD display on a stable area Do not place the LCD display where it may subject to vibration o...

Страница 12: ... wet hands When turning off the display by detaching the power cord wait 6 seconds before re attaching the power cord for normal operation Do not knock or drop the display during operation or transportation Cleaning and Maintenance To protect your display from possible damage do not put excessive pressure on the LCD panel When moving your display grasp the frame to lift do not lift the display by ...

Страница 13: ...tended periods of time It can be several hours or several days Use a screen saver and run it for extended periods of time Use a black and white image and run it for extended periods of time There are millions of micro transistors inside the LCD display It is normal for a few transistors to be damaged and to produce spots This is acceptable and is not considered a failure IMPORTANT Always activate ...

Страница 14: ...neovo com HX 32E_Quick Guide_V010 Quick Start Guide HX 32E LED Backlit Display LCD Display RS232 cable Note Remote control is shipped with the supplied AAA batteries For all other regions apply a power cord that conforms to the AC voltage of the power socket and has been approved by and complies with the safety regulations of the particular country You might like to save the package box and packin...

Страница 15: ...e Stands optional To install table stands 1 Ensure your display is powered off 2 Spread a protective sheet on a flat surface 3 Grab the carrying handles and place the display face down on the protective sheet 4 After inserting the stand in the guide block tighten the screws on both sides of the display Carrying handle Thumbscrews Guide block Table stand Longer portions face the front To remove tab...

Страница 16: ...e instructions that come with the base mounting kit Failure to follow correct mounting procedures could result in damage to the equipment or injury to the user or installer Product warranty does not cover damage caused by improper installation 1 4 Wall Mounting Installation To mount this display to a wall you will have to obtain a standard wall mounting kit commercially available We recommend usin...

Страница 17: ...f the display in case of earthquake or other natural disaster be sure to consult the bracket manufacturer for installation location 1 4 2 Ventilation Requirements for Enclosure Locating To allow heat to disperse leave space between surrounding objects as shown in the diagram below 100 mm 100 mm 100 mm 100 mm Note For the wall mounting kit use M6 mounting screws having a length 10 mm longer than th...

Страница 18: ... can be installed in portrait position 1 Remove the table stand if attached 2 To change the display orientation from a landscape orientation to portrait orientation rotate the device 90 degrees counter clockwise as illustrated below HX 32E 90 90 HX 42E 90 90 HX 55E 90 90 ...

Страница 19: ...15 PRODUCT DESCRIPTION 1 6 LCD Display Overview 1 6 1 Control Panel HX 32E MUTE INPUT MENU 1 2 3 4 5 6 7 8 HX 42E MUTE INPUT MENU 1 2 3 4 5 6 7 8 ...

Страница 20: ...16 PRODUCT DESCRIPTION HX 55E MUTE INPUT MENU 1 2 3 4 5 6 7 8 HX 32E HX 42E HX 55E 9 ...

Страница 21: ...item while OSD menu is on 7 Down Move the highlight bar down to adjust the selected item while OSD menu is on 8 MENU Close the OSD menu while OSD menu is on Activate the OSD menu when OSD menu is off 9 Remote control sensor power status indicator and auto brightness Light sensor Receive command signals from the remote control Indicate the operating status of the display Lights green when the displ...

Страница 22: ...18 PRODUCT DESCRIPTION 1 6 2 Input Output Terminals HX 32E 14 15 16 3 4 1 2 5 6 7 8 9 10 13 11 12 18 17 19 20 21 22 23 HX 42E 14 15 16 23 3 4 5 6 7 8 9 10 13 11 12 18 17 19 20 21 22 1 2 ...

Страница 23: ...19 PRODUCT DESCRIPTION HX 55E 23 3 4 5 6 7 8 9 10 13 14 15 11 12 18 17 19 20 21 22 1 2 16 ...

Страница 24: ...eo input 12 DisplayPort OUT DisplayPort video output 13 VGA IN D Sub VGA video input 14 COMPONENT VIDEO Component YPbPr video source input 15 CVBS OUT CVBS video source output 16 Y CVBS IN CVBS video source input 17 PC Audio In Audio input for PC source 3 5mm stereo phone 18 AUDIO IN Audio input from external AV device RCA 19 AUDIO OUT Audio output to external AV device 20 USB FW Multi Media Funct...

Страница 25: ...e through menus and choose items 7 OK Confirm an entry or selection 8 ADJUST Access currently available picture and sound menus 9 MUTE Turn the mute function on off 10 COLOR Choose tasks or options 11 Number ID SET ENTER Enter text for network setting Set the display ID Refer to 1 7 2 ID Remote Control for more detail 12 FORMAT Change the aspect ratio 13 BACK Return to the previous menu or exit fr...

Страница 26: ...splay you want to control For example Display ID 1 press 0 0 1 Display ID 11 press 0 1 1 The numbers available are from 001 255 Not pressing any button within 10 seconds will exit the ID mode If an error pressing of buttons other than the digits occured wait 1 second after the red LED lights off and then lights up again then press the correct digits again 4 Press the ENTER button to confirm The re...

Страница 27: ...e the remote control within the range which is shown in the following table Operation Angle RC operational distance θ 0º for H V 8m θ 20º for H V 5m θ 45º for H only 2m θ H V Caution The incorrect use of batteries can result in leaks or bursting Be sure to follow these instructions Place AAA batteries matching the and signs on each battery to the and signs of the battery compartment Do not mix bat...

Страница 28: ...ct one end of the power cord to the AC IN connector at the rear of the LCD display 2 Connect the other end of the power cord to a power outlet or a power supply 3 Set the Main Power switch to ON HX 32E HX 42E CHAPTER 2 MAKING CONNECTIONS ...

Страница 29: ...e LCD display is not connected to the power outlet before making any connections Connecting cables while the power is ON may cause electric shock or personal injury When unplugging the power cord hold the power cord by the plug head Never pull by the cord ...

Страница 30: ... of a VGA cable to the VGA OUT D Sub connector of the computer For audio input connect one end of an audio cable to the AUDIO IN connector of the LCD display and the other end of an audio cable to the AUDIO OUT connector of the computer HX 32E Computer VGA OUT D Sub 15 pin VGA IN AUDIO OUT AUDIO IN HX 42E Computer VGA OUT D Sub 15 pin VGA IN AUDIO OUT AUDIO IN ...

Страница 31: ...to the DVI IN connector of the LCD display and the other end of a DVI cable to the DVI OUT connector of the computer For audio input connect one end of an audio cable to the AUDIO IN connector of the LCD display and the other end of an audio cable to the AUDIO OUT connector of the computer HX 32E DVI OUT DVI IN Computer AUDIO IN AUDIO OUT ...

Страница 32: ...28 MAKING CONNECTIONS HX 42E DVI OUT DVI IN Computer AUDIO IN AUDIO OUT HX 55E DVI OUT DVI IN Computer AUDIO IN AUDIO OUT ...

Страница 33: ...MI Input Connect one end of an HDMI cable to the HDMI1 IN HDMI2 IN connector of the LCD display and the other end of an HDMI cable to the HDMI OUT connector of the computer HX 32E HDMI IN Computer HDMI OUT HX 42E HDMI IN Computer HDMI OUT ...

Страница 34: ...2 2 4 Using DisplayPort Input Connect one end of a DisplayPort cable to the DisplayPort IN connector of the LCD display and the other end of a DisplayPort cable to the DisplayPort OUT connector of the computer HX 32E DisplayPort IN DisplayPort OUT Computer ...

Страница 35: ...31 MAKING CONNECTIONS HX 42E DisplayPort IN DisplayPort OUT Computer HX 55E DisplayPort IN DisplayPort OUT Computer ...

Страница 36: ... a component cable to the COMPONENT OUT connector of the video player For audio input connect one end of an audio cable to the AUDIO IN connector of the LCD display and the other end of an audio cable to the AUDIO OUT connector of the video player HX 32E COMPONENT OUT YPbPr Video Player AUDIO OUT COMPONENT IN YPbPr AUDIO IN L R HX 42E COMPONENT OUT YPbPr Video Player AUDIO OUT COMPONENT IN YPbPr A...

Страница 37: ...IN port of the LCD display and the other end of a video cable to the COMPONENT VIDEO CVBS OUT port of the video player For audio input connect one end of an audio cable to the AUDIO IN connector of the LCD display and the other end of an audio cable to the AUDIO OUT connector of the video player HX 32E Video Player AUDIO OUT AUDIO IN L R Y CVBS IN COMPONENT VIDEO CVBS OUT CVBS OUT ...

Страница 38: ...34 MAKING CONNECTIONS HX 42E Video Player AUDIO OUT AUDIO IN L R Y CVBS IN COMPONENT VIDEO CVBS OUT CVBS OUT HX 55E Video Player AUDIO OUT AUDIO IN L R Y CVBS IN COMPONENT VIDEO CVBS OUT CVBS OUT ...

Страница 39: ...ect one end of an HDMI cable to the HDMI1 IN HDMI2 IN connector of the LCD display and the other end of an HDMI cable to the HDMI OUT connector of the video player HX 32E HDMI1 IN HDMI2 IN HDMI OUT Video Player HX 42E HDMI1 IN HDMI2 IN HDMI OUT Video Player ...

Страница 40: ...layer 2 3 4 Using SDI Input Connect one end of a SDI cable to the SDI IN connector of the LCD display and the other end of a SDI cable to the SDI OUT connector of the video player or security camera HX 32E SDI IN Video Player Security Camera SDI OUT SDI IN SDI OUT ...

Страница 41: ...37 MAKING CONNECTIONS HX 42E SDI IN Video Player Security Camera SDI OUT SDI IN SDI OUT HX 55E SDI IN SDI OUT SDI IN SDI OUT Video Player Security Camera ...

Страница 42: ...o Device Connect one end of an audio cable to the AUDIO OUT connector of the LCD display and the other end of an audio cable to the AUDIO IN connector of the audio device HX 32E AUDIO OUT Audio Device AUDIO IN HX 42E AUDIO OUT Audio Device AUDIO IN HX 55E AUDIO OUT Audio Device AUDIO IN ...

Страница 43: ...y recommended to keep a minimum space of 0 5mm in which a business card is able to slip between all displays on all sides 0 5 mm 2 5 1 Display Control Connection Connect the RS232 OUT connector of DISPLAY 1 to the RS232 IN connector of DISPLAY 2 DISPLAY 1 PC DISPLAY 2 RS232 IN RS232 RS232 OUT RS232 IN 2 5 2 Digital Video Connection Connect the DVI OUT connector of DISPLAY 1 to the DVI IN connector...

Страница 44: ...a version make sure the Tiling mode Enable setting is set to Off When using DisplayPort 1 1a each display will clone the same content as the source DisplayPort 1 2 supports MST up to 4 displays Connect the video player connector of DISPLAY 1 to the video player connector of DISPLAY 2 DISPLAY 1 DISPLAY 2 DVI IN HDMI DVI OUT DVI IN Video Player Connect the DVI OUT connector of DISPLAY 1 to the DVI I...

Страница 45: ...1 to the VGA IN connector of DISPLAY 2 PC DISPLAY 1 DISPLAY 2 VGA IN VGA DVI OUT VGA IN 2 6 IR Connection Connect the IR sensor cable to the IR IN connector of the LCD display DISPLAY IR IN External IR Receiver Note This display s remote control sensor will stop working if the IR IN is connected ...

Страница 46: ...45 ROUTER INTERNET DISPLAY To setup the network 1 Switch on the router and switch on its DHCP setting 2 Connect the router to the LCD display with an Ethernet cable 3 Press the button to display the OSD menu 4 Press the or button to select Network Press the button to enter its submenu 5 Press the or button to select Network configuration Press the to enter its submenu 6 Press the or button to sele...

Страница 47: ... is connected to the power outlet Disconnect the power cord to completely cut off power 3 2 Selecting the Input Source Signal Note After pressing the button a menu with available input sources will be displayed on the screen USB Network HDMI 1 HDMI 2 Display Port SDI DVI D YPbPr AV VGA If the selected input source signal is not connected to the LCD display or is turned off the no signal message is...

Страница 48: ...e or button to choose a picture format then press the button Note The available picture formats include Auto Enlarge the picture to fill the screen Recommended for minimal screen distortion but not for HD or PC Movie expand 16 9 Scale 4 3 format to 16 9 Not recommended for HD or PC Wide screen Shows wide screen format content unstretched Not recommended for HD or PC Unscaled Provide maximum detail...

Страница 49: ...tyle Personal Original Movie Music Game News Press the button to choose an option then press the button Note The available picture styles include Personal Apply your personalised picture settings Vivid Rich and dynamic settings ideal for daytime viewing Natural Natural picture settings Standard Default settings that suit most environments and types of video Movie Ideal settings for movies Photo Id...

Страница 50: ...tton to adjust the value Picture format Auto Movie expand 16 9 Wide screen Unscaled 4 3 Press the button to choose an option then press the button Picture shift Press the or button to adjust the value Note For the available Picture formats see page 44 ...

Страница 51: ...to your home network A media server running on your computer Appropriate settings on your computer firewall to allow you to run the media server 3 6 1 Set Up the Network 1 Connect your display and the computer to the same home network See illustration below to connect your display to a network 2 Switch on your computer and the router Single display setup PC RJ45 RJ45 ROUTER DISPLAY Multiple displa...

Страница 52: ...ct display and your PC to the same router via RJ45 2 Run Windows Media Player Set stream handling as public sharing Play Files from Display 1 Press the button choose network and press the button USB Network HDMI 1 HDMI 2 Display Port SDI DVI D YPbPr AV VGA 2 Now you can see all the PC s connected to the same router on the screen Choose the right one 3 Press the or button to choose the directory an...

Страница 53: ...me of your display Picture Sound Tiling General Settings Network View Network Settings Network Configuration Static IP Configuration Digital Media Render Wake On LAN Network Name Cancel Clear Done Done HX 32E_ 4 Press the button choose Network and press the button 5 On your PC go to Network and Sharing Center and click Choose homegroup and sharing options 6 Check the media formats Then click Choos...

Страница 54: ...ote control to control the media playback Tips Choose the top bar to filter your files by type Choose Sort to arrange the files by album name artist or other fields To clear the list of offline media servers press the button Then choose Clear offline servers and press the button 3 7 Playing Multimedia Files from USB Device 1 Connect your USB device to the USB connector on the LCD display HX 32E HX...

Страница 55: ...ic Photo Video_001 mp4 Video_002 mp4 Video_003 mp4 USB device Options System Volume Information Press the button to go up the top layer in the screen Then press the or button to select the desired file type Music Movie and Photo 5 Press the button to enter its play list 6 Choose the file you want Press the button to start playing 7 Follow the on screen instructions to control the play option 8 Pre...

Страница 56: ...e or button again to resume playback To skip backward or forward 10 seconds press the or button To search backward or forward press the or button press repeatedly to toggle between different speeds To stop the music press the button Music options While you play music press the button then use the or to choose an option Then press the button to select an option Shuffle Enable or disable random play...

Страница 57: ...device the button To pause the video press the or button Press the or button again to resume playback To skip backward or forward 10 seconds press the or button To search backward or forward press the or button press repeatedly to toggle between different speeds To stop the video press the button Movie options While playing video press the button then use or to choose an option Then press the butt...

Страница 58: ...kip to the previous or next photo press the or button and then press the button To stop the slideshow press the button Slideshow options While you play a slideshow press the button then press the button to choose an option Shuffle Enable or disable random display of pictures in the slideshow Repeat Choose Repeat to watch a slideshow repeatedly or Play Once to watch once Slideshow Time Choose the d...

Страница 59: ...he highlighted item orange indicates the active submenu 1 Press the or button to select the menu item 2 Press the INPUT button to enter the submenu 1 Press the or button to select the menu item 2 Press the or button to enter the submenu 3 Adjust the settings The highlighted item indicates the active submenu For example 90 Picture Sound Tiling General Settings Network PC Or Video Picture Mode Resto...

Страница 60: ...the or button to return to the previous menu 5 Close the OSD window Press the MENU button again Press the button again When settings are modified all changes are saved when the user does the following Proceeds to the another menu Exits the OSD menu Waits for the OSD menu to disappear Note Availability of some menu items depend on the input source signal ...

Страница 61: ...harpness Gamma Saturation Tint 1 2 3 4 5 Main Menu Submenu Remarks 1 Picture PC Or Video Picture Mode Restore Default Mode Brightness Contrast Backlight Colour Temp Sharpness Gamma Saturation Tint Aspect Ratio Color Range Advanced VGA Auto Adjust VGA Input Resolution See page 59 2 Sound Sound Mode Restore Default Mode Bass Treble Balance Surround Mode Volume Advanced See page 63 ...

Страница 62: ...uto Brightness DisplayPort Ver KEY Lock RC Lock Source Detect Sleep Timer Monitor ID Clock Scheduling Cooling Fan Factory Defaults See page 67 5 Network View Network Settings Network Configuration Static IP Configuration Digital Media Renderer DMR Wake On LAN Network Name See page 76 Note Availability of some menu items depend on the input source signal Cooling Fan option is only applicable for HX...

Страница 63: ...mode depending on your input source Note This option is not available in SDI VGA DVI AV and YPbPr modes Press the button on the control panel or the button on the remote control to select the setting Video PC Picture Mode Choose a predefined picture setting Note This option is not available in PC mode Personal Vivid Natural Standard Movie Photo Energy saving Restore Default Mode Restore the last s...

Страница 64: ...ng conditions Warm Apply a reddish tint for warmer colours sRGB Display accurate colours Most suitable for viewing images on the Internet User Set the colour temperature by adjusting the R G B settings according to your preference Note If you set the colour temperature to User option adjust the R G B level in Picture Colour Temp User menu For manual setting the adjustment range of each color is 0 ...

Страница 65: ...ote control to select the setting Auto Movie Expand 16 9 Wide Screen Unscaled 4 3 Picture Shift Adjust the picture position Press the button on the control panel or the button on the remote control to adjust the setting Up Down Left Right Color Range Choose the output setting for the video input signal Note This option is not available in PC AV and YPbPr modes Select Limited when displaying the si...

Страница 66: ...ement Dynamically enhance the vividness and details of colours Off Low Medium High VGA Auto Adjust Use this function to automatically optimize the display of VGA input image a Press the button on the control panel or the button on the remote control to select the setting b Press the INPUT button on the control panel or the button on the remote control to confirm Cancel Start VGA Input Resolution C...

Страница 67: ...io content Press the button on the control panel or the button on the remote control to select the setting Personal Original Movie Music Game News Restore Default Mode Restore the last selected predefined sound setting a Press the button on the control panel or the button on the remote control to select the setting b Press the INPUT button on the control panel or the button on the remote control t...

Страница 68: ...the button on the control panel or the button on the remote control to select the setting Off On External Audio Volume Adjust the external audio volume Press the button on the control panel or the button on the remote control to adjust the value 0 to 100 Auto Volume Leveling Enable the reduction of sudden volume changes Press the button on the control panel or the button on the remote control to s...

Страница 69: ...bmenu Item Function Operation Range Tiling Mode With this function you can create a single large screen matrix video wall that consists of up to 100 sets of this display up to 10 sets on the vertical and 10 sets on the horizontal sides If tiling is enabled you can configure the following display settings H Monitors V Monitors Position Frame Comp Press the button on the control panel or the button ...

Страница 70: ...he value 0 to 100 Example1 1 x 2 screen matrix 2 displays H monitors 2 displays V monitors 1 display 1 2 H monitors V monitors Position Frame Comp If frame compensation is enabled then the display will adjust the image to compensate for the width of the display bezels in order to accurately display the image Frame Comp H 0 100 Frame Comp V 0 100 Press the button on the control panel or the button ...

Страница 71: ... control panel or the button on the remote control to enter the submenu Item Function Operation Range Language Choose the language used for OSD menus Press the button on the control panel or the button on the remote control to select the setting English Deutsch 繁體中文 Français Italiano Español Pyccкий Polski Türkçe 简体中文 Português اﻟﻌﺮﺑﻴﺔ اﻟﻠﻐﺔ 日本語 Logo When enabled the AG Neovo logo will be shown on...

Страница 72: ...e Source Detect setting If the Source Detect is set to Auto the display checks all input source signals before entering Standby mode if no signal is detected this takes up more time If the Source Detect is set to Manual the display enters Standby mode right away Off On Switch Power On State Choose the display status used for the next time you connect the power cord On Standby Last Status Switch Po...

Страница 73: ...d on Press the button on the control panel or the button on the remote control to select the setting 1 1a 1 2 KEY Lock Choose to enable or disable the keyboard control panel buttons function of the LCD display Unlock Enable the keyboard function Lock all Lock all keyboard function Lock but volume Disable all the keyboard function except the or button Lock but power Disable all the keyboard functio...

Страница 74: ...o disable the RC Lock function press the button and buttons 1 9 9 8 on the remote control Press the button on the control panel or the button on the remote control to select the setting Unlock Lock All Lock But Volume Lock But Power Lock All Except Volume and Power Source Detect Configure how the LCD monitor detects the input source Status Failover1 Failover2 Failover3 Failover4 Failover5 Failover...

Страница 75: ...ust the ID number for controlling the display via the RS232 connection Each display must have a unique ID number when multiple sets of this display are connected Press the button on the control panel or the button on the remote control to adjust the value 1 to 255 Clock Set the current date and time for the display s internal clock Daylight saving Choose the daylight saving time Press the button o...

Страница 76: ... activate You can set Which input source the display will use for each scheduled activation period The time for the display to turn on and turn off The days in a week for the display to activate Note We recommend you to set up current date and time in the Clock menu before using this function After changing the Clock option in the General settings menu you need to set this Scheduling again Status ...

Страница 77: ...rned off a Press the button on the control panel or the button on the remote control to set hours and minutes b Press the button on the control panel or the button on the remote control to navigate between hours and minutes fields c Press the INPUT button on the control panel or the button on the remote control to confirm Cancel Done Repeat Choose the days in a week when the schedule is activated ...

Страница 78: ...ntrol panel or the button on the remote control to choose the file b Press the INPUT button on the control panel or the button on the remote control to set or clear the playlist Options Exit Photo Video 0001 0002 Photo Playlist View a Press the button on the remote control then select Save list to save the playlist b Press the button on the remote control to exit Playlist and return to the OSD men...

Страница 79: ...the cooling fan is turned on automatically if the temperature reaches 70 C 158 F for three successive minutes and a temperature waning message is shown on the screen for 10 seconds In this situation the LCD display is shut down and the Power LED indicator will be blinking red and green This option is only applicable for HX 42E and HX 55E models Press the button on the control panel or the button o...

Страница 80: ...ntrol panel or the button on the remote control to select an option 4 Press the INPUT button on the control panel or the button on the remote control to enter the submenu Item Function Operation Range View Network Settings View connected network status Press the INPUT button on the control panel or the button on the remote control Close Network Configuration Choose how the LCD display should assig...

Страница 81: ...he remote control to configure the network parameters d When the setting is complete press the INPUT button on the control panel or the button Press the button on the control panel or the button on the remote control to select Done Then press the INPUT button on the control panel or the button on the remote control to save the setting IP Address Netmask Gateway DNS 1 DNS 2 Digital Media Renderer D...

Страница 82: ...l panel or the button on the remote control to confirm the selection Note While using the on screen keyboard press the button on the remote control to switch the on screen keyboard keys to lowercase button on the remote control to switch the on screen keyboard keys to uppercase button on the remote control to enter symbols or button on the remote control to enter backspace c When done select Done ...

Страница 83: ...lay cannot detect the input source signal Check if the input source is turned On Check if the signal cable is properly connected Check if any pin inside the cable connector is twisted or broken KEY Lock The operation using the control panel buttons has been locked by the user Disable the KEY Lock function See page 69 RC Lock The operation using the remote control buttons has been locked by the use...

Страница 84: ... v2 AC3 E AC3 Dolby Pulse MPEG 4 ASP 1920x1080 25p 30p 50i 60i 30 H 264 1920x1080 25p 30p 50p 60p 60i 30 MVC 1920x1080i field rate 50 60Hz 1920x1080p frame rate 24 25 30Hz 1280x720p frame rate 50 60Hz 30 ts m2ts mts mt2 MaTS TTS MPEG 2 1920x1080 25p 30p 50i 60i 30 MPEG 1 L1 L2 MPEG 1 2 2 5 L3 AAC HE AAC v1 v2 AC3 E AC3 Dolby Pulse MPEG 4 ASP 1920x1080 25p 30p 50i 60i 30 H 264 1920x1080 25p 30p 50p...

Страница 85: ...t mpd frag MP4 H 264 1920x1080 25p 30p 50p 60p 60i 30 AAC HE AAC v1 v2 AC3 E AC3 WMA WMA PRO MVC 1920x1080i field rate 50 60Hz 1920x1080p frame rate 24 25 30Hz 1280x720p frame rate 50 60Hz 30 mp4 MP4 MPEG 4 ASP 1920x1080 25p 30p 50i 60i 30 AAC HE AAC v1 v2 AC3 E AC3 WMA WMA PRO H 264 1920x1080 30 MVC 1920x1080i field rate 50 60Hz 1920x1080p frame rate 24 25 30Hz 1280x720p frame rate 50 60Hz 30 WMV...

Страница 86: ... Pro wav PC LPCM 192 768 LPCM aif mac aiff mac LPCM 192 768 LPCM aac mp4 m4a AAC 48 1024 AAC HE AAC v1 v2 pls m3u Playlists m4a M4A 48 1024 AAC HE AAC v1 v2 Note Sound or video may not work if the contents have a standard bit rate frame rate above the compatible Frame sec listed in the table above Video content with a Bit rate or Frame rate larger than the rate specified in the table above can cau...

Страница 87: ...108 MHz 5 4 Super XGA WXGA 1360 768 60 Hz 85 5 MHz 16 9 Wide XGA WXGA 1366 768 60 Hz 85 5 MHz 16 9 Wide XGA UXGA 1600 1200 60 Hz 162 MHz 4 3 Ultra XGA HD1080 1920 1080 60 Hz 148 5 MHz 16 9 HD1080 SDTV Resolution Standard Resolution Active Resolution Refresh Rate Pixel Rate Aspect Ratio Stand for Mode H Pixels V Lines 480i 720 480 29 97 Hz 13 5 MHz 4 3 Modified NTSC Standard 480p 59 94 Hz 27 MHz 57...

Страница 88: ...ay itself Be sure to disconnect all cables before moving the display Moving the display with its cables attached may damage the cables and thus cause fire or electric shock Disconnect the power plug from the wall outlet as a safety precaution before carrying out any type of cleaning or maintenance procedure Front Panel Cleaning Instructions The front of the display has been specially treated Wipe ...

Страница 89: ... the screen The picture format is not set correctly Press the button and select Wide Screen Can hear sound but no picture Improperly connected source signal cable Make sure that both video inputs and sound inputs are correctly connected Can see picture but no sound is heard Improperly connected source signal cable Volume is turned all the way down MUTE function is turned on No external speaker con...

Страница 90: ...al packaging carton HX 32E 1 Place the LCD display inside the supplied protective bag 2 Place the lower foam cushion inside the box a 3 Place the LCD display down in the box b 4 Place the upper foam cushion on the top of the LCD display c 5 Place the accessories on the designated area if necessary 6 Close and tape the box a c b ...

Страница 91: ...d protective bag 2 Place the lower foam cushions inside the box a 3 Place the LCD display down in the box b 4 Place the upper foam cushions on the top of the LCD display c 5 Place the accessories on the designated area if necessary 6 Close and tape the box a c b ...

Страница 92: ... inside the lower box a 3 Place the LCD display down in the lower box b 4 Place the upper foam cushion on the top of the LCD display c 5 Place the accessories on the designated area if necessary 6 Place the upper box on the LCD display 7 Secure the upper box to the lower box with the supplied locks d a b c d ...

Страница 93: ...In Out 2 5 mm Phone Jack 2 5 mm Phone Jack 2 5 mm Phone Jack LAN RJ45 Yes Yes Yes Other Connectivity USB 2 0 x 1 Service Port Media Playback 2 0 x 1 Service Port Media Playback 2 0 x 1 Service Port Media Playback Audio Audio In Stereo Audio Jack 3 5 mm x 1 Stereo Audio Jack RCA x 1 Stereo Audio Jack 3 5 mm x 1 Stereo Audio Jack RCA x 1 Stereo Audio Jack 3 5 mm x 1 Stereo Audio Jack RCA x 1 Audio O...

Страница 94: ...es Dimensions Product w o Base W x H x D 757 6 x 452 0 x 75 1 mm 29 8 x 17 8 x 3 0 987 2 x 581 2 x 83 0 mm 38 9 x 22 9 x 3 3 1268 8 x 739 6 x 83 0 mm 50 0 x 29 1 x 3 3 Packaging W x H x D 892 0 x 600 0 x 185 0 mm 35 1 x 23 6 x 7 3 1161 0 x 759 0 x 203 0 mm 45 7 x 29 9 x 8 0 1475 0 x 936 0 x 223 0 mm 58 1 x 36 9 x 8 8 Weight Product w o Base 15 2 kg 33 5 lb 23 2 kg 51 1 lb 37 1 kg 81 8 lb Packaging...

Страница 95: ... outline dimension opening dimension 28 1 28 1 28 1 28 1 outline dimension opening dimension SDI MODULE 37 8 75 1 HX 42E 987 2 931 0 581 2 525 0 393 6 393 6 200 0 200 0 Key button 28 1 28 1 AC IN OUT Power switch M6xL10 x4 28 1 83 0 37 2 100 7 443 4 206 1 190 6 190 6 85 8 695 3 outline dimension opening dimension outline dimension opening dimension SDI MODULE 43 1 40 0 68 7 28 1 ...

Страница 96: ...28 1 28 1 739 6 683 4 28 1 28 1 outline dimension opening dimension outline dimension opening dimension 138 3 SDI Module 83 43 1 AG Neovo Company Address 5F 1 No 3 1 Park Street Nangang District Taipei 11503 Taiwan Copyright 2021 AG Neovo All rights reserved HX 32E 42E 55E Eprel registration number 444210 444219 444232 HX 32E HX 42E HX 55E_UM_V011 ...

Отзывы: