background image

10

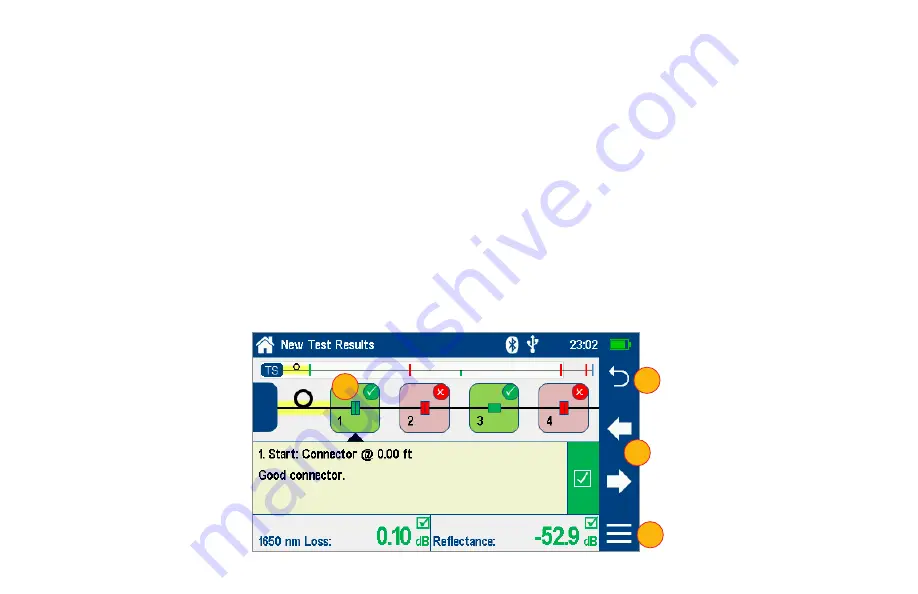
LinkMap Display and Navigation 

Notes:


The LinkMap Display automatically selects first fault when LinkMap first selected after test is complete.


The LinkMap Display returns to previously selected event if LinkMap previously selected for this test.

When in LinkMap Display, you may perform the following operations:
1.  Touch any LinkMap Icon to select it.
2.  Touch Left or Right arrows to move to previous or next LinkMap event.


Shift LinkMap left or right when left/right arrow pressed and previous or more off-screen events available to view.

3.  Touch Menu to save results and/or send to a Bluetooth-paired iOS or Android device running the FlexScan App.


Note: Results must be saved before they can be sent to a paired device.

4.  Touch Back to return to Test/Home screen.

1

2

4

3

Содержание FlexScan TS100

Страница 1: ...FlexScan TS100 Optical Troubleshooter Quick Reference Guide Test Inspection www AFLglobal com 2020 AFL all rights reserved TS100 00 1000 Revision AA 2020 12 07 ...

Страница 2: ...Battery partially charged Battery nearing empty Battery discharged Battery charging Battery fully charged Battery partially charged and Battery discharged symbols will only be shown when unit is operating without being connected to AC Configuring FlexScan to Auto Off Turn your FlexScan On From the displayed Home screen press Home Menu button to display General Settings menu In the Settings menu lo...

Страница 3: ...Home Menu screen and select Save Send or configure General Settings 2 Press Start Stop button to enable Live Fiber check or to start a new test or if test is running to end a test 3 Press VFL button to enable VFL mode 4 Touch Tool icon to configure Test Settings or select OLS OPM or Inspection 5 Touch Launch Cable to change LC length 6 Touch Network to configure Network Type Pt to Pt or FTTH PON a...

Страница 4: ...results to Bluetooth paired device If Send To option is grayed out Bluetooth is either not available or disabled Select General Settings to enable Bluetooth and pair to mobile device running the FlexScan App if you wish to upload results to that device for reporting or sharing 4 Touch General Settings to select view and edit General Settings 5 Touch My Projects to recall and view saved results 6 T...

Страница 5: ...Setting to edit it Network Type Launch Cord Pass Fail Rules Fiber Type 3 Press Start Stop to initiate a test and return to Home screen 4 Press Home Menu or touch Back to return to Home Test Results screen without starting a new test 5 Touch dB dBm icon to select Light Source Power Meter test screen 6 Touch Inspection icon to select Connector Inspection display screen 1 2 4 3 5 6 ...

Страница 6: ... Point to Point PON to Splitter Touch Back to return to Test Setup Launch Cord Touching Launch Cord option displays the Launch Cord Setup screen that allows the user to View Edit Launch Cable Length 1 Touch Clear to clear current launch cable length 2 Enter desired launch cable length 3 Touch Cancel or Back to return to previous screen without saving changes 4 Touch Done to save changes and return...

Страница 7: ... Pass Fail rule to view edit link and event pass fail limits Use left right arrows to navigate through view and edit pass fail limits Notes 1 Splice Connector and Splitter pass fail limits are fixed and cannot be edited for ITU G 671 and TIA 568 3 D standards 2 Splitter pass fail limits can only be viewed and set in TS100 70 ...

Страница 8: ...layed in the Fiber Type field If not touch the Fiber Type field to display the Fiber Type menu and touch the User option to select When back in the Setup screen touch and hold the displayed User label to open the User Fiber Type settings screen and configure settings as follows Group Index of Refraction GIR Backscatter Coefficient BC Fiber Attenuation ACI Loss per Distance Touch the desired parame...

Страница 9: ... savings Auto Off Timer Enable disable auto off and configure auto off delay Launch Quality Check Enable disable launch quality check Remote Control Future Received Image Display received inspection image in popup window or save in tray for later viewing Switch Mode Configure multi fiber testing when connected to MFS multi fiber switch General Settings General Settings screen is accessed from the ...

Страница 10: ...ch Network Configuration to edit Network Type Pt to Pt or FTTH PON and Split Ratio Press Start Stop again to initiate a test Touching Press To Start will also initiate a test Press Start Stop to end a test Link Length Loss ORL detected and measured in 3 5 seconds Test continues to locate identify and measure events Test completes within 30 seconds identifying faults with loss or reflectance exceed...

Страница 11: ...form the following operations 1 Touch any LinkMap Icon to select it 2 Touch Left or Right arrows to move to previous or next LinkMap event Shift LinkMap left or right when left right arrow pressed and previous or more off screen events available to view 3 Touch Menu to save results and or send to a Bluetooth paired iOS or Android device running the FlexScan App Note Results must be saved before th...

Страница 12: ...e Tone for fiber identification 270 Hz 330 Hz 1 kHz 2 kHz 3 Touch Wavelength field to select test wavelength Power Meter Settings and Features 4 If used with non Wave ID source touch to select wavelength If used with Wave ID source power meter automatically synchronizes to and indicates received wavelength s 5 Touch and hold Ref Set to store new reference s at received wavelength s Touch and relea...

Страница 13: ...ameters which are defined in the Save As screen End 1_End 2_Cable_Fiber _Wavelength Fiber S13 for 1310 nm S15 for 1550 nm M85 for 850 nm M13 for 1300 nm Touch Save To to display File Manager and navigate to the desired Project Fiber Group folder Project End 1 End 2 and Cable are user defined in Text Editor Fiber number auto increments after each save but can be modified in Number Editor as needed ...

Страница 14: ...ly Created Folder While in the Results view touch Menu icon From the displayed sub screen touch Save As to display the Results Manager screen Define Project End1 End2 Cable and Fiber fields used to name saved results Touch Done when finished Note this will make the newly created Project End1 End2 Cable or Fiber current Saving to the Current Folder While in the Results view touch the Menu icon From...

Страница 15: ...e through Project Fiber Group Fiber screens to locate the desired test record then touch it to display it Touch up down keys to scroll up down through list of files Touch Folder Up icon to navigate up to Fiber Groups or Projects level Touch the Memory USB icon to toggle between USB memory stick and internal memory card if USB stick present ...

Страница 16: ...r where X is the drive letter assigned to your FlexScan Under TS100 X you should see two folders RESULTS and SOFTWARE Copy the RESULTS folder to your PC Under RESULTS you will see TRACES Under TRACES you will see all of the folders containing test results Note Before removing the USB cable connecting your FlexScan to your PC or pressing the Cancel soft key on the USB screen left click the Safely R...

Страница 17: ...me Menu button From the displayed Test Home Menu touch Info View FlexScan Info displayed on the Device Information screen Model Number Displays the Model Number of your FlexScan Software Operating System and Application software Calibration Date FlexScan s calibration date Serial Number FlexScan s serial number Optical Software Revision of current optical firmware Bluetooth Software Revision of cu...

Страница 18: ...of delivery to the end user Any product that is found defective within the warranty period will at the discretion of AFL be repaired or replaced Warranty will be voided if the product has been repaired or altered by other than an authorized AFL product repair facility if the void sticker has been compromised or which have been subject to misuse negligence or accident In no case shall AFL liabiliti...

Страница 19: ...www AFLglobal com Thank you for choosing AFL Test Inspection Test Inspection ...

Отзывы: