background image

9

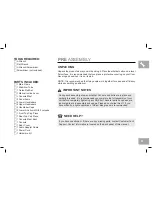
TOOLS REQUIRED:


F

L-Wrench


F

Flat Wrench


F

L-Wrench/Screwdriver


F

Screwdriver (not included)

PARTS INCLUDED:


F

1 Main Frame


F

1 Stabilizer Tube


F

1 Guide Rail Set


F

1 Manual Incline Lever


F

1 Console Mast


F

2 Pedal Arms


F

2 Lower Handlebars


F

2 Upper Handlebars


F

2 Handlebar Caps


F

2 Lower Link Arms With Footpads


F

1 Front Top Cap Piece


F

1 Rear Top Cap Piece


F

1 Console Mast Boot


F

1 Console


F

1 Rear Cover


F

1 Audio Adapter Cable


F

1 Power Cord


F

1 Hardware Kit

UNPACKING

Unpack the product where you will be using it. Place the elliptical carton on a level 

flat surface. It is recommended that you place a protective covering on your floor. 

Never open box when it is on its side.
NOTE: It is recommended that two people work together for ease and efficiency 

while assembling an elliptical.

If you have questions or if there are any missing parts, contact Customer Tech 

Support. Contact information is located on the back panel of this manual.

NEED HELP?

PRE 

ASSEMBLY

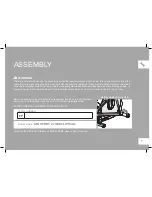
During each assembly step, ensure that ALL nuts and bolts are in place and 

partially threaded. It is recommended you complete the full assembly of your 

unit before completely tightening any ONE bolt. Several parts have been pre-

lubricated to aid in assembly and usage. Please do not wipe this off. If you 

have difficulty, a light application of lithium bike grease is recommended.

IMPORTANT NOTES

Содержание 2.7AE

Страница 1: ...Read the ELLIPTICAL GUIDE before using this OWNER S MANUAL 2 7 ELLIPTICAL OWNER S MANUAL...

Страница 2: ...2...

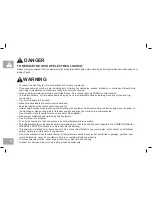
Страница 3: ...is elliptical It is the responsibility of the owner to ensure that all users of this elliptical are adequately informed of all warnings and precautions If you have any questions after reading this gui...

Страница 4: ...Before mounting or dismounting move the pedal on the mounting or dismounting side to its lowest position and bring the machine to a complete stop Do not wear clothes that might catch on any part of t...

Страница 5: ...f 13 or pets be within 10 feet of the machine At NO time should children under the age of 13 use the elliptical Children over the age of 13 or disabled persons should not use the elliptical without ad...

Страница 6: ...6...

Страница 7: ...ed and will seem loose and may cause irritating noises To prevent damage to the elliptical the assembly instructions must be reviewed and corrective actions should be taken Before proceeding find your...

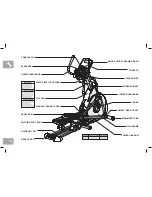
Страница 8: ...ER BOTTLE HOLDER TOP CAP MANUAL INCLINE LEVER PEDAL ARM PIVOTING FOOT PADS GUIDE RAIL SET REAR COVER MUSIC PLAYER READING RACK CONSOLE PULSE GRIPS CONSOLE MAST LOWER HANDLEBAR CRANK POWER CORD SOCKET...

Страница 9: ...level flat surface It is recommended that you place a protective covering on your floor Never open box when it is on its side NOTE It is recommended that two people work together for ease and efficie...

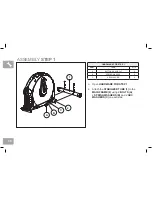
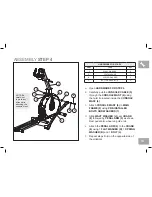
Страница 10: ...ARE FOR STEP 1 B Attach the STABILIZER TUBE 1 to the MAIN FRAME 2 using 2 BOLTS A 2 SPRING WASHERS B and 2 ARC WASHERS C on each side A B C 2 1 HARDWARE FOR STEP 1 PART TYPE QTY A BUTTON HEAD BOLT 4 B...

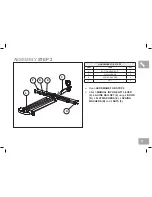
Страница 11: ...HARDWARE FOR STEP 2 B Attach MANUAL INCLINE LIFT LEVER 3 to GUIDE RAIL SET 4 using 4 BOLTS D 4 FLAT WASHERS E 4 SPRING WASHERS B and 4 NUTS F HARDWARE FOR STEP 2 PART TYPE QTY D BUTTON HEAD BOLT 4 E F...

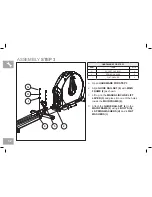
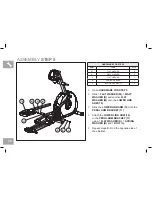
Страница 12: ...P 3 4 3 2 H I G A Open HARDWARE FOR STEP 3 B Align GUIDE RAIL SET 4 with MAIN FRAME 2 as shown C Lift up on the MANUAL INCLINE LIFT LEVER 3 and place it in one of the holes inside the MAIN FRAME 2 D A...

Страница 13: ...E MAST 6 C Attach CONSOLE MAST 6 to MAIN FRAME 2 using PRE INSTALLED BOLTS AND WASHERS 7 D Slide WAVY WASHER J over CRANK 8 followed by PEDAL ARM 9 as shown Rest pedal arm wheel on guide rail E Attach...

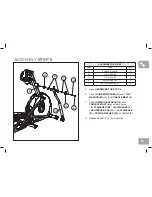
Страница 14: ...B L A Open HARDWARE FOR STEP 5 B Slide 1 FLAT WASHER M 1 WAVY WASHER N and another FLAT WASHER M onto the LOWER LINK ARM 10 C Slide the LOWER LINK ARM 10 into the PEDAL ARM BRACKET 11 D Attach the LOW...

Страница 15: ...AST 6 C Slide LOWER HANDLEBAR 12 onto CONSOLE MAST 6 and attach using 1 FLAT WASHER M 1 FLAT WASHER P 1 HANDLEBAR CAP 13 1 FLAT WASHER P 1 SPRING WASHER B and 1 BOLT L D Repeat steps B C on the other...

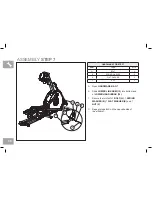
Страница 16: ...WASHER 2 F NUT 2 ASSEMBLY STEP 7 10 K B 12 Q F A Open HARDWARE BAG 7 B Slide LOWER LINK ARM 12 into bottom end of LOWER HANDLEBAR 10 C Secure the joint with 1 BOLT Q 1 SPRING WASHER B 1 FLAT WASHER K...

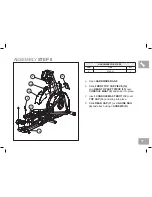
Страница 17: ...FRONT TOP CAP PIECE 14 and REAR TOP CAP TPIECE 15 over CONSOLE MAST 6 and snap into place C Insert CONSOLE MAST BOOT 16 over TOP CAP 14 and snap into place D Slide REAR CAP 17 over GUIDE RAIL 4 and a...

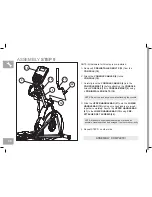
Страница 18: ...ach CONSOLE 19 to CONSOLE MAST 6 using 4 PRE INSTALLED BOLTS 18 D Slide the UPPER HANDLEBAR 21 onto the LOWER HANDLEBAR 12 making sure handlebars are joined together completely Secure the UPPER HANDLE...

Страница 19: ...and programming The BASIC OPERATION section in the ELLIPTICAL GUIDE has instructions for the following LOCATION OF THE ELLIPTICAL POWER GROUNDING INSTRUCTIONS FOOT POSITIONING MOVING THE ELLIPTICAL LE...

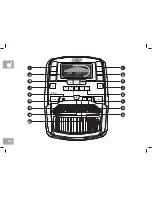
Страница 20: ...20 ENTER DISPLAY START STOP A B J D I I C J F E L G K H O N M...

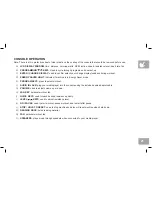
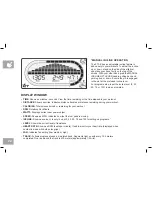
Страница 21: ...chine is in Energy Saver mode E PROGRAM KEYS press to select workout F AUDIO IN JACK plug your media player into the console using the included audio adaptor cable G VOLUME used to adjust volume up or...

Страница 22: ...e Used to monitor your heart rate displayed when contact is made with both pulse grips FAN Indicates fan setting low medium high TRACK Follows progress around a simulated track Segments light up with...

Страница 23: ...e power cord to power the elliptical ON 3 Select User 1 User 2 or Guest using and press ENTER 4 Set User Weight using and press ENTER 5 You have the following options to start your workout A QUICK STA...

Страница 24: ...es burned are calculated using weight input by user with the resistance and incline of workout DISTANCE Push yourself and go further during your workout with 10 distance workouts Choose from 1 mile 2...

Страница 25: ...s activated the display will automatically enter standby mode Energy Saver mode after 15 minutes of inactivity This feature saves energy by disabling most power to the machine until a key is pressed o...

Страница 26: ...26...

Страница 27: ...27 LIMITED HOME USE WARRANTY...

Страница 28: ...and is not transferable What IS covered Repair or replacement of a defective motor electronic component or defective part and is the sole remedy of the warranty What IS NOT covered Normal wear and tea...

Страница 29: ...ny such repairs or replacement parts costs including but not limited to gym membership fees work time lost diagnostic visits maintenance visits or transportation Equipment used for commercial purposes...

Страница 30: ...30...

Страница 31: ...31...

Страница 32: ...ve an opportunity to correct it for you NOTE Please read the TROUBLESHOOTING section in the ELLIPTICAL GUIDE before contacting Customer Tech Support Additional product information is available on our...

Отзывы: