BEFORE
YOU
BEGIN
INTRODUCTION
IMPORT
ANT
PRECAUTIONS
ASSEMBL
Y
BEFORE
YOU
BEGIN
BIKE
OPERA
TION
LIMITED
W
ARRANTY
TROUBLESHOOTING
&
MAINTENANCE
CONDITIONING
GUIDELINES
BEFORE YOU
BEGIN
ASSEMBL
Y
INTRODUCTION
IMPORT
ANT
PRECAUTIONS
BIKE
OPERA
TION
CONDITIONING GUIDELINES
TROUBLESHOOTING &
MAINTENANCE
LIMITED WARRANTY
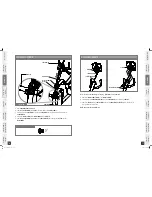
BOLTS (B)
BOLTS (B)
PULSE GRIP BAR
PLASTIC CLIP
EXPOSED WIRES
RECESS
COVERED PULSE
GRIP WIRES
SEAT SLIDE
PRE-ATTACHED
ADJUSTMENT LEVER SCREW
ASSEMBLY
STEP 3
ASSEMBLY
STEP 2
Open
hardware bag for step 2
.
Firmly Tighten the
pre-attaChed adJustMent LeVer sCrew
to the
braCKet
.
Attach the
seat fraMe
to the
seat sLIde
using 4
boLts (b)
.
Attach the
puLse grIp wIres
from the rear of the recumbent to the
puLse grIp wIres
from the
puLse grIp bar
.
Press
CoVered puLse grIp wIres
into the
pLastIC CLIp
as shown above. Tuck
eXposed wIres
into
reCess
under
puLse grIp bar
.
Attach the
puLse grIp bar
to the
seat sLIde
using 4
boLts (b)
.
Note: Tuck in wires as shown. Be sure that the
puLse grIp wIres
will not be crushed when adjusting the
seat back and forth.
A.
B.
C.
D.
E.
F.
BOLT (B)
10 mm
Qty: 8
HARDWARE BAG FOR STEP 2 CONTENTS :
BOLTS (B)
BOLTS (B)
PULSE GRIP BAR
PLASTIC CLIP
EXPOSED WIRES
RECESS
COVERED PULSE
GRIP WIRES
SEAT SLIDE
PRE-ATTACHED
ADJUSTMENT LEVER SCREW
BOLT (C)
40 mm
Qty: 8
WASHER (D)
17 mm
Qty: 8
HARDWARE BAG FOR STEP 3 CONTENTS :
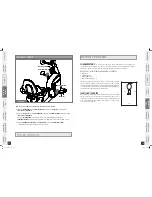
Open
hardware bag for step 3.
Attach
seat base
to
seat fraMe
using 4
boLts (C
) and 4
washers (d)
.
Attach
seat baCK
to
seat fraMe
using 4
boLts (C
) and 4
washers (d)
.
A.
B.
C.
3.0AR SHOWN
3.0AR SHOWN
WASHERS (D)
SEAT BASE
SEAT BACK
BOLTS (C)
WASHERS (D)
BOLTS (C)
SEAT FRAME
3.0AR SHOWN
WASHERS (D)
SEAT BASE
SEAT BACK
BOLTS (C)
WASHERS (D)
BOLTS (C)
SEAT FRAME
3.0AR SHOWN
2.0_3.0_AR_Rev.2.3.indd 8-9
8/1/07 11:41:57 AM


