background image

R

emote Contr

ol 

Overview

7

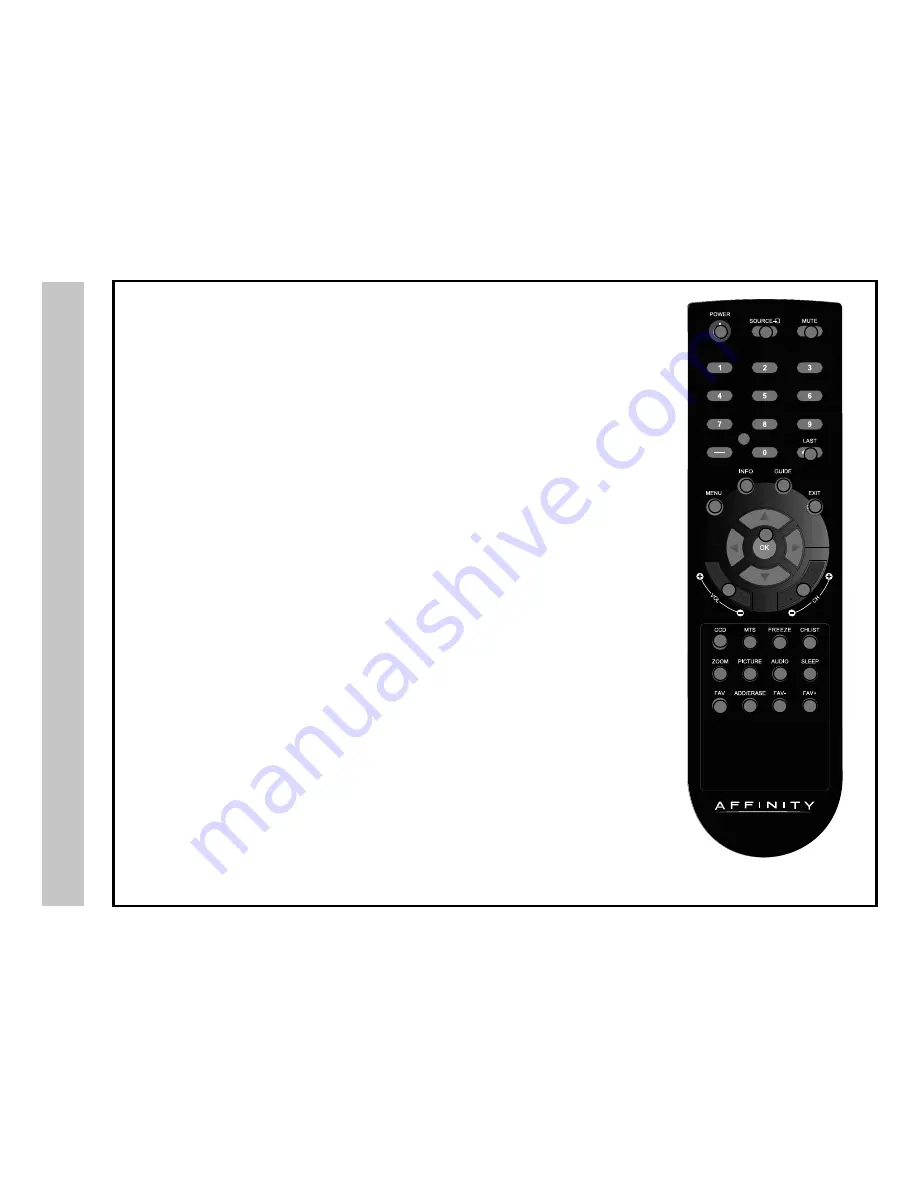
Functions Using the Remote Control Handset

1.    Power – 

Turn the television display On/Off.

2.    Source – 

Press to display all input sources on screen.

3.    Mute – 

Press to temporarily turn sound off. Press again to resume.

4.    Numbers / Dash –

  Select desired TV channel directly. For example: to select digital channel four,  

    press “4”  “-”  “1” (4-1).

5.    Repeat – 

Press to select between the current and previously viewed TV channel.

6.    Menu – 

Press to display the Main menu.

7.    Info – 

Provides information on the currently viewed program.

8.    EPG/Guide – 

Press to review scheduled programming for the current channel viewed. 

9.    Exit – 

Press to exit a menu that is displayed. 


10.  

qpt


u

Arrows/ OK – 

Navigate menus to make selections. Press OK to confirm.

11.  /-  – 

Adjust volume up and down.

12.  /-  – 

Scan channels up and down.

13.  CCD – 

Select closed caption subtitles (if available) OFF > ON > CC on Mute (pg. 22)

14.  MTS – 

Press to select an alternate audio language (if applicable)

15.  Freeze – 

Pause and still-frame the current image on the display. Press again for live TV.

16.  Channel List – 

Displays channel lists on the screen.

17.  Zoom – 

Select viewable display options: Normal > Wide > Zoom > Cinema. 

18.  Picture Mode – 

Select from various preset picture modes: Dynamic > Standard > Movie > User.

19.  Audio Mode – 

Select Dynamic, Standard, Movie or User sound modes.


20.  Sleep – 

Press to activate the Sleep function to turn off the TV automatically; 5 Min > 10 Min > 15 Min >  

 30 Min > 45 Min > 60 Min > 90 Min > 120 Min > 180 Min > 240 Min > OFF. 

21.  FAV –  

Press to display a list of favorite TV channels you have added.

22.  Add/Erase –  

Add and erase favorite channels.

23.  FAV-  – 

Press to scan to a lower channel from your list of favorites.

24.  FAV+ – 

Press to scan to a higher channel from your list of favorites.

NOTE: When using the remote control, point it directly at the TV.

1

3

6

9

4

7

10

11

14

16

19

22

23

12

15

18

24

13

17

20

21

5

8

2

Remote Code: 08F7

Содержание LE1950

Страница 1: ...LE1950 USER S MANUAL V20303 19 LED HDTV 19...

Страница 2: ...tal device pursuant to Part 15 of the FCC Rules These limits are designed to provide reasonable protection against harmful interference in a residential installation This television generates uses and...

Страница 3: ...Safety Instructions 2...

Страница 4: ...Safety Instructions 3 KCPI Affinity...

Страница 5: ...r Connection to a Receiver Amp Initial TV Setup Initial Setup Wizard Picture Settings Contrast Brightness Color Tint AV mode only Sharpness Color Temperature Specifications Troubleshooting Warranty 1...

Страница 6: ...t composite and VGA terminal for connection to a computer A coaxial digital audio SPDIF jack is included to connect through your home amplifier receiver to provide a spectacular home theater sound exp...

Страница 7: ...f you do not plan to use the remote control handset for an extended period of time Do not mix bat teries of different age and or type Always discard used batteries safely Do not expose remote control...

Страница 8: ...ubtitles if available OFF ON CC on Mute pg 22 14 MTS Press to select an alternate audio language if applicable 15 Freeze Pause and still frame the current image on the display Press again for live TV...

Страница 9: ...appropriate input source to view Press the SOURCE button to display input options 3 Menu Press the MENU button to display menu settings 4 5 Volume VOL VOL Press the VOL VOL buttons to adjust volume up...

Страница 10: ...on most video equip ment NOTE There is one set of audio L R input jacks for use with either your Component YPbPr or AV installation 7 HDMI Input Supports enhanced high definition video and up to 5 1...

Страница 11: ...with Digital Cable Satellite Set Top Box Connect the RF coaxial 75 ohm cable from the video outlet of your cable Satellite box to the RF IN on the TV s rear panel Select Ch 3 or 4 on the TV and select...

Страница 12: ...HDMI input available for use with HD set top boxes gaming con soles and blu ray players How to Connect HDMI From your external device connect an HDMI cable from the HDMI OUT PUT to the HDMI INPUT on...

Страница 13: ...e video output jacks Y Pb Pr on your external equipment to the Compo nent YPbPr input on the TV s rear panel Connect white red audio cables for sound from the audio L R output jacks on your external e...

Страница 14: ...olors of the connecting jacks Video Yellow Audio White Red Connect the yellow video cable from the video output jack on your external A V equipment ie DVD player set top box to AV input on the TV s re...

Страница 15: ...he computer s mini audio output jack to the PC Audio jack on the TV s rear panel How to Use Press the SOURCE button on the remote control Use qp arrow buttons to highlight the input to view VGA then p...

Страница 16: ...ereo receiver amplifier or Dolby Pro Logic sound system when connected to your AV equipment Example Diagram illustrates the connection of audio cables from your AV equipment to a stereo receiver inste...

Страница 17: ...nnel Search may take several minutes to complete Notice 1 Channel scan starts from the analog channels and then ends with digital channels 2 Channels found will automatically be stored 3 You may press...

Страница 18: ...q arrow button to highlight Brightness Navigate using the t u arrow buttons to increase or decrease overall brightness Press down q arrow button to highlight Contrast Navigate using the t u arrow butt...

Страница 19: ...y Press down q arrow button to highlight Treble Navigate using the t u arrow buttons to increase or decrease high frequency intensity Press down q arrow button to highlight Balance Navigate using the...

Страница 20: ...arrow button to highlight Channel List and press the OK button to display channel list It will show the current channels Press the qp arrow button to highlight Favorite List and press the OK button to...

Страница 21: ...ntrol and enter your four digit passwrd with numeric key 0 9 Factory default code is 0000 After unlocking the items in parental control menu can be used Press the qp arrow button to highlight V CHIP a...

Страница 22: ...hich contains two sub menus Movie Rating and TV Block Unrated Show Block all the unrated programs Highlight TV then press the u arrow button to enter the TV Ratings menu and select your preference TV...

Страница 23: ...ess OK or u arrow button to enter CANADA V chip ratings menu which contains two sub menus English Rating and French Rating E Appropriate for everyone C Appropriate for all children C8 Appropriate for...

Страница 24: ...rrow button to highlight Analog Caption Type and press the t ubutton to select caption type CC1 CC2 CC3 CC4 TEXT1 TEXT2 TEXT3 TEXT4 Press the qp arrow button to highlight Digital Caption Type and pres...

Страница 25: ...qp arrow button to highlight No Signal Power Off and press the OK button to turn on or off If turned on the TV will shut off after 10 minutes if no signal is found We suggest you to turn on this funct...

Страница 26: ...tretches certain 4 3 content and may reduce the black bars Zooms in to fill the screen when viewing widescreen content The zoom effect will crop images somewhat When viewing 4 3 content Cinema mode wi...

Страница 27: ...lions Power Consumption Power Supply Dimension with Pedestal Installed Weight with Pedestal Input Connections LED 18 5 Diagonal 480i 480p 720p 1080i 1 366 x 768 200 1 000 1 170 170 16 7M 36 Watts DC I...

Страница 28: ...o the TV tuner memory Check whether the channel is hidden Check parental control settings Restore default settings Check that connected audio cables are completely inserted Verify you have selected th...

Страница 29: ...ty period or 45 days whichever is greater Your Responsibility Warranty service shall be provided when a return authorization number RMA is provided to you Warranty extends to defects in materials or w...

Страница 30: ......

Страница 31: ......

Страница 32: ......

Отзывы: