3
2
1
2
1
T-7
min 1-3
/8"
2
1
T-1
INSTALLATION
Option 2
Permanent Installation
(
Drilling
required
)
2
3
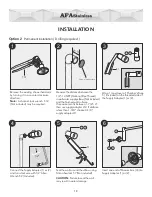
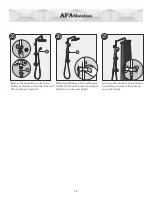
Wrap 1 (one) layer of Plumber’s Tape
T-1(Included) on the threaded side of
the Supply Adapter (1) or (2).
Insert one end of Shower Arm (3) into
Supply Adaptor (1) or (2).
1/2"
T-2
5
6
4
12
Shower wall surface
Remove the existing showerhead arm
by turning it in a counter clockwise
direction.
Note:
A channel lock wrench T-12
(Not included) may be required.
Connect the Supply Adapter (1) or (2)
and turn clockwise with 1/2" Allen
Wrench T-2 (Included).
Seal the wall around the elbow using
Silicon Sealant T-7 (Not included).
CAUTION:
Failure to seal the wall
may result in water damage.
T-12
1
Measure
the
distance
between
the
1/2”-14
NPT
(
National Pipe Thread)
in wall water supply elbow
(
Not included
)
and the nished
wall
surface.
If measurement is between 1-7/8”- 4”
then use supply adapter #2. If distance
is less than 1-3/8” choose 3-1/8”
supply adapter #1.


