background image


Multiconference Setup 

Before activating a multiconference session, configuration is required. 
From the Home Page select: 

1. SETTINGS 
2. MULTICONFERENCE 

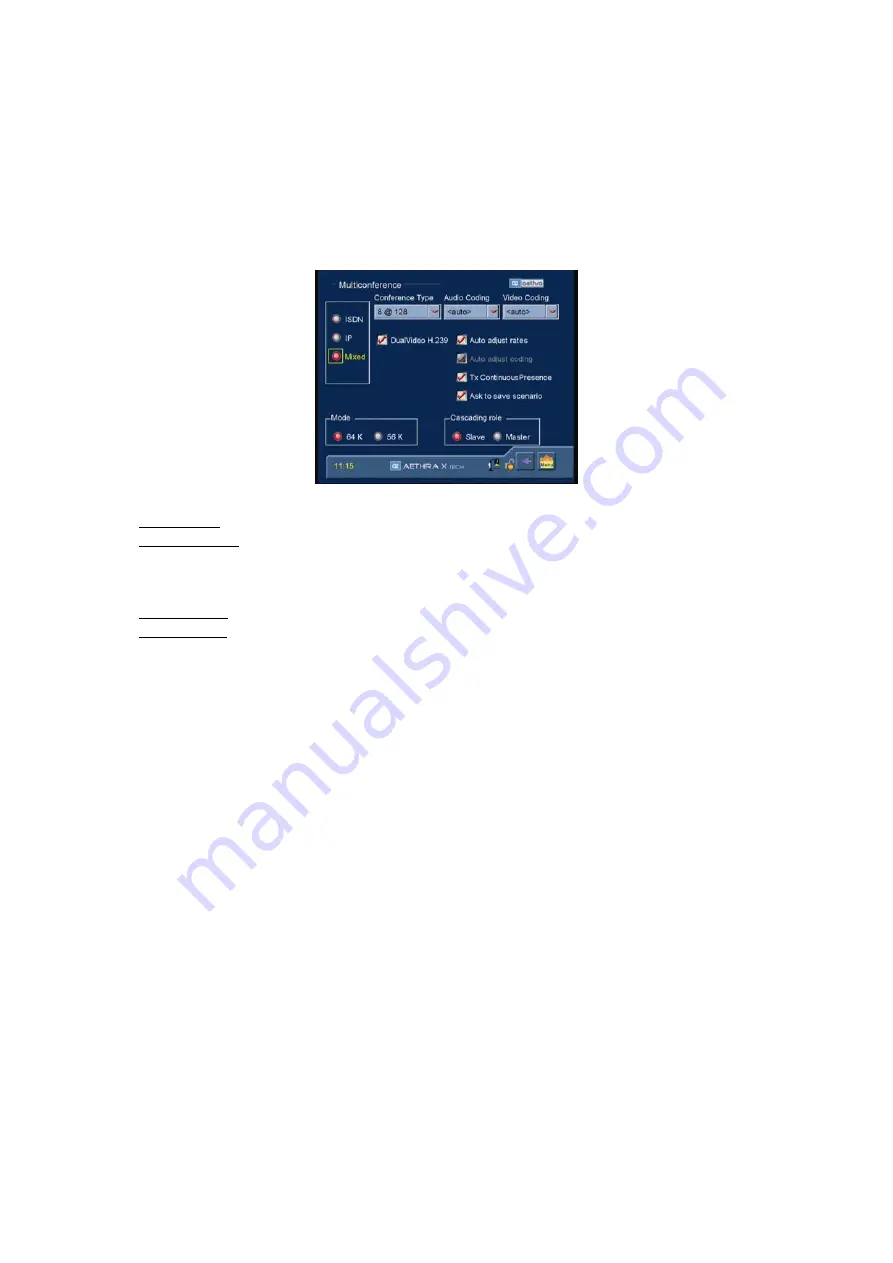
The following will be displayed: 


In this menu you can set: 

• 

Network Type

: IP, ISDN or Mixed.  

• 

Conference Type

: allows you to select the number of participants and the desired rate (example: for an MCU IP you 

select 8@256 from the drop-down menu, which means that the MCU will allow the System to manage a 

multiconference with a maximum of 8 terminals (including itself), via IP, with a maximum rate of 256K for each 
connection). 

• 

Preferred Audio Coding 

• 

Preferred Video Coding 

Go to the corresponding drop-down menu, press OK, with the aid of the arrow keys on the remote control make 

your selection and press OK again to confirm. <Auto> is the default setting. 

In addition, you can select the following options: 

• 

Automatic rate adaptation and automatic encoding adaptation 

If automatic adaptation is enabled, the System will automatically adapt the multiconference to the audio/video 
encoding and bit rate of the lowest quality connection within the conference, without excluding any participant. 

• 

Continuous presence 

Enable/Disable transmission of Continuous presence: for multiconferences (at least two participants) all participating 
sites receive the signals simultaneously from all participating terminals. 

• 

Ask to save scenario: At the close of the multiconference, the system asks whether save in the phonebook all 
information needed to repeat it, with an editable “conference name.” 

• 

Mode (only for MCU ISDN or Mixed) 

Multiple of 64K 
Multiple of 56K. 
 

• 

Master or Slave Cascade Role. 

This option allows you to set up cascaded MCUs in a two-level hierarchy tree. Corresponding to the base node of the 

cascade there is the Master System, with Slave Systems for the child nodes. 


Note 

In a mixed-mode MCU session, the user can choose to substitute NIC protocol for ISDN. So in a multiconference with an 

active NIC connection, no ISDN connections are allowed, and in a multiconference with an active ISDN connection, no NIC 

connections are allowed 


66

Содержание AVC500

Страница 1: ...rporation Windows is a trade mark of Microsoft Corporation The information contained in this document is the property of Aethra SpA it is subject to change without notice and it shall in no way be binding for Aethra SpA Copyright Aethra Telecomunicazioni SpA 2006 All rights reserved Cod 074111020GB Rev 0 July 2006 ...

Страница 2: ...DEO CALLS 24 TO RESELECT AN INCOMING OR OUTGOING CALL 24 TCS 4 MODE VIDEO CALL 24 AUDIO CALL 25 SECURE CONNECTIONS 25 HOW TO RECEIVE A CALL 25 DUAL VIDEO MODE 26 Dual Video Connection 26 Dual Video Disconnection 26 USING THE PHONEBOOK 27 Entering Names in the Phonebook 27 Modifying and Erasing Phonebook Entries 28 Connecting to a global Remote Phonebook 28 VIDEO INPUT MANAGEMENT 29 VIDEO PRIVACY 2...

Страница 3: ...n 55 H323 Settings 56 SIP Settings 57 Services 57 PPPoE 61 Enable network 61 Location 62 Load default settings 62 PRESENTATIONS 63 Slides storage 64 Slides recall via WEB client 64 Saving slides on a PC 64 INTEGRATED MULTI CONFERENCE UNIT MCU OPTIONAL 65 Technical Specification MCU 65 Multiconference Setup 66 How to start a multiconference 67 Multiconference Management 70 MCU control panel icons 7...

Страница 4: ...ference software 81 APPENDICES 82 NETWORK REQUIREMENTS IP H 323 82 NAT FIREWALL INTEROPERABILITY 83 WIRELESS CARDS 86 TECHNICAL SPECIFICS 87 ELECTRICAL FEATURES OF CONNECTORS 88 TROUBLESHOOTING PROBLEMS 95 GLOSSARY 96 USE AND STORAGE CONDITIONS 97 4 ...

Страница 5: ...or as part of building wiring systems 1 Tmra The manufacturer s maximum recommended ambient temperature is 40 C 2 Elevated Operating Ambient Temperature If installed an a closed or multi unit rack assembly the operating ambient temperature of the rack environment may be grater than room ambient Therefore consideration should be given to installing the equipment in an environment compatible with th...

Страница 6: ...se be caused by inappropriate waste handling of this product For more detailed information about recycling of this product please contact your local city office your household waste disposal or the dealer where you purchased this product FCC15 Classe A COMPLIANCE This equipment has been tested and found to comply with the limits for a Class A digital device pursuant to part 15 of the FCC Rules The...

Страница 7: ...ystem functions see Remote control chapter Remote control uses two 1 5V AAA alkaline batteries and an alert appears on the status bar when batteries are low user can change the batteries opening the cover on the remote control rear Insertion of the characters in the alphanumeric fields For numbers or letters insertion it is possible to use the alphanumeric keyboard of the remote control or alterna...

Страница 8: ...onality or setting status STATUS BAR the graphic horizontal bar displayed in all pages lower end Inside the bar depending on the page images or symbols show available functionalities or settings status Home page Icons Status Bar Active icon Video window Inside a Menu you can SELECT AN ICON to choose an icon use arrow keys yellow frame showing the selection To activate the desired functionality pre...

Страница 9: ...ith Continuous Presence function in mix mode ISDN and IP Convenient Fully featured set top solution with embedded XGA ports and support for 3 monitors Supports multiple connectivity Available in several versions for connections up to 768 kbps over ISDN BRI and 4 Mbps over IP as well as connections up to 2 Mbps over ISDN PRI or over leased lines X 21 V 35 RS366 RS449 RS530 G 703 Simultaneous Dual S...

Страница 10: ...a and document camera Supports AMXTM and CrestronTM protocols for keyboards and control panels T 120 for multimedia Full duplex audio with echo cancellation Automatic Noise Suppression Remote diagnostics and management Web streaming function Wireless LAN support AVC 500 system components Main components of the AVC 500 are H 320 H323 Codec High Band Microphone POD Power supply whit cable Infrared r...

Страница 11: ...om the screen saver mode By pressing the key results in opening a window of notice YES Turn off the system NO To enter screen saver mode SEND Key It sends slides still pictures SLIDE Key Opens the integrated PPT presentation FAR NEAR Key Select the remote o local camera for PTZ DUAL Key Once in connection it activates the DualVideo functionality the system asks for the second video source By press...

Страница 12: ...ied SELF Key Activates deactivates selfview Help Key Activates deactivates on line help Keys ZOOM sets the camera zoom Auto Key Activates deactivates the autotracking function Keys VOL sets the audio level Mute Key Activates deactivates audio transmission Arrow Keys allow navigation inside interface pages and camera movements OK Key confirms actual selection Call Key Allows to call or receive an i...

Страница 13: ...mize cameras MEMO PRESET Key Saves the camera presets SEL PRESET Key Selects the camera presets Alphanumeric Keys It allows letters and numbers insertion See the chart Remote control alfa numeric symbols to keys association KEY SYMBOLS 1 1 A B 2 2 C D 3 3 E F G 4 4 H I J 5 5 K L M 6 6 N O 7 7 P Q R 8 8 S T 9 9 U V W 0 0 X Y Z _ 13 ...

Страница 14: ...14 Cabling Scheme ...

Страница 15: ...ures as in a real meeting Speak in your normal voice Optimal Video Avoid contemporaneous usage of natural changing and artificial lightning Avoid direct artificial lightning Avoid mobile backgrounds curtains moved by the wind Try to fill the screen as much as possible with persons not backgrounds Optimal Audio Place the microphone on the table in front of people use 2 microphones in case of big ta...

Страница 16: ...nnecting each ISDN access to the system connectors please take note of the corresponding telephone numbers see cable 4 Connect the ISDN input ISDN connector or network interface only to a network termination NT1 Do not connect the equipment to an external telecommunications line 6 Connect supplementary audio or video equipments to the available inputs outputs 7 Connect the power supply see cable 5...

Страница 17: ...ct the High Band Pod microphone High Band POD 1 Connect the High Band POD output to the rear panel of the System 2 In case a second High Band POD is used connect second POD output to first POD input Note Max two 2 Aethra Pods can be used 17 ...

Страница 18: ...udio Video Data Cameras Driver section Cascading Camera Option You can create a cascade of moveable cameras connected to the Codec 1 Connect cameras to the desired video inputs 2 Connect a pin to pin Visca cable from the CTRL Video1 output of the Codec to the Visca input of the first camera 3 Connect a crossed Visca cable from the Visca output of the first camera to the Visca input of the second c...

Страница 19: ...equipment is switched on When the equipment is switched on for the first time the following will appear on the screen This allows the user to select Terminal Name Country Language PBX Audio Coding Video Standard Selection Tone Camera Frequency Date and time settings By means of arrow keys select time on the control bar and press OK insert date and time 19 ...

Страница 20: ...Menu structure 20 ...

Страница 21: ...21 ...

Страница 22: ...e main user interface will display the Home Page A call can be made in three different ways From the Phonebook Audio Video Audio Only To make an IP call the address of called IP terminal must be inserted following this syntax xxx xxx xxx xxx 22 ...

Страница 23: ...ress OK The following image will appear Note The remote control has a dedicated key to directly open the phone book See the Remote Control section To make a call 1 Use Search field for an alpha numeric search 2 Select the name press OK to confirm 3 Move down to the chosen name and press OK to confirm 4 Move to the CALL icon and press OK to make the call The same function can be achieved by pressin...

Страница 24: ...r aliases for calls 2 To activate it set the remote control cursor in the box where you want to enter text and press OK 3 Select the desired letter by moving the cursor over it and pressing OK 4 To close the virtual keypad select the ESC key and press OK 5 Move to the CALL icon and press OK to make the call The same function can be achieved by pressing the CALL key on the remote control 6 To end t...

Страница 25: ...mation refer to the Encryption section of this manual Once encryption is properly configured you can make a secure call by following the same procedure described for a standard call Useful information The encryption status can be checked on the status bar If the encryption is enabled and configured an icon showing a padlock is displayed on the status bar If the padlock is yellow and open encryptio...

Страница 26: ...emote control To create a Dual Video connection 1 Set up a normal audio video connection with the desired terminal 2 Press the Dual key on the remot control 3 Select the desired second video input source from the drop down menu 4 Move to the YES icon and press OK Once Dual Video is activated if the receiving terminal is set up with two monitors the user will be able to see the two video streams si...

Страница 27: ... control key Move the arrow keys to the ENTER icon and press OK The following page will be displayed Enter data in the phonebook by using the remote control alphanumeric keys or the virtual keypad to fill out the available fields Choose the call configuration to record the connection details for this user Interface used ISDN IP SIP and transfer rate Enter NAME and COMPANY Enter the prefix and numb...

Страница 28: ...lobal Remote Phonebook Phone book on a remote server LDAP H 350 protocol To connect to the remote server move to the drop down menu and select the desired server IP address The phonebook will now operate as described above Note To correctly configure remote server connection parameters please contact your network administrator To connect to the remote server from Phonebook page move to the drop do...

Страница 29: ...ideo window and press OK Adjust the video camera s field of view with the arrow keys and press OK on the remote control An alternate method From the Home Page go to the Magnifier icon on the status bar and press OK You will see a full screen display with the camera under your control To release camera control press OK Video Privacy Once in connection To activate the Video Privacy function press th...

Страница 30: ...th speakers The use of the Autotracking function is not recommended for crowded conferences where a lot of background noise is present Video camera presets The Preset function allows the user to save camera positions up to a maximum of 122 positions in order to enable quick selection of a certain camera frame To save a preset 1 Set the desired camera position and adjust the video zoom 2 Press the ...

Страница 31: ...ome configuration parameters can be modified only when no connection is active User settings From the Home page select 1 SETTINGS 2 USER SETTINGS The following page will be displayed From here you can access the following submenus Control Panel Call Answer mode Display Status Bar Transparency Customize colors 31 ...

Страница 32: ...till images will be available for future use Screensaver Automatic screensaver to enable disable the automatic screensaver function and to set its timeout XGA on screensaver Enable disable XGA loop function XGA IN signal sent to XGA OUT Two possible cases 1 Active XGA IN signal monitor shows XGA signal 2 Inactive XGA IN signal no signals on monitor Stand By mode Remote control Numeric only remote ...

Страница 33: ... confirmation requests for call disconnection Enable Tones Enable disable tones in phase of call Automatic answer Enable disable the automatic answer function after the selected number of rings H 320 This menu contains the following configuration settings Audio Number Video Number In a non aggregated ISDN call the audio number may be different from the video number If this checkbox is not selected...

Страница 34: ...erent preset levels high 75 transparency medium 50 low 25 opaque 0 Transparency can be used in different ways a Automatic default Only the diagnostic pages of the Connection state uses transparency with a selectable initial level default medium The transparency level can be changed dynamically b Variable All pages where no video is present use a selectable initial transparency level default medium...

Страница 35: ...Audio Video Data From the Home Page select 1 SETTINGS 2 AUDIO VIDEO DATA The following page will be displayed You can access the following submenus Audio Video Quality Cameras Monitor Data channel 35 ...

Страница 36: ...ts for video or DVD We strongly recommend to use VCR inputs for signals directly coming from video recorders or DVD because the echo cancellation is disabled on these inputs Recommended inputs for external audio Mixers We strongly recommend to use the Line input for signals directly coming from an external audio mixer because echo cancellation can be enabled on this input The icon load default val...

Страница 37: ...ecommended option you allow this operation to be performed automatically by the system Alternatively you can make manual adjustments by moving the slider along the bar until you obtain the best synchronisation Cameras This menu allows you to Settings Enable disable the remote control of the local camera Select from dropdown menu the video input Set the values for contrast brightness and colour in ...

Страница 38: ...itor Menu default setting Automatic In case the Multi Monitor configuration has been choosen so to have more monitors connected to the system is possible to choose where to see GUI Graphical user interface Available configurations are Automatic GUI set by the system TV1 GUI always on TV1 TV2 GUI always on TV2 XGA GUI always on XGA 16 9 check box use only with 16 9 monitors If selected system adds ...

Страница 39: ...te control PIP key you can switch between PIP and PaP b By selecting PIP PIP function is enabled c By selecting PaP PaP function is enabled Multi image modality must be enabled separately for TV1 TV2 and XGA monitor Multi Imagine Mode a By selecting AUTO PIP and PaP functions are enabled only when needed that is when number of video flows is greater than available monitors number and automatically...

Страница 40: ...u First time Plasma type is selected usually factory done a particular operations sequence must be followed 1 Do not connect the system and the monitor by means of serial cable 2 Select plasma type 3 Once completed all initializations switch off the system connect the system and the monitor by means of serial cable switch on the system now is ready Viewing modes Different viewing modes may change ...

Страница 41: ...viewing mode to BigLittleScreen mode once in this mode surfing inside menus will let back again to the MultiScreen viewing mode To see a local XGA image select full screen visualization then you can switch to BigLittleScreen mode by pressing the C key on the remote control Exiting from the FullScreen mode the system immediately comes back to the MultiScreen viewing mode a Disconnected system b Con...

Страница 42: ... a big one 42 with 1024 x 768 XGA resolution image and a small one 11 d Connected system with remote XGA image while local user looks at the menu e Connected system with remote XGA image in DualVideo XGA mode The larger pane displays the XGA image while the smaller one displays the remote vide stream 42 ...

Страница 43: ...Screen If this mode is selected the system will show two video outputs in different sized frames The larger frame on the left will show the graphics relating to system management while the video stream will appear in the smaller frame on the right During an active connection the system automatically selects which video stream to place in the larger frame The initial viewing mode can be restored on...

Страница 44: ...b Connected system c Connected system that receives an XGA image d Connected system while user browses the menu 44 ...

Страница 45: ...e Choose the data channel max rate only H 320 High Max data no audio no video Data channel optimisation to the detriment of both audio and video Medium Max data audio no video Data channel optimisation to the detriment of audio video still active Norm Max data audio video Data channel optimisation with both audio and video active Auto Data audio video Data channel rate optimisation to RS232 rate a...

Страница 46: ...the beginning of a videoconference Encryption is active from start ISDN If this option is selected the System executes the encryption procedure from the beginning of the ISDN connection If this option is not selected the ISDN connection starts in unencrypted mode Encryption can be activated later at any time during the connection To do this select the yellow padlock on the status bar and press OK ...

Страница 47: ...ty length 1536 bits Note For IP calls the System always uses the High Security option with a 1024 bit length Most common video communication terminals normally use the High Security prime number length and the 128 bit AES private key Licenses From the Home Page select 1 SETTINGS 2 INSTALLATION 3 LICENSES This page is dedicated to supplementary functions not offered by default In order to obtain in...

Страница 48: ...f present The maximum data Rate for a call excluding NIC Audio coding Enable disable G 722 1 and MP4 AAC LD coding Video coding Enable disable H 264 coding Channels Determine if channels are to be bonded or not ISDN only Note With audio and video encoder decoder settings set to Auto the system choose the encoder decoder based on the connection bit rate DualVideo H 239 and DuoVideoTM can also be en...

Страница 49: ...ate the Downspeed function that is automatically called when one or more lines are dropped during a call Activate the FALLBACK function in order to allow a phone call when the remote system is a basic telephone Enable disable the Bonding Recovery function in order to cope with a situation in which network errors such as network SLIP errors occur during a bonding connection In a call following mess...

Страница 50: ...oose to enable one or more accesses Specify the number to be associated with the access Specify the SPID if present Select TEI either Automatic or Fixed Enable any eventual SPID2 and enter the appropriate numbers Access configuration ISDN PRI Euro Select PRI in the Access box Move to the desired access configuration icon and press OK At this stage you can Choose to enable Primary Rate Interface Sp...

Страница 51: ...by the terminal or by the network Define usable B channels per service provider instructions Available channels search in increasing decreasing order on defined B channels Select cable length From the drop down menu you can also select Cable Length the length of the cable connecting the System to the Primary Rate access socket used Note It is appropriate here to stress that unless you have special...

Страница 52: ...Primary Access G 703 E1 National Primary Access G 703 T1 Choose the Rate Set the Network Speed 64K or 56K Enable Disable automatic calls To make an automatic call 1 Enter Audio Video call page 2 Select NIC in Type of call drop down menu 3 Wait for few seconds and the System will automatically start the call Enable Disable CRC4 E1 only Enable Disable the Enabled Alarms option Configure the System t...

Страница 53: ...he interface signals Select CLOCK RX TX for identical bit rates in transmission and reception Select ADVANCED in order to display the following advanced settings ON indicates that the signal is managed OFF indicates that the signal is not managed For all signals ON indicates normal management of the signal while OFF sets the value of the signal to active Selecting ON OFF ON in the DTR box activate...

Страница 54: ...tion From the Home Page select 1 SETTINGS 2 INSTALLATION 3 NETWORK INTERFACES 4 IP The following page will be displayed The five available options are IP Configuration H 323 settings SIP settings Services PPPoE 54 ...

Страница 55: ...ED you can enter a page to set The range of dynamic TCP and UDP ports The quality of service policy to be applied IP Precedence TOS Differentiated service You can choose audio and video values in a 0 to 63 range Use NAT 1 NAT Type should be set to Others 2 Public IP address must be the public IP address of the NAT By selecting the BANDWIDTH icon is possible to enable and set maximum bandwidth usag...

Страница 56: ...e limits can be different for transmission and reception a very useful feature on ADSL networks Note This manual contains a section on Recommended Wireless Network Interface Cards H323 Settings This section contains the configuration options necessary to use the system with the H 323 protocol Name H 323 H 323 ID the name used by the terminal for registration with the gatekeeper Number H 323 E 164 ...

Страница 57: ...stem allows for the configuration of various parameters associated with web management SNMP management and streaming management Web Telnet management In this section you can Enable disable System access from the Web using Telnet by means of IP ISDN or NIC connections Enable disable phonebook management from the Web Enable disable phonebook management from the Web via ISDN default enabled Limit acc...

Страница 58: ...ions are Streaming Management Enable Streaming and Activation Streaming Management Allows modifications of the Announcements Video Rate Address Port and TTL Hops parameters by external applications from the Web for example If this option is not selected and a unicast IP address is present in the Address then only the system identified by that IP address will be able to view the stream Enable all a...

Страница 59: ...ort This parameter contains the number of the UDP port where audio packets are to be sent Since the streaming content is RTP data are sent to four different ports one port for audio one port for video and two ports for the RTP information corresponding to both streams Therefore starting with an audio port number it is implied that the audio data will be sent to this port number video data will be ...

Страница 60: ...stem that is to send the stream Viewing using a Distribution Server Distribution servers offer a range of services for stream management that the System cannot offer directly If users would like to make use of a distribution server for streaming transmission sent from a System they can do so in accordance with the server s characteristics Using a Proxy Multicast streaming transmissions require an ...

Страница 61: ...name Service Name Default field empty Alpha numeric string for remote control of equipment connected with PPPoE server ex modem Connection mode Two different WAN connection modes are available Always connected On call Bandwidth By selecting the BANDWIDTH icon it is possible to enable and set maximum bandwidth usage limits in Kbps These limits can be different in transmission and reception a very u...

Страница 62: ...he peripheral connected to Video Out Selection Tone Select the desired tone Camera Frequency Auto or 50Hz NTSC Load default settings From the Home Page select 1 SETTINGS 2 INSTALLATION From here the default System configuration can be reloaded There are two options User settings only Factory Defaults Once selected the desired option from the dropdown menu move to the LOAD DEFAULT VALUES icon and p...

Страница 63: ...ay the following 1 The program requests you to enter the system s IP address and to choose the presentation to transfer 2 By pressing the SLIDE key on the remote control you will enter the presentation manager page 3 Selecting the DISPLAY PRESENTATIONS icon and pressing OK will cause the first nine slides of the presentation being displayed on video 4 You can select a slide by moving the remote co...

Страница 64: ...nnection is terminated Slides recall via WEB client Enter the System WEB interface select Camera and Video Control and in the dialog box labelled Photo click Photo Download A list will be opened containing slides named SnapshotXX jpg Saving slides on a PC When a file is selected the image will be uploaded to the PC and shown by the browser Do not forget to save it on the PC 64 ...

Страница 65: ... n participants 512 n participants 768 n participants 1152 Number Participants for mixed MCU or only IP 8 participants 64 8 participants 128 8 participants 256 6 participants 384 5 participants 512 4 participants 768 3 participants 1152 Supported Standard ITU T H 320 ISDN leased networks ITU T H 323 IP networks IETF SIP RFC3261 IP networks PpoE Video Coding H 261 H 263 H 264 Audio Coding G 711 G 7...

Страница 66: ...enabled the System will automatically adapt the multiconference to the audio video encoding and bit rate of the lowest quality connection within the conference without excluding any participant Continuous presence Enable Disable transmission of Continuous presence for multiconferences at least two participants all participating sites receive the signals simultaneously from all participating termin...

Страница 67: ...f the MCU has not been configured it is possible to enter the configuration menu previously described by selecting the CONFIGURE MCU icon and pressing OK 5 If the MCU has already been configured go to the Active Conference icon and press OK to start the multiconference The same can be obtained by pressing the CALL key on the remote control 6 Local video will be displayed at full screen 7 To add pa...

Страница 68: ...eo Zoom icon Video Zoom icon With MCU on and various connected terminals is possible to choose disposition and how many video flows should be displayed From the fullscreen page of the manager press right or left keys to select the terminals disposition icon and press OK Once the window is opened 1 By means of up and down keys choose the visualization mode then confirm selection with OK key 2 Close...

Страница 69: ...connected terminals number as in picture Note This disposition enables Continuous Presence 4 Terminals Shows four terminals video flows only independently from connected terminals number as in picture Note This disposition enables Continuous Presence 7 terminals Shows seven terminals video flows only independently from connected terminals number as in picture Big square is for the active speaker N...

Страница 70: ...ulticonference management interface The window in the centre displays current local video The following table shows various information icons for the local terminal the MCU manager Some of displayed information is also valid for other connected terminals MCU control panel icons MCU manager by means of control panels get information and can interact using following icons 70 ...

Страница 71: ...cted Previous active speaker For broadcast activation Current active speaker For broadcast activation Video in broadcasting For broadcast deactivation Voice switched Active speaker in full screen For ContinuousPresence activation Continuous Presence All participants are on the screen default For Voice Switched activation Conference status For terminal information Stay for conference status table E...

Страница 72: ...Video Call page will appear There are three different MCU modes 1 Continuous Presence When second terminal joins the conference system automatically switches to this mode that allows all participants to see all connected terminals at the same time Video windows disposition can be chosen among available by selecting the Terminals disposition icon 2 Voice Switched MCU manager detects the active spea...

Страница 73: ...inals only to visualize connection diagnostics Choose between Always accept or Refuse incoming IP or ISDN calls with disconnected terminals only Choose Control Number for ISDN to insert the only number allowed to join the conference for that terminal The X icon closes the page Ending a Multiconference There are two ways to end a multiconference 1 From the full screen video page press the remote co...

Страница 74: ... key 4 Select the V Input for the DualVideo and press OK 5 Press YES icon Note One other icon camera or XGA present in the status bar means active Dualvideo System Diagnostics The System s diagnostics menu allows you to perform tests and checks to verify that the system is properly working From the Home Page select 1 SETTINGS 2 DIAGNOSTICS The following page will be displayed Terminal test This op...

Страница 75: ...he Connection status page is displayed in a window overlaid on the current video The CANCEL key on the remote control can be used to change the transparency To move within the table press the OK key then use the up and down arrows keys to navigate To exit the page press the left arrow keys ISDN In an ISDN call you can check certain data about the connection rate audio encoding video encoding frame...

Страница 76: ...emperature and MAC address Information about the processor and audio video system can also be found in the Audio and Video submenus Software Release This section shows contains information about the software modules installed on the system including versions build dates etc 76 ...

Страница 77: ... the system 3 Start the browser on your PC In the address bar enter the System s IP address The web page manager will appear Connecting to the System via a PC in a LAN To connect to the System from a PC in a LAN 1 Ensure that a LAN cable connects the System s rear connector to your LAN The PC can be connected to a LAN node or to the LAN OUT connector at the rear of the System 2 Switch on the Syste...

Страница 78: ... previously described The arrangement of the menus for configuration and diagnostics is also the same In addition to the normal menus a TOOLS section has been added where the following downloads are available The program DataConf exe enables you to use NetMeeting 3 xx with ISDN IP or NIC calls for multimedia activities data channels T 120 See section Managing the Data Conference Software The progr...

Страница 79: ...nter the IP address of the system to be updated in the field labelled Host IP Address 4 Press Start to begin the download Attention During this procedure follow the instructions displayed on the monitor The download process requires a few minutes to complete When the download has finished the system will restart automatically 79 ...

Страница 80: ...bles automatic configuration of the previous program and must be installed in the same folder where the DataConf exe file was saved 1 Download the software DataConf exe 2 Will be downloaded dc exe file start the file 3 Download the software DataConf ini 4 Start DataConf exe Use of Data Conference In order to use the System as a bridge for data transfer navigate through the system menus as shown 1 ...

Страница 81: ...pe of call incoming or outgoing The T 120 data channel active The status of the NetMeeting connection between the two users Once the connection has been established NetMeeting 3 xx is displayed in the foreground and you can perform all data conference management operations If you desire to change the IP address of the System you have to disconnect press the key Configure and enter the new address ...

Страница 82: ...ow as possible Extended times for latency and variable jitter can create serious problems especially in video quality It is always preferable for H 323 terminals to be connected to switched type LAN connections to avoid the traffic generated by terminals being superposed on the normal traffic present on the network It is preferable to avoid using NAT type protocols on router interfaces that route ...

Страница 83: ...e software packages specifically designed for firewalls from various producers that examine every packet attempting to pass through the firewall in order to determine whether it concerns a known protocol like H 323 or SIP If the packet contains a known protocol the Firewall allows it through However like Proxies and MCUs that go around firewalls ALGs also need an access policy for firewalls and ev...

Страница 84: ... know the IP address of a machine they cannot attack it and cause disruptions NAT also allows a company to use more IP addresses than they might otherwise be allocated Since these addresses are only used internally there is no problem with IP address conflicts with other organisations Problems with Video and Voice Communications on NAT Firewall Protected Networks The IP based voice and video proto...

Страница 85: ...ternal connection The NAT device substitutes the static IP address in the payload and header setup packet sent from the internal terminal to the external terminal The destination terminal uses that address for addressing the reply packets which are routed through the NAT device to the internal terminal Firewall ALG Application Level Gateways ALGs are firewalls programmed to recognize specific IP p...

Страница 86: ... Fi PCMCIA IEEE 802 11b Some models of cards wireless supported BENQ AWL100 CISCO AIRONET AIRPCM 350 All AGERE ORINOCO compatible cards For other information relative to the compatibility Wi Fi 802 11b 802 11g 802 11a please contact Help Desk Aethra Telecomunicazioni SpA Mail service center aethra com 86 ...

Страница 87: ...ain camera Integrated Y C not accessible VCR Composite RCA Doc Cam 1 S video Mini DIN Doc Cam 2 S video Mini DIN Doc Cam 3 Composite RCA XGA In DB 15 Hi Den Video outputs Monitor 1 Composite RCA S video Mini DIN Monitor 2 S video Mini DIN with monitor detect VCR Composite RCA XGA Out DB 15 Hi Den Audio inputs Connection Level Connector 2xPod mic 360 Dig RJ 11 6 6 Aux mic Mic Stereo jack 3 5 mm Aud...

Страница 88: ...han those expressly described LINE IN OUT RCA Pin Connection Tip Unbalanced signal Jacket Ground Nominal Input Output Level RCA 14 dB 150 mV rms standard LINE level Nominal Input Impedance RCA Zout 10 KΩ Nominal Output Impedance RCA Zout 100 Ω Maximum Input Level RCA 8 dB 2 V rms Maximum Output Level RCA 2 11 dB 1 V rms Nominal Dynamic Range 50 dB 88 ...

Страница 89: ...4 700mVpp Luminance Signal 300mVpp Composite Sync 75Ω Nominal Impedance Pin 3 300mVpp Chrominance Signal 75 Ω Nominal Impedance Pins 1 and 2 Ground for Pins 3 and 4 LAN SWITCH 10 100 BASE T RJ45 Pin connection LAN IN Pin 1 Transmit data Pin 2 Transmit data Pin 3 Receive data Pin 4 N C Pin 5 N C Pin 6 Receive data Pin 7 N C Pin 8 N C Pin connection LAN OUT direct PC connection Pin 1 Receive data Pi...

Страница 90: ... consistent with both to EURO ISDN and NATIONAL ISDN standards PRI NETWORK E1 T1 G703 RJ45 Pin connection Pin 1 Receive data Pin 2 Receive data Pin 3 N C Pin 4 Transmit data Pin 5 Transmit data Pin 6 N C Pin 7 N C Pin 8 N C A digital telephone line can be connected to this connector for data transfer rates of up to 1920 Kb sec or 2048Kbit sec data rate of 30B for E1 T1 data rate of 31B for G703 Pi...

Страница 91: ... C106 27 13 12 RING449 A C125 15 13 RING449 B C125 TO GND 14 RTS449 B C105 25 19 15 GND C102 7 19 7 8 B 16 NB1 14 17 NB8 17 18 DPR 2 19 PWI 6 20 TT A C113 17 11 U 21 TCLK A C114 5 15 7 Y 22 TX A C103 4 2 2 P 23 RX B C104 24 16 11 T 24 RCLK B C115 26 9 13 X 25 DSRV35 C107 E 26 DSR449 B C107 31 22 27 CD449 A C109 11 8 28 SELNET2 TO GND TO GND TO GND TO GND 29 RTS449 A C105 7 4 30 GND C102 7 19 7 8 B...

Страница 92: ...tions calling system configurations etc Pin characteristics are consistent with USA RS 232 standard DCE DATA MINIDIN 8P 1 3 8 7 6 4 5 2 Pin connection Pin 1 Clear To Send Pin 2 Ready To Send Pin 3 Receive Data Pin 4 Ground Pin 5 Transmit Data Pin 6 Carrier Detect Pin 7 Data Terminal Ready Pin 8 Ring Indicator case shield The DATA connection is for use with a data terminal using AVC8400 as a modem ...

Страница 93: ... with Aethra Tracking Camera Do not use in any other configurations MODE MOLEX 2P Pin connection Pin 1 0V not active 6V active Mode 16 9 if supported from the TV 12V active Mode 4 3 Pin 2 GND Mode TV used as AVMODE function select on SCART connector 93 ...

Страница 94: ... N C Case Shield The CAMERA connection can be used for main camera control via VISCA interface with a pin to pin cable XGA Pin Connection Pin 1 Red Pin 2 Green Pin 3 Blue Pin 4 ID Bit Pin 5 Self test Pin 6 Red Return Pin 7 Green Return Pin 8 Blue Return Pin 9 N C Pin 10 Ground Pin 11 ID Bit Pin 12 ID Bit Pin 13 Horizontal Sync Pin 14 Vertical Sync Pin 15 ID Bit Case shield 94 ...

Страница 95: ...Check that the data channel is enabled see related section in this manual Check that the IP of the DataConf is the same as that of the system to be connected If the connection is IP make sure that the check box Use NetMeeting is checked and the PC IP address to be connected is correct see relevant section in this manual If the problem persists contact the Aethra Help Desk I cannot make an IP conne...

Страница 96: ...on NTSC National Television SystemsCommittee PABX Private Automatic Branch Exchange PAL Phase Alternation Line PBX Private Branch Exchange PC Personal Computer PaP Picture and Picture PIP Picture in Picture PRI Primary Rate Interface QCIF Quarter Common Intermediate Format QoS Quality of Service Router A device that attaches two or morenetwork devices and forwards data accordingly RTS Ready To Sen...

Страница 97: ...0068 2 2 Test Bb IEC 60068 2 2 IEC 60068 2 14 Test Nb IEC 60068 2 56 Test Cb IEC 60068 2 6 Test Fc IEC 60068 2 31 Test Ec IEC 60068 2 32 Test Ed Method 1 IEC 60068 2 64 Test Fdb CEI 50 6 9 EMC EN 55022 EN 55024 EN 61000 3 2 EN 61000 3 3 FCC15 SAFETY EN 60950 1 IEC 60950 1 CONNECTION TO TELECOMMUNICATION NETWORK FCC 68 Equipment for USA market only Hereby Aethra S p A declares that this device comp...

Отзывы: