


P a g e
|
32
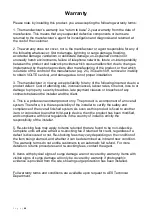
Auxiliary Device Relay Setup
Relay 3
Relay 4
Relay 5
5
Relay 6
Relay 7
Relay 8
ON
DIP
1
2
3
4
ON
DIP
1
2
3
4
ON
DIP
1
2
3
4
ON
DIP
1
2
3
4
ON
DIP
1
2
3
4
ON
DIP
1
2
3
4
Dip switch configuration for
relays 3 to 8 on auxiliary
devices.
1
2
3
4
ON
DIP
24V 1 2 3
NC COM NO PTE
24V
1
2
3
1
2
3
4
ON
DI
P
SLAVE IN
SLAVE OUT
1 2 3
1 2 3
IN
+
2
4V
-
O
U
T
+
2
4V
-
IN
1
2
3
O
U
T
1
2
3
COI L
The
sounder boards
dip switches
set
the
relay number for
the
auxiliary unit
it is in.
The dip switch of the prox must
match the dip switch configuration
of the auxiliary it wants to trigger
*
#
91
#
RelayNumber
#
(Relay Number = 3-8)
A keypad does not have dip switches.
To assign the relay number use the
keypad keys as follows:
4
5
6
1
2
3
7
8
9
*
0
#
Содержание KEY-AUX-PBPK-US
Страница 3: ...P a g e 3 PHASE 1 Site Survey...
Страница 5: ...P a g e 5 PHASE 2 Product Overview...
Страница 7: ...P a g e 7 Overview of Intercoms Flush Design Antenna Separate...
Страница 16: ...P a g e 16 PHASE 3 Setup Programming To be done before installing the intercom...
Страница 23: ...P a g e 23 PHASE 4 Using the Intercom Only to be done after the unit is successfully programmed...
Страница 27: ...P a g e 27 PHASE 5 Installation...
Страница 33: ...P a g e 33 PHASE 6 Aftercare...
Страница 42: ...P a g e 42...
Страница 43: ...P a g e 43...


