8
9
11
10
B
H
2 cm.
5
4
6
7
G
F
E
M
IT
4 -
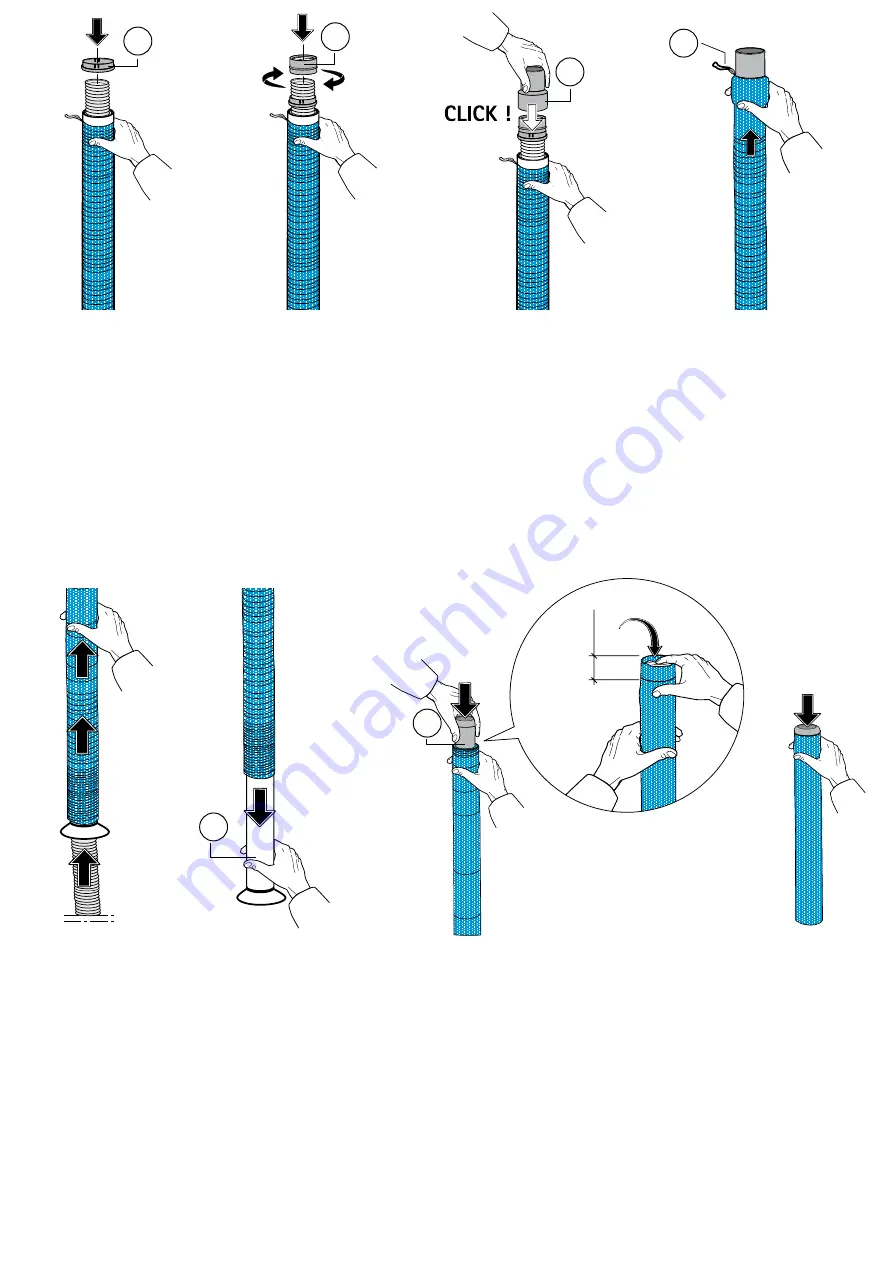
inserire l’anello di bloccaggio (G)
5 -
avvitare la boccola di tenuta (F) ruotandola a fondo
fino alla battuta
6 -
accoppiare mediante pressione il raccordo (E) con
l’anello (G) fino ad avvenuto bloccaggio (CLICK)
7 -
coprire il raccordo con la calza e stringere il laccio (M)
EN
4 -
inset the locking ring (G)
5 -
screw the sealing bushing (F) turning it until it is
firmly screwed in
6 -
apply pressure in order to join the union (E) to the ring
(G) until it clicks into place
7 -
cover the union with the braid and tie the strap (M)
IT
8 -
far scorrere la calza sul tubo flessibile, sfilandola
progressivamente dal tubo di raccolta.
9 -
dopo aver inserito completamente la calza sul tubo flessibile,
sfilare il tubo di raccolta (B)
10 -
prendere l’estremità del tubo flessibile ed effettuare il
risvolto della calza per circa 2cm. all’interno del tubo
11 -
inserire la boccola (H) fino alla battuta bloccando la calza
dentro al tubo flessibile.
EN
8 -
allow the braid to slide over the hose, gradually pulling it out
from the collection hose.
9 -
after having fully inserted the braid to the hose, pull out the
collection hose (B)
10 -
take the end of the hose and turn up the braid approximately
2 cm within the hose.
11 -
insert the bushing (H) completely until it clicks locking the
braid within the hose.
DE
4 -
Setzen Sie den Sicherungsring ein (G)
5 -
Schrauben Sie die Dichtbuchse fest (F), indem Sie sie
bis zu Anschlag drehen
6 -
Verbinden Sie das Anschlussstück (E) mit Druck mit
dem Ring (G), bis dieser einrastet (KLICK)
7 -
Bedecken Sie das Anschlussstück mit dem Mantel,
und ziehen Sie das Band (M) fest
FR
4 -
insérer l’anneau de blocage (G)
5 -
visser la bague d’étanchéité (F) en la tournant à fond
jusqu’à la butée
6 -
accoupler moyennant pression le raccord (E) avec
l’anneau (G) jusqu’au blocage (CLIC)
7 -
couvrir le raccord avec la gaine et serrer le lacet (M)
DE
8 -
Ziehen Sie den Mantel über den Schlauch, und ziehen Sie ihn
dabei nach und nach vom Sammelschlauch ab.
9 -
Wenn der Schlauch vollständig vom Mantel bedeckt ist,
ziehen Sie den Sammelschlauch (B) vollständig heraus
10 -
Nehmen Sie das Schlauchende und schlagen Sie den
Mantel im Schlauch etwa 2 cm um
11 -
Setzen Sie die Buchse (H) bis zum Anschlag ein, und halten
Sie dabei den Mantel im Schlauch fest, damit er nicht verrutscht.
FR
8 -
faire glisser la gaine sur le flexible, en la libérant progressivement
du tube de récupération.
9 -
après avoir inséré complètement la gaine sur le flexible,
extraire le tube de récupération (B)
10 -
prendre l’extrémité du flexible et rabattre la gaine sur environ
2cm à l’intérieur du tube
11 -
insérer la bague (H) jusqu’à la butée en bloquant la gaine
dans le flexible.
ES
8 -
deslice la funda sobre la manguera, retirándola
progresivamente del tubo de recogida.
9 -
una vez cubierta completamente la manguera con la funda,
quite el tubo de recogida (B)
10 -
tome el extremo de la manguera y haga un dobladillo en la
funda de unos 2 cm hacia el interior de la manguera
11 -
monte el casquillo (H) hasta el tope para bloquear la funda
dentro de la manguera.
PT
8 -
faça deslizar a manga na mangueira, desenfiando-a
progressivamente do tubo de recolha.
9 -
depois de ter inserido completamente a manga na
mangueira, desenfie o tubo de recolha (B)
10 -
pegue na extremidade da mangueira e faça uma dobra na
manga com aproximadamente 2cm para dentro do tubo
11 -
insira a bucha (H) até encostar bem, prendendo a manga
dentro da mangueira.
ES
4 -
monte en anillo de bloqueo (G)
5 -
enrosque el casquillo de sujeción (F) girándolo a
fondo hasta el tope
6 -
acople a presión el conector (E) con el anillo (G) hasta
que queden bloqueados (CLICK)
7 -
cubra el conector con la funda y apriete el lazo (M)
PT
4 -
insira o anel de fixação (G)
5 -
enrosque a bucha de vedação (F), rodando-a até
encostar no fundo
6 -
acople a união (E) no anel (G), fazendo pressão, até
ficarem unidos (CLICK)
7 -
cubra a união com a manga e aperte o laço (M)


