background image

Add

Nutrients

Replace

Bulbs

Space•Saver 6 Model #s

 – 100602-BLK;  100602-WHT;

                                                     100602-SLR;  100603-BSS

Input Voltage: 120V, 60Hz, 1.5A

Simple Steps

To Get Your
Up and Growing

Quick Start 

Guide

Date Code:

KEEP 

THIS GUIDE

 !

English

Содержание 100340

Страница 1: ...trients Replace Bulbs Space Saver 6 Model s 100602 BLK 100602 WHT 100602 SLR 100603 BSS Input Voltage 120V 60Hz 1 5A Simple Steps To GetYour Up and Growing Quick Start Guide Date Code KEEPTHISGUIDE En...

Страница 2: ...s 10 Do not use outdoors 11 Do not operate where aerosol spray products are being used or where oxygen is being administered 12 Do not touch moving parts or hot parts such as pumps bulbs reflective su...

Страница 3: ...art Assembly No tools required Insert Deluxe B Grow Bulbs into Lamp Hood C Plug Lamp Cord into Lamp Hood D Push straight in DO NOT TWIST BULBS Deluxe B Grow Bulbs 2 Instructions Continued On Next Page...

Страница 4: ...mp Arm E back view Center hands over Lamp Arm and push Lamp Hood down until you hear a click Moving Your Space Saver 6 G Use one hand to grasp Lamp Arm Gently slide your Space Saver 6 toward the surfa...

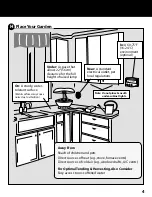
Страница 5: ...lamp On A sturdy water tolerant surface Metal surfaces may cause noise due to vibration In A 60 75 F 16 24 C environment optimal Away From Reach of children and pets Direct sources of heat e g stove f...

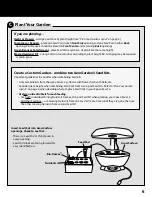
Страница 6: ...n Your Garden Layout B Use height information on Seed Pod Label to decide where to place each Seed Pod in Grow Surface For best results plant Seed Pods labeled Tall in Back or Front Center openings se...

Страница 7: ...all plants are the same height Master Gardener Kit arrange Pods in Grow Surface according to plant height Re arranging may be required as plants grow Create a Custom Garden combine two AeroGarden 3 Se...

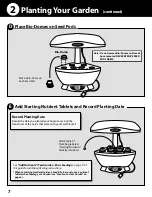
Страница 8: ...rient Tablets and Record Planting Date E Place Bio Domes on Seed Pods D Place a Bio Dome on each Seed Pod Bio Dome Note Do not remove Bio Domes until seeds have sprouted NEVER REMOVE SEED POD LABELS 2...

Страница 9: ...e page 2 step1C Lamp Cord is plugged into Lamp Hood see page 2 step1D You are getting power through the electrical outlet Air bubbles should be visible inside Bowl If not check to see if Bowl is secur...

Страница 10: ...ing a custom garden You are no longer limited to the pre programmed light schedules associated with each plant type such as Vegetables Herbs etc NOTE The 24 Hour Light setting is not recommended for F...

Страница 11: ...set to go off at this time every day You can reset your timer as often as you wish 1 2 3 4 5 Your Space Saver 6 has lights and a built in timer that automatically provide your plants with sunlight ab...

Страница 12: ...tart grow bulb timer and turn off light ADD NUTRIENTS Feed Garden Basic Feeding When Add Nutrients light illuminates every 2 weeks add 2 nutrient tablets and fill Bowl with water up to Fill To Here Pr...

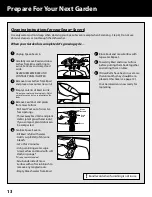
Страница 13: ...Unplug Space Saver 6 Remove old Grow Bulbs and carefully discard IMPORTANT To avoid burning be sure Grow Bulbs are cool before handling Insert new Grow Bulbs into Lamp Hood Plug in Space Saver 6 and p...

Страница 14: ...r them Remove Seed Pods and plants from Grow Surface Pull Seed Pods out of Grow Sur face openings Throw away Seed Pods and plant debris plant growth and roots If you compost plant debris can be compos...

Страница 15: ...ly 6 seconds Release Reset button Add Nutrients light will turn off Your Space Saver 6 is now reset In some cases you may see other lights blink as well This is nothing to worry about Add Nutrient Res...

Страница 16: ...erference to radio or television reception which can be determined by turning the equipment off and on the user is encouraged to try to correct the interference by one or more of the following measure...

Отзывы: