background image

13

2 WARNINGS AND PRECAUTIONS

Transport and storage

• Do not leave the device exposed to atmospheric agents (rain, sun, snow, etc.).

• Duct connections/duct ends must be covered during storage and installation.

Installation

• After removing the product from its packaging, verify its conditions. Do not leave packaging within the reach of children or 

people with disabilities.

• Beware of sharp edges. Use protective gloves.

• The device should not be used as an activator for water heaters, stoves, etc., nor should it discharge into hot air/fume vent 

ducts deriving from any type of combustion unit or tumble dryer.

• If the environment in which the product is installed also houses a fuel-operating device (water heater, methane stove etc., that 

is not a “sealed chamber” type), it is essential to ensure adequate air intake, to ensure good combustion and proper equipment 

operation.

•If the supply cord is damaged, it must be replaced by the manufacturer, its service agent or similarly qualified persons in order 

to avoid a hazard.

• The electrical system to which the device is connected must comply with local regulations.

• Before connecting the product to the power supply or the power outlet, ensure that:

  - the data plate (voltage and frequency) correspond to those of the electrical mains;

  - the electrical power supply/socket is adequate for maximum device power.

• For installation an omnipolar switch should be incorporated in the fixed wiring, in accordance with the wiring rules, to providea 

full disconnection under overvoltage category III conditions (contact opening distance equal to or greater than 3mm).

• Ensure adequate air return into the room in compliance with existing regulations in order to ensure proper device operation.

• Install the product so that the impeller is not accessible from the air outlet side as verified by contact with the Test Finger (test 

probe “B” of the norm EN61032) in compliance with the current safety regulations.

Use

• The device should not be used for applications other than those specified in this manual.

• This appliance can be used by children aged from 8 years and above and persons with reduced physical, sensory or mental 

capabilities or lack of experience and knowledge if they have been given supervision or instruction concerning use of the 

appliance in a safe way and understand the hazards involved. Children shall not play with the appliance. 

  Cleaning and user maintenance shall not be made by children without supervision.

• Do not touch the appliance with wet or damp hands/feet.

• The device is designed to intake clean air only, i.e. without grease, soot, chemical or corrosive agents, or flammable or explosive 

mixtures. 

• Do not use the product in the presence of inflammable vapours, such as alcohol, insecticides, gasoline, etc.

• The system should operate continuously, and only be stopped for maintenance/service.

• Do not obstruct ducts or grilles to ensure optimum air passage.

• Do not immerse the device or its parts in water or other liquids.

• Operating temperature: 0°C up to +40°C.


Service

• Although the mains supply to the unit has been disconnected there is still risk for injury due to rotating parts that have not come 

to a complete standstill.

• Beware of sharp edges. Use protective gloves.

• Use original spare parts only for repairs.

3 PRODUCT INFORMATION

3.1 General

The AIRQURE P1 model is a loft mounted whole-house Positive Input Ventilation unit, designed to introduce fresh, clean, filtered 

and (eventually) heated air into the central hallway or landing of a dwelling.

No need of ducting system.

Suitable for floor or ceiling installation, in any position.

The AIRQURE P1-H model is equipped with an integrated heating element.

WARNING

Make sure that the mains supply to the unit is disconnected before

performing any installation, service, maintenance or electrical work!

The installation and service of the unit and complete ventilation system must be performed

by an authorized installer and in accordance with local rules and regulations.

If any abnormality in operation is detected, disconnect the device from

the mains supply and contact a qualified technician immediately.

Содержание AIRQURE P1

Страница 1: ...AIRQURE P1 MANUALE DI INSTALLAZIONE USO E MANUTENZIONE 2 INSTALLATION USE AND MAINTENANCE MANUAL 12 MANUEL D INSTALLATION D UTILISATION ET D ENTRETIEN 22 I GB FR ...

Страница 2: ...fusore 5 5 5 Installazione a soffitto 5 5 6 Installazione a pavimento 6 5 7 Collegamenti elettrici precablati 6 6 Messa in servizio e funzionamento 8 6 1 AIRQURE P1 N 8 6 2 AIRQURE P1 H 8 6 2 1 Settaggio velocità minima continua 8 6 2 2 Settaggio velocità massima 8 6 2 3 Settaggio velocità intermedia modalità Heat Recovery 9 6 2 4 Settaggio soglia intervento temperatura modalità Heat Recovery 9 6 ...

Страница 3: ...norme antinfortunistiche Utilizzo L apparecchio non deve essere utilizzato in applicazioni diverse da quelle indicate in questo manuale Questo apparecchio può essere utilizzato da bambini di età non inferiore ad 8 anni e da persone con ridotte capacità fisiche sensoriali o mentali o con esperienza e conoscenze insufficienti purché attentamente sorvegliate o istruite su come utilizzare in modo sicu...

Страница 4: ...ordinato prima di procedure all installazione Eventuali discrepanze rispetto a quanto ordinato devono essere comunicate al fornitore 5 2 Dove come installarlo L unità AIRQURE P1 è intesa per installazione all interno in zone riscaldate L unità può essere installata orizzontalmente Montare l unità su superfici piane soffitto o pavimento E importante che l unità sia completamente posta a livello pri...

Страница 5: ...on è adatto per essere installato in abitazioni con 3 o più piani o in aree protette dal fuoco In caso di installazione di un unità AIRQURE P1 H con elemento riscaldante il tubo flessibile deve essere il più corto possibile In alternativa utilizzare un tubo isolato termicamente accessorio su richiesta Fig 5 c Fig 5 d 5 5 Installazione a soffitto L unità deve essere installata come segue Fig 5 e Li...

Страница 6: ...ssa a terra I collegamenti interni del AIRQURE P1 N sono eseguiti durante l assemblaggio in fabbrica L unità viene fornita pre cablata con cavo di alimentazione 3 fili marrone blu giallo verde cavo di collegamento a comando esterno 2 fili blu marrone 5 7 Collegamenti elettrici precablati ATTENZIONE Assicurarsi che l interruttore generale dell impianto sia spento prima di qualsiasi operazione di in...

Страница 7: ...LLO GIALLO VERDE BLU MARRONE N L GIALLO S2 BIANCO S3 MARRONE S1 VERDE GND ALIMENTAZIONE CONTROLLO GIALLO VERDE BLU MARRONE N L GIALLO S2 BIANCO S3 MARRONE S1 VERDE GND CTRL P1 L 1 1 1 L L S1 S2 S3 II I I Fig 5 j Collegamento AIRQURE P1 H a interruttore dedicato non fornito Attenzione l elemento riscaldante non può essere disattivato completamente resta sempre in modalità automatica Fig 5 k Collega...

Страница 8: ...WITCHES 2 3 4 1 1 0 DIP SWITCHES 2 3 4 L unità funziona alla velocità minima continua impostata La velocità massima può essere attivata tramite interruttore esterno dedicato schema elettrico Fig 5 i Le velocità possono essere regolate durante l installazione in base al tasso di ventilazione richiesta agendo sui trimmer V1 e V2 Fig 6 a Settaggio di fabbrica default V1 velocità minima 104m3 h 29l s ...

Страница 9: ...switch come indicato in tabella 6 2 1 L intervento della sonda di temperatura integrata attiverà automaticamente la modalità heat recovery o stand by 6 2 8 Velocità massima La velocità massima può essere attivata manualmente attraverso un interruttore esterno dedicato schema elettrico Fig 5 j e impostata come mostrato in tabella 6 2 2 6 2 9 Modalità Heat Recovery Quando l aria nell attico supera l...

Страница 10: ...ZIONE PULIZIA 6 2 11 Attivazione elemento riscaldante L unità è provvista di elemento riscaldante che riscalda l aria immessa quando necessario La temperatura desiderata può essere settata attraverso i dip switch vedere tabella 6 2 6 6 2 12 Funzionamento a due velocità con comando CTRL P1 accessorio su richiesta Tramite l interruttore S1 si attiva o disattiva l unità ON OFF Tramite l interruttore ...

Страница 11: ...irifiutielettroniciedelettrotecnici oppurericonsegnarla al rivenditore al momento dell acquisto di una nuova apparecchiatura di tipo equivalente L adeguataraccoltadifferenziataperl avviosuccessivodell apparecchiaturadimessaalriciclaggio altrattamento e allo smaltimento ambientale compatibile contribuisce ad evitare possibili effetti negativi sull ambiente e sulla salute e favorisce il riciclo dei ...

Страница 12: ...15 5 5 Ceiling installation 15 5 6 Floor installation 16 5 7 Precabled electric connections 16 6 Commissioning and operations 18 6 1 AIRQURE P1 N 18 6 2 AIRQURE P1 H 18 6 2 1 Setting of the continuous running low speed 18 6 2 2 Setting of the maximum speed 18 6 2 3 Setting of the intermediate speed Heat Recovery Mode 19 6 2 4 Setting of the trigger temperature threshold Heat Recovery Mode 19 6 2 5...

Страница 13: ...be used for applications other than those specified in this manual This appliance can be used by children aged from 8 years and above and persons with reduced physical sensory or mental capabilities or lack of experience and knowledge if they have been given supervision or instruction concerning use of the appliance in a safe way and understand the hazards involved Children shall not play with the...

Страница 14: ...delivered is according to order before starting the installation Any discrepancies from the ordered equipment must be reported to the supplier 5 2 Where how to install AIRQURE P1 unit are meant for indoor installation in a heated space The unit should be mounted horizontally Mount the unit on flat surface ceiling or floor It s important that the unit is completely leveled before it is put into ope...

Страница 15: ...t suitable for installation in 3 storey or above homes or fire protected areas In case of installation of the AIRQURE P1 H model with heating element the flexible duct should be the shortest possible Alternatively use a thermal insulated duct accessory on request Fig 5 c Fig 5 d 5 5 Ceiling installation The unit must be installed in the following position Fig 5 e Spirit level Fig 5 f 5 e Prepare t...

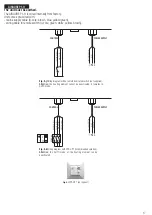
Страница 16: ...ied The unit must be earthed The AIRQURE P1 N is wired internally from factory Unit comes pre wired with mains supply cable 3 core brown blue yellow green wiring cable to remote switch 2 core blue brown 5 7 Precabled electric connections ATTENZIONE Make sure that the mains supply to the unit is disconnected before performing any installation service maintenance or electrical work The installation ...

Страница 17: ...LLOW GREEN BLUE BROWN N L YELLOW S2 WHITE S3 BROWN S1 GREEN GND POWER SUPPLY CONTROL YELLOW GREEN BLUE BROWN N L YELLOW S2 WHITE S3 BROWN S1 GREEN GND CTRL P1 L 1 1 1 L L S1 S2 S3 II I I Fig 5 j Wiring diagram with a remote dedicated switch not supplied Attention the heating element cannot be deactivated it remains in AUTO mode Fig 5 k Wiring diagram with CTRL P1 recommended solution Attention the...

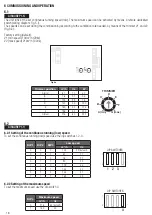
Страница 18: ...IP SWITCHES 2 3 4 1 1 0 DIP SWITCHES 2 3 4 The unit runs at the set continuous running speed low The maximum speed can be activated by means a remote dedicated switch wiring diagram Fig 5 i The speeds can be set during the commissioning according to the ventilation rate needed by means of the trimmer V1 and V2 Fig 6 a Factory setting default V1 min speed 104m3 h 29l s V2 max speed 216m3 h 60l s 6 ...

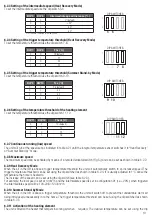
Страница 19: ... switches it to Heat Recovery or Summer Stand by mode 6 2 8 Maximum speed The maximum speed can be activated by means of a remote dedicated switch Fig 5 j and can be set as shown in table 6 2 2 6 2 9 Heat Recovery Mode When the air in the loft is above a trigger temperature threshold the unit will automatically switch to an increased speed The trigger temperature threshold can be set using the dip...

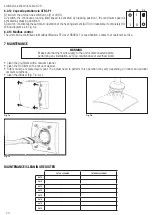
Страница 20: ...Fig 7 a Fig 7 b FILTER CLEANING FILTER REPLACEMENT DATE DATE DATE DATE DATE DATE DATE DATE MAINTENANCE CLEANING REGISTER 6 2 12 2 speed operation via CTRL P1 S1 switch the unit can be switched on I or off O S2 switch the continuous running low speed is activated by pressing position I the maximum speed is activated by pressing position II S3 switch it activates the automatic operation of the heati...

Страница 21: ...and electro technical waste disposal collection centres or else send the product back to the retailer when purchasing a new equivalent type device Separate collection of decommissioned equipment for recycling treatment and environmentally compatible disposal helps to prevent negative effects on the environment and on health and promotes the recycling of the materials that make up the equipment Imp...

Страница 22: ... 5 6 Installation au sol 26 5 7 Connexions électriques précâblées 26 6 Mise en service et exploitation 28 6 1 AIRQURE P1 N 28 6 2 AIRQURE P1 H 28 6 2 1 Réglage de la vitesse de fonctionnement en continu minimum 28 6 2 2 Réglage de la vitesse maximale 28 6 2 3 Réglage de la vitesse intermédiaire mode récupération de chaleur 29 6 2 4 Réglage du seuil de température de déclenchement mode de récupérat...

Страница 23: ...ons autres que celles spécifiées dans ce manuel Cet appareil ne peut être utilisé par des enfants âgés de 8 ans ou moins et par des personnes avec des capaités physiques sensorielles ou mentales reduites sauf si ils sont attentivement surveillés afin d utiliser l appareil en toute sécurité et de comprendre les risques encourus Les enfants ne doivent pas jouer avec l appareil Le nettoyage et l entr...

Страница 24: ... accessoires livré est conforme à la commande avant de commencer l installation Si l équipement commandé n est pas présent il faut le signaler au fournisseur 5 2 Où comment installer L unité AIRQURE P1 est conçue pour une installation intérieure dans un espace chauffé L unité doit être montée horizontalement Montez l unité sur une surface plane plafond ou sol Il est important que l unité soit comp...

Страница 25: ...ndard ne doit pas être installé dans des habitations de 3 étages ou plus ou encore dans des zones protégées contre le feu En cas d installation du modèle AIRQURE P1 H avec élément chauffant le conduit flexible doit être le plus court possible Vous pouvez également utiliser un conduit à isolation thermique accessoire sur demande Fig 5 c Fig 5 d 5 5 Installation au plafond L unité doit être installé...

Страница 26: ...rre L AIRQURE P1 N est câblé en interne depuis l usine L unité est précâblée avec câble d alimentation secteur 3 conducteurs marron bleu jaune vert câble de câblage vers interrupteur à distance 2 conducteurs bleu marron 5 7 Connexions électriques précâblées AVERTISSEMENT Assurez vous que l alimentation secteur de l unité est débranchée avant d effectuer toute installation entretien maintenance ou ...

Страница 27: ...LEU MARRON N L JAUNE S2 BLANC S3 BLEU S1 GREEN GND N L CTRL P1 L 1 1 1 L L S1 S2 S3 II I I Fig 5 j Schéma de câblage avec un interrupteur dédié à distance non fourni Attention l élément chauffant ne peut pas être désactivé il reste en Mode automatique Fig 5 k Schéma de câblage avec CTRL P1 solution recommandée Attention le mode AUTO de l élément chauffant peut être désactivée AUTO AUTO AIRQURE P1 ...

Страница 28: ...1 1 1 0 DIP SWITCHES 2 3 4 1 1 0 DIP SWITCHES 2 3 4 L unité fonctionne à la vitesse de fonctionnement continu réglée vitesse minimum La vitesse maximale peut être activée au moyen d un interrupteur à distance dédiée schéma de câblage Fig 5 i Les vitesses peuvent être réglées lors de la mise en service en fonction du débit de ventilation nécessaire au moyen du trimmer V1 et V2 Fig 6 a Réglage d usi...

Страница 29: ...aximale La vitesse maximale peut être activée au moyen d un interrupteur dédié à distance Fig 5 j et peut être réglée comme indiqué dans le tableau 6 2 2 6 2 9 Mode récupération de chaleur Lorsque la température de l air dans les combles est supérieur au seuil de déclenchement de la température l unité passe automatiquement à une vitesse supérieure Le seuil de température de déclenchement peut êtr...

Страница 30: ...7 a Fig 7 b NETTOYAGE DU FILTRE REMPLACEMENT DU FILTRE DATE DATE DATE DATE DATE DATE DATE DATE REGISTRE D ENTRETIEN NETTOYAGE 6 2 12 2 Fonctionnement à 2 vitesses via CTRL P1 Interrupteur S1 l unité peut être allumée I ou éteinte O Interrupteur S2 la vitesse de fonctionnement continue minimum est activée en appuyant sur la position I la vitesse maximale est activé en appuyant sur la position II In...

Страница 31: ...ectroniques et électrotechniques appropriés ou bien renvoyer le produit au détaillant lors de l achat d un nouvel appareil équivalent La collecte séparée des équipements déclassés pour le recyclage le traitement et l élimination compatible avec l environnement aide à prévenir les effets négatifs sur l environnement et la santé et favorise le recyclage des matériaux qui composent l équipement Une m...

Страница 32: ...Trafilamento interno massimo Maximum internal leakage rate Taux de fuites internes maximaux N A o2 Trafilamento esterno massimo Maximum external leakage rate Taux de fuites externes maximaux N A p1 Tasso di miscela interno Internal mixing rate Taux de mélange interne N A p2 Tasso di miscela esterno External mixing rate Taux de mèlange externe N A q Segnale avvertimento filtro Visual filter warning...

Страница 33: ...dulée locale o1 Trafilamento interno massimo Maximum internal leakage rate Taux de fuites internes maximaux N A o2 Trafilamento esterno massimo Maximum external leakage rate Taux de fuites externes maximaux N A p1 Tasso di miscela interno Internal mixing rate Taux de mélange interne N A p2 Tasso di miscela esterno External mixing rate Taux de mèlange externe N A q Segnale avvertimento filtro Visua...

Страница 34: ...rauliqa com info aerauliqa it Aerauliqa srl si riserva il diritto di modificare apportare migliorie ai prodotti e o alle istruzioni di questo manuale in qualsiasi momento e senza preavviso Aerauliqa srl reserves the right to modify make improvements to products and or this instruction manual at any time and without prior notice Aerauliqa srl se réserve le droit de modifier améliorer les produits et ...

Отзывы: