

View the expanded manual:
http://aeotec.com/support
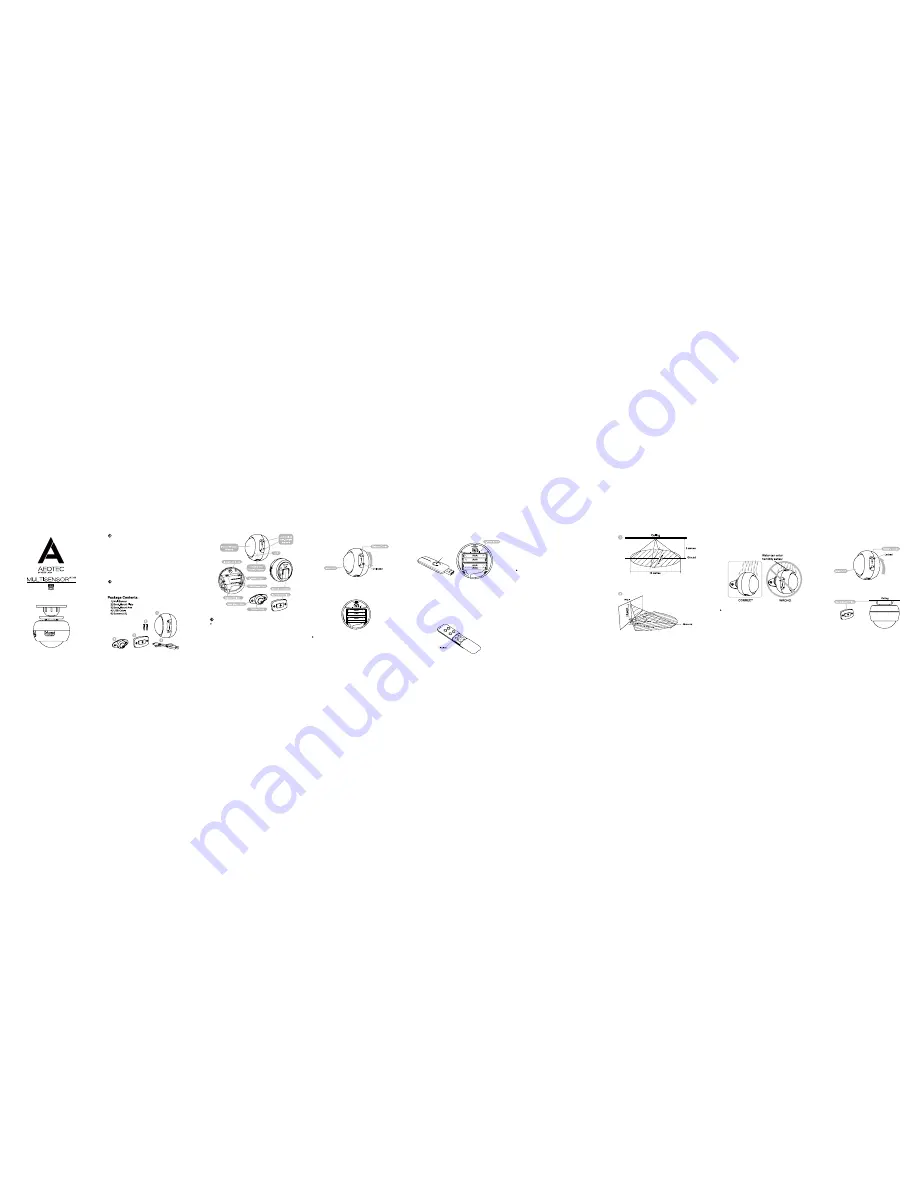
Aeotec by Aeon Labs MultiSensor.
Motion sensor. Humidity sensor. Thermometer. Light sensor.
The corner of your room just got smart.
Aeotec by Aeon Labs’ MultiSensor looks like a motion sensor and it acts like one
too. But it’s also so much more. Installing this 1 piece of Z-Wave® technology is
the same as installing 4 pieces of Z-Wave technology. Your home control network
will immediately understand motion, temperature, humidity and light readings
wherever MultiSensor installed. Those intelligent readings will equate to intelligence
automation. And intelligent automation will give you the perfect, smart home.
Your MultiSensor comes packaged with a number of accessories that will help with
its installation and operation.
Your MultiSensor can be powered by battery or by USB with an appropriate adaptor.
For the purposes of installation and setup, and even if you intend to power your
sensor with batteries, we recommend utilising the provided USB cable for setup.
For this you’ll need an adaptor to plug your USB cable into, this can include any
USB port on a computer and most mobile phone chargers. These first steps can be
performed in any location with your home, and not necessarily in your MultiSensor’s
final installation location.
For a USB powered installation;
1. Remove the rear part of your sensor by twisting the battery cover in a counter-
clockwise motion and separating the two parts of your sensor.
1. If your Z-Stick is plugged into a gateway or a computer, unplug it.
2. Take your Z-Stick to your MultiSensor .
3. Press the Action Button on your Z-Stick.
4. Press the Z-Wave Button on your MultiSensor .
5. You can test if your MultiSensor has been successfully synced with your Z-Wave
network by pressing its Z-Wave Button. If you press the button and your sensor’s
LED illuminates for a few seconds, then syncing has been successful. If the LED
blinks when the button is pressed, the syncing has been unsuccessful and you
should repeat the above steps.
6. Press the Action Button on the Z-Stick to return it to standard operating mode.
Return it to your gateway or computer.
1. Take your Minimote to your MultiSensor.
2. Press the Include button on your Minimote.
3. Press the Z-Wave Button on your MultiSensor.
4. You can test if your MultiSensor has been successfully synced with your Z-Wave
network by pressing its Z-Wave Button. If you press the button and your sensor’s
LED illuminates for a few seconds, then syncing has been successful. If the LED
blinks when the button is pressed, the syncing has been unsuccessful and you
should repeat the above steps.
5. Press any button on your Minimote to return it to standard operating mode.
MultiSensor can bring its intelligent readings to many locations of your home. That
includes outside of your home. MultiSensor is weatherized and can operate outdoors
in elements such as rain and snow. Please note that when installed outdoors, your
MultiSensor should only be relied on for temperature, light and humidity readings
and that the motion sensing capabilities should be disabled on your gateway in order
to avoid false readings.
While light can impact on the quality of motion readings, it’s also important to
understand things that may impact on other readings within your home. Specifically,
your MultiSensor should not be installed in areas of artificial temperature change.
Thus, when selecting a location, avoid placing it beside or near air conditioners,
humidifiers, and heaters, and avoid positioning it directly opposite a window or direct
sunlight.
Selecting a location for your MultiSensor to be installed depends on the use case.
Whatever the case or the installation location, please ensure that it fits with your
sensor’s effective motion sensing range as described in these diagrams.
For a battery powered installation;
1. Remove the rear part of your sensor as shown in the previous step 1.
2. Insert 4 AAA batteries oriented according to the picture below. Your MultiSensor is
now powered on.
It’s now time to sync your MultiSensor with a Z-Wave network. The following
instructions explain how to do this using a Z-Stick or a Minimote from Aeotec. If
you’re using an alternative controller for your Z-Wave network, please refer to its user
manual for network inclusion instructions.
If you’re using a Z-Stick:
If you’re using a Minimote:
For ceiling mounting using the Back-Mount Plate:
Further, for optimal performance your MultiSensor should NOT be mounted directly
on or near metal framing or other large metallic objects. Large metal objects may
weaken the Z-Wave wireless signal.
If selecting an outdoor location, it’s important to position your MultiSensor in a
sheltered location. It is best if your MultiSensor is not directly exposed to rain and
integral that the humidity venting on your MultiSensor neer is. As such,during
installation you should orient your MultiSensor according to the following diagram so
that the sensor perforations on the side of your sensor are facing downwards.
With your MultiSensor now part of your Z-Wave network, it’s time to finish its physical
installation.
There are 2 ways that your MultiSensor can be mounted on on a wall or ceiling.
Using the Back-Mount Plate, you can mount it flat against a wall or ceiling. Using the
Back-Mount Arm you can mount it on a surface or in a corner and angle it as desired.
To physically install your MultiSensor;
1. Reattach the two parts of your MultiSensor to each other. To do this, align the
lock/unlock half-dimple markers that are under the unlock symbol and then twist in
a clockwise motion.
2. If used the USB cable to power your MultiSensor, ensure that power can be
provided to your desired installation location. Please note that when installed in
areas that where the temperature can drop below-10°C, it is advised that mains
power is used and battery power is not.
3. Attach your desired mounting accessory. This can be the Back-Mount Plate or the
Back-Mount Arm.
4. If using the Back-Mount Plate, utilize the provided 3mm screws to affix it to a surface.
5. If using the Back-Mount Arm, utilize one 3x10mm screw to attach the Back-Mount
Plate to the Back-Mount Arm. Then affix the Back-Mount Arm to a surface utilizing
the provided 3x20mm screws.
6. The Back-Mount Arm may be locked at various angles by turning the Friction Lock
clockwise and counter-clockwise to respectively tighten or loosen the angle of the
arm.
For wall mounting using the Back-Mount Arm:
2. Insert the appropriate end of the provided USB cable into your sensor’s USB port.
Your MultiSensor is now powered on.
Familiarize yourself with your MultiSensor.
Quick start.
Setup your power.
Add your MultiSensor to your Z-Wave network.
Selecting a location for your MultiSensor .
Physically install your MultiSensor .
Action
Button


