background image

2/26/2018

MultiSensor 6 user guide. : Aeotec by Aeon Labs

https://aeotec.freshdesk.com/support/solutions/articles/6000057073-multisensor-6-user-guide-

5/11


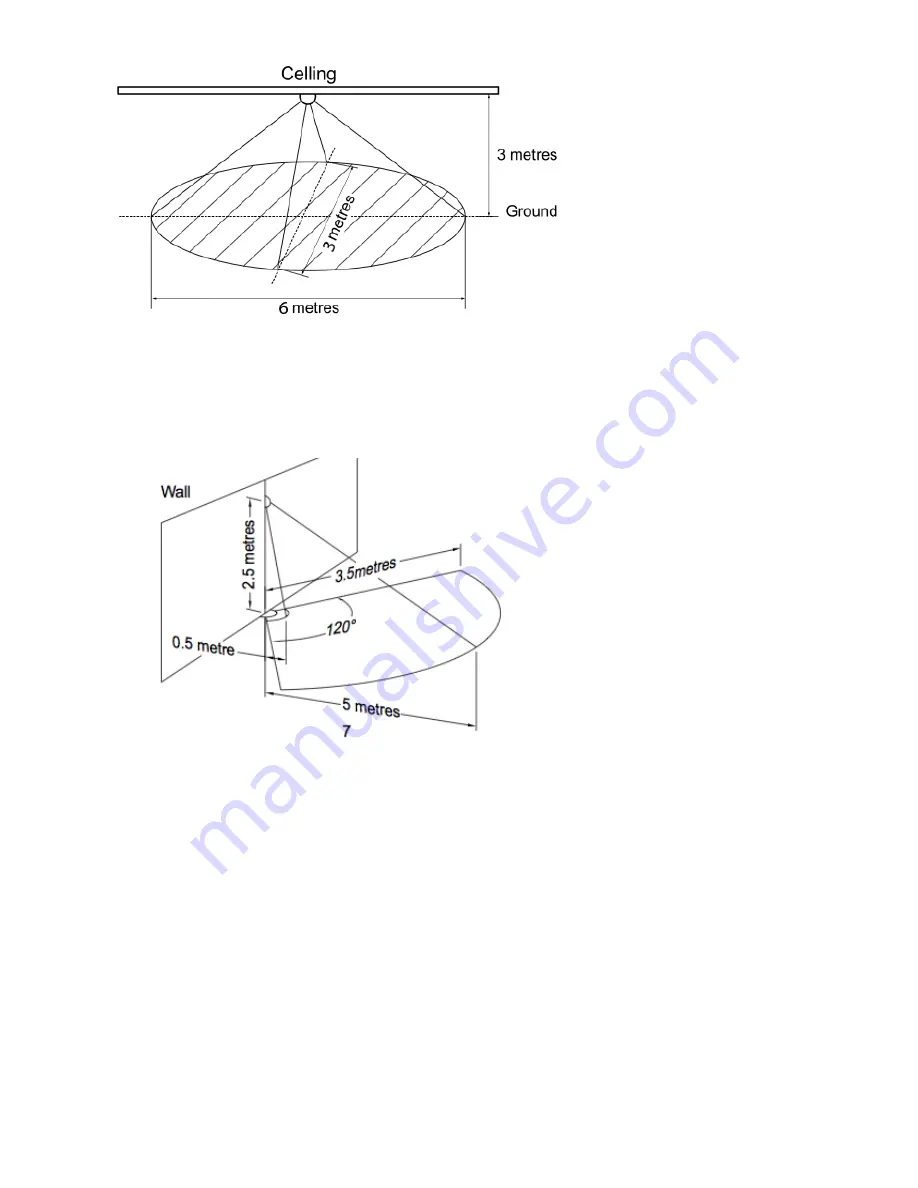
If installing MultiSensor 6 in a corner where the wall meets the ceiling it can take measurements within a 2.5 x 3.5 x 5 metres / 8 x 11 x
15 feet range:

 
For optimal performance, your MultiSensor 6 should NOT be mounted 

directly on or near metal framing or other large metallic objects.

Large metal objects may weaken the Z-Wave wireless signal MultiSensor 6 depends on for communication due to the wireless reflective
properties of metal. 


Physically install your MultiSensor.

 
With your MultiSensor 6 now a part of your Z-Wave network and having 

determined its installation location, it's time to finish its physical

installation. There are 2 ways that your MultiSensor 6 can be mounted on a wall or ceiling. Most simply it can be placed upon a shelf
without the need to attach further accessories. You can mount your sensor in a corner or against a wall or ceiling by using the Back-
Mount Plate. It's also possible to embed your MultiSensor 6 within a ceiling or wall using its Recessor accessory (sold separately).
To install your MultiSensor 6;
 
Reattach the three parts of your MultiSensor to each other. Unlock the Battery Cover from the Sensor unit. 


Содержание Aeotec MULTISENSOR 6

Страница 1: ...t more about Multisensor 6 by following that link To see whether Multisensor 6 is known to be compatible with your Z Wave system or not please reference our Z Wave gateway comparison http aeotec com z...

Страница 2: ...r this you ll need an adapter to plug your USB cable into this can include any computer USB port and most smartphone chargers These steps can be performed in any location within your home and not nece...

Страница 3: ...ies will require changing more frequently If powering your MultiSensor 6 with a sole battery insert it into the battery holder marked 1 WARNING Not compatible to rechargeable CR123A batteries 3 7V Add...

Страница 4: ...nfirm that it is waiting to add a new device 2 Press the Action Button on your MultiSensor The LED on Multisensor will blink Green rapidly followed by a solid Green LED for 1 second for a successful i...

Страница 5: ...wireless reflective properties of metal Physically install your MultiSensor With your MultiSensor 6 now a part of your Z Wave network and having determined its installation location it s time to fini...

Страница 6: ...upon a shelf without the need to attach further accessories To install your MultiSensor 6 with the Back Mount Plate 1 You can affix the Back Mount Arm by Double Sided Tape or using the provided KA2 5...

Страница 7: ...ly in an optimised Z Wave network your MultiSensor can be powered by batteries for 24 months before battery replacement is necessary Recommendation For networks which do not offer a method to display...

Страница 8: ...moving your MultiSensor from Z Wave Network Your MultiSensor can be removed from your Z Wave network at anytime You ll need to use your Z Wave network s main controller to do this and the following in...

Страница 9: ...waiting to remove a device 2 Press the Action Button on your MultiSensor The LED on Multisensor will blink red then change into a colourful gradient 3 If your MultiSensor has been successfully remove...

Страница 10: ...essages to your gateway when it has finished it will blink 1 of 3 colors Red Bad Health Yellow Moderate Health Green Great Health Be sure to watch for the blink as it will only blink once very quickly...

Страница 11: ...troubleshooting steps that you can take to make them work depending on if your gateway will allow you to Troubleshoot Motion Sensor https aeotec freshdesk com solution articles 6000156713 troubleshoo...

Отзывы: