background image

17

Service and Spare Parts

In the event of your appliance requiring service, or if you wish to purchase
spare parts, please contact your local Service Force Centre by telephoning:

0870 5 929929

Your telephone call will be automatically routed to the Service Force Cen-
tre covering your post code area.
For address of your local Service Force Centre and further information
about Service Force, please visit the website at www.serviceforce.co.uk.
Before calling out an engineer, please ensure you have read details under
the heading “Something Not Working”.
When you contact the Service Force Centre you will need to give following
details:

1. Your name, address and post code

2. Your telephone number

3. Clear and concise details of the fault

4. The model and serial number of the appliance. (found on the rating pla-

te).

5. The purchase date
Please note that a valid purchase receipt or guarantee documentation is
required for in-guarantee service calls.

Customer Care Department 

For general enquiries concerning your AEG appliance or for futher
information on AEG products, please contact our Customer Care
Department by letter or telephone at the address below or visit our
website at www.aeg.co.uk.

Customer Care Department

AEG Domestic Appliances 

55-77 High Street,

Slough,

Berkshire

SL1 1DZ

Tel: 08705 350 350*

*calls to this number may be recorded for training purposes

Содержание SANTO C 8 16 41 i

Страница 1: ...SANTO C 8 18 43 i Integrated Fridge Freezer Operating and Installation Instructions ...

Страница 2: ...functioning of the appliance are stressed with a warning triangle and or with signal words Warning Important Attention Please observe the following instructions carefully Additional information regarding operation and practical applications of the appliance appear after this symbol Tips and notes concerning economical and environmentally sound use of the appliance are marked with the flower In the...

Страница 3: ... 8 Moisture regulator 9 Fresh food refrigeration 10 Freezing and storing frozen food 10 Ice pack 11 Preparation of Ice Cubes 11 Freezing calendar 12 Defrosting 12 Switching off the appliance 13 Cleaning and Care 13 Energy Saving Tips 14 Something Not Working 14 Changing the light bulb 16 Service and Spare Parts 17 Guarantee Conditions 18 Installation 19 Electrical Connection 19 Positioning 20 Your...

Страница 4: ...nce should a damaged appliance be plugged in In the event of damage please con tact your retailer Refrigerant The refrigerant isobutane R600a is contained within the refrigerant circuit of the appliance a natural gas with a high level of environmental compat ibility which is nevertheless flammable During transportation and installation of the appliance be certain that none of the components of the...

Страница 5: ... appliances in the refrigerator freezer e g electric ice cream makers mixers etc Before cleaning the appliance always switch off the appliance and disconnect from the electricity supply When unplugging always pull the plug from the mains socket do not pull on the cable Service Under no circumstances should you attempt to repair the appliance your self Repairs carried out by inexperienced persons m...

Страница 6: ... of properly This applies to your old appliance and at the end of its service life to your new appliance as well Warning Before disposing of old appliances make them inoperable Remove plug from mains sever the power cable remove or destroy any snap or latch closures to prevent small children being trapped inside Use an authorised disposal site Contact your Local Council or Environmental Health Off...

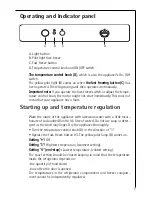
Страница 7: ...ing up and temperature regulation Wash the inside of the appliance with lukewarm water with a little bicar bonate of soda added 5ml to 0 5 litre of water Do not use soap or deter gent as the smell may linger Dry the appliance thoroughly Turn the temperature control knob D in the direction of 1 Operate the fast freeze button C The yellow pilot lamp B comes on Setting Off Setting 1 Hightest temperat...

Страница 8: ...d at other positions as needed Variable Storage Box Some models are equipped with a variable storage box which is fitted under a door shelf compartment and can be slid sideways D338 If you want to freeze fresh food rapidly select setting 4 ensuring that the temperature in the refrigerator compartment does not drop below 0 C You should reset the temperature control knob to setting 2 or 3 if this do...

Страница 9: ...Moisture regulator There is an adjustable air grille in front of the shelf above the fruit and vege table compartments The opening in the ventilation slots can be adjusted with the slider Right slider Ventilation slots opened With the ventilation slots open more air circulation results in a lower air moisture content in the fruit and vegetable compartments Left slider Ventilation slots closed When...

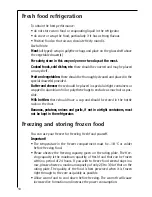
Страница 10: ...uch air as pos sible Milk bottles these should have a cap and should be stored in the bottle rack on the door Bananas potatoes onions and garlic if not in airtight containers must not be kept in the refrigerator Freezing and storing frozen food You can use your freezer for freezing fresh food yourself Important The temperature in the freezer compartment must be 18 C or colder before freezing food ...

Страница 11: ...packed food in the drawers Place food to be frozen in the upper drawer Unfrozen food must not touch items already frozen otherwise the frozen food could begin to defrost 2 Press the fast freeze button 24 hours before introducing fresh food for free zing The yellow light comes on 3 Place frozen foods in the drawers sorted by type as far as possible Ice pack There are two ice packs in one drawer of ...

Страница 12: ...tment however will become progressively covered with frost This should be removed with the special plastic scraper provided whenever the thickness of the frost exceeds 4 mm During this operation it is not necessary to switch off the power supply or to remove the foodstuffs However when the ice becomes very thick on the inner liner complete defrosting should be carried out as follows 1 Remove the f...

Страница 13: ...mpartment and clean thoroughly see section Cleaning and Care 4 Leave the door open to avoid the build up of odours Cleaning and Care For hygienic reasons the appliance interior including interior accessories should be cleaned regularly Warning Before carrying out any cleaning or maintenance disconnect the appliance from the electricity supply Never clean the appliance with a steam cleaner Moisture...

Страница 14: ... the appliance thoroughly 5 Check the water drain hole on the rear wall of the fridge Clear a blocked drain hole with the aid of the drain cleaning tool included with the appliance 6 When everything is dry place the appliance back into service Energy Saving Tips Do not install the appliance near radiators or other sources of continuous warmth High ambient temperatures cause longer more frequent op...

Страница 15: ...Symptom Possible Cause Remedy Appliance does not work Appliance is not switched on Switch on the appliance Mains plug is not plugged in or is loose Insert mains plug Fuse has blown or is defective Check fuse replace if neces sary Socket is defective Electrical malfunctions are to be corrected by an electrician Appliance cools too much Temperature is set too cold Turn the temperature control knob t...

Страница 16: ... required for any in guarantee service calls Changing the light bulb Warning There is a risk of electric shocks Before changing the light bulb switch off the appliance and unplug it Light bulb data 220 240 V max 25 W 1 To switch off the appliance turn the temperature control knob to position 0 2 Unplug the mains plug 3 To change the light bulb remove the screw from the light bulb cover 4 Unhook th...

Страница 17: ...ce Force Centre you will need to give following details 1 Your name address and post code 2 Your telephone number 3 Clear and concise details of the fault 4 The model and serial number of the appliance found on the rating pla te 5 The purchase date Please note that a valid purchase receipt or guarantee documentation is required for in guarantee service calls Customer Care Department For general en...

Страница 18: ... 5 Repairs carried out under guarantee do not extend the guarantee period for the applian ce Parts removed during guarantee repairs become the property of AEG 6 The purchaser s statutory rights are not affected by this guarantee European Guarantee If you should move to another country within Europe then your guarantee moves with you to your new home subject to the following qualifications The guar...

Страница 19: ... the fol lowing code Green and Yellow Earth Blue Neutral Brown Live As the colours of the wires in the mains lead of this appliance may not correspond with the coloured mark ings identifying the terminals in your plug proceed as follows 1 The wire coloured green and yellow must be connected to the terminal marked with the letter E or by the earth symbol or coloured green and yel low 2 The wire col...

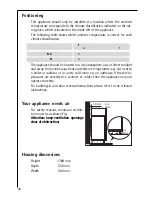
Страница 20: ... o r S N N Your appliance needs air For safety reasons minimum ventila tion must be as shown Fig Attention keep ventilation openings clear of obstruction 50 mm min 200cm2 200cm 2 min D567 The appliance should be located in a dry atmosphere out of direct sunlight and away from continuous heat and extreme temperature e g not next to a boiler or radiator or in a very cold room e g an outhouse If thes...

Страница 21: ...ent prevention regulations for refrigeration appliances VBG 20 and the regu lations of the German Society of Electrical Engineers VDE were observed in the manufacture of this appliance The refrigerant circuit has been checked for leaks This appliance is in accordance with the following EU guidelines 73 23 EWG dated 19 February 1973 low voltage guidelines 89 336 EWG dated 3 May 1989 including guide...

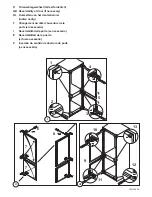
Страница 22: ... GB Reversibility of door if necessary NL Overzetten van het deurscharnier indien nodig F Changement du côté d ouverture de la porte si nécessaire I Reversibilità della porta se necessario E Reversibilidad de la puerta si fuera necesario P Inversão do sentido de abertura da porta se necessário ...

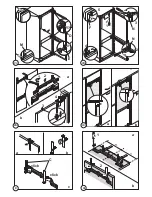
Страница 23: ...inbauanweisung GB Installation instructions NL Montage aanwijzing F Instructions de montage I Istruzioni di montaggio E Instrucciones para el montaje P Instruções de montagem para o encastre 90 115 L D L I 41xI 10xH 2xA 1xM M M 4xG 2xF 4xL 6xJ 2xD 2xE 1xB 2xC 1xK 4xN ...

Страница 24: ...a b click c X 1 VII VI a b a b 10 1 2 IX XI b a 1 2 E 3 4 C D M 3 2 4 5 F VIII click C N N ...

Страница 25: ... GB Only for split front panel NL Alleen voor deusen van verschillende houtsoorten F Uniquement pour portes en bois séparées I Solo per ante in legno divise E Solo para puertas de madera separadas P Só para portas em madeira separadas H 1 2 8 mm K J XVI A G H M M XIII 10 ...

Страница 26: ......

Страница 27: ......

Страница 28: ...AEG Hausgeräte GmbH Postfach 1036 D 90327 Nürnberg http www aeg hausgeraete de 2222 161 41 ...

Отзывы: