background image

16

GB

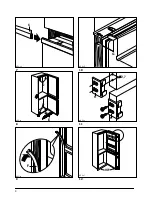
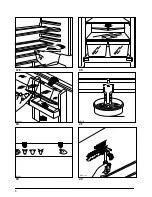
Unscrew the central door pivot and fit it on the left

(Fig. 4

).

Remount the upper door and screw in the upper
bolt on the LH side

 (Fig. 5)

. Unscrew the lower bolt

on the RH side and screw it in on the LH side. Both
doors can now be opened to the left.

Installing, aligning, and fixing

Figs. 6, 7, 8, 9, and 10

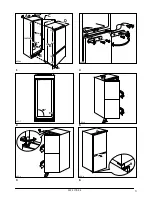
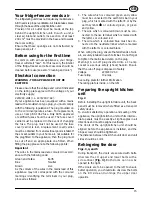
Insert the fridge-freezer in the recess of the upright
kitchen unit until the upper limit strip (A) bears
against the unit ceiling or intermediate panel and
the lower door pivot (B)

 (Fig. 6) 

closes flush with the

unit floor at the front.
If a gap remains owing to a greater recess height
between the limit strip above and unit ceiling, this
can be closed by insertion of the supplied profile
sealing strip (C) 

(Fig. 7)

.

Slide and align a fridge-freezer with doors hinged on
the right until it bears against the LH side

 (Fig. 8)

and a fridge-freezer with doors hinged on the left
until it bears against the RH side.
Screw in mounting screws (D) above and below.
Insert ventilation grille (E).
Cut supplied the sealing strip (F) 

(Fig. 9) 

to length

and press in between the appliance and kitchen
unit side wall.
Seal mounting and hinge holes with supplied plugs
(G) 

(Fig. 10

).

Connecting the door

Figs. 11,12, 13 and 14

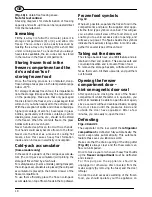
Mounting positions for slide pieces (H)

 (Fig. 11)

should be marked on the appliance doors.
Drillholes of 2.7 mm dia. should be drilled and the
slide pieces screwed on, 2 per door. Open kitchen
unit and appliance doors 90

°


(Fig. 12)

. Place guide

pieces (K) on slide pieces (H), prepunch mounting
drillholes 26-30 mm away from the kitchen unit
door edge depending on the furniture sidewall
thickness, and screw on guide pieces

 (Fig. 13

).

Check closing function of doors, and re-adjust slide
pieces (H) and guide pieces (K) as necessary.
Insert cover (O) on lower door pivot 

(Fig. 14

).

Starting up and temperature
regulation

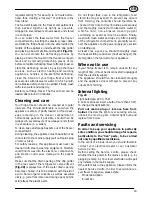
Fig. 15

Insert the plug of your fridge-freezer in a plug socket
with protective earth contact wired as prescribed.
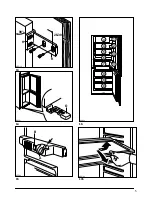
The knob for temperature selection is located in the
upper RH part of the refrigerator compartment (A)

(Fig. 15)

.

The mark to which the knob must be set is located
on top of the thermostat housing 

(Fig. 15/arrow)

.

Setting "O" means: 

Off.

Rotation in direction "1":

 Lighting on, refriger-

ating unit on, the latter then operating automatically.

Setting "1" means:

 Highest temperature, warmest

setting.

Setting "6" means: 

Lowest temperature, coldest

setting.
The internal temperature is strongly affected by the
ambient temperature, loading, and frequent door-
opening. If the setting is changed, the refrigerating
unit of your fridge-freezer does not start immedi-
ately if automatic defrosting is in progress.
When starting your fridge-freezer for the first time,
we recommend selection of setting "6" = lowest
temperature, coldest setting for 3-4 hours.
The necessary refrigerator and freezer compart-
ment temperatures are then rapidly attained. After
3-4 hours, you can set back the knob to a medium
setting between 2 and 4.

Setting when the room
temperature is below 16 

°

C *)

Fig. 15

In the cold season in unheated rooms, the switch
(B) 

(Fig. 15)

 should be switched on. The red pilot

lamp in the switch comes on.
Through engagement of a low heating capacity of
8 W in the refrigerator compartment, it is ensured
that, at a low room temperature, the running time of
the refrigerating unit is prolonged and the storage
temperature of -18

°

C is attained in the freezer

compartment.
*) Not on all models

Содержание SANTO 2732-4I

Страница 1: ...AUS ERFAHRUNG GUT Integrierbare Einbau Kühl Gefrierkombination Integrating Fridge Freezer Gebrauchs und Montageanweisung Operating and Installation Instructions ...

Страница 2: ... bereiten 10 11 Abtauen 11 Reinigung und Pflege 12 Störungen und Kundendienst 12 Tips 13 _______________________ Contents Page lllustration pages please unfold 3 6 General instructions 14 Rehingeing the door 15 16 Installing aligning and fixing 16 Connecting the door 16 Starting up and temperature regulation 16 Correct storage 17 Freezing fresh food and storing frozen food 17 18 Making ice cubes 1...

Страница 3: ...3 1 2 3 AEG29 E B D C A 50min 540 540 1443 1446 550min 560min 50min 1441 831 11 15 552 32 AEG7 90 90 AEG8 4 5 6 AEG30 AEG10 AEG11 B A 3 2222 178 54 ...

Страница 4: ...4 7 8 9 AEG12 C AEG13 E D D AEG14 F 10 11 12 AEG15 G AEG16 2 7 H H AEG17 90 ...

Страница 5: ...5 13 14 15 AEG18 K 26 30 H 90 AEG31 O AEG20 A B 16 17a AEG32 4 4 5 7 9 8 6 8 3 3 1 2 AEG22 5 ...

Страница 6: ...6 17b 18 19 AEG23 AEG006 AEG25 20 21 22 AEG26 AEG27 AEG110 ...

Страница 7: ...EC of 03 05 1989 including Amendment Directive 92 31 EEC EMC Electromagnetic Compatibily Directive Before starting up we recommend you to read the following Operating Instructions since only by doing so can you benefit from all the advantages offered by your fridge freezer Please unfold the illustration pages on the cover to enable you to compare the text and pictures alongside Removing the adhesi...

Страница 8: ... Brown Live As the colours of the wires in the mains lead of this appliance may not correspond with the coloured markings identifying the terminals in your plug proceed as follows 1 The wire which is coloured green and yellow must be connected to the earth terminal in your plug which is marked with the letter E or by the earth symbol or coloured green or green and yellow 2 The wire which is colour...

Страница 9: ...ss and screw on guide pieces Fig 13 Check closing function of doors and re adjust slide pieces H and guide pieces K as necessary Insert cover O on lower door pivot Fig 14 Starting up and temperature regulation Fig 15 Insert the plug of your fridge freezer in a plug socket with protective earth contact wired as prescribed The knob for temperature selection is located in the upper RH part of the ref...

Страница 10: ... of the VARIO glass shelf if fitted to a different level You will thus gain the necessary space to store tall items on the shelf below Adjusting the door rack Fig 18 Depending on the food stored some door racks can be changed to other holders or removed Take out the refrigerated food press the door racks upwards reposition them and press them back into place Freezing fresh food and storing frozen ...

Страница 11: ...are placed the cold pack accumulator is placed in the bottom drawer of the freezer compartment To use them efficiently place the frozen cold pack accumulators on top of frozen foods in the top drawer Frozen food symbols Fig 19 Wharever possible separate the frozen food in the compartments and place the supplied rider oppo site the food type symbol concerned This will give you a better overall view...

Страница 12: ...rear wall of the refrigerator compartment Fig 20 is always free If the water drain opening becomes choked it is to be cleaned with the aid of a wire Some organic solvents as well as essential oils e g juice from lemon and orange peel butyric acid attack the plastic parts Do not forget that even in the refrigerator food stored too long may spoil To prevent any odours from forming the contents shoul...

Страница 13: ...t Never place hot food in the refrigerator compart ment or freezer compartment for cooling Hints on energy saving One or two additional hints on energy saving are given below Do not install your fridge freezer next to a radia tor oven or in direct sunlight since through high ambient temperature the temperature reg ulator switches on the refrigerating unit more fre quently and for longer Do not pla...

Страница 14: ...AUS ERFAHRUNG GUT AEG Hausgeräte GmbH Postfach 1036 D 90327 Nürnberg Copyright by AEG H 271 280 000 0497 00 151 2222 178 54 ET 1 2 3 4 5 6 7 8 9 10 11 12 97 ...

Отзывы: