background image

Electrical connection

Any electrical work required to install this appliance should be carried
out by a qualified electrician or competent person.

29

WARNING - THIS APPLIANCE MUST BE EARTHED

The manufacturer declines any liability should these safety measures
not be observed.

Before switching on, make sure the electricity supply voltage is the
same as that indicated on the appliance rating plate. The rating plate
is inside, on the left.
The appliance is supplied with a 13 amp plug fitted. In the event of
having to change the fuse in the plug supplied, a 13 amp ASTA
approved (BS 1362) fuse must be used.

Important

The wires in the mains lead are coloured in accordance with the
following code:

Green and Yellow Earth
Blue Neutral
Brown Live
As the colours of the wires in the mains lead of this appliance may not
correspond with the coloured markings indentifying the terminals in
your plug, proceed as follows:
1. The wire coloured green and yellow must be connected to the
terminal marked with the letter “E”or by the earth symbol 

or

coloured green and yellow.
2. The wire coloured blue must be connected to the terminal “N” or
coloured black.
3. The wire coloured brown must be connected to the terminal marked
"L" or coloured red.
4. Upon completion there must be not cut, or stray strands of wire
present and the cord clamp must be secure over the outer sheat.

Warning!

A cut-off plug inserted into a 13 amp socket is a serious

safety (shock) hazard. Ensure that the cut-off plug is disposed of safe-
ly.

Содержание SANTO 1403-4 U

Страница 1: ...ekorfähiger Unterbau Kühlschrank Undercounter Refrigerator Réfrigérateur à sous encastrer Onderbouwkoelkasten ÖKO_SANTO 1403 4 U Gebrauchsanweisung Operating Instructions Mode d emploi Gebruiksannwijzing ...

Страница 2: ...ng under a continuous worktop 22 Rehingeing the door 22 Pannelling the door 23 Cleaning before using for the first time 23 Starting up and temperature regulation 24 Correct storage 25 Icemaking 26 Defrosting 26 Cleaning and care 27 When not in use 27 Minor repairs that you can carry out yourself 28 Faults and servicing 28 Electrical connection 29 Plug socket 30 Internal lighting 30 Your appliance ...

Страница 3: ...environmentally friendly manner Any snap catch or lock on your old appliance should also be made unusable before you put the appliance away or hand it over to be disposed of in an environmentally friendly manner In this way you can prevent children from locking themselves in when playing and thus endangering their lives Please make sure that the pipelines of your fridge freezer are not damaged bef...

Страница 4: ...geration circuit has been checked for leakage This appliance complies with the following EC Directives 73 23 EEC of 19 02 1973 Low Voltage Directive 89 336 EEC of 03 05 1989 including Amendment Directive 92 31 EEC EMC Electromagnetic Compatibily Directive Before starting up we recommend you to read the following Operating Instructions since only by doing so can you benefit from all the advantages ...

Страница 5: ... data on this on the rating plate which is in the interi or of the appliance on the left hand side It will consist of one of the following Climate category Ambient temperature from to SN 10 to 32 C N 16 to 32 C ST 18 to 38 C T 18 to 43 C If installation beside a heat source is unavoidable the following minimum distances at the sides are to be complied with To electric cookers 3 cm to oil or coal f...

Страница 6: ...torage of food and to prevent undesirable odours from forming Never place hot food in your refrigerator for cooling Appliance packaging information All materials used are environmentally compatible They can be safely disposed of or burnt in a refuse incinerator Regarding the materiale The plastics can also be recycled and are marked as follows PE for polyethylene e g as used in the outer wrapping ...

Страница 7: ...ure the temperature regulator switches on the refrigerating unit more frequently and for longer Do not place any hot food in the refrigerator first allow the food to cool to room temperature Do not open the door unnecessarily and close it again as quickly as possible Set the most energy saving frozen food storage temperature see Starting up and temperature regulation Ensure good ventilation Keep t...

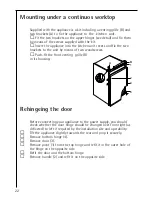
Страница 8: ...oodscrews Push fit the front venting grille B in its housing Rehingeing the door Before connecting your appliance to the power supply you should check whether the door hinge should be changed over from right as delivered to left if required by the installation site and operability Tilt the appliance slightly towards the rear and prop it securely Remove bottom hinge 4 Remove door 3 Remove pivot 1 f...

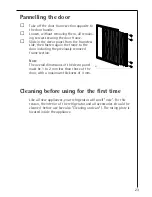
Страница 9: ...including the previously removed frame section Note The overall dimensions of the decor panel must be 1 to 2 mm less than those of the door with a maximum thickness of 4 mm Cleaning before using for the first time Like all new appliances your refrigerator will smell new For this reason the interior of the refrigerator and all accessories sh oul d be cleaned before use see also CIeaning and care Th...

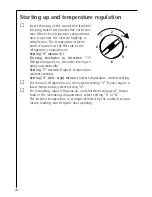
Страница 10: ...ckwise in direction 1 Refrigerating unit on the latter then oper ating automatically Setting 1 means Highest temperature warmest setting Setting 6 end stop means Lowest temperature coldest setting For normal refrigeration we recommend setting 3 If you require a lower temperature select setting 4 For icemaking rapid refrigeration and shortterm storage of frozen food in the icemaking compartment sel...

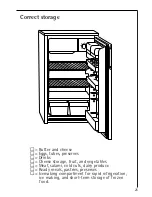
Страница 11: ... Eggs tubes preserves Drinks Cheese storage fruit and vegetables Meat salami cold cuts dairy produce Ready meals pastries preserves Icemaking compartment for rapid refrigeration ice making and short term storage of frozen food 1 2 9 8 7 6 ...

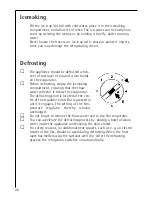
Страница 12: ...ompartment ensuring that the thaw water collector is below the evaporator The defrosting knob is located at the cen tre of the regulator knob This is pressed in until it engages The setting of the tem perature regulator thereby remains unchanged Do not forget to remove the thaw water and to dry the evaporator You can accelerate the defrosting process by placing a bowl of warm water inside the appl...

Страница 13: ...too long may spoil To prevent any odours from forming the contents should therefore be checked from time to time including accessories and thoroughly cleaned with lukewarm water to which a mild detergent can be added Finally wash with clean water and wipe dry After clearing promptly restart your appliance When not in use If your refrigerator is to remain unused for any length of time it must be di...

Страница 14: ... trained electrician In the event of a fault please contact your retailer or the service centre direct Before approaching the service centre check whether the plug socket is energized connect light bulb where necessary Power supply faults can be rectified by your electrician If your refrigerator has a fault please notify the nearest service centre promptly To avoid unnecessary journeys and costs p...

Страница 15: ...coloured in accordance with the following code Green and Yellow Earth Blue Neutral Brown Live As the colours of the wires in the mains lead of this appliance may not correspond with the coloured markings indentifying the terminals in your plug proceed as follows 1 The wire coloured green and yellow must be connected to the terminal marked with the letter E or by the earth symbol or coloured green ...

Страница 16: ...nal lighting Light bulb data 220 V 15 W E 14 socket never use a bulb of more than 15 W Changing the light bulb Unplug or otherwise disconnect the appliance from the mains sup ply e g by removing the fuse Unscrew the light bulb from below and replace with a new one 130 300 Your appliance needs air The refrigerating unit of your refrigerator is designed for maintenance free opera tion What it should...

Страница 17: ...AEG Hausgeräte GmbH Postfach 1036 D 90327 Nürnberg Copyright by AEG H 271 271 300 0797 04 151 2222 621 92 ET 7 8 9 10 11 12 98 ...

Отзывы: