background image

Protect 5.31/xxx-480-220-120   10 kVA - 120 kVA 


Page 32 of 56 

8000020680 BAL, en 

8 Operation 

8.1 

Disconnecting the UPS (Individual Unit) 


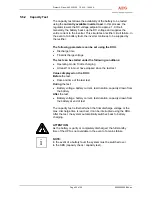
ATTENTION: 
Only switch off the UPS in an absolute emergency by switching 
off the rectifier circuit and SBS circuit in their distribution! In 
addition, the inverter must be switched off using the remote OFF 
contact. The external battery isolator must be opened to 
completely disconnect the unit from the power supply. 

To restart the system, proceed as described in Chapter 7. 


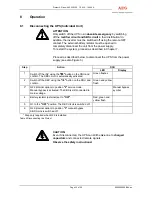
Proceed as described below to disconnect the UPS from the power 
supply (see also Figure 3).  


Step Action 

DOU 


LED 

Display 

Switch off the INV using the "

0" button on the DOU and 

confirm. The SBS circuit is automatically activated. 

Green flashes 


Switch off the REC using the "=0" button on the DOU and 
confirm. 

Green and yellow 
flash 


3* 

Q29 (internal option) to position "2" service mode. 
Manual bypass is activated. The SBS is still connected to 
mains voltage. 

 Manual 

bypass 

symbol 

Battery isolator (external) set to "OFF"

Red, green and 
yellow flash 


Q1 to the "OFF" position. The REC circuit is switched off. 


Q29 (internal option) to position "3" manual bypass. 
SBS mains is switched off. 


* Step only required when Q29 is installed 

Table 5 Disconnecting the Protect 


CAUTION: 
Even if disconnected, the UPS can still be live due to charged 
capacitors
 and connected remote signals. 

Observe the safety instructions! 


Содержание Protect 5.31

Страница 1: ...ing Instructions 8000020680 BAL en Uninterruptible Power Supply UPS Protect 5 31 xxx 480 220 120 10 kVA 120 kVA AEG Power Supply Systems GmbH Department PSS TED Name Schenuit Bögge Revision 02 Date 09 05 2008 ...

Страница 2: ...data and maintain their validity has been entered into Warranty Our goods and services are subject to the general conditions of supply for products of the electrical industry and our general sales conditions We reserve the right to alter any specifications given in these operating instructions especially with regard to technical data operation dimensions and weights Claims in connection with suppl...

Страница 3: ... dealt with in these operating instructions Our service department is available on the hotline number given below AEG Power Supply Systems GmbH Emil Siepmann Straße 32 D 59581 Warstein Germany 49 2902 763 100 FAX 49 2902 763 645 E mail Service Be aegpss powersupplysystems com http www aegpss de Copyright No part of these operating instructions may be transmitted reproduced and or copied by any ele...

Страница 4: ... a Forklift or Lowlift Truck 15 4 4 Site Requirements 16 4 5 Floor Mounting 17 4 6 Storage 18 5 Function 18 5 1 Operating Modes 18 5 1 1 Operation with Mains Power Supply 18 5 1 2 Operation with Faulty Mains Supply 19 5 1 3 Operation with a Faulty Inverter 20 5 1 4 Operation with Manual Bypass 20 5 2 Function of the Circuit Breakers 21 5 3 Static Bypass Switch SBS 22 5 4 Charging the Battery 23 5 ...

Страница 5: ...y 39 9 3 4 Status Measured Values 40 9 3 5 Blocking 41 9 3 6 Fault History 41 9 3 7 Settings 41 9 3 8 Information 41 9 3 9 Service 41 9 3 10 Help 42 10 Annex 43 10 1 Battery Handling using the Graphical DOU 43 10 1 1 Charging the Battery 43 10 1 2 Battery Data 44 10 1 3 Battery Tests 45 10 1 4 Possible Battery Tests 46 11 Interfaces 47 11 1 Remote Signalling 47 11 2 Serial Interface 48 12 Maintena...

Страница 6: ...te compliance to avoid any danger to persons ATTENTION This symbol identifies all working and operational procedures requiring absolute compliance to prevent any damage irreparable or otherwise to the UPS or its components i NOTE This symbol identifies technical requirements and additional information requiring the operator s attention This document includes brief instructions which describe the f...

Страница 7: ...floors e g textile wood PVC or in computer centres the floor plate must always be installed The assembler is responsible for proper installation CAUTION If smoke is detected or a fire breaks out immediately disconnect the UPS from the power supply and inform the maintenance personnel 1 5 Qualified Personnel The UPS may only be transported installed connected started serviced and operated by qualif...

Страница 8: ...sible connection values as specified in these operating instructions The unit may only be used for this intended purpose It is not permitted to make any unauthorised modifications to the UPS or to use any spare parts and replacement parts not approved by AEG Power Supply Systems GmbH or to use the UPS for any other purpose The person responsible for the installation must ensure that the safety ins...

Страница 9: ...s number Reason for claim Period of use Ambient conditions Operating mode 1 9 Directives The Protect 5 31 xxx units comply with the currently applicable DIN and VDE regulations VBG4 is met on the basis of compliance with VDE 0106 Part 100 The requirements of VDE 0100 Part 410 Functional extra low voltage with safe isolation have been complied with where applicable The CE sign on the unit confirms ...

Страница 10: ... voltage 216 bei 108 Lead acid cells voltage range 173 bis 260 Output voltage in V neutral conductor under full load 120 V optional adjustable from 110 V 127 V Output current in A 83 167 250 333 500 667 833 1000 Output frequency in Hz 50 Hz 1 optional 60 Hz 1 THD factor in at rated load 3 Overload capacity 1 5 x Inom for 1 minute 1 25 x Inom for 10 minutes Ishort circuit max 3 x Inom 50 Load Effic...

Страница 11: ... operation unit 2 Ventilation grids 4x for each control cabinet 3 1 Technology Due to the utilisation of electronic high performance components the Protect 5 31 xxx series is suitable for universal applications and has a very high degree of operational reliability as well as optimum efficiency and communication capability with other systems due to integrated interfaces The entire control electroni...

Страница 12: ...ns SBS Mains Battery Load Rectifier Inverter SBS T40 optional optional Figure 2 Functional principles of the Protect5 xxx 31 The main components of the UPS are Figure 2 Rectifier section with Thyristor stack and control unit Transformer Smoothing device for the batteries Interference suppression devices Inverter section with Inverter stack and control unit Interference suppression devices Static b...

Страница 13: ...itches the SBS circuit over to the load circuit without any interruption 3 2 Operating Elements of the UPS 12 1 2 3 7 8 9 10 6 11 X1 X2 X3 X4 OFF 5 4 Figure 3 Arrangement of the operating elements components and individual PCBs with open door 1 Fans 2 Optional PCBs on the control unit pivot plate 3 Remote signalling master board and expansion board 4 CAN COM controller CCC 5 Terminal strip X12 rem...

Страница 14: ...he unit against moisture i NOTE To prevent damage only remove the protective film from the UPS immediately prior to installation The four fixing bolts on the base frame can then be removed using a spanner 4 2 Crane Transport CAUTION Do not walk under suspended loads Always wear protective clothing such as a helmet safety shoes and work gloves Transport the unit with due care and observe the safety...

Страница 15: ...lied in the threaded bores provided on top of the cabinet Hook in the four ropes Carefully lift the UPS and transport it to its intended location Lower the UPS carefully without jolting it Remove the ropes and transport eyelets 4 3 Transporting the Unit using a Forklift or Lowlift Truck ATTENTION Prior to transport with a forklift or lowlift truck always ensure that the transport devices used for ...

Страница 16: ...ion grids on the UPS using the corresponding fixing bolts 4 4 Site Requirements Suitable floor surfaces for installation of the UPS are Double floors Above cable ducts or directly on a level surface Ensure that the weight of the UPS units does not exceed the maximum floor bearing capacity refer to Table 1 Chapter 2 The site must also meet the following requirements be free of conductive dust be fr...

Страница 17: ...mpartment should not exceed 20 C as the service life of the batteries is otherwise considerably reduced 4 5 Floor Mounting Four holes are provided in the base frame of the UPS for the fixing bolts The spacing and diameter of the bores can be found in the table below Before securing the UPS to the floor ensure that it is vertically aligned and compensate for any unevenness e g using metal wedges Ty...

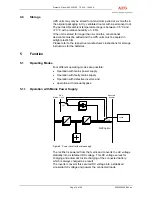
Страница 18: ... instructions for the batteries 5 Function 5 1 Operating Modes Four different operating modes are possible Operation with mains power supply Operation with faulty mains supply Operation with defective inverter and operation with manual bypass 5 1 1 Operation with Mains Power Supply _ _ Q29 Mains Secured busbar Loads SBS circuit Q29 Q29 option Figure 8 Power circuit with mains supply The rectifier ...

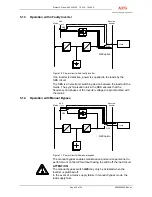
Страница 19: ... battery without interruption The power supply to the loads is therefore also ensured in the event of a mains failure The standby time is limited by the extent to which the batteries are discharged and is primarily determined by the battery capacity The inverter only switches off when the battery voltage drops below the permissible value When the voltage and frequency are within the tolerance rang...

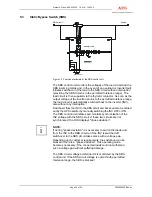
Страница 20: ...he synchronisation unit in the SBS ensures that the frequency and phases of the inverter voltage are synchronised with the mains 5 1 4 Operation with Manual Bypass _ _ Q29 Mains Secured busbar Loads SBS circuit Q29 Q29 option Figure 11 Power circuit with manual bypass The manual bypass enables maintenance and service personnel to perform work on the UPS without having to switch off the load circui...

Страница 21: ...h Q1 and by opening the battery isolator external Manual bypass switch Q29 Switch Q29 Figure 2 is located externally to fully disconnect the UPS It can however also be installed in the unit as an alternative It permits switchover of the loads to the mains input of the SBS without interruption This switchover is only permitted if the inverter has been switched off and the SBS activated see also Cha...

Страница 22: ...so without any interruption Switchover from the INV to the SBS circuit and back can also be carried out by the UPS operator by manually switching the INV OFF or ON The SBS control unit initiates and monitors synchronisation of the INV voltage with the SBS circuit If these two circuits are not synchronised the DOU displays phase deviation i NOTE If during phase deviation it is necessary to switch t...

Страница 23: ... charging When the electronically controlled charging has been carried out the control unit switches over to trickle charge voltage e g 2 27 V cell 5 5 Manual Characteristic Curve Switchover Additional operating modes are available for special treatment of the battery These can be manually activated via the DOU using the SERVICE REC OP MODE menu The works setting of the characteristic values can b...

Страница 24: ...under the following conditions Operating mode charging or trickle charging Battery voltage 2 2 V cell for lead acid cells Rectifier current 90 of Inom Rectifier current Battery discharge current setpoint 5 At least 1 min must have elapsed since the last test Values displayed on the DOU Before the test Date and time of the last test During the test Battery voltage battery current test duration capa...

Страница 25: ...lowing conditions Operating mode Trickle charging At least 1 min must have elapsed since the last test Values displayed on the DOU Before the test Date and time of the last test During the test Battery voltage battery current test duration capacity drawn from the battery After the test Battery voltage battery current test duration capacity drawn from the battery at end of test The capacity test is...

Страница 26: ...he clamping screw refer to Figure 14 15 The protective measure of earth connection serves to prevent excessive touch voltages on freely accessible metal parts The UPS is earthed using the earthing bolts PE provided on the housing refer to Table 2 Chapter 6 4 Prior to start up it is necessary to ensure that the UPS is earthed in accordance with valid regulations VDE 0100 6 1 Inputs and Outputs Figu...

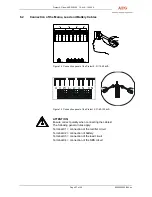
Страница 27: ... panel of the Protect 5 31 10 40 kVA L L X2 U N X3 U V W X1 U N X4 Figure 15 Connection panel of the Protect 5 31 60 120 kVA ATTENTION Ensure correct polarity when connecting the cables The following general rules apply Terminal X1 connection of the rectifier circuit Terminal X2 connection of battery Terminal X3 connection of the load circuit Terminal X4 connection of the SBS circuit ...

Страница 28: ...E connection next to terminal strip X2 using the shortest possible route Secure the cables for strain relief on the cable clamp rail Check to ensure that the cables are secured correctly and tighten the fixing bolts if necessary Check the cables for correct polarity and correct phase sequence Remove any cable debris tools bolts etc from the connection panel Replace the connection cover 6 3 Connect...

Страница 29: ...5 2x95 70 2x95 2x50 2x95 2x70 2x95 4x50 4x95 3x120 3x240 4x150 4x240 5 Load output X3 Load output fusing in A max 40 63 100 125 200 250 315 400 6 Cross section in mm pole min max 35 2x95 95 2x95 2x70 2x95 2x95 2x95 2x150 4x95 3x120 3x240 4x150 4x240 7 Remote signalling X12 Cross section of the signal line in mm pole max 0 2 2 5 Battery 8 Battery connection X2 Battery fusing in A 50 100 160 200 315...

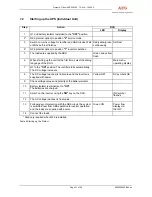
Страница 30: ...inals Always observe the safety regulations Starting the UPS see also Figure 3 7 1 Preparing Start up of the UPS Individual Unit Step Action 1 Q1 and battery isolator external to the OFF position 2 Q29 internal option set to position 2 manual bypass 3 Remove connection cover 4 Connect the mains voltage for the rectifier circuit and SBS circuit 5 Measure the mains voltage at terminal X1 outer condu...

Страница 31: ...uage of the DOU Main menu operating display 7 Q1 to the ON position The rectifier starts automatically The DC voltage increases 8 The DC voltage reaches its final value and the inverter is supplied with power Yellow OFF DC symbols OK 9 Check voltage values and polarity at the battery isolator 10 Battery isolator external set to ON The batteries are charged 11 Switch on the inverter using the I key...

Страница 32: ...tep Action DOU LED Display 1 Switch off the INV using the 0 button on the DOU and confirm The SBS circuit is automatically activated Green flashes 2 Switch off the REC using the 0 button on the DOU and confirm Green and yellow flash 3 Q29 internal option to position 2 service mode Manual bypass is activated The SBS is still connected to mains voltage Manual bypass symbol 4 Battery isolator externa...

Страница 33: ...he rectifier starts automatically The DC voltage increases 8 The DC voltage reaches its final value and the inverter is supplied with power Yellow ON DC symbol OK 9 Battery isolator external set to ON The batteries are charged 10 Switch on the inverter using the I key on the DOU INV symbol flashes 11 The AC voltage reaches its final value 12 Following synchronisation with the SBS circuit the syste...

Страница 34: ...uses fuse ratings and protected components can be found in the following table see also Figure 3 Position 11 Item 10 40 kVA value Protected components F1 to F10 0 4 A fast Fans M1 to M10 depending on type F13 1 x 5 A fast L1 Actual SBS mains voltage F14 F15 F16 3 x 5 A fast L1 L1 Actual load voltage L1 F17 F18 2 x 5 A fast L1 Actual INV voltage L1 F20 F21 F22 3 x 5 A fast L1 L2 Actual REC mains vo...

Страница 35: ...atuses and measured values using symbols and plain language The unit can be controlled and parameterised using menus which are protected by a password The DOU is operated using 4 display keys to which several functions are assigned and one ENTER key The currently active key functions are shown on the LCD as symbols 1 2 3 4 Figure 16 DOU 1 LEDs Red yellow green from top to bottom 2 Graphical displa...

Страница 36: ... the system If a switch off procedure has been initiated you must confirm it in the safety routine so that the unit cannot be inadvertently switched off The general control of the power converters can be blocked and protected with a password If a unit fault occurs you must refer to the system where the cause is specified After eliminating the cause you must acknowledge the fault in the menu You ca...

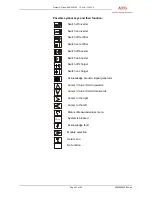
Страница 37: ...r Switch off rectifier Switch on rectifier Acknowledge acoustic signal generator Cursor Value Scroll upwards Cursor Value Scroll downwards Cursor to the right Cursor to the left Status Measured values menu System is blocked Acknowledge fault Help menu Switch off booster Switch on booster Switch off charger Switch on charger Module selection No function ...

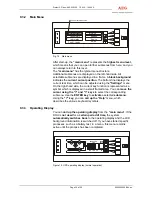
Страница 38: ...cted is displayed on a black background You activate the selected language by pressing the ENTER key and the next menu opens In order to comply with international requirements all menus up to the language selection are displayed in English When you start up the UPS for the first time commissioning depending on the UPS type the language selection menu is followed by several other menus where you ha...

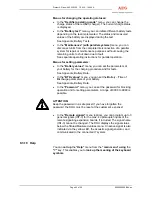
Страница 39: ...ch can be adjusted using the Settings menu On the right hand side the current key function is represented as a symbol which is displayed in a small framed area You can move the cursor using the and keys to select the corresponding submenu Use the ENTER key to activate a selected submenu Using the key you can call up the Help menu which describes the various keyboard symbols 9 3 3 Operating Display...

Страница 40: ...nerator in this area in the event of messages or faults Use the bottom key with the measuring device icon to call up menus with detailed information on status and measured values Figure 20 Operating display of the UPS with activated manual bypass Using the manual bypass switch option you can disconnect the unit from the load The load is then supplied directly by the mains This state is shown on th...

Страница 41: ... date 9 3 7 Settings You can call up the Settings menu from the main menu Here you can set the parameters LCD contrast Language Real time Acoustic signal generator for fault signalling and keyboard operation in the respective submenus 9 3 8 Information You can call up the Information menu from the main menu Using this menu you can call up information about the unit type the firmware versions and t...

Страница 42: ...ameters of your battery for the charging procedure and for tests See Appendix Battery Data In the BTD values menu you can set the Battery Time of Discharge parameters of your battery See Appendix Battery Data In the Password menu you can set the password for blocking operation and for setting parameters A range of 0000 to 9999 is possible ATTENTION Keep the password in a safe place If you have for...

Страница 43: ...e electronically controlled charging has been carried out the control unit switches over to trickle charge voltage e g 2 27 V cell Further operating modes are available for special treatment of the battery providing they are implemented in the UPS These can be manually activated via the graphical DOU in the SERVICE REC OPERATING MODE menu The works setting of the characteristic values can be chang...

Страница 44: ...rs and their setting ranges Protect 5 Type Pb NiCd Number of cells 90 120 155 190 Cap acity 0 9999 Ah U Tri cell 2 13 2 32 V cell 1 33 1 50 V cell U Cha cell 2 23 2 43 V cell 1 37 1 70 V cell U Equ cell 2 23 2 58 V cell 1 37 1 75 V cell U EPS cell 1 90 2 32 V cell 1 10 1 50 V cell U Sta cell 1 00 2 86 V cell 0 50 1 95 V cell I bat limit ation Tri Cha Equ of Inom 1 110 of Inom I bat limit ation Sta...

Страница 45: ... SERVICE BATTERY TEST menu of the DOU Status messages and measured values of the battery branches are shown in the display The yellow LED signals an ongoing test The tests are either completed successfully completed with an error or cancelled manually The test parameters are set using the SERVICE BATTERY VALUES menu This menu allows the operator to set the discharge current the maximum discharge t...

Страница 46: ...e date and time The values at the end of the test are retained after a current test ATTENTION As the battery is partly or completely discharged the full standby time of the UPS is not available in the event of a mains failure Capacity test The capacity test allows the availability of the battery to be tested using the currently available inverter load This involves reducing the DC voltage of the r...

Страница 47: ...8 A AC A12 X3 Inverter operation Mains operation Rectifier fault Battery undervoltage Assign Meaning Collective fault Inverter remote h td Assign Meaning Assign Meaning X12 22 23 24 25 26 27 28 29 30 19 20 21 4 5 6 7 8 9 10 11 12 1 2 3 A12 X4 X12 16 17 1 2 3 18 A12 X5 X12 52 53 1 2 Figure 21 Terminal assignment of the remote signalling master board A12 i NOTE The A13 and A14 expansion board can be...

Страница 48: ...option 46 47 48 A14 X3 7 8 9 Signal K31 A14 option 49 50 51 A23 X1 1 X1 2 24 V AC 49 51 A23 OPTION 52 53 54 A12 X5 1 2 A13 X4 1 INV remote shutdown 52 53 OPT2 54 Standard A12 A13 55 56 57 A13 X4 2 A13 X4 3 4 Signal OPT2 55 OPT3 56 57 A13 58 59 60 A14 X4 1 2 A14 X4 3 Signal OPT4 58 59 OPT5 60 A14 option 61 62 63 A14 X4 4 Signal OPT5 61 NC 62 63 A14 option Table 8 Assignment of terminal strip X12 11...

Страница 49: ...nctions some of which are optional Self diagnosis This is activated when the system is switched on Internal auxiliary programs monitor and signal faults including those from the bus system the control PCBs or the sensors Data logger Specified measuring data and parameters from the REC INV and SBS are stored in the event of a fault This data is read out and evaluated as required 12 2 Repairs CAUTIO...

Страница 50: ...DOU Replace the faulty fuses Check whether Q1 is in the ON position Check voltage at X2 No load voltage Load fuse faulty Measure output voltage at X3 Check external load fuses Faulty connection to battery Battery isolator external in the OFF position F24 to F25 faulty Switch on battery isolator external refer to start up renew defective fuses Fan does not work Fan fuse faulty Loose contact in the ...

Страница 51: ...ng fuse in acc with Table 7 Unscrew the two fixing bolts on the fan cover grid and remove the grid Lift the fan until the fan connector is accessible Unlock and disconnect the fan connector Remove the fan Installing the fan Fit the fan connector onto the appropriate connector section on the UPS so that both connectors engage in place Insert the fan refit the fan cover grid and tighten the fixing b...

Страница 52: ...ries 3 months Chapter 12 3 3 Battery compartment Annually Chapter 12 3 3 Fan replacement 40 000 hours Chapter 12 2 2 Table 10 Checklist for maintenance work Depends on the ambient conditions observe the instructions of the fan manufacturer 12 3 1 Visual Checks When visually inspecting the unit check whether there is any mechanical damage or whether foreign bodies can be found in the system any con...

Страница 53: ...ccordance with the safety regulations of VDE 0510 Part 2 If the electrolyte level of open batteries has dropped to the minimum mark the level must be topped up with distilled water in accordance with DIN 43530 Part 4 The battery must be kept clean and dry in order to prevent creepage currents Only use pure water without additives for cleaning the plastic battery components especially the cell comp...

Страница 54: ...PS system has been supplied by AEG Power Supply Systems GmbH the battery has been specially designed for the Protect model Use a comparable battery type when replacing the battery We would like to draw your attention to the fact that spare parts not supplied by us have neither been tested nor approved Installation of such spare parts can therefore have a detrimental effect on the functional capabi...

Страница 55: ...A14 Remote signalling expansion board 2 A20 Parallel operation adapter A23 Power supply unit 24 V AC A25 SNMP adapter RFC1628 A30 Modem UPS A28 Power supply unit 12 V DC A54 Measuring amplifier for temperature dependent charging Standard scope of supply Slot Designation A12 Remote signalling master board A29 CAN COM controller CCC Table 12 Legend for Figure 24 Please see the enclosed technical dat...

Страница 56: ... ensure that no cables are pinched 1 2 3 4 7 8 5 6 Figure 25 PCBs in the control unit pivot plate sample model 40 kVA Item Slot Designation 1 A1 A80 Rectifier triggering 2 A1 A1 Inverter triggering 3 C42 Capacitor number depending on capacity 4 A17 A17 A1 Inverter interface Inverter control 5 A50 A50 A1 Rectifier interface Rectifier control 6 A16 A16 A1 SBS interface SBS control 7 A91 Fuse protect...

Отзывы: