background image

10.12 

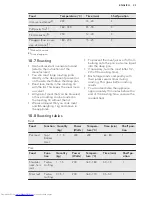
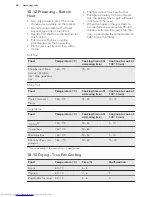
Preserving - Bottom

Heat

• Use only preserve jars of the same

dimensions available on the market.

• Do not use jars with twist-off and

bayonet type lids or metal tins.

• Use the first shelf from the bottom for

this function.

• Put no more than six one-litre

preserve jars on the baking tray.

• Fill the jars equally and close with a

clamp.

• The jars cannot touch each other.

• Put approximately 1/2 litre of water

into the baking tray to give sufficient

moisture in the oven.

• When the liquid in the jars starts to

simmer (after approximately 35 - 60

minutes with one-litre jars), stop the

oven or decrease the temperature to

100 °C (see the table).

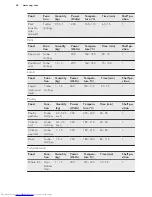
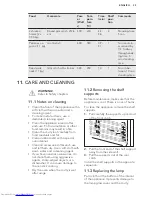
Soft fruit

Food

Temperature (°C)

Cooking time until
simmering (min)

Continue to cook at
100 °C (min)

Strawberries / Blue-
berries / Raspber-
ries / Ripe gooseber-
ries

160 - 170

35 - 45

-

Stone fruit

Food

Temperature (°C)

Cooking time until
simmering (min)

Continue to cook at
100 °C (min)

Pears / Quinces /
Plums

160 - 170

35 - 45

10 - 15

Vegetables

Food

Temperature (°C)

Cooking time until
simmering (min)

Continue to cook at
100 °C (min)

Carrots

1)

160 - 170

50 - 60

5 - 10

Cucumbers

160 - 170

50 - 60

-

Mixed pickles

160 - 170

50 - 60

5 - 10

Kohlrabi / Peas / As-
paragus

160 - 170

50 - 60

15 - 20

1) 

Leave standing in the oven after it is deactivated.

10.13 

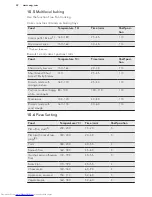
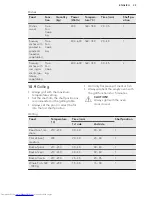
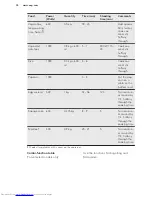
Drying - True Fan Cooking

Food

Temperature (°C)

Time (h)

Shelf position

Beans

60 - 70

6 - 8

3

Peppers

60 - 70

5 - 6

3

Vegetables for soup

60 - 70

5 - 6

3

www.aeg.com

28

Содержание KME561000M

Страница 1: ...USER MANUAL EN User Manual Microwave combi oven KME561000M ...

Страница 2: ...ur website for Get usage advice brochures trouble shooter service information www aeg com webselfservice Register your product for better service www registeraeg com Buy Accessories Consumables and Original spare parts for your appliance www aeg com shop CUSTOMER CARE AND SERVICE Always use original spare parts When contacting our Authorised Service Centre ensure that you have the following data a...

Страница 3: ... it operates or when it cools down Accessible parts are hot If the appliance has a child safety device this should be activated Children shall not carry out cleaning and user maintenance of the appliance without supervision Children aged 3 years and under must be kept away from this appliance when it is in operation at all times 1 2 General Safety Only a qualified person must install this applianc...

Страница 4: ... the appliance must not be operated until it has been repaired by a qualified person Only a qualified person can carry out any service or repair operation that involves the removal of a cover which gives protection against exposure to microwave energy Do not heat liquids and other foods in sealed containers They are liable to explode Only use utensils that are suitable for use in microwave ovens W...

Страница 5: ...djacent to appliances or to units with the same height The appliance is equipped with an electric cooling system It must be operated with the electric power supply 2 2 Electrical connection WARNING Risk of fire and electrical shock All electrical connections should be made by a qualified electrician The appliance must be earthed Make sure that the electrical information on the rating plate agrees ...

Страница 6: ...the enamel do not put aluminium foil directly on the bottom of the appliance do not put water directly into the hot appliance do not keep moist dishes and food in the appliance after you finish the cooking be careful when you remove or install the accessories Discoloration of the enamel has no effect on the performance of the appliance Use a deep pan for moist cakes Fruit juices cause stains that ...

Страница 7: ...connect the appliance from the power supply Only use lamps with the same specifications 2 6 Disposal WARNING Risk of injury or suffocation Disconnect the appliance from the mains supply Cut off the mains electrical cable close to the appliance and dispose of it Remove the door catch to prevent children or pets from becoming trapped in the appliance 2 7 Service To repair the appliance contact an Au...

Страница 8: ...osition 5 DAILY USE WARNING Refer to Safety chapters 5 1 Retractable knobs To use the appliance press the control knob The control knob comes out 5 2 Activating and deactivating the appliance It depends on the model if your appliance has knob symbols indicators or lamps The indicator comes on when the oven heats up The lamp comes on when the appliance operates The symbol shows whether the knob con...

Страница 9: ...r than for Conventional Cooking Pizza Setting To bake food on 1 shelf position for a more intensive browning and a crispy bottom Set the temperature 20 40 C lower than for Conventional Cooking Top Bottom Heat To bake and roast food on 1 shelf position Bottom Heat To bake cakes with crispy bottom and to preserve food Defrost To defrost frozen food Grilling To grill flat food and to toast bread Fast...

Страница 10: ...only while an oven function is in operation 5 6 Heat up indicator When you activate an oven function the bars in the display come on one by one The bars show that the oven temperature increases or decreases 6 MICROWAVE MODE 6 1 Microwave General CAUTION Do not let the appliance operate when there is no food in it After you deactivate the appliance let the food stand for some minutes Refer to the m...

Страница 11: ...uid can run off Turn the food after half the defrosting time If possible divide and then remove the pieces that have started to defrost Defrosting butter portions of gateau quark Do not fully defrost in the appliance but let them defrost completely at a room temperature This gives a more even result Remove all metal or aluminium packaging or parts before defrosting Defrosting fruit vegetables If f...

Страница 12: ...3 You must follow the manufacturer s instructions about the maximum temperatures 6 3 Tips for the microwave Result Remedy You cannot find details for the amount of food prepared Find details for similar type of food Increase or shorten the length of the cooking time according to the following rule double the amount almost double the time half the amount half the time The food after cooking is too ...

Страница 13: ...tings turn the knob for the temperature microwave power The power setting changes in 100 Watt steps 3 Press and then to change the Duration settings The appliance automatically starts to operate after few seconds When the set time ends an acoustic signal sounds and the Microwave function deactivates automatically 4 Turn the knob for the oven functions to the off position When the Microwave functio...

Страница 14: ...efrosting meat fish bread Defrosting cheese cream butter Defrosting fruit and cakes gateaux Raising yeast dough Heating up cold dishes and drinks 7 CLOCK FUNCTIONS 7 1 Clock functions table Clock function Application TIME OF DAY To show or change the time of day You can change the time of day only when the appliance is off DURATION To set how long the appliance operates Use only when an oven funct...

Страница 15: ...nutes and time setting flash in the display The appliance deactivates automatically 5 Press any button to stop the acoustic signal 6 Turn the knob for the oven functions to the off position 7 4 Setting the END 1 Set an oven function 2 Press again and again until starts to flash 3 Press or to set the hours and the minutes for END time 4 Press to confirm At the set time an acoustic signal sounds for...

Страница 16: ...t Up Timer press and hold and The timer starts to count up again 8 USING THE ACCESSORIES WARNING Refer to Safety chapters 8 1 Inserting the accessories Use only suitable cookware and material WARNING Refer to Microwave mode chapter Wire shelf Push the shelf between the guide bars of the shelf support and make sure that the feet point down Baking tray Push the baking tray between the guide bars of ...

Страница 17: ...ctions the appliance deactivates When you deactivate the appliance while the Function Lock is on the Function Lock switches automatically to the Child Lock Refer to Using the Child Lock 9 3 Residual heat indicator When you deactivate the appliance the display shows the residual heat indicator if the temperature in the oven is more than 40 C Turn the knob for the temperature left or right to show t...

Страница 18: ...aking When the trays become cold again the distortions are gone 10 2 Tips on baking Baking results Possible cause Remedy The bottom of the cake is not browned sufficiently The shelf position is incor rect Put the cake on a lower shelf The cake sinks and becomes soggy lumpy or streaky The oven temperature is too high The next time you bake set a slightly lower oven temper ature The cake sinks and b...

Страница 19: ... 35 50 2 Sponge cake Sponge cake Top Bottom Heat 160 35 50 2 Flan base short pas try1 True Fan Cook ing 170 180 10 25 2 Flan base sponge mix ture True Fan Cook ing 150 170 20 25 2 Apple pie Apple pie 2 tins Ø 20 cm diagonally off set True Fan Cook ing 160 70 90 2 Apple pie Apple pie 2 tins Ø 20 cm diagonally off set Top Bottom Heat 180 70 90 1 Cheesecake tray2 Top Bottom Heat 160 170 60 90 1 1 Pre...

Страница 20: ...0 35 55 3 Fruit flans made with yeast dough sponge mixture 2 Top Bottom Heat 170 35 55 1 Fruit flans made with short pastry True Fan Cook ing 160 170 40 80 3 Yeast cakes with deli cate toppings e g quark cream custard 1 Top Bottom Heat 160 180 40 80 2 1 Preheat the oven 2 Use a deep pan Biscuits Food Function Tempera ture C Time min Shelf posi tion Short pastry biscuits True Fan Cook ing 150 160 1...

Страница 21: ...rue Fan Cook ing 160 20 35 3 Small cakes Small cakes1 Top Bottom Heat 170 20 35 2 1 Preheat the oven 10 4 Bakes and gratins Food Function Temperature C Time min Shelf position Pasta bake Top Bottom Heat 180 200 45 60 1 Lasagne Top Bottom Heat 180 200 25 40 1 Vegetables au gratin1 Turbo Grilling 160 170 15 30 1 Baguettes top ped with melted cheese True Fan Cook ing 160 170 15 30 1 Sweet bakes Top B...

Страница 22: ...y Stripes 140 25 45 1 3 Biscuits made with sponge mixture 160 170 25 40 1 3 Pastries made with egg white meringues 80 100 130 170 1 3 Macaroons 100 120 40 80 1 3 Biscuits made with yeast dough 160 170 30 60 1 3 10 6 Pizza Setting Food Temperature C Time min Shelf position Pizza thin crust 1 200 230 15 20 3 Pizza with a lot of top ping 2 180 200 20 30 3 Tarts 180 200 40 55 3 Spinach flan 160 180 45...

Страница 23: ...ecommend that you cook meat and fish weighing 1 kg and above in the appliance To prevent the meat juices or fat from burning onto the pan put some liquid into the deep pan If necessary turn the roast after 1 2 2 3 of the cooking time Baste large roasts and poultry with their juices several times during roasting This gives better roasting results You can deactivate the appliance approximately 10 mi...

Страница 24: ...Tempera ture C Time min Shelf po sition Leg of lamb roast lamb Turbo Grilling 1 1 5 200 150 170 50 70 1 Poultry Food Func tion Quantity kg Power Watts Tempera ture C Time min Shelf po sition Poultry portions Turbo Grilling 0 2 0 25 each 200 200 220 20 35 1 Chicken half Turbo Grilling 0 4 0 5 each 200 190 210 25 40 1 Chicken poulard Turbo Grilling 1 1 5 200 190 210 60 80 1 Duck Turbo Grilling 1 5 2...

Страница 25: ...t the shelf into the shelf position as recommended in the grilling table Always set the pan to collect the fat into the first shelf position Grill only flat pieces of meat or fish Always preheat the empty oven with the grill functions for 5 minutes CAUTION Always grill with the oven door closed Grilling Food Temperature C Time min Shelf position 1st side 2nd side Roast beef me dium 210 230 30 40 3...

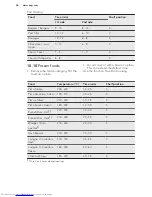
Страница 26: ...an extend the defrost time Use the function True Fan Cooking Food Temperature C Time min Shelf position Pizza frozen 200 220 15 25 3 Pizza American frozen 190 210 20 25 3 Pizza chilled 210 230 13 25 3 Pizza Snacks frozen 180 200 15 30 3 French Fries thin1 210 230 20 30 3 French Fries thick1 210 230 25 35 3 Wedges Cro quettes1 210 230 20 35 3 Hash Browns 210 230 20 30 3 Lasagne Cannelloni fresh 170...

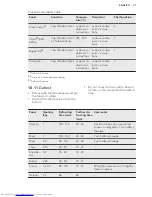
Страница 27: ...he oven 2 Turn 2 or 3 times during cooking 3 Preheat the oven 10 11 Defrost Remove the food packaging and put the food on a plate Use the first shelf position from the bottom Do not cover the food with a bowl or a plate as this can extend the defrost time Food Quantity kg Defrosting time min Further de frosting time min Comments Chicken 1 100 140 20 30 Put the chicken on an upturned saucer in a bi...

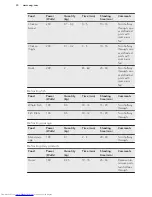
Страница 28: ...decrease the temperature to 100 C see the table Soft fruit Food Temperature C Cooking time until simmering min Continue to cook at 100 C min Strawberries Blue berries Raspber ries Ripe gooseber ries 160 170 35 45 Stone fruit Food Temperature C Cooking time until simmering min Continue to cook at 100 C min Pears Quinces Plums 160 170 35 45 10 15 Vegetables Food Temperature C Cooking time until simm...

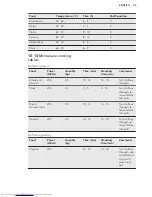
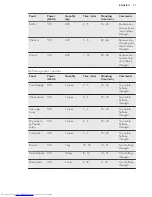
Страница 29: ...nts Whole cuts of meat 200 0 5 10 12 10 15 Turn halfway through Steak 200 0 2 3 5 5 10 Turn halfway through re move defros ted parts Mixed minced meat 200 0 5 10 15 10 15 Turn halfway through re move defros ted parts Goulash 200 0 5 10 15 10 15 Turn halfway through re move defros ted parts Defrosting poultry Food Power Watts Quantity kg Time min Standing time min Comments Chicken 200 1 25 30 10 20...

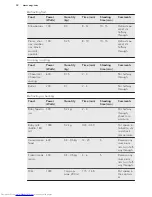
Страница 30: ...parts with aluminium foil Defrosting fish Food Power Watts Quantity kg Time min Standing time min Comments Whole Fish 100 0 5 10 15 15 20 Turn halfway through Fish fillets 100 0 5 10 12 15 20 Turn halfway through Defrosting sausage Food Power Watts Quantity kg Time min Standing time min Comments Sliced saus age 100 0 1 2 4 20 40 Turn halfway through Defrosting dairy products Food Power Watts Quant...

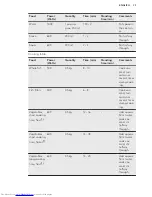
Страница 31: ...tity Time min Standing time min Comments Yeast dough 100 1 piece 2 3 15 20 Turn plate halfway through Cheesecake 100 1 piece 2 4 15 20 Turn plate halfway through Cake ga teau 100 1 piece 1 2 15 20 Turn plate halfway through Dry cake e g Pound cake 100 1 piece 2 4 15 20 Turn plate halfway through Fruit cake 100 1 piece 1 2 15 20 Turn plate halfway through Bread 100 1 kg 15 20 10 15 Turn halfway thr...

Страница 32: ...15 2 3 Stir halfway through Butter 200 0 1 2 4 Stir halfway through Defrosting or heating Food Power Watts Quantity Time min Standing time min Comments Baby food in jars 300 0 2 kg 2 3 Stir halfway through check tem perature Baby milk bottle 180 ml 1000 0 2 kg 0 20 0 40 Put spoon in to bottle stir and check temperature Convenience food 600 0 4 0 5 kg 14 20 5 Remove any aluminium lids turn half way...

Страница 33: ...0 5 kg 8 10 Cook cov ered turn container several times during cook ing Fish fillets 500 0 5 kg 6 8 Cook cov ered turn container several times during cook ing Vegetables short cooking time fresh1 600 0 5 kg 12 16 Add approx 50 ml water cook cov ered stir halfway through Vegetables short cooking time frozen1 600 0 5 kg 14 18 Add approx 50 ml water cook cov ered stir halfway through Vegetables long c...

Страница 34: ...way through Popcorn 1000 3 4 Put the pop corn on a plate on the bottom level Egg custard 300 1 kg 34 36 120 Turn contain er around by 1 4 halfway through the cooking time Sponge cake 600 0 475 kg 8 9 5 Turn contain er around by 1 4 halfway through the cooking time Meatloaf 400 0 9 kg 25 27 5 Turn contain er around by 1 4 halfway through the cooking time 1 Cook all vegetables with a cover on the co...

Страница 35: ... roof carefully from food residuals and fat Clean stubborn dirt with a special oven cleaner Clean all accessories after each use and let them dry Use a soft cloth with warm water and a cleaning agent If you have nonstick accessories do not clean them using aggressive agents sharp edged objects or a dishwasher It can cause damage to the nonstick coating Dry the oven when the cavity is wet after usa...

Страница 36: ...ck if the oven is correctly connected to the electrical supply refer to the connec tion diagram if available The oven does not heat up The oven is deactivated Activate the oven The oven does not heat up The clock is not set Set the clock The oven does not heat up The necessary settings are not set Make sure that the settings are correct The oven does not heat up The automatic switch off is activat...

Страница 37: ...tion to the problem yourself contact your dealer or an Authorised Service Centre The necessary data for the service centre is on the rating plate The rating plate is on the front frame of the appliance cavity Do not remove the rating plate from the appliance cavity We recommend that you write the data here Model MOD Product number PNC Serial number S N 13 ENVIRONMENTAL CONCERNS Recycle the materia...

Страница 38: ...www aeg com 38 ...

Страница 39: ...ENGLISH 39 ...

Страница 40: ...www aeg com shop 867300547 A 462016 ...

Отзывы: