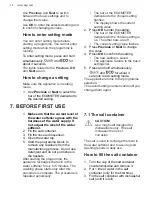
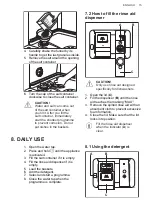
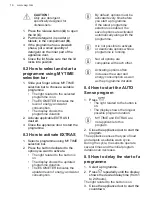
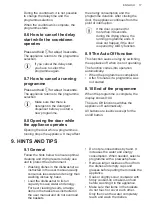
background image

• You can use dishwasher detergent,

rinse aid and salt separately or you

can use the multi-tablets (e.g. ''All in

1''). Follow the instructions on the

packaging.

• Select a programme according to the

type of load and the degree of soil.

ECO offers the most efficient use of

water and energy consumption.

• To prevent limescale buildup inside

the appliance:

– Refill the salt container whenever

necessary.

– Use the recommended dosage of

the detergent and rinse aid.

– Make sure that the current level of

the water softener agrees with the

hardness of the water supply.

– Follow the instructions in the

chapter "Care and cleaning".

9.2 Using salt, rinse aid and

detergent

• Only use salt, rinse aid and detergent

designed for dishwasher. Other

products can cause damage to the

appliance.

• In areas with hard and very hard

water, we recommend to use basic

dishwasher detergent (powder, gel,

tablets containing no additional

agents), rinse aid and salt separately

for optimal cleaning and drying

results.

• Detergent tablets do not fully dissolve

with short programmes. To prevent

detergent residues on the tableware,

we recommend that you use tablets

with long programmes.

• Always use the correct quantity of

detergent. Insufficient dosage of

detergent can result in poor cleaning

results and hard-water filming or

spotting on the items. Using too much

detergent with soft or softened water

results in detergent residues on the

dishes. Adjust the amount of

detergent based on the water

hardness. Refer to the instructions on

the detergent packaging.

• Always use the correct quantity of

rinse aid. Insufficient dosage of rinse

aid decreases the drying results.

Using too much rinse aid results in

bluish layers on the items.

• Make sure that the water softener

level is correct. If the level is too high,

the increased quantity of salt in the

water might result in rust on cutlery.

9.3 What to do if you want to

stop using multi-tablets

Before you start using separately

detergent, salt and rinse aid, complete

the following steps:

1. Set the highest level of the water

softener.

2. Make sure that the salt and rinse aid

containers are full.

3. Start the Quick programme. Do not

add detergent and do not put dishes

in the baskets.

4. When the programme is completed,

adjust the water softener according

to the water hardness in your area.

5. Adjust the released quantity of rinse

aid.

9.4 Before starting a

programme

Before you start the selected

programme, make sure that:
• The filters are clean and correctly

installed.

• The cap of the salt container is tight.

• The spray arms are not clogged.

• There is enough salt and rinse aid

(unless you use multi-tablets).

• The arrangement of the items in the

baskets is correct.

• The programme is suitable to the type

of load and the degree of soil.

• The correct quantity of detergent is

used.

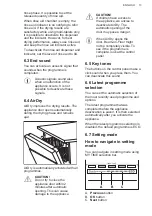
9.5 Loading the baskets

• Always use the whole space of the

baskets.

• Use the appliance to wash

dishwasher-safe items only.

• Do not wash in the appliance items

made of wood, horn, aluminium,

pewter and copper as they could

crack, warp, get discoloured or pitted.

• Do not wash in the appliance items

that can absorb water (sponges,

household cloths).

www.aeg.com

18

Содержание FSE63717P

Страница 1: ...USER MANUAL EN User Manual 2 Dishwasher DE Benutzerinformation 29 Geschirrspüler FSE63717P ...

Страница 2: ...t usage advice brochures trouble shooter service and repair information www aeg com support Register your product for better service www registeraeg com Buy Accessories Consumables and Original spare parts for your appliance www aeg com shop CUSTOMER CARE AND SERVICE Always use original spare parts When contacting our Authorised Service Centre ensure that you have the following data available Mode...

Страница 3: ...supervised Children of less than 3 years of age should be kept away from the appliance unless continuously supervised Do not let children play with the appliance Keep detergents away from children Keep children and pets away from the appliance when the door is open Children shall not carry out cleaning and user maintenance of the appliance without supervision 1 2 General Safety This appliance is i...

Страница 4: ...fied person must install this appliance Remove all the packaging Do not install or use a damaged appliance Do not use the appliance before installing it in the built in structure due to safety manner Follow the installation instructions supplied with the appliance Always take care when moving the appliance as it is heavy Always use safety gloves and enclosed footwear Do not install or use the appl...

Страница 5: ...on the appliance Dishwasher detergents are dangerous Follow the safety instructions on the detergent packaging Do not drink and play with the water in the appliance Do not remove the dishes from the appliance until the programme is complete Some detergent may remain on the dishes Do not store items or apply pressure on the open door of the appliance The appliance can release hot steam if you open ...

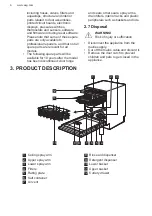
Страница 6: ...er the model has been discontinued door hinge and seals other seals spray arms drain filters interior racks and plastic peripherals such as baskets and lids 2 7 Disposal WARNING Risk of injury or suffocation Disconnect the appliance from the mains supply Cut off the mains cable and discard it Remove the door catch to prevent children and pets to get closed in the appliance 3 PRODUCT DESCRIPTION 5 ...

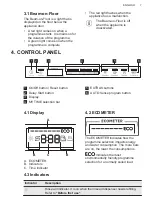
Страница 7: ...2 3 4 5 6 1 On Off button Reset button 2 Delay Start button 3 Display 4 MY TIME selection bar 5 EXTRAS buttons 6 AUTO Sense program button 4 1 Display A C B B A ECOMETER B Indicators C Time indicator 4 2 ECOMETER The ECOMETER indicates how the programme selection impacts energy and water consumption The more bars are on the lower the consumption is indicates the most environmentally friendly progr...

Страница 8: ...CO is the longest programme 4h offering the most efficient use of energy and water consumption for crockery and cutlery with normal soil This is the standard programme for test institutes 1 5 2 EXTRAS You can adjust the programme selection to your needs by activating EXTRAS ExtraSilent ExtraSilent allows to reduce the noise generated by the appliance When the option is activated the wash pump work...

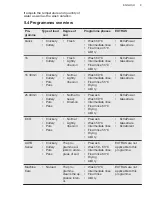
Страница 9: ...rDry ExtraPower GlassCare 2h 40min Crockery Cutlery Pots Pans Normal to heavy Dried on Prewash Wash 60 C Intermediate rinse Final rinse 60 C Drying AirDry ExtraPower GlassCare ECO Crockery Cutlery Pots Pans Normal Lightly dried on Prewash Wash 50 C Intermediate rinse Final rinse 55 C Drying AirDry ExtraPower GlassCare ExtraSilent AUTO Sense Crockery Cutlery Pots Pans The pro gramme ad justs to all...

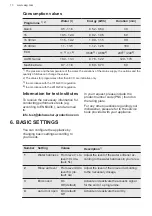
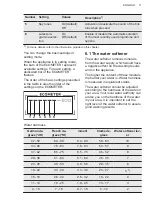
Страница 10: ...ing performance tests e g according to EN60436 send an email to info test dishwasher production com In your request please include the product number code PNC found on the rating plate For any other questions regarding your dishwasher please refer to the service book provided with your appliance 6 BASIC SETTINGS You can configure the appliance by changing basic settings according to your needs Num...

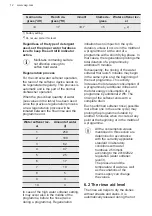
Страница 11: ...water softener removes minerals from the water supply which would have a negative effect on the washing results and on the appliance The higher the content of these minerals the harder your water is Water hardness is measured in equivalent scales The water softener should be adjusted according to the hardness of the water in your area Your local water authority can advise you on the hardness of th...

Страница 12: ...s it occurs in the middle of a programme or at the end of a programme with a short drying phase In that cases the regeneration prolongs the total duration of a programme by additional 5 minutes Subsequently the rinsing of the water softener that lasts 5 minutes may begin in the same cycle or at the beginning of the next programme This activity increases the total water consumption of a programme b...

Страница 13: ...ed with all programmes CAUTION Do not try to close the appliance door within 2 minutes after automatic opening This can cause damage to the appliance CAUTION If children have access to the appliance we advise to deactivate AirDry The automatic opening of the door may pose a danger When AirDry opens the door Beam on Floor might not be completely visible To see if the programme is complete look at t...

Страница 14: ...usly and for about 3 seconds to exit setting mode The appliance returns to the programme selection The saved settings remain valid until you change them again 7 BEFORE FIRST USE 1 Make sure that the current level of the water softener agrees with the hardness of the water supply If not adjust the level of the water softener 2 Fill the salt container 3 Fill the rinse aid dispenser 4 Open the water ...

Страница 15: ...e rinse aid designed specifically for dishwashers 1 Open the lid C 2 Fill the dispenser B until the rinse aid reaches the marking MAX 3 Remove the spilled rinse aid with an absorbent cloth to prevent excessive foam formation 4 Close the lid Make sure that the lid locks into position Fill the rinse aid dispenser when the indicator A is clear 8 DAILY USE 1 Open the water tap 2 Press and hold until t...

Страница 16: ...ion The ECOMETER indicates the updated level of energy and water consumption By default options must be activated every time before you start a programme If the latest programme selection is enabled the saved options are activated automatically along with the programme It is not possible to activate or deactivate options while a programme is running Not all options are compatible with each other A...

Страница 17: ...not operating The function comes into operation automatically When the programme is completed After 5 minutes if a programme was not started 8 10 End of the programme When the programme is complete the display shows 0 00 The Auto Off function switches the appliance off automatically All buttons are inactive except for the on off button 9 HINTS AND TIPS 9 1 General Follow the hints below to ensure ...

Страница 18: ...fer to the instructions on the detergent packaging Always use the correct quantity of rinse aid Insufficient dosage of rinse aid decreases the drying results Using too much rinse aid results in bluish layers on the items Make sure that the water softener level is correct If the level is too high the increased quantity of salt in the water might result in rust on cutlery 9 3 What to do if you want ...

Страница 19: ...sults It removes limescale and grease buildup When the appliance senses the need for cleaning the indicator is on Start the Machine Care programme to clean the appliance interior How to start the Machine Care programme Before starting the Machine Care programme clean the filters and spray arms 1 Use a descaler or a cleaning product designed specifically for dishwashers Follow the instructions on t...

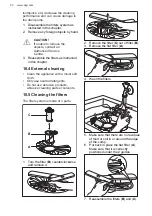
Страница 20: ...ance with a moist soft cloth Only use neutral detergents Do not use abrasive products abrasive cleaning pads or solvents 10 5 Cleaning the filters The filter system is made of 3 parts C B A 1 Turn the filter B counterclockwise and remove it 2 Remove the filter C out of filter B 3 Remove the flat filter A 4 Wash the filters 5 Make sure that there are no residues of food or soil in or around the edg...

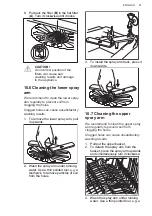
Страница 21: ...arm pull it upwards 2 Wash the spray arm under running water Use a thin pointed tool e g a toothpick to remove particles of soil from the holes 3 To install the spray arm back press it downwards 10 7 Cleaning the upper spray arm We recommend to clean the upper spray arm regularly to prevent soil from clogging the holes Clogged holes can cause unsatisfactory washing results 1 Pull out the upper bas...

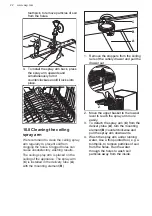
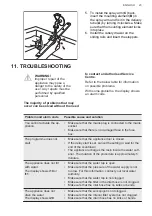
Страница 22: ...the appliance The spray arm C is installed in the delivery tube A with the mounting element B C B A 1 Remove the stoppers from the sliding rails of the cutlery drawer and pull the drawer out 2 1 2 Move the upper basket to the lowest level to reach the spray arm more easily 3 To detach the spray arm C from the delivery tube A turn the mounting element B counterclockwise and pull the spray arm downw...

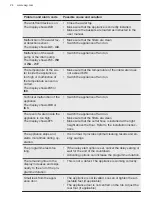
Страница 23: ...s connected to the mains socket Make sure that there is no damaged fuse in the fuse box The programme does not start Make sure that the appliance door is closed If the delay start is set cancel the setting or wait for the end of the countdown The appliance recharges the resin inside the water soft ener The duration of the procedure is approximately 5 minutes The appliance does not fill with water ...

Страница 24: ...lay shows iC0 or iC3 Switch the appliance off and on The level of water inside the appliance is too high The display shows iF1 Switch the appliance off and on Make sure that the filters are clean Make sure that the outlet hose is installed at the right height above the floor Refer to the installation instruc tions The appliance stops and starts more times during op eration It is normal It provides...

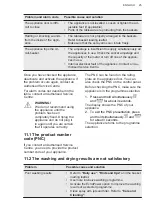
Страница 25: ...vice Centre WARNING We do not recommend using the appliance until the problem has been completely fixed Unplug the appliance and do not plug it in again until you are certain that it operates correctly 11 1 The product number code PNC If you contact an Authorised Service Centre you need to provide the product number code of your appliance The PNC can be found on the rating plate on the appliance d...

Страница 26: ...to a higher level The quality of the rinse aid can be the cause The interior of the appliance is wet This is not a defect of the appliance Humid air con densates on the appliance walls Unusual foam during washing Use the detergent designed specifically for dishwash ers There is a leak in the rinse aid dispenser Contact an Authorised Service Centre Traces of rust on cutlery There is too much salt i...

Страница 27: ...Make sure that only dishwasher safe items are wash ed in the appliance Load and unload the basket carefully Refer to the basket loading leaflet Place delicate items in the upper basket Activate the GlassCare option to ensure special care for glassware and delicate items Refer to Before first use Daily use or Hints and tips for other possible causes 12 TECHNICAL INFORMATION Dimensions Width height ...

Страница 28: ...l ec europa eu and the model name and product number that you can find on the rating plate of the appliance Refer to the chapter Product description For more detailed information about the energy label visit www theenergylabel eu 13 ENVIRONMENTAL CONCERNS Recycle materials with the symbol Put the packaging in relevant containers to recycle it Help protect the environment and human health by recycl...

Страница 29: ...m Lesen um seine Vorzüge kennen zu lernen Besuchen Sie uns auf unserer Website um Anwendungshinweise Prospekte Fehlerbehebungs Service und Reparatur Informationen zu erhalten www aeg com support Ihr erworbenes Produkt zu registrieren um den besten Service für es zu gewährleisten www registeraeg com Zubehör Verbrauchsmaterial und Original Ersatzteile für Ihr Gerät zu erwerben www aeg com shop REPAR...

Страница 30: ...verbundenen Gefahren verstanden haben Kinder zwischen 3 und 8 Jahren und Personen mit schweren Behinderungen oder Mehrfachbehinderung müssen vom Gerät ferngehalten werden wenn sie nicht ständig beaufsichtigt werden Halten Sie Kinder unter 3 Jahren vom Gerät fern wenn sie nicht ständig beaufsichtigt werden Kinder dürfen nicht mit dem Gerät spielen Halten Sie alle Wasch und Reinigungsmittel von Kind...

Страница 31: ...ersehentlich auf sie treten Schalten Sie das Gerät immer aus und ziehen Sie den Netzstecker aus der Steckdose bevor Reinigungsarbeiten durchgeführt werden Reinigen Sie das Gerät nicht mit einem Wasser und oder Dampfstrahl Besitzt das Gerät Lüftungsschlitze im Boden dürfen diese zum Beispiel nicht von einem Bodenbelag blockiert werden Das Gerät muss mit den mitgelieferten neuen Schläuchen an die Wa...

Страница 32: ...llen Sie sicher dass der Netzstecker nach der Montage noch zugänglich ist Ziehen Sie nicht am Netzkabel wenn Sie das Gerät von der Stromversorgung trennen möchten Ziehen Sie stets am Netzstecker Dieses Gerät ist mit einem 13 A Netzstecker ausgestattet Muss die Sicherung im Netzstecker ausgetauscht werden setzen Sie immer eine 13 A Sicherung des Typs ASTA BS 1362 ein nur GB und Irland 2 3 Wasserans...

Страница 33: ...rfen ausschließlich Originalersatzteile verwendet werden Bitte beachten Sie dass eigene Reparaturen oder Reparaturen die nicht von Fachkräften durchgeführt werden die Sicherheit des Geräts beeinträchtigen und die Garantie ungültig machen können Folgende Ersatzteile sind innerhalb von 7 Jahren nach Produkteinstellung des Modells erhältlich Motor Umwälz und Ablaufpumpe Heizungen und Heizelemente ein...

Страница 34: ...b 11 Oberkorb 12 Besteckschublade 3 1 Beam on Floor Der Beam on Floor ist ein Lichtstrahl der unterhalb der Gerätetür auf den Boden projiziert wird Am Programmstart leuchtet eine rotes Licht Es leuchtet während der gesamten Dauer des Spülprogramms Am Programmende leuchtet ein grünes Licht Das rote Licht blinkt im Fall einer Gerätestörung Nach dem Abschalten des Gerätes erlischt der Beam on Floor w...

Страница 35: ...n Energie und Wasserverbrauch auswirkt Je mehr Balken leuchten desto geringer ist der Verbrauch zeigt das umweltfreundlichste Programm für ein mit normal verschmutztem Geschirr beladenes Gerät an 4 3 Kontrolllampen Anzeige Beschreibung Klarspülmittel Anzeige Leuchtet wenn der Klarspülmittel Dosierer nach gefüllt werden muss Siehe Vor der ersten Inbetriebnahme Salz Anzeige Leuchtet wenn der Salzbeh...

Страница 36: ... gewährleistet den wirtschaftlichsten Wasser und Energieverbrauch für normal verschmutztes Geschirr und Besteck Dies ist das Standardprogramm für Prüfinstitute 1 5 2 EXTRAS Sie können die Programmwahl an Ihre Anforderungen anpassen durch das Einschalten von EXTRAS ExtraSilent ExtraSilent reduziert das vom Gerät erzeugte Geräusch Wenn die Option eingeschaltet ist arbeitet die Spülpumpe leiser mit e...

Страница 37: ...nnen Normal ver schmutzt Gering haf tend Hauptspülgang 60 C Zwischenspülgang Klarspülgang 55 C Trockengang AirDry ExtraPower GlassCare 2h 40min Geschirr Besteck Töpfe Pfannen Normal bis schwer Haftend Vorspülgang Hauptspülgang 60 C Zwischenspülgang Klarspülgang 60 C Trockengang AirDry ExtraPower GlassCare ECO Geschirr Besteck Töpfe Pfannen Normal ver schmutzt Gering haf tend Vorspülgang Hauptspülg...

Страница 38: ... die Schwankungen in der Stromversorgung die ausgewählten Optionen und die Geschirrmenge können die Werte verändern 2 Die Werte für Programme außer ECO sind lediglich Richtwerte 3 In Übereinstimmung mit der Richtlinie 1016 2010 4 In Übereinstimmung mit der Richtlinie 2019 2022 Informationen für Prüfinstitute Wenn Sie Informationen zur Durchführung von Leistungsprüfungen z B EN60436 benötigen schic...

Страница 39: ...itere Einzelheiten finden Sie in diesem Kapitel Die Grundeinstellungen können im Einstellmodus geändert werden Wenn sich das Gerät im Einstellmodus befindet repräsentiert jeder Balken des ECOMETER eine verfügbare Einstellung Für jede Einstellung blinkt der zugehörige Balken des ECOMETER Die in der Tabelle angegebene Reihenfolge der Grundeinstellungen entspricht der Reihenfolge der Einstellungen de...

Страница 40: ...rten von hartem Wasser Regenerierungsprozess Für einen einwandfreien Betrieb des Wasserenthärters muss das Salz des Enthärters regelmäßig regeneriert werden Dieser Vorgang wird automatisch ausgeführt und ist Teil des normalen Geschirrspülerbetriebs Wenn die vorgeschriebene Wassermenge siehe Werte in der Tabelle seit dem letzten Rgenerierungsvorgang aufgebraucht wurde wird zwischen dem letzten Spül...

Страница 41: ... Es wird automatisch während der heißen Spülphase abgegeben Die Zugabemenge des Klarspülmittels kann eingestellt werden Ist das Klarspülmittelfach leer wird die Nachfüllanzeige für Klarspülmittel eingeschaltet und weist darauf hin dass Klarspülmittel nachgefüllt werden sollte Wenn Sie nur Multi Reinigungstabletten verwenden und die Trocknungsergebnisse zufriedenstellend sind können Sie den Dosiere...

Страница 42: ...fen Sie die gewünschte Einstellung mit OK auf und bestätigen Sie die Änderung der Wertes Aufrufen des Einstellmodus Sie können den Einstellmodus vor einem Programmstart aufrufen Der Einstellmodus kann nicht während eines laufenden Programms aufgerufen werden Halten Sie zum Aufrufen des Einstellmodus und gleichzeitig etwa 3 Sekunden gedrückt Die Kontrolllampen der Tasten Zurück OK und Weiter leucht...

Страница 43: ...r bestimmtes grobkörniges Salz Mit feinem Salz besteht erhöhte Korrosionsgefahr Das Salz wird für die Regenerierung des Filterharzes im Wasserenthärter und zur Erzielung guter Spülergebnisse im täglichen Gebrauch benötigt So füllen Sie den Salzbehälter 1 Drehen Sie den Deckel des Salzbehälters gegen den Uhrzeigersinn und entfernen Sie ihn 2 Füllen Sie 1 Liter Wasser in den Salzbehälter nur beim er...

Страница 44: ...die Körbe 6 Füllen Sie Reinigungsmittel ein 7 Wählen und starten Sie ein Programm 8 Schließen Sie den Wasserzulaufhahn wenn das Programm zu Ende ist 8 1 Verwenden des Reinigungsmittels A B C VORSICHT Verwenden Sie nur Reinigungsmittel für Geschirrspüler 1 Drücken Sie die Entriegelungstaste A um den Deckel C zu öffnen 2 Füllen Sie das Reinigungsmittel ein oder legen Sie eine Reinigungstablette in d...

Страница 45: ...e Programms 1 Drücken Sie Die Lampe der Taste leuchtet Im Display wird die längstmögliche Programmdauer angezeigt MY TIME und EXTRAS können für dieses Programm nicht gewählt werden 2 Schließen Sie die Gerätetür um das Programm zu starten Das Gerät erkennt die Beladung und stellt ein geeignetes Spülprogramm ein Die Sensoren schalten sich während des Programms mehrmals ein und die ursprüngliche Prog...

Страница 46: ...nweise um optimale Reinigungs und Trocknungsergebnisse im täglichen Gebrauch sicherzustellen Sie tragen auch zum Umweltschutz bei Das Spülen im Geschirrspüler wie in der Bedienungsanleitung beschrieben verbraucht in der Regel weniger Wasser und Energie als das Spülen von Hand Beladen Sie den Geschirrspüler mit der maximalen Füllmenge um Wasser und Energie zu sparen Ordnen Sie die Gegenstände in de...

Страница 47: ...rhärte ein Siehe hierzu die Angaben auf der Reinigungsmittelverpackung Verwenden Sie stets die richtige Klarspülmittelmenge Eine unzureichende Dosierung des Klarspülmittels beeinträchtigt die Trocknungsergebnisse Die Verwendung von zu viel Klarspülmittel führt zu bläulichen Schleiern auf den Gegenständen Vergewissern Sie sich dass der Wasserenthärter auf die richtige Stufe eingestellt ist Ist die ...

Страница 48: ...r an den Innenseiten des Geräts befinden 10 REINIGUNG UND PFLEGE WARNUNG Schalten Sie das Gerät immer aus und ziehen Sie den Netzstecker aus der Steckdose bevor Wartungsarbeiten mit Ausnahme des Progamms Machine Care durchgeführt werden Verschmutzte Siebe und verstopfte Sprüharme wirken sich negativ auf das Spülergebnis aus Prüfen Sie diese Teile regelmäßig und reinigen Sie sie falls nötig 10 1 Ma...

Страница 49: ... usw verringern die Reinigungsleistung und können Schäden an der Ablaufpumpe verursachen 1 Bauen Sie das Siebsystem wie in diesem Kapitel beschrieben aus 2 Entfernen Sie Fremdkörper von Hand VORSICHT Können Sie die Gegenstände nicht entfernen wenden Sie sich an einen autorisierten Kundendienst 3 Bauen Sie das Siebsystem wie in diesem Kapitel beschrieben wieder ein 10 4 Reinigen der Außenseiten Rei...

Страница 50: ...u schlechten Spülergebnissen und kann das Gerät beschädigen 10 6 Reinigen des unteren Sprüharms Wir empfehlen den unteren Sprüharm regelmäßig zu reinigen um zu verhindern dass Verunreinigungen die Löcher verstopfen Verstopfte Löcher können die Ursache für nicht zufriedenstellende Spülergebnisse sein 1 Um den unteren Sprüharm des Oberkorbs zu entfernen ziehen Sie ihn nach oben 2 Reinigen Sie den Sp...

Страница 51: ...ließendem Wasser Entfernen Sie Verunreinigungen aus den Öffnungen des Sprüharms mit einem spitzen Gegenstand z B einem Zahnstocher 4 Drücken Sie zum Einsetzen des Sprüharms diesen nach oben und drehen Sie ihn gleichzeitig gegen den Uhrzeigersinn bis er einrastet 10 8 Reinigung des Deckensprüharms Wir empfehlen den Deckensprüharm regelmäßig zu reinigen damit keine Speisereste die Austrittsdüsen ver...

Страница 52: ... dem Inneren zu entfernen 5 Setzen Sie zum Einsetzen des Sprüharms C das Montageelement B in den Sprüharm und drehen Sie ihn im Uhrzeigersinn um ihn am Überleitungsrohr A zu befestigen Achten Sie darauf dass das Montageelement einrastet 6 Setzen Sie die Besteckschublade auf die Gleitschienen und setzen Sie die Anschläge ein 11 STÖRUNGSSUCHE WARNUNG Eine unsachgemäße Reparatur des Geräts kann eine ...

Страница 53: ...r Zulaufschlauch nicht geknickt oder zu stark gekrümmt ist Das Gerät das Wasser nicht abpumpt Im Display erscheint i20 Stellen Sie sicher dass der Siphon nicht verstopft ist Vergewissern Sie sich dass das interne Siebsystem nicht verstopft ist Vergewissern Sie sich dass der Ablaufschlauch nicht geknickt oder zu stark gekrümmt ist Die Aquasafe Einrichtung ist eingeschaltet Im Display erscheint i30 ...

Страница 54: ...ie die Schraubfüße weiter hinein oder weiter heraus falls vorhanden Die Gerätetür ist nicht mittig zur Wanne positioniert Stellen Sie den hinteren Fuß ein sofern vorhanden Die Gerätetür ist schwer zu schließen Das Gerät ist nicht eben ausgerichtet Schrauben Sie die Schraubfüße weiter hinein oder weiter heraus falls vorhanden Teile des Geschirrs ragen aus den Körben heraus Klappernde oder schlagend...

Страница 55: ... Gebrauch Tipps und Hinweise sowie die Broschüre zum Beladen der Körbe Nutzen Sie intensivere Spülprogramme Schalten Sie die Option ExtraPower ein um das Spül ergebnis des gewählten Programms zu verbessern Reinigen Sie die Austrittsdüsen der Sprüharme und das Sieb Siehe Reinigung und Pflege Nicht zufriedenstellende Trocknungsergebnisse Das Geschirr stand zu lange im geschlossenen Gerät Schalten Si...

Страница 56: ...mitge nommen Das Wasser kann das Reinigungsmittel nicht aus dem Behälter ausspülen Achten Sie darauf dass die Sprüharme nicht blockiert oder verstopft sind Stellen Sie sicher dass die im Korb eingeordneten Gegenstände ein Öffnen des Reinigungsmittelbehäl ters nicht verhindern Gerüche im Gerät Siehe Reinigen des Geräteinnenraums Starten Sie das Programm Machine Care mit einem Entkalker oder Reinigu...

Страница 57: ...05 0 8 Wasserzufuhr Kalt oder Warmwasser 2 max 60 C Fassungsvermögen Maßgedecke 15 Leistungsaufnahme Ein Zustand W 5 0 Aus Zustand W 0 50 1 Weitere Angaben finden Sie auf dem Typenschild 2 Wenn Sie Heißwasser mit umweltfreundlichen alternativen Energiequellen z B Solaranlagen aufbe reiten können Sie durch den Anschluss des Geräts an die Heißwasserversorgung Energie sparen 12 1 Link zur EU EPREL Da...

Страница 58: ...ymbol Entsorgen Sie die Verpackung in den entsprechenden Recyclingbehältern Recyceln Sie zum Umwelt und Gesundheitsschutz elektrische und elektronische Geräte Entsorgen Sie Geräte mit diesem Symbol nicht mit dem Hausmüll Bringen Sie das Gerät zu Ihrer örtlichen Sammelstelle oder wenden Sie sich an Ihr Gemeindeamt www aeg com 58 ...

Страница 59: ......

Страница 60: ...www aeg com shop 117867441 A 312020 ...

Отзывы: