background image

If the supply cord is damaged, it must be replaced by

the manufacturer, its Authorised Service Centre or

similarly qualified persons in order to avoid a hazard.

Put the cutlery in the cutlery basket with the sharp

ends pointing down or put them in the cutlery drawer

in a horizontal position with the sharp edges down.

Do not leave the appliance with the open door

unattended to avoid stepping accidentally onto it.

Before any maintenance operation, deactivate the

appliance and disconnect the mains plug from the

socket.

Do not use high pressure water sprays and/or steam

to clean the appliance.

If the appliance has ventilation openings in the base,

they must not be covered e.g. by a carpet.

The appliance is to be connected to the water mains

using the new supplied hose-sets. Old hose sets must

not be reused.

2. SAFETY INSTRUCTIONS

2.1 Installation

WARNING!

Only a qualified person must

install this appliance.

• Remove all the packaging.

• Do not install or use a damaged

appliance.

• Do not use the appliance before

installing it in the built-in structure due

to safety manner.

• Follow the installation instructions

supplied with the appliance.

• Always take care when moving the

appliance as it is heavy. Always use

safety gloves and enclosed footwear.

• Do not install or use the appliance

where the temperature is less than

0 °C.

• Install the appliance in a safe and

suitable place that meets installation

requirements.

2.2 Electrical connection

WARNING!

Risk of fire and electric

shock.

• The appliance must be earthed.

• Make sure that the parameters on the

rating plate are compatible with the

electrical ratings of the mains power

supply.

• Always use a correctly installed

shockproof socket.

• Do not use multi-plug adapters and

extension cables.

• Make sure not to cause damage to

the mains plug and to the mains

cable. Should the mains cable need to

be replaced, this must be carried out

by our Authorised Service Centre.

• Connect the mains plug to the mains

socket only at the end of the

installation. Make sure that there is

access to the mains plug after the

installation.

www.aeg.com

4

Содержание FSE32407Z

Страница 1: ...USER MANUAL EN User Manual 2 Dishwasher FR Notice d utilisation 26 Lave vaisselle FSE32407Z ...

Страница 2: ... usage advice brochures trouble shooter service and repair information www aeg com support Register your product for better service www registeraeg com Buy Accessories Consumables and Original spare parts for your appliance www aeg com shop CUSTOMER CARE AND SERVICE Always use original spare parts When contacting our Authorised Service Centre ensure that you have the following data available Model...

Страница 3: ...supervised Children of less than 3 years of age should be kept away from the appliance unless continuously supervised Do not let children play with the appliance Keep detergents away from children Keep children and pets away from the appliance when the door is open Children shall not carry out cleaning and user maintenance of the appliance without supervision 1 2 General Safety This appliance is i...

Страница 4: ...ng Do not install or use a damaged appliance Do not use the appliance before installing it in the built in structure due to safety manner Follow the installation instructions supplied with the appliance Always take care when moving the appliance as it is heavy Always use safety gloves and enclosed footwear Do not install or use the appliance where the temperature is less than 0 C Install the appli...

Страница 5: ... remain on the dishes Do not store items or apply pressure on the open door of the appliance The appliance can release hot steam if you open the door while a programme operates 2 5 Service To repair the appliance contact the Authorised Service Centre Use original spare parts only Please note that self repair or non professional repair can have safety consequences and might void the guarantee The f...

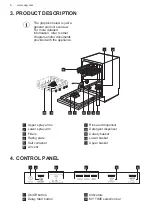
Страница 6: ...rovided with the appliance 4 3 7 8 10 9 5 6 11 1 2 1 Upper spray arms 2 Lower spray arm 3 Filters 4 Rating plate 5 Salt container 6 Air vent 7 Rinse aid dispenser 8 Detergent dispenser 9 Cutlery basket 10 Lower basket 11 Upper basket 4 CONTROL PANEL 1 3 4 5 2 6 1 On Off button 2 Delay Start button 3 Indicators 4 MY TIME selection bar www aeg com 6 ...

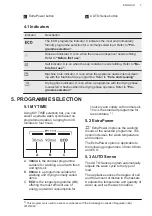
Страница 7: ...based on programme duration ranging from 30 minutes to four hours B A C A 30min is the shortest programme suitable for washing a load with fresh and light soil B 90min is a programme suitable for washing and drying normally soiled items C ECO is the longest programme 4h offering the most efficient use of energy and water consumption for crockery and cutlery with normal soil This is the standard pr...

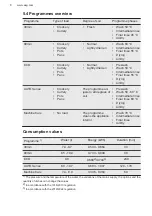
Страница 8: ...egrees of soil Prewash Wash 50 60 C Intermediate rinse Final rinse 60 C Drying AirDry Machine Care No load The programme cleans the appliance interior Wash 70 C Intermediate rinse Final rinse AirDry Consumption values Programme 1 Water l Energy kWh Duration min 30min 7 9 9 7 0 543 0 664 30 90min 8 5 10 4 0 743 0 909 90 ECO 9 9 0 6892 0 7043 240 AUTO Sense 8 0 10 7 0 683 1 047 120 170 Machine Care ...

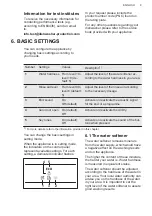
Страница 9: ...acoustic signal for the end of a programme 4 Auto door open On default Off Activate or deactivate the AirDry 5 Key tones On default Off Activate or deactivate the sound of the but tons when pressed 1 For more details refer to the information provided in this chapter You can change the basic settings in setting mode When the appliance is in setting mode the indicators on the control panel represent...

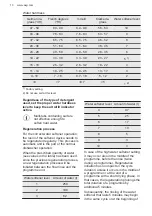
Страница 10: ...is process is automatic and is the part of the normal dishwasher operation When the prescribed quantity of water see values in the table has been used since the previous regeneration process a new regeneration process will be initiated between the final rinse and the programme end Water softener level Amount of water l 1 250 2 100 3 62 Water softener level Amount of water l 4 47 5 25 6 17 7 10 8 5...

Страница 11: ... is on notifying to refill rinse aid If the drying results are satisfactory while using multi tablets only it is possible to deactivate the dispenser and the indicator However for best drying performance always use rinse aid and keep the rinse aid indicator active To deactivate the rinse aid dispenser and indicator set the level of rinse aid to 0 6 3 End sound You can activate an acoustic signal t...

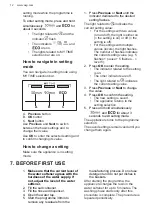
Страница 12: ...urrent setting value e g 5 flashes pause 5 flashes level 5 2 Press OK to enter the setting The indicator related to the setting is on The other indicators are off The light related to indicates the current setting value 3 Press Previous or Next to change the value 4 Press OK to confirm the setting The new setting is saved The appliance returns to the setting selection 5 Press and hold simultaneous...

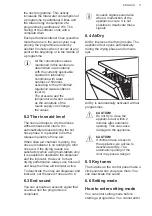
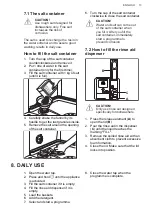
Страница 13: ...ainer CAUTION Water and salt can come out of the salt container when you fill it After you fill the salt container immediately start a programme to prevent corrosion 7 2 How to fill the rinse aid dispenser B C A CAUTION Only use rinse aid designed specifically for dishwashers 1 Press the release element A to open the lid B 2 Pour the rinse aid in the dispenser C until the liquid reaches the markin...

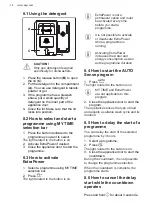
Страница 14: ... permanent option and must be activated every time before you start a programme It is not possible to activate or deactivate ExtraPower while a programme is running Activating ExtraPower increases the water and energy consumption as well as the programme duration 8 4 How to start the AUTO Sense program 1 Press The light related to the button is on MY TIME and ExtraPower are not applicable to this ...

Страница 15: ...mal cleaning and drying results in daily use and to protect the environment Washing dishes in the dishwasher as instructed in the user manual usually consumes less water and energy than washing dishes by hand Load the dishwasher to its full capacity to save water and energy For best cleaning results arrange items in the baskets as instructed in the user manual and do not overload the baskets Do no...

Страница 16: ...te the following steps 1 Set the highest level of the water softener 2 Make sure that the salt and rinse aid containers are full 3 Start the 30min programme Do not add detergent and do not put dishes in the baskets 4 When the programme is completed adjust the water softener according to the water hardness in your area 5 Adjust the released quantity of rinse aid 9 4 Before starting a programme Befo...

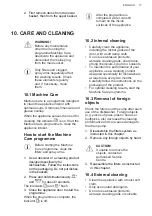
Страница 17: ...about 3 seconds The indicators and flash 3 Close the appliance door to start the programme When the programme is complete the indicator is off 10 2 Internal cleaning Carefully clean the appliance including the rubber gasket of the door with a soft damp cloth Do not use abrasive products abrasive cleaning pads sharp tools strong chemicals scourer or solvents To maintain the performance of your appl...

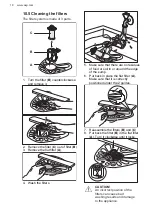
Страница 18: ...e sure that there are no residues of food or soil in or around the edge of the sump 6 Put back in place the flat filter A Make sure that it is correctly positioned under the 2 guides 7 Reassemble the filters B and C 8 Put back the filter B in the flat filter A Turn it clockwise until it locks CAUTION An incorrect position of the filters can cause bad washing results and damage to the appliance www...

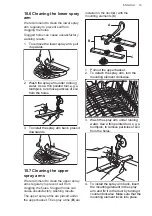
Страница 19: ... upper spray arms regularly to prevent soil from clogging the holes Clogged holes can cause unsatisfactory washing results The upper spray arms are placed under the upper basket The spray arms B are installed in the duct A with the mounting elements C A B C 1 Pull out the upper basket 2 To detach the spray arm turn the mounting element clockwise 3 Wash the spray arm under running water Use a thin ...

Страница 20: ...t Make sure that there is no damaged fuse in the fuse box The programme does not start Make sure that the appliance door is closed If the delay start is set cancel the setting or wait for the end of the countdown The appliance recharges the resin inside the water soft ener The duration of the procedure is approximately 5 minutes The appliance does not fill with water The lights related to MY TIME ...

Страница 21: ...ded as instructed in the user manual Malfunction of the water lev el detection sensor The lights related to MY TIME selection bar flash 4 times intermittent ly An acoustic signal sounds intermittently Make sure that the filters are clean Switch the appliance off and on Malfunction of the wash pump or the drain pump The lights related to MY TIME selection bar flash 5 times intermittent ly An acoust...

Страница 22: ...Small leak from the appli ance door The appliance is not levelled Loosen or tighten the ad justable feet if applicable The appliance door is not centred on the tub Adjust the rear foot if applicable The appliance door is diffi cult to close The appliance is not levelled Loosen or tighten the ad justable feet if applicable Parts of the tableware are protruding from the baskets Rattling or knocking ...

Страница 23: ...e rinse aid dispenser or set the level of rinse aid to a higher level The quality of the rinse aid can be the cause We recommend to use rinse aid always even in com bination with multi tablets Plastic items may need to be towel dried The programme does not have the drying phase Re fer to Programmes overview There are whitish streaks or bluish layers on glasses and dishes The released quantity of r...

Страница 24: ...s Limescale deposits on the ta bleware on the tub and on the inside of the door The level of salt is low check the refill indicator The cap of the salt container is loose Your tap water is hard Refer to The water soften er Use salt and set regeneration of the water softener even when multi functional tablets are used Refer to The water softener Start the Machine Care programme with a descaler desi...

Страница 25: ...ogether with the user manual and all other documents provided with this appliance It is possible to find information related to the performance of the product in the EU EPREL database using the link https eprel ec europa eu and the model name and product number that you can find on the rating plate of the appliance Refer to the chapter Product description For more detailed information about the en...

Страница 26: ...re appareil Visitez notre site Web pour Obtenir des conseils d utilisation des brochures un dépanneur des informations sur le service et les réparations www aeg com support Enregistrer votre produit pour un meilleur service www registeraeg com Acheter des accessoires des consommables et des pièces de rechange d origine pour votre appareil www aeg com shop SERVICE ET ASSISTANCE À LA CLIENTÈLE Utili...

Страница 27: ...es ayant un handicap très important et complexe doivent être tenus à l écart de l appareil à moins d être surveillés en permanence Les enfants de moins de 3 ans doivent être tenus à l écart de l appareil à moins d être surveillés en permanence Ne laissez pas les enfants jouer avec l appareil Ne laissez pas les détergents à la portée des enfants Tenez les enfants et les animaux éloignés de l appare...

Страница 28: ...reil dispose d orifices d aération à la base veillez à ne pas les couvrir par ex avec de la moquette L appareil doit être raccordé au circuit d eau à l aide des tuyaux neufs fournis N utilisez pas de tuyaux provenant d anciens appareils 2 CONSIGNES DE SÉCURITÉ 2 1 Installation AVERTISSEMENT L appareil doit être installé uniquement par un professionnel qualifié Retirez l intégralité de l emballage ...

Страница 29: ... eau s écouler jusqu à ce qu elle soit parfaitement propre et claire Pendant et après la première utilisation de l appareil vérifiez qu aucune fuite n est visible Le tuyau d arrivée d eau comporte une vanne de sécurité et une gaine avec un câble d alimentation intérieur AVERTISSEMENT Tension dangereuse Si le tuyau d arrivée d eau est endommagé fermez immédiatement le robinet d eau et débranchez la...

Страница 30: ...s à tous les modèles Les pièces de rechange suivantes seront disponibles pendant 10 ans après l arrêt du modèle charnière et joints de porte autres joints bras d aspersion filtres de vidange supports intérieurs et périphériques en plastique tels que paniers et couvercles 2 6 Mise au rebut AVERTISSEMENT Risque de blessure ou d asphyxie Débranchez l appareil de l alimentation électrique Coupez le câ...

Страница 31: ...e sel régénérant 6 Fente d aération 7 Distributeur de liquide de rinçage 8 Distributeur de détergent 9 Panier à couverts 10 Panier inférieur 11 Panier supérieur 4 BANDEAU DE COMMANDE 1 3 4 5 2 6 1 Touche Marche Arrêt 2 Delay Start touche 3 Voyants 4 MY TIME Touche de sélection 5 ExtraPower touche 6 AUTO Sense touche FRANÇAIS 31 ...

Страница 32: ...re de sélection MY TIME vous pouvez choisir un cycle de lavage adapté basé sur la durée du programme de 30 minutes à 4 heures B A C A 30min est le programme le plus court adapté pour une vaisselle fraîchement ou légèrement sale B 90min est un programme adapté pour laver et sécher une vaisselle normalement sale C ECO est le programme le plus long 4h offrant une consommation d eau et d énergie effic...

Страница 33: ... Poêles Normale Légèrement sè che Prélavage Lavage à 50 C Rinçage intermé diaire Rinçage final à 55 C Séchage AirDry AUTO Sense Vaisselle Couverts Casseroles Poêles Le programme s adapte à tous les degrés de salissure Prélavage Lavage à 50 60 C Rinçage intermé diaire Rinçage final à 60 C Séchage AirDry Machine Care Pas de vaisselle Le programme net toie l intérieur de l ap pareil Lavage à 70 C Rin...

Страница 34: ...nant votre lave vaisselle veuillez vous reporter au manuel d utilisation fourni avec votre appareil 6 RÉGLAGES DE BASE Vous pouvez configurer l appareil en modifiant les réglages de base en fonction de vos besoins Numéro Réglages Valeurs Description1 1 Dureté de l eau Du niveau 1 au niveau 10 par défaut 5 Pour régler le niveau de l adoucisseur d eau en fonction de la dureté de l eau de votre régio...

Страница 35: ...s français fH mmol l Degrés Clar ke Réglage du niveau de l adoucisseur d eau 47 50 84 90 8 4 9 0 58 63 10 43 46 76 83 7 6 8 3 53 57 9 37 42 65 75 6 5 7 5 46 52 8 29 36 51 64 5 1 6 4 36 45 7 23 28 40 50 4 0 5 0 28 35 6 19 22 33 39 3 3 3 9 23 27 5 1 15 18 26 32 2 6 3 2 18 22 4 11 14 19 25 1 9 2 5 13 17 3 4 10 7 18 0 7 1 8 5 12 2 4 7 0 7 5 1 2 1 Réglages d usine 2 N utilisez pas de sel à ce niveau Qu...

Страница 36: ...mmation indiquées dans cette section sont déterminées conformément à la norme actuellement en vigueur dans des conditions de laboratoire avec une dureté de l eau de 2 5 mmol L conformément au règlement 2019 2022 adoucisseur d eau niveau 3 La pression et la température de l eau ainsi que les variations de l alimentation secteur peuvent modifier les valeurs 6 2 Le niveau du liquide de rinçage Le liq...

Страница 37: ... Pour entrer en mode Programmation maintenez simultanément les touches et enfoncées pendant environ 3 secondes La lumière liée à et le voyant de l indicateur Les voyants et sont allumés Les voyants de MY TIME la barre de sélection sont allumés Comment naviguer dans le Mode réglage Vous pouvez naviguer dans le Mode réglage en utilisant la barre de sélection MY TIME B A C A Touche Précédent B Touche...

Страница 38: ...ibuteur de liquide de rinçage 4 Ouvrez le robinet d eau 5 Démarrez le programme 30min pour éliminer tout résidu de fabrication N utilisez pas de produit de lavage et laissez les paniers vides Lorsque vous démarrez un programme l appareil peut prendre 5 minutes pour recharger la résine dans l adoucisseur d eau La phase de lavage ne démarre qu une fois cette procédure achevée La procédure sera répét...

Страница 39: ...ouvrir le couvercle B 2 Versez le liquide de rinçage dans le distributeur C jusqu à ce qu il atteigne la marque FILL 3 Si le liquide de rinçage déborde épongez le avec un chiffon absorbant pour éviter tout excès de mousse 4 Fermez le couvercle Assurez vous que le couvercle se verrouille correctement 8 UTILISATION QUOTIDIENNE 1 Ouvrez le robinet d eau 2 Maintenez la touche enfoncée jusqu à ce que l...

Страница 40: ...iver l option ExtraPower 1 Sélectionnez un programme en utilisant la barre de sélection MY TIME 2 Appuyez sur Le voyant correspondant à la touche est allumé ExtraPower n est pas une option permanente et doit être activée chaque fois que vous démarrez un programme Vous ne pouvez pas activer ni désactiver ces options ExtraPower pendant l exécution d un programme Activer ExtraPower des options augmen...

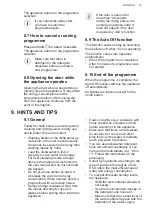
Страница 41: ...ne se produit pas si la porte est ouverte par la fonction AirDry 8 9 Fonction Auto Off Cette fonction permet d économiser de l énergie en éteignant l appareil lorsqu il n est pas en cours de fonctionnement La fonction est activée automatiquement Lorsque le programme est terminé Au bout de 5 minutes si le programme n a pas démarré 8 10 Fin du programme Lorsque le programme est terminé la fonction A...

Страница 42: ...tion supplémentaire de liquide de rinçage et de sel régénérant pour des résultats de lavage et de séchage optimaux Les tablettes de détergent ne se dissolvent pas complètement durant les programmes courts Pour éviter que des résidus de produit de lavage ne se déposent sur la vaisselle nous recommandons d utiliser des pastilles de détergent avec des programmes longs Utilisez toujours la quantité ad...

Страница 43: ...sseroles en les retournant Vérifiez que les verres ne se touchent pas pour éviter qu ils ne se brisent Placez les objets légers dans le panier supérieur Veillez à ce que les articles ne puissent pas bouger Placez les petits articles et les couverts dans le panier à couverts Assurez vous que les bras d aspersion tournent librement avant de lancer un programme 9 6 Déchargement des paniers 1 Attendez...

Страница 44: ...ent conçu pour les lave vaisselle au moins une fois tous les deux mois Reportez vous aux instructions figurant sur l emballage de ces produits Pour des résultats de lavage optimaux lancez le programme Machine Care 10 3 Retrait de corps étrangers Vérifiez les filtres et le collecteur d eau après chaque utilisation du lave vaisselle Les corps étranger par exemple les morceaux de verre de plastique l...

Страница 45: ...tée ATTENTION Une position incorrecte des filtres peut donner de mauvais résultats de lavage et endommager l appareil 10 6 Nettoyage du bras d aspersion inférieur Nous vous conseillons de nettoyer régulièrement le bras d aspersion inférieur afin d éviter que ses orifices ne se bouchent Si les orifices sont bouchés les résultats de lavage peuvent ne pas être satisfaisants 1 Pour retirer le bras d a...

Страница 46: ...installés dans le conduit A avec les éléments de montage C A B C 1 Sortez entièrement le panier supérieur en le tirant vers l extérieur 2 Pour détacher le bras d aspersion tournez l élément de montage vers la droite 3 Nettoyez le bras d aspersion à l eau courante Utilisez un outil pointu comme un cure dent pour extraire toutes les particules de saleté incrustées dans les orifices 4 Pour réinstalle...

Страница 47: ...né un départ différé annulez le ou attendez la fin du décompte L appareil recharge la résine à l intérieur de l adoucis seur d eau La durée de cette procédure est d environ 5 minutes L appareil ne se remplit pas d eau Les voyants correspon dant à la barre de sélec tion MY TIME clignotent une fois par intermitten ce Un signal sonore retentit par intermittence Assurez vous que le robinet d eau est o...

Страница 48: ...umez le Dysfonctionnement de la pompe de lavage ou de la pompe de vidange Les voyants correspon dant à la barre de sélec tion MY TIME clignotent 5 fois par intermittence Un signal sonore retentit par intermittence Éteignez l appareil et rallumez le La température de l eau à l intérieur de l appareil est trop élevée ou un dysfonc tionnement du capteur de température s est produit Les voyants corres...

Страница 49: ...ière si disponible La porte de l appareil est dif ficile à fermer L appareil n est pas d aplomb Desserrez ou serrez les pieds réglables si disponibles De la vaisselle dépasse des paniers Bruit de cliquetis ou de bat tement à l intérieur de l ap pareil La vaisselle n est pas correctement rangée dans les pa niers Reportez vous au manuel de chargement du pa nier Assurez vous que les bras d aspersion ...

Страница 50: ...ns de toujours utiliser du liqui de de rinçage même si vous utilisez déjà des pastilles tout en 1 Les articles en plastiques peuvent avoir besoin d être essuyés Le programme ne possède pas de phase de séchage Reportez vous au chapitre Présentation des pro grammes Il y a des traînées blanchâtres ou pellicules bleuâtres sur les verres et la vaisselle La quantité de liquide de rinçage libérée est tro...

Страница 51: ...térieur Lancez le programme Machine Care avec un agent détartrant ou un produit de nettoyage conçu pour les lave vaisselle Dépôts calcaires sur la vais selle dans la cuve et à l inté rieur de la porte Le niveau de sel régénérant est bas vérifiez le voyant de remplissage Le bouchon du réservoir de sel régénérant est dévis sé L eau de votre arrivée est dure Reportez vous au cha pitre Adoucisseur d e...

Страница 52: ...avec l appareil contient un lien Web permettant d enregistrer cet appareil dans la base de données EPREL de l UE Conservez l étiquette énergétique à titre de référence avec le manuel d utilisation et tous les autres documents fournis avec cet appareil Il est possible de trouver des informations relatives aux performances du produit dans la base de données EPREL de l EU grâce au lien https eprel ec...

Страница 53: ...dans votre centre local de recyclage ou contactez vos services municipaux FRANÇAIS 53 ...

Страница 54: ......

Страница 55: ......

Страница 56: ...www aeg com shop 156946150 A 212020 ...

Отзывы: