background image

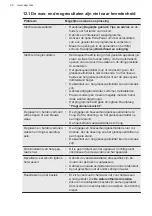
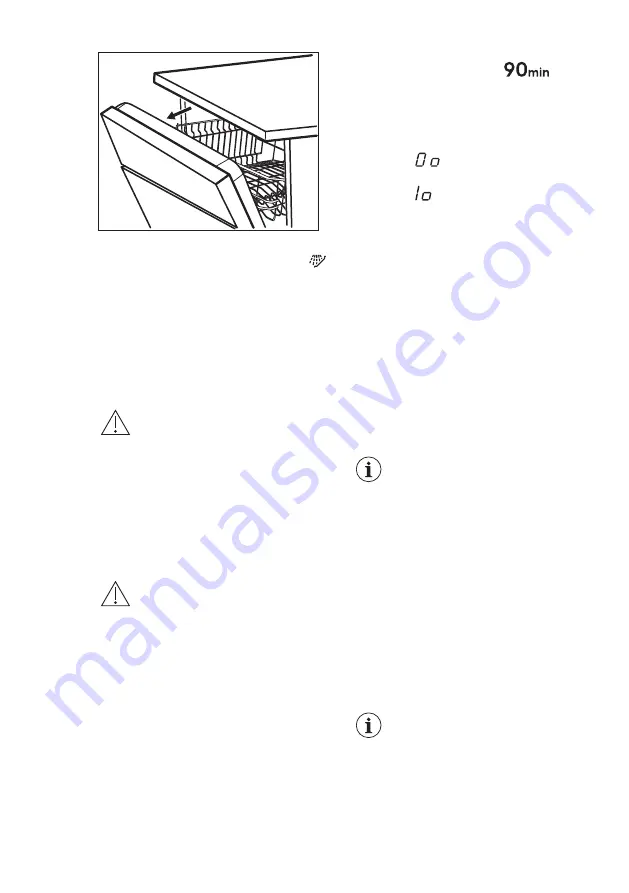
AirDry wordt bij alle programma's
automatisch geactiveerd, behalve bij 

(indien van toepassing).
De duur van de droogfase en de

openingstijd van de deur variëren

afhankelijk van het geselecteerde

programma en de opties.
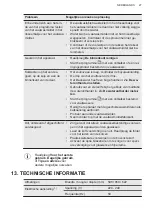
Wanneer AirDry de deur opent, toont het

display de resterende tijd van het actieve

programma.

LET OP!

Probeer de deur van het

apparaat niet binnen 2

minuten na automatisch

openen te sluiten. Dit kan

het apparaat beschadigen.

Als hierna de deur

gedurende ten minste 3

minuten wordt gesloten,

eindigt het draaiende

programma.

LET OP!

Als kinderen toegang tot het

apparaat hebben, adviseren

we AirDry om te deactiveren.

Het automatisch openen van

de deur kan een gevaar

vormen.

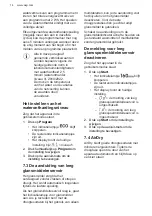
Deactiveren van AirDry

Zorg dat het apparaat in de

gebruikersmodus staat.

1. Druk op Delay.

• Het indicatielampje 

 blijft

knipperen.

• De resterende indicatielampjes

zijn uit.

• Het display toont de huidige

instelling:

 = AirDry is

uitgeschakeld.

 = AirDry is ingeschakeld.

2. Druk op Delay om de instelling te

wijzigen.

3. Druk op de aan/uit-toets om de

instelling te bevestigen.

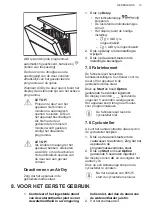
7.5 Fabrieksreset

De fabrieksreset herstelt de

fabrieksinstellingen. Controleer vóór de

reset of het apparaat in de

gebruikersmodus staat.

Druk op Start en houd Option

gedurende 5 seconden ingedrukt.

De displays worden _ _ _ gedurende

ongeveer 5 seconden weergegeven.

Het apparaat keert terug naar modus

voor programmakeuze.

De fabrieksreset reset de

cyclusteller niet.

7.6 Cyclusteller

U kunt het aantal voltooide afwascycli in

de cyclusteller bekijken.

1. Druk op de aan/uit-toets om de

vaatwasser te activeren. Zorg dat het

apparaat in de

programmakeuzemodus staat.

2. Druk op Start en houd Option

gedurende 5 seconden ingedrukt.

De displays tonen uC en vervolgens het

aantal cycli.

Druk op een willekeurige knop om de

cyclusteller te verlaten.

Na het bereiken van 65535

start de cyclusteller opnieuw.

8. VOOR HET EERSTE GEBRUIK

1. Controleer of het ingestelde stand

van de waterontharder juist is voor

de waterhardheid in uw omgeving.

Indien niet, stel dan de stand van

de waterontharder juist in.

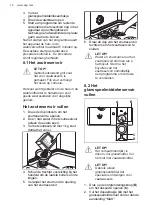
2. Vul het zoutreservoir.

NEDERLANDS

15

Содержание FFB53617ZW

Страница 1: ...USER MANUAL NL Gebruiksaanwijzing 2 Afwasautomaat EN User Manual 29 Dishwasher FFB53617ZW ...

Страница 2: ...t niet op gewone apparaten aantreft Neem een paar minuten de tijd om het beste uit het apparaat te halen Ga naar onze website voor Advies over gebruik brochures het oplossen van problemen service en reparatie informatie www aeg com support Registreer je product voor een betere service www registeraeg com Koop accessoires verbruiksartikelen en originele reserveonderdelen voor je apparaat www aeg co...

Страница 3: ...over het veilig gebruiken van het apparaat en indien zij de gevaren begrijpen Kinderen tussen de 3 en 8 jaar oud en personen met zware en complexe beperkingen dienen altijd uit de buurt van het apparaat te worden gehouden tenzij ze voortdurend onder toezicht staan Kinderen jonger dan 3 jaar dienen tenzij zij voortdurend onder toezicht staan bij het apparaat uit de buurt te worden gehouden Houd toe...

Страница 4: ...lijkbaar gekwalificeerde personen om gevaar te voorkomen WAARSCHUWING Messen en andere gebruiksvoorwerpen met scherpe punten moeten met hun punt naar beneden of horizontaal in de mand geplaatst worden Laat het apparaat niet onbeheerd achter met de geopende deur om te voorkomen dat u er per ongeluk op stapt Schakel het apparaat uit en trek de stekker uit het stopcontact voordat je onderhoudshandeli...

Страница 5: ...enservice Steek de stekker pas in het stopcontact als de installatie is voltooid Zorg ervoor dat het netsnoer na installatie bereikbaar is Trek niet aan het netsnoer om het apparaat los te koppelen Trek altijd aan de stekker Dit apparaat is voorzien van een 13 A stekker Als de zekering van de stekker vervangen moet worden moet een ASTA BS 1362 zekering van 13 ampère worden gebruikt uitsluitend VK ...

Страница 6: ...laars thermostaten en sensoren software en firmware inclusief resetsoftware Houd er rekening mee dat sommige van deze reserveonderdelen alleen beschikbaar zijn voor professionele reparateurs en dat niet alle reserveonderdelen relevant zijn voor alle modellen De volgende reserveonderdelen zullen gedurende 10 jaar nadat het model is stopgezet beschikbaar zijn deurscharnieren en afdichtingen andere a...

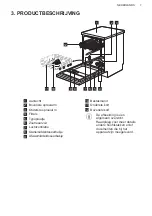
Страница 7: ...lters 5 Typeplaatje 6 Zoutreservoir 7 Luchtventilatie 8 Glansmiddeldoseerbakje 9 Afwasmiddeldoseerbakje 10 Bestekmand 11 Onderste korf 12 Bovenste korf De afbeelding is een algemeen overzicht Raadpleeg voor meer details andere hoofdstukken en of documenten die bij het apparaat zijn meegeleverd NEDERLANDS 7 ...

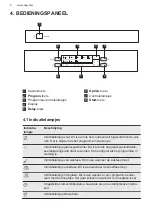
Страница 8: ...g is Indicatielampje glansspoelmiddel Dit is aan als het glansspoelmiddeldo seerbakje bijgevuld dient te worden Het is altijd uit als het programma in werking is Indicatielampje van wasfase Dit is aan wanneer de wasfase loopt Indicatielampje spoelfase Dit is aan wanneer de spoelfase loopt Indicatielampje droogfase Dit is aan wanneer u een programma selec teert met de droogfase Het gaat knipperen w...

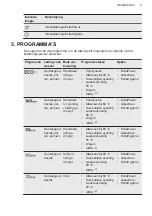
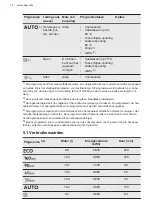
Страница 9: ...e Serviesgoed bestek pot ten pannen Standaard tot grondig volledig ge droogd Voorspoelen Afwassen bij 60 C Tussentijdse spoeling Laatste spoeling 60 C Drogen AirDry 2 ExtraPower GlassCare ExtraHygiene Serviesgoed bestek pot ten pannen Standaard licht ge droogd Afwassen bij 60 C Tussentijdse spoeling Laatste spoeling 55 C Drogen AirDry 2 ExtraPower GlassCare ExtraHygiene Serviesgoed bestek Schoon l...

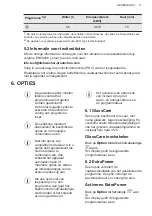
Страница 10: ...ordt automatisch geopend tijdens de droogfase Raadpleeg Instellingen 3 Het apparaat detecteert de vuilgraad en het aantal voorwerpen in de rekken De temperatuur de hoe veelheid water het energieverbruik en de programmaduur worden automatisch aangepast 4 Dit programma is ontworpen om de binnenkant van het apparaat effectief en efficiënt te reinigen Het verwijdert kalkaanslag en vetresten Het progra...

Страница 11: ... opties en de mogelijke combinaties ervan Niet alle opties zijn compatibel met elkaar Als u opties hebt geselecteerd die niet met elkaar te combineren zijn dan schakelt het apparaat automatisch één of meerdere opties uit Alleen de indicatielampjes van de actieve opties zijn aan Als een optie niet van toepassing is op een programma dan gaat het bijbehorende indicatielampje niet branden of het knipp...

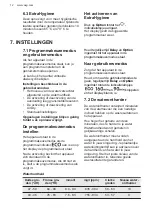
Страница 12: ... Na de activering bevindt het apparaat zich standaard in de programmakeuzemodus Als dit niet zo is stelt u de programmakeuzemodus als volgt in Houd tegelijkertijd Delay en Option ingedrukt tot het apparaat in de programmakeuzemodus staat Naar gebruikersmodus Zorg dat het apparaat in de programmakeuzemodus staat Houd om naar de gebruikersmodus te gaan tegelijkertijd Delay en Option ingedrukt totdat...

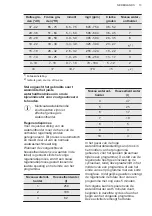
Страница 13: ... normale vaatwasmachinewerking Wanneer de voorgeschreven hoeveelheid water zie waarden in de tabel is gebruikt sinds het vorige regeneratieproces wordt een nieuw regeneratieproces gestart tussen de laatste spoeling en het einde van het programma Niveau wateront harder Hoeveelheid water l 1 250 2 100 3 62 Niveau wateront harder Hoeveelheid water l 4 47 5 25 6 17 7 10 8 5 9 3 10 3 In het geval van d...

Страница 14: ...leeg glansmiddelreservoir Het glansmiddel zorgt dat het serviesgoed zonder vlekken of strepen droogt Het wordt automatisch losgelaten tijdens de laatste spoeling Als het glansmiddelreservoir leeg is gaat het indicatielampje voor glansmiddel aan Als je tevreden bent met de droogresultaten bij het gebruik van alleen multitabletten kun je de aanduiding voor het bijvullen van het glansmiddel deactiver...

Страница 15: ...keld 2 Druk op Delay om de instelling te wijzigen 3 Druk op de aan uit toets om de instelling te bevestigen 7 5 Fabrieksreset De fabrieksreset herstelt de fabrieksinstellingen Controleer vóór de reset of het apparaat in de gebruikersmodus staat Druk op Start en houd Option gedurende 5 seconden ingedrukt De displays worden _ _ _ gedurende ongeveer 5 seconden weergegeven Het apparaat keert terug naa...

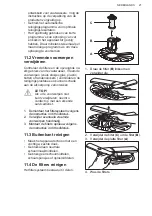
Страница 16: ...et zoutreservoir te openen 2 Doe 1 liter water in het zoutreservoir alleen de eerste keer 3 Vul het zoutreservoir met 1 kg zout totdat het vol is 4 Schud de trechter voorzichtig bij het handvat om de laatste korrels erin te krijgen 5 Verwijder het zout rond de opening van het zoutreservoir 6 Draai de dop van het zoutreservoir rechtsom om het zoutreservoir te sluiten LET OP Water en zout kunnen uit...

Страница 17: ...ddel als poeder of tabletten in het vakje A 3 Als het programma een voorspoelfase heeft plaats dan een kleine hoeveelheid vaatwasmiddel aan de binnenkant van de deur van het apparaat 4 Sluit de deur Zorg ervoor dat de ontgrendelknop op zijn plaats vergrendelt Raadpleeg de instructies van de fabrikant op de verpakking van het product voor informatie over de dosering van het vaatwasmiddel Doorgaans ...

Страница 18: ...nen want dit kan schade aan het apparaat veroorzaken Als hierna de deur gedurende ten minste 3 minuten wordt gesloten beëindigt het draaiende programma De uitgestelde start annuleren tijdens het aftellen Als u de uitgestelde start annuleert moet u het programma en de opties opnieuw instellen Houd tegelijkertijd Delay en Option ingedrukt tot het apparaat in de programmakeuzemodus staat Het programm...

Страница 19: ...n zout voor optimale reinigings en droogresultaten Vaatwasmiddeltabletten lossen bij korte programma s niet geheel op Om te voorkomen dat vaatwasmiddelresten op het servies achterblijven raden we u aan om tabletten enkel bij lange programma s te gebruiken Gebruik altijd de juiste hoeveelheid wasmiddel Onvoldoende dosering van het wasmiddel kan leiden tot slechte reinigingsresultaten en hardwaterfi...

Страница 20: ...men niet verstopt zijn Er regenereerzout en glansmiddel is toegevoegd tenzij u gecombineerde afwastabletten gebruikt De positie van de voorwerpen in de korven correct is Het programma geschikt is voor het type lading en de mate van bevuiling De juiste hoeveelheid afwasmiddel wordt gebruikt 10 6 De rekken uitruimen 1 Laat de borden afkoelen voordat u deze uit het apparaat neemt Hete borden zijn gev...

Страница 21: ... de reinigingsprestaties en kunnen schade aan de afvoerpomp veroorzaken LET OP Als u de voorwerpen niet kunt verwijderen neemt u contact op met een erkende servicedienst 1 Demonteer het filtersysteem volgens de instructies in dit hoofdstuk 2 Verwijder eventuele vreemde voorwerpen handmatig 3 Monteer de filters opnieuw volgens de instructies in dit hoofdstuk 11 3 Buitenkant reinigen Maak het appara...

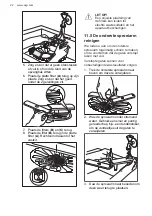
Страница 22: ...tot slechte wasresultaten en het apparaat beschadigen 11 5 De onderste sproeiarm reinigen We raden u aan om de onderste sproeiarm regelmatig schoon te maken om te voorkomen dat de gaten verstopt raken met vuil Verstopte gaten kunnen voor onbevredigende wasresultaten zorgen 1 Trek de onderste sproeiarm naar boven om deze te verwijderen 2 Was de sproeiarm onder stromend water Gebruik een smal en pun...

Страница 23: ...g Je kunt het apparaat niet in schakelen Controleer of de stekker is aangesloten op het stopcon tact Controleer of er geen beschadigde zekering in het zeke ringenkastje is Het programma start niet Controleer of de deur van het apparaat gesloten is Druk op de startknop Als de optie uitgestelde start is ingesteld annuleert u de instelling of wacht u totdat het aftellen voorbij is Het apparaat herlaa...

Страница 24: ...opgetre den Het display toont i61 of i69 Controleer of de temperatuur van het toegevoerde water niet hoger is dan 60 C Schakel het apparaat uit en aan Technische storing van het apparaat Het display toont iC0 of iC3 Schakel het apparaat uit en aan Het niveau van het water in het apparaat is te hoog Op het display verschijnt iF1 Schakel het apparaat uit en aan Controleer of de filters schoon zijn C...

Страница 25: ...in de korven gerangschikt Raadpleeg de folder voor het beladen van de korven Controleer of de sproeiarmen vrij kunnen ronddraaien Het apparaat maakt kortslui ting De stroomsterkte is niet voldoende om alle apparaten tegelijkertijd te voeden Controleer de stroomsterkte van het stopcontact en de capaciteit van de meter of schakel een van de apparaten die in gebruik zijn uit Interne elektrische stori...

Страница 26: ...ek worden afgedroogd Het programma heeft geen droogfase Raadpleeg Programmaoverzicht De glazen en borden vertonen witte strepen of een blauwe waas De vrijgegeven hoeveelheid glansspoelmiddel is te hoog Zet de dosering van het glansspoelmiddel op een lagere stand De hoeveelheid vaatwasmiddel is te hoog De glazen en borden vertonen vlekken en droge waterdrup pels De vrijgegeven hoeveelheid glansmidd...

Страница 27: ...reservoir zit los Het kraanwater heeft een hoge hardheid Zie De wa terontharder instellen Gebruik zout en stel zelfs bij het gebruik van multitabs de waterontharder in Zie De waterontharder instel len Start het programma met een ontkalker bestemd voor vaatwassers Reinig het apparaat met de geschikte wasmiddelen als kalkaanslag aanhoudt Probeer een ander vaatwasmiddel Neem contact op met de vaatwas...

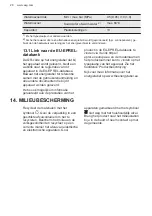
Страница 28: ... dit apparaat worden geleverd Het is ook mogelijk om informatie gerelateerd aan de prestaties van het product in de EU EPREL databank te vinden via de link https eprel ec europa eu en de modelnaam en het productnummer kunt u vinden op het typeplaatje van het apparaat Zie het hoofdstuk Productbeschrijving Kijk voor meer informatie over het energielabel op www theenergylabel eu 14 MILIEUBESCHERMING ...

Страница 29: ...t the very best from it Visit our website to Get usage advice brochures trouble shooter service and repair information www aeg com support Register your product for better service www registeraeg com Buy Accessories Consumables and Original spare parts for your appliance www aeg com shop CUSTOMER CARE AND SERVICE Always use original spare parts When contacting our Authorised Service Centre ensure ...

Страница 30: ...ce unless continuously supervised Children of less than 3 years of age should be kept away from the appliance unless continuously supervised Children should be supervised to ensure that they do not play with the appliance Keep detergents away from children Keep children and pets away from the appliance when the door is open Children shall not carry out cleaning and user maintenance of the applianc...

Страница 31: ...the new supplied hose sets Old hose sets must not be reused 2 SAFETY INSTRUCTIONS 2 1 Installation WARNING Only a qualified person must install this appliance Remove all the packaging Do not install or use a damaged appliance Follow the installation instructions supplied with the appliance Always take care when moving the appliance as it is heavy Always use safety gloves and enclosed footwear Do n...

Страница 32: ...uctions on the detergent packaging Do not drink and play with the water in the appliance Do not remove the dishes from the appliance until the programme is complete Some detergent may remain on the dishes Do not store items or apply pressure on the open door of the appliance The appliance can release hot steam if you open the door while a programme operates 2 5 Service To repair the appliance cont...

Страница 33: ...f injury or suffocation Disconnect the appliance from the mains supply Cut off the mains cable and discard it Remove the door catch to prevent children and pets to get closed in the appliance 3 PRODUCT DESCRIPTION 5 4 8 10 9 11 6 7 12 2 3 1 1 Worktop 2 Upper spray arm 3 Lower spray arm 4 Filters 5 Rating plate 6 Salt container 7 Air vent 8 Rinse aid dispenser 9 Detergent dispenser 10 Cutlery baske...

Страница 34: ...inse aid indicator It is on when the rinse aid dispenser needs refilling It is always off while the programme operates Washing phase indicator It is on when the washing phase operates Rinsing phase indicator It is on when the rinsing phase operates Drying phase indicator It is on when you select a programme with the dry ing phase It flashes when the drying phase operates Delay indicator It is on w...

Страница 35: ...2 ExtraPower GlassCare ExtraHygiene Crockery cutlery pots pans Normal lightly dried on Dishwashing 60 C Intermediate rinse Final rinse 55 C Drying AirDry 2 ExtraPower GlassCare ExtraHygiene Crockery cutlery Fresh light ly dried on Dishwashing 60 C Intermediate rinse Final rinse 50 C AirDry 2 ExtraPower GlassCare ExtraHygiene Crockery cutlery Fresh Dishwashing 50 C Intermediate rinse Final rinse 50...

Страница 36: ... desca ler or a cleaning product designed for dishwashers and without any load 5 With this programme you can quickly rinse off food remains from dishes and prevent odours forming in the appliance Do not use detergent with this programme 5 1 Consumption values Programme 1 2 Water l Energy kWh Duration min 9 9 0 835 240 10 2 0 980 160 10 1 1 030 90 10 4 0 860 60 10 4 0 630 30 10 2 0 980 170 9 3 0 65...

Страница 37: ...ess Option until the indicator is on The display shows the updated programme duration 6 2 ExtraPower This option improves the dishwashing results of the selected programme It increases the wash temperature and duration How to activate ExtraPower Press Option until the indicator is on The display shows the updated programme duration 6 3 ExtraHygiene This option provides better cleaning results by k...

Страница 38: ...our water is Water hardness is measured in equivalent scales The water softener should be adjusted according to the hardness of the water in your area Your local water authority can advise you on the hardness of the water in your area Set the right level of the water softener to assure good washing results Water hardness German de grees dH French de grees fH mmol l mg l ppm Clarke degrees Water so...

Страница 39: ...th a complete drain Each performed softener rinse possible more than one in the same cycle may prolong the programme duration by another 5 minutes when it occurs at any point at the beginning or in the middle of a programme All the consumption values mentioned in this section are determined in line with the currently applicable standard in laboratory conditions with water hardness 2 5mmol L water ...

Страница 40: ...nutes after automatic opening This can cause damage to the appliance If afterwards the door is closed for at least 3 minutes the running programme ends CAUTION If children have access to the appliance we advise to deactivate AirDry The automatic opening of the door may pose a danger How to deactivate AirDry Make sure the appliance is in user mode 1 Press Delay The indicator still flashes The remai...

Страница 41: ...he washing phase starts only after this procedure is complete The procedure is repeated periodically 8 1 The salt container CAUTION Use rough salt designed for dishwashers only Fine salt increases the risk of corrosion The salt is used to recharge the resin in the water softener and to assure good washing results in daily use How to fill the salt container 1 Turn the cap of the salt container coun...

Страница 42: ...ramme selection mode If the salt indicator is on fill the salt container If the rinse aid indicator is on fill the rinse aid dispenser 3 Load the baskets 4 Add the detergent 5 Set and start a programme suitable for the type of load and the degree of soil 9 1 Using the detergent 20 30 A B C CAUTION Only use detergent specifically designed for dishwashers 1 Press the release button B to open the lid...

Страница 43: ... phase is on The indicator is off Opening the door while the appliance operates Opening the door while a programme is running stops the appliance It may affect the energy consumption and the programme duration After closing the door the appliance continues from the point of interruption If the door is opened for more than 30 seconds during the drying phase the running programme ends It does not ha...

Страница 44: ... the water supply Follow the instructions in the chapter Care and cleaning 10 2 Using salt rinse aid and detergent Only use salt rinse aid and detergent designed for dishwasher Other products can cause damage to the appliance In areas with hard and very hard water we recommend to use basic dishwasher detergent powder gel tablets containing no additional agents rinse aid and salt separately for opt...

Страница 45: ...inse aid unless you use multi tablets The arrangement of the items in the baskets is correct The programme is suitable to the type of load and the degree of soil The correct quantity of detergent is used 10 6 Unloading the baskets 1 Let the tableware cool down before you remove it from the appliance Hot items can be easily damaged 2 First remove items from the lower basket then from the upper bask...

Страница 46: ...e any foreign objects manually 3 Reassemble the filters as instructed in this chapter 11 3 External cleaning Clean the appliance with a moist soft cloth Only use neutral detergents Do not use abrasive products abrasive cleaning pads or solvents 11 4 Cleaning the filters The filter system is made of 3 parts C B A 1 Turn the filter B counterclockwise and remove it 2 Remove the filter C out of filter...

Страница 47: ...soil from clogging the holes Clogged holes can cause unsatisfactory washing results 1 To remove the lower spray arm pull it upwards 2 Wash the spray arm under running water Use a thin pointed tool e g a toothpick to remove particles of soil from the holes 3 To install the spray arm back press it downwards 11 6 Cleaning the upper spray arm Do not remove the upper spray arm If the openings in the sp...

Страница 48: ...ly 5 minutes The appliance does not fill with water The display shows i10 or i11 Make sure that the water tap is open Make sure that the pressure of the water supply is not too low For this information contact your local water authority Make sure that the water tap is not clogged Make sure that the filter in the inlet hose is not clogged Make sure that the inlet hose has no kinks or bends The appl...

Страница 49: ...splayed programme duration is different than the duration in the consumption values table The pressure and the temperature of the water the var iations of the mains supply the options the quantity of dishes and the degree of soil can change the pro gramme duration The remaining time in the display increases and skips nearly to the end of pro gramme time This is not a defect The appliance is workin...

Страница 50: ...s are not satisfactory Problem Possible cause and solution Poor washing results Refer to Daily use Hints and tips and the basket loading leaflet Use more intensive washing programme Activate the ExtraPower option to improve the washing results of a selected programme Clean spray arm jets and filter Refer to Care and Cleaning Poor drying results Tableware was left for too long inside the closed app...

Страница 51: ...is penser Make sure that the spray arms are not blocked or clogged Make sure that items in the baskets do not impede the lid of the detergent dispenser from opening Odours inside the appliance Refer to Internal cleaning Start the programme with a descaler or a cleaning product designed for dishwashers Limescale deposits on the ta bleware on the tub and on the inside of the door The level of salt i...

Страница 52: ...L database Keep the energy label for reference together with the user manual and all other documents provided with this appliance It is possible to find information related to the performance of the product in the EU EPREL database using the link https eprel ec europa eu and the model name and product number that you can find on the rating plate of the appliance Refer to the chapter Product descri...

Страница 53: ......

Страница 54: ......

Страница 55: ......

Страница 56: ...www aeg com shop 156810391 A 372022 ...

Отзывы: