background image

g

32

Setting and saving the water 
hardness level

You can set 4 hardness levels. The cof-
fee machine is factory-set to hardness 
level 3.

0

Press and hold the "Descale" key (Fig. 3, 
e)
 .

0

Now repeatedly press the "Coffee 
Quantity" key (Fig. 3, c) 

 until you 

have selected the required hardness 
level. Release the "Descale" key. The 
selected value is now saved.
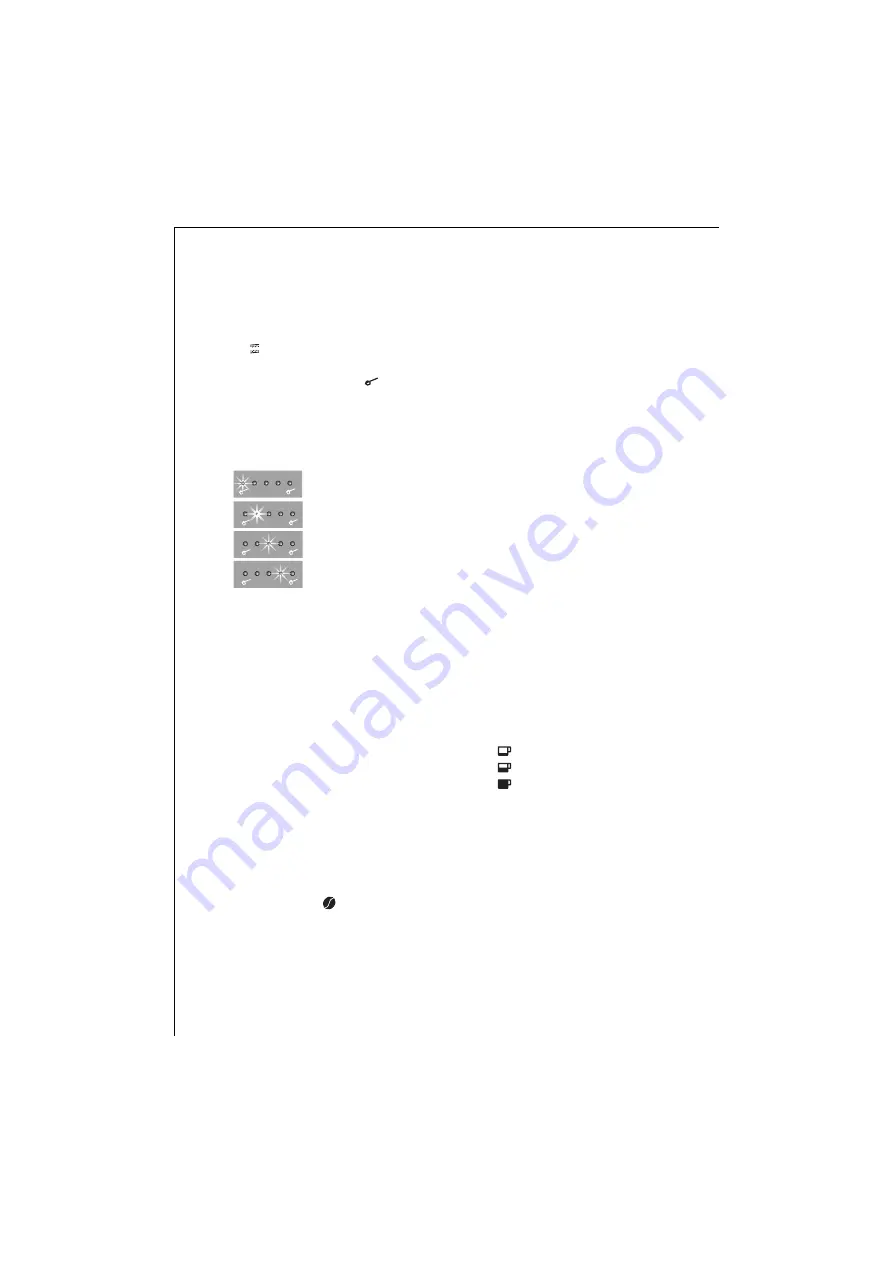
The hardness levels are indicated as 
follows:

 Hardness level 1 

 Hardness level 2 

 Hardness level 3 

 Hardness level 4

3

Making Coffee with Beans

The following process for making cof-
fee with beans runs 

completely auto-

matically

: Grinding, portioning, 

pressing, pre-brewing, brewing, ejec-
tion of the coffee grounds.
The facility to select the grinding tex-
ture and the coffee quantity allows 
you to individually set up the coffee 
machine to your own personal taste.

1

Ensure that you use only pure coffee 
beans with no caramelised or aroma-
tised additives. Do not use frozen 
beans.

3.1

Filling the Coffee Bean 
Container

0

Turn the bean container to the "Coffee 
Beans" position 


(Fig. 10)

. The 

mechanism sets to the required func-
tion.

0

Set the grinding texture 

(Fig. 11)

Using the grinding texture adjustment 
(Fig. 2, bottom) you can set the grind-
ing texture of the grinder. 

1

Note!

 Before putting beans into the 

coffee machine for the first time, you 
can set the grinding texture once with 
the grinder stationary. Once the 
grinder has been filled with beans, the 
setting can be changed only while 
grinding is proceeding. Otherwise the 
coffee machine could be damaged.

3

The grinder is factory-set at a medium 
grinding texture. Notes on changing 
the grinder setting can be found in 
„Setting the Grinding Texture" Page 35.

0

Raise the lid of the coffee bean con-
tainer, and fill the container with fresh 
coffee beans 

(Fig. 12)

. Then reclose the 

lid.

1

Note!

 Make sure that no foreign bod-

ies, such as stones, enter the coffee 
bean container. 

Damage

 caused by for-

eign bodies in the grinder is excluded 
from the guarantee.

3.2

Selecting the Cup Measure

Depending on your taste, select a 
"short" espresso or a "long" milky cof-
fee.

0

The selection is made by repeatedly 
pressing the "Cup Measure" key (Fig. 3, 
d) 
until the desired cup symbol is indi-
cated.
The cup measures are indicated as fol-
lows:

 Espresso cup
 Coffee cup
 Coffee mug

The coffee machine is factory-set to 
standard measures.

3

Notes on changing the cup measures 
can be found in „Changing and Saving 
the Cup Measure" 
on Page 35.

Содержание CF 2..

Страница 1: ...ic Espresso Maker Volautomatische koffie en espressomachine Máquina automática para Café Expresso Máquina de café Espresso totalmente automática Gebrauchsanweisung Operating instructions Gebruiksaanwijzing Instrucciones de uso Instruções de serviço ...

Страница 2: ...2 1 D B L H K F A E C N I O J G M ...

Страница 3: ...3 2 3 T P R U Q S j b c d f i k g h a e ...

Страница 4: ...4 4 5 6 7 8 9 10 11 12 13 14 a b ...

Страница 5: ...5 15 16 17 18 19 20 21 22 23 24 25 26 3 sec 1 2 1 2 1 2 ...

Страница 6: ...6 27 28 29 30 32 31 33 1 2 3 1 3 ...

Страница 7: ...7 34 35 36 37 38 39 40 41 42 43 44 1 2 2 3 3 max max max max ...

Страница 8: ...8 ...

Страница 9: ...N Teststreifen für Wasserhärte O Messlöffel mit Reinigungspinsel Ansicht von oben Bild 2 P Tassenablage Q Einfüllöffnung für Kaffeepulver mit Deckel Pulvereinwurf R Bohnenbehälter Positionseinstellung S Entriegelung Servicetür T Entriegelung zur Mahlringentnahme U Hebel für die Mahlgradeinstellung Bedienfeld Bild 3 a Taste für 2 Tassen Kaffee mit Anzeige b Taste für 1 Tasse Kaffee mit Anzeige c Ta...

Страница 10: ...ffee wesentlich kürzer als bei her kömmlichem Filterkaffee Damit wer den weniger Bitterstoffe aus dem Kaffeemehl herausgelöst was den Espresso Kaffee viel bekömmlicher macht Inhaltsverzeichnis 1 Sicherheitshinweise 11 2 Vor der ersten Inbetriebnahme 12 2 1 Gerät aufstellen und anschliessen 12 2 2 Wasser einfüllen 12 2 3 Gerät einschalten 13 2 4 Gerät ausschalten 13 2 5 Wasserhärte einstellen 13 3 ...

Страница 11: ...erbrühungen führen Aktivieren Sie die Dampfdüse nur wenn Sie ein Behältniss unter die Dampfdüse halten Keine entzündbaren Flüssigkeiten mit Dampf erhitzen Das Gerät nur betreiben wenn sich Wasser im System befindet Nur kaltes Wasser in den Wassertank einfüllen kein heißes Wasser Milch oder andere Flüssigkeiten Beachten Sie die max Füllmenge von 1 5 Litern Keine gefrorenen oder karamelisierten Kaff...

Страница 12: ...em warmen Raum aufgestellt wird ca 2 Stunden mit dem Einschalten warten Wir empfehlen eine geeignete Unter lage unter das Gerät zu legen um Beschädigungen durch Spritzer zu ver meiden 0 Halten Sie den Bohnenbehälter mit der Markierung auf die Position Behälter entriegelung und setzen Sie ihn auf Bild 4 Hierbei muss die untere Öffnung des Bohnenbehälters geschlossen sein Bild 4 a falls nicht Bild 4...

Страница 13: ...Die dadurch entste henden Geräusche sind völlig normal 2 4 Gerät ausschalten Wenn das Gerät nach der Kaffeezube reitung mit der Taste Ein Aus Bild 3 h ausgeschaltet wird erfolgt noch ein Spülvorgang und die Anzeige Tre sterbehälter leeren Bild 3 j blinkt zur Erinnerung noch ca 1 Min Wenn das Gerät während einer Funktion mit der Taste Ein Aus Bild 3 h aus geschaltet wird sind sofort alle Funk tione...

Страница 14: ...ilfe der Mahlgradeinstellung Bild 2 U können Sie den Mahlgrad des Mahlwerkes einstellen 1 Achtung Vor der ersten Befüllung des Gerätes mit Bohnen können Sie die Einstellung einmalig bei stehendem Mahlwerk vornehmen Ist das Mahl werk einmal mit Bohnen gefüllt dür fen Sie das Mahlwerk nur noch wäh rend des Mahlvorgangs verstellen da sonst Beschädigungen am Gerät auf treten können 3 Werkseitig ist ei...

Страница 15: ...be vorzeitig beenden indem Sie die zuvor betätigte Kaffeebezugstaste kurz drük ken 4 Kaffee mit Pulver zubereiten Mit dieser Funktion können Sie bereits gemahlenen Kaffee z B entkoffei nierten Kaffee aufbrühen Beachten Sie dass Sie nur den mitge lieferten Messlöffel verwenden und nie mehr als 2 gestrichene Messlöffel Kaf feepulver in den Schacht eingeben 1 Achtung Vergewissern Sie sich dass kein P...

Страница 16: ...e Dampffunktion länger als 1 Minute nicht benutzt schaltet das Gerät automatisch in den Kaffeezube reitungsmodus zurück 0 Gießen Sie ca 100 ml fettarme kalte Milch in einen schmalen kleinen Krug max 0 5 l Fassungsvermögen der unter die Dampfdüse des Gerätes pas sen muss 3 Die Milch sollte gut gekühlt sein Eben falls sollten Sie ein kaltes Gefäß benut zen und dieses nicht vorher mit warmem Wasser a...

Страница 17: ...ck anpassen und speichern 0 Drücken Sie die Taste Tassenfüll menge Bild 3 d so oft bis das Tas sensymbol leuchtet für das Sie die Tassenfüllmenge anpassen möchten 0 Stellen Sie eine entsprechende Tasse unter den Kaffeeauslauf z B Kaffeebe cher 0 Drücken Sie anschließend die Taste für 1 Tasse Kaffee Bild 3 b und hal ten Sie diese solange gedrückt bis die gewünschte Tassenfüllmenge erreicht ist Lass...

Страница 18: ...s Rattern verursacht Sollten Sie während des Mahlvorgangs dieses Geräusch hören schalten Sie das Gerät unverzüglich aus und entfernen Sie den Fremdkörper wie im Abschnitt Mahlwerk reinigen Seite 20 beschrie ben 10 Kaffeetemperatur ein stellen Sie können zwischen 5 Temperaturstu fen wählen Im Modus Kaffeetempe ratur einstellen leuchtet die Anzeige zur Regulierung der Kaffeemahlmenge die in diesem F...

Страница 19: ...en Werte wieder auf Werks einstellungen zurückgesetzt Folgende Einstellungen sind davon betroffen Tassenfüllmengen Mahlmengen Kaffeetemperaturen 0 Drücken Sie gleichzeitig die Taste Ent kalken Bild 3 e und die Taste Reini gen Bild 3 f Halten Sie die beiden Tasten für ca 3 Sekunden gedrückt bis sich das Gerät kurz ausschaltet und sich anschließend mit den werkseitigen Einstellungen wieder einschalt...

Страница 20: ...er immer bei eingeschaltetem Gerät Nur dann erkennt das Gerät die Entleerung 13 3 Mahlwerk reinigen Kaffeemehlrückstände können mit dem mitgelieferten Pinsel entfernt werden 1 Achtung Niemals Wasser in das Mahl werk geben dadurch wird das Mahl werk beschädigt 0 Schalten Sie das Gerät mit der Taste Ein Aus Bild 3 h aus und ziehen Sie den Netzstecker 0 Drehen Sie den Bohnenbehälter mit der Markierun...

Страница 21: ...pf nach unten drük ken halten und die Brüheinheit her ausziehen Bild 31 Brüheinheit säubern 0 Um die Brüheinheit von groben Parti keln Verunreinigungen zu befreien öffnen Sie die Brüheinheit indem Sie den weißen Servicehebel bis zum Anschlag nach unten schwenken Bild 32 Die beiden Siebe sind nun frei zugäng lich und der Auswerferhebel klappt nach unten 0 Reinigen Sie die Brüheinheit unter flie ßen...

Страница 22: ... Bei Stromausfall oder Unterbrechung muss das Programm neu gestartet werden Der Reinigungsprozess ist nach ca 8 Minuten beendet wenn die Anzeige der Taste Reinigen Bild 3 f leuchtet und die Anzeige Tresterbe hälter leeren Bild 3 j blinkt 0 Entleeren Sie den Tresterbehälter und setzen Sie ihn wieder ein so dass die Anzeige erlischt 0 Drehen Sie den Bohnenbehälter in die gewünschte Position und füll...

Страница 23: ...D auf die Pos zurück Bild 43 und der automati sche Entkalkungsprozess über die Brüheinheit beginnt 3 Während des Entkalkungsprozesses leuchtet die Anzeige der Taste Entkal ken Bild 3 e permanent Gerät für Phase 2 vorbereiten Die Phase 1 des Entkalkungsprozesses ist nach ca 36 Minuten beendet Dies wird durch Blinken der Anzeige Was sertank füllen Bild 3 k und der Anzeige Tresterbehälter leeren Bild...

Страница 24: ... Seite 21 Kaffeekuchen restlos aus der Brüheinheit entfernen weniger Kaffeepulver einfüllen Sollten Sie den Fehler nicht beheben können wenden Sie sich bitte an den AEG Kundendienst oder die Hot line der Espresso Kaffee nicht heiß genug ist Tassen mit Heißwasser vorwärmen Kaffeetemperatur nach Anleitung erhöhen eventuell Gerät entkalken Espresso Kaffee zu dünn ist zu wenig Kaffeepulver eingefüllt ...

Страница 25: ...können Frostschäden entstehen 15 Anzahl der bezogenen Kaffees abfragen Das Gerät bietet die Möglichkeit die Anzahl aller bisher mit dem Gerät zubereiteten Kaffees abzufragen 3 Werden mit der Taste für 2 Tassen Kaf fee Bild 3 a gleichzeitig 2 Tassen Kaf fee bezogen so werden diese auch als 2 Tassen gezählt 0 Schalten Sie das Gerät ein 0 Drücken Sie gleichzeitig die Taste Dampfvorwahl Bild 3 g und d...

Страница 26: ... bei Ihrer Kommunal verwaltung den für Sie zuständigen Recyclinghof Das gebrauchte Kaffeemehl ist hervor ragend zum Kompostieren geeignet 18 Im Service Fall Bei einer evtl erforderlichen Reparatur einschließlich Ersatz der Netzzuleitung wenden Sie sich bitte zunächst telefo nisch an eine der AEG Kundendienst stellen in Deutschland bitte an folgende Hotline Deutsche Telekom Euro 0 12 Min Die Origin...

Страница 27: ...ness O Measuring spoon with cleaning brush Top View Fig 2 P Cup rack Q Opening for ground coffee with lid ground coffee filler R Bean container position setting S Service cover release button T Release catch for removing grinding ring U Lever for setting grinding texture Control Panel Fig 3 a Key for 2 cups of coffee with indicator b Key for 1 cup of coffee with indicator c Coffee Quantity key wit...

Страница 28: ...ground coffee making espresso coffee that much milder Contents 1 Safety Information 29 2 Before Using for the First Time 30 2 1 Setting Up and Connecting the Coffee Machine 30 2 2 Filling with Water 30 2 3 Switching the Coffee Machine On 31 2 4 Switching the Coffee Machine Off 31 2 5 Setting the Water Hardness 31 3 Making Coffee with Beans 32 3 1 Filling the Coffee Bean Container 32 3 2 Selecting ...

Страница 29: ...m nozzle only when you are holding a container under the nozzle Do not use steam to heat inflammable liquids Only use the coffee machine with water in the system Fill the water tank with cold water Do not use hot water milk or other liquids Do not exceed the maximum fill level of 1 5 litres Do not put frozen or caramelised cof fee beans in the bean container Use only roast coffee beans Remove any ...

Страница 30: ...room from a cold environment wait about two hours before switching on We advise you to place the coffee machine on a suitable mat to prevent damage being caused by spray and splashes 0 Hold the bean container with the marking on the Unlockcontainer position and set it in place Fig 4 The bottom opening of the bean con tainer must be closed Fig 4 a If it is not closed Fig 4 b insert the tip of a bal...

Страница 31: ...ng up phase the cof fee machine runs through a set up cycle The noises this creates are com pletely normal 2 4 Switching the Coffee Machine Off If you switch the coffee machine off with the On Off key Fig 3 h after you have finished making coffee the machine carries out a flush pro gram during which time the Empty grounds container indicator Fig 3 j flashes for about 1 minute as a reminder If you ...

Страница 32: ... 11 Using the grinding texture adjustment Fig 2 bottom you can set the grind ing texture of the grinder 1 Note Before putting beans into the coffee machine for the first time you can set the grinding texture once with the grinder stationary Once the grinder has been filled with beans the setting can be changed only while grinding is proceeding Otherwise the coffee machine could be damaged 3 The gr...

Страница 33: ...ressing the coffee dispensing key 4 Making Ready ground Coffee This function allows you to brew pre ground coffee e g decaffinated cof fee Note that you must use only the sup plied measuring spoon and never put more than 2 level measuring spoons of ground coffee into the ground coffee filler 1 Note Make sure that no ground coffee has remained in the filler and that no foreign bodies enter the fill...

Страница 34: ...Pour approximately 100 ml cold skimmed or semi skimmed milk into a small narrow jug max 0 5 l capacity This must be small enough to fit under the steam nozzle 3 The milk should be cold You should also use a cold jug and not rinse this with hot water 0 Swivel the steam nozzle out and hold the jug under the steam nozzle so that the end is completely immersed in the milk Turn the Selection dial for s...

Страница 35: ... now saved 0 Repeat the process if you would like to change the measures for the other cup symbols 3 The saved measures remain stored when the coffee machine is switched off If your coffee cups or your taste change you can easily change the cup measure s to your new requirements whenever you want 8 Changing and Saving the Coffee Quantity You can set and save a different coffee quantity for each cu...

Страница 36: ...the coffee machine off 0 Simultaneously press and hold the Key for 1 cup of coffee Fig 3 b and the Steam Pre selector key Fig 3 g 0 While still holding these keys press the On Off key Fig 3 h 0 Keep all three keys pressed for around 3 seconds until the Coffee machine heating indicator Fig 3 i and one of the coffee temperature indicators are illuminated 0 Now release all three keys 0 Use the Coffee...

Страница 37: ...ar Cleaning 1 Caution Before cleaning switch off the coffee machine and allow it to cool down Do not use any abrasive scour ing or corrosive cleaning materials Wipe the inside and outside of the case only with a damp cloth 1 Note Never put the coffee machine or separate parts of the coffee machine in the dishwasher 1 Note Never put water in the coffee bean container as this would damage the grinde...

Страница 38: ...ign body is impossible to remove take off the grinding ring 0 To do this proceed as follows Fig 24 1 Push the Release catch for removing grinding ring Fig 2 T forward toward the centre of the grinder 2 Keep it in this position and turn the Lever for setting grinding texture Fig 2 U approximately one full turn clockwise until it comes up against the stop 3 You can continue to turn the Lever for set...

Страница 39: ... water It is essential to thoroughly flush the stainless steel strainers to remove all coffee residues Fig 33 and 34 0 Dry the coffee making unit off and push the service lever back up to the stop Fig 35 The ejector lever flips in and the cof fee making unit closes Inserting the coffee making unit 0 Follow these steps to re insert the cof fee making unit 1 Push the coffee making unit onto the guid...

Страница 40: ...ning program you are advised to throw away the first cup of coffee from the machine 13 6 Running the Descaling Program The descaling program allows you to simply and effectively descale your coffee machine The coffee machine should be regularly descaled every 4 6 months but no later than when the Descale key Fig 3 e indicator flashes 1 Note Formic acid based lime scale solvents must not be used Us...

Страница 41: ... flashing The indicator flashes Fig 44 0 Rinse the water tank out and fill with a maximum of 1 litre fresh water 0 Empty the grounds container and push it just far enough back into the coffee machine to catch the water which drains out of the coffee dispenser Fig 42 Phase 2 flushing 0 Place a cup or jug with a capacity of at least 200 ml under the hot water noz zle 0 Turn the Selection dial for st...

Страница 42: ...re as described in this manual The coffee machine may need des caling the espresso coffee is too weak Not enough ground coffee Increase the amount of ground coffee The coffee bean container is empty Add coffee beans The coffee quantity is set too low Increase the coffee quantity The grinding texture is set too coarse Set the grinding texture to a finer grade milk not frothy enough The milk is too ...

Страница 43: ...y freezing 15 Using the Total Cups Counter The coffee machine has the facility to display the total number of cups of coffee made 3 If the Key for 2 cups of coffee Fig 3 a is used to make 2 cups of coffee at the same time these are counted as 2 cups 0 Switch the coffee machine on 0 Simultaneously press and hold the Steam Pre selector key Fig 3 g and the On Off key Fig 3 h Keep both keys pressed fo...

Страница 44: ...ity to find your nearest recycling centre The coffee grounds make excellent composting material 18 Service If a repair becomes necessary includ ing a replacement of the mains lead please first telephone one of the AEG Customer Service Centres in German on the following Hotline 0 18 05 30 60 80 EUR 0 12 min Please keep the original packaging including the expanded foam parts The coffee machine must...

Страница 45: ...aanzicht afbeelding 2 P Afzetvlak voor kopjes Q Vulopening voor poeder met deksel vulopening voor gemalen koffie R Positie instelling voor bonenreservoir S Ontgrendeling servicedeur T Ontgrendeling voor verwijderen van maalring U Hendel voor instelling van maalgraad Bedieningspaneel afbeelding 3 a Toets voor 2 kopjes koffie met indicatielampje b Toets voor 1 kopje koffie met indicatielampje c Toet...

Страница 46: ...i tionele filterkoffie Hierdoor komen minder bitterstoffen uit de koffie vrij wat de espressokoffie veel beter ver teerbaar maakt Inhoud 1 Veiligheidsvoorschriften 47 2 Voor de eerste ingebruikneming 48 2 1 Apparaat opstellen en aansluiten 48 2 2 Met water vullen 48 2 3 Apparaat inschakelen 49 2 4 Apparaat uitschakelen 49 2 5 Waterhardheid instellen 49 3 Koffie zetten met bonen 50 3 1 Koffiebonenr...

Страница 47: ...en kopje of bakje onder het stoompijpje houdt Geen ontvlambare vloeistoffen met stoom verhitten Het apparaat alleen gebruiken als er zich water in het systeem bevindt Alleen koud water in de watertank doen geen heet water melk of andere vloeistoffen Neem de max vulhoe veelheid van 1 5 liter in acht Geen bevroren of gekarameliseerde koffiebonen in het bonenreservoir doen alleen gebrande koffiebonen...

Страница 48: ... het apparaat vanuit de kou in een warme ruimte wordt opge steld moet u ca 2 uur wachten voor dat u het apparaat inschakelt Wij raden u aan een geschikte onder laag onder het apparaat te plaatsen om beschadiging door spatten te voorko men 0 Houd het bonenreservoir met de mar kering op de positie Ontgrendeling reservoir en breng het aan afbeelding 4 Hierbij moet de onder ste opening van het bonenre...

Страница 49: ...n nog tijdens het opwarmen gaat het apparaat aan De daardoor veroorzaakte geluiden zijn volkomen normaal 2 4 Apparaat uitschakelen Als het apparaat na het maken van koffie met de Toets Aan uit afbeel ding 3 h uitgeschakeld wordt vindt er nog een spoeling plaats en het Indicatielampje Koffiedikreservoir legen afbeelding 3 j knippert nog ca 1 minuut om u daaraan te her inneren Als het apparaat tijde...

Страница 50: ...r in de stand Koffiebonen afbeelding 10 Het mechanisme wordt ingesteld 0 Stel de maalgraad in afbeelding 11 Met behulp van de maalgraadinstelling afbeelding 2 U kunt u de maalgraad van de maalmechanisme instellen 1 Attentie Voordat u het apparaat de eerste keer met bonen vult kunt u de instelling één keer uitvoeren terwijl het maalmechanisme stilstaat Als het maalmechanisme eenmaal met bonen is ge...

Страница 51: ... gemalen koffie bij het voorkoken eerst met een kleine hoeveelheid water vochtig gemaakt Na een korte pauze volgt dan het eigenlijke zetten van de koffie 0 U kunt de afgifte van de koffie op elk gewenst moment voortijdig afbreken door de eerder ingedrukte koffiezet toets nog eens kort in te drukken 4 Koffie zetten met poeder Met deze functie kunt u reeds gemalen koffie b v cafeïnevrije koffie gebr...

Страница 52: ...dt en het Indicatielampje Apparaat warmt op afbeelding 3 i knippert Na afloop van het verhittingsproces brandt dit indicatielampje continu en is het apparaat voorbereid om melk op te schuimen 3 Als de stoomfunctie langer dan 1 minuut niet gebruikt wordt schakelt het apparaat automatisch terug naar de koffiezetmodus 0 Giet ca 100 ml magere koude melk in een smal kannetje max 0 5 l inhoud dat onder ...

Страница 53: ...aardhoeveelheden ingesteld Deze hoeveelheden kunt u voor elke kop grootte individueel aan uw smaak aan passen en opslaan 0 Druk een aantal keren op de Toets Kopvulhoeveelheid afbeelding 3 d tot het kopsymbool brandt waarvoor u de kopvulhoeveelheid wilt aanpassen 0 Zet de betreffende kop onder de kof fieuitloop b v koffiebeker 0 Druk vervolgens op de Toets voor 1 kopje koffie afbeelding 3 b en houd...

Страница 54: ... gelijkmatig hard ratelend geluid ver oorzaakt Als u dit geluid tijdens het malen hoort schakel het apparaat dan meteen uit en verwijder de vreemde elementen zoals beschreven in de para graaf Maalmechanisme reinigen pagina 56 10 Koffietemperatuur instellen U kunt kiezen uit 5 temperatuurni veaus In de modus Koffietemperatuur instellen brandt het indicatielampje voor het reguleren van de koffiemaal...

Страница 55: ...paraat terugzetten reset Met deze functie worden alle tevoren veranderde waarden weer op de fabrieksinstellingen teruggezet Dit geldt voor de volgende instellingen kopvulhoeveelheden maalhoeveelheden koffietemperaturen 0 Druk gelijktijdig op de Toets Ontkal ken afbeelding 3 e en de Toets Rei nigen afbeelding 3 f Houd beiden toetsen ca 3 seconden ingedrukt tot het apparaat even uitgeschakeld wordt ...

Страница 56: ...t dagelijks gebruikt maak het reservoir dan ook dagelijks leeg Daaraan wordt u telkens herin nerd doordat het na het uitschakelen nog ca 1 minuut knippert 3 Maak het koffiedikreservoir alleen leeg als het apparaat ingeschakeld is Alleen dan detecteert het apparaat dat het geleegd wordt 13 3 Maalmechanisme reinigen Resten van gemalen koffie kunnen met de bijgeleverde kwast verwijderd wor den 1 Atte...

Страница 57: ...vicedeur Achter de servicedeur bevindt zich de koffiezeteenheid afbeelding 29 De 3 rood gekleurde elementen dienen voor ontgrendeling en vergrendeling 0 Om de koffiezeteenheid te verwijderen gebruikt u de vergrendelingselementen in de volgende volgorde afbeelding 30 1 Vergrendelingshendel omhoog schuiven 2 Beveiligingsknop indrukken en ingedrukt houden 3 Vergrendelingsknop omlaag drukken zo houden...

Страница 58: ...rbroken worden 3 Tijdens het reinigingsproces brandt het Indicatielampje Koffiedikreservoir legen afbeelding 3 j Het pro gramma voert 6 cycli met reinigings vloeistof uit De pauzetijden zijn bedoeld om het reinigingstablet te laten inwerken Bij stroomuitval of onderbreking moet het programma opnieuw gestart worden Het reinigingsproces is na ca 8 minuten afgelopen als het indicatie lampje van de To...

Страница 59: ...toom en heet water afbeelding 1 D in de stand afbeelding 43 Laat de draaischakelaar beslist open tot de pomp uitschakelt en er geen ontkalkingsoplossing meer uit het pijpje loopt 0 Draai de Draaiknop voor stoom en heet water afbeelding 1 D terug naar de stand afbeelding 43 dan begint het automatische ontkalkingsproces via de koffiezeteenheid 3 Tijdens het ontkalkingsproces brandt het indicatielamp...

Страница 60: ...lding 3 j knippert Koffiedikreservoir is vol reservoir legen en goed reinigen het apparaat niet meer kan worden bediend en alle 5 de indicatielampjes en of knipperen Koffiezeteenheid is verstopt zie paragraaf Koffiezeteenheid reini gen pagina 57 koffiekoek helemaal uit de koffiezeteenheid verwijderen maalhoeveelheid lager instellen Koffiezeteenheid is te vol geraakt zie paragraaf Koffiezeteenheid ...

Страница 61: ...rden Originele verpakking als transport bescherming bewaren Apparaat tegen schokken beveiligen Reservoirs van het apparaat legen en het systeem droogstomen Zo beschermt u het apparaat in de koude tijd van het jaar tegen vorst schade Het systeem wordt drooggestoomd door de stoomfunctie te kiezen maar eerst de watertank te verwijde ren Als er geen stoom meer naar buiten komt stoomkraan sluiten en ap...

Страница 62: ...ofzak van polyethyleen PE voor recycling bij een inzamelpunt inleveren De piepschuimdelen van polystyreen PS zijn CFK vrij Informeer bij uw gemeente naar de mogelijkheden voor afvalverwerking in uw woonplaats Het koffiedik is uitstekend geschikt om te composteren 18 Service Neem bij een evt nodige reparatie ook bij het vervangen van het snoer eerst telefonisch contact op met een van de AEG klanten...

Страница 63: ...a O Cuchara medidora con pincel de limpieza Vista superior Fig 2 P Soporte para tazas Q Orificio de llenado para café molido con tapa boca de entrada del café molido R Regulación de la posición del recipiente para café en grano S Desbloqueo compuerta de servicio T Desbloqueo para la extracción del anillo de molienda U Palanca de regulación del grado de molienda Zona de los mandos Fig 3 a Tecla par...

Страница 64: ...café expreso mucho más saludable Indice 1 Indicaciones de seguridad 65 2 Antes de la primera puesta en marcha 66 2 1 Colocar el aparato y conectarlo a la red 66 2 2 Llenado del agua 66 2 3 Conectar el aparato 67 2 4 Desconexión del aparato 67 2 5 Ajustar la dureza del agua 67 3 Preparación de café en grano 68 3 1 Llenado del recipiente para café en grano68 3 2 Seleccionar el nivel de llenado de la...

Страница 65: ...lamente si ha colocado un recipiente bajo la misma No caliente líquidos inflamables con vapor Utilice el aparato sólo si hay agua en el sistema Llene el depósito de agua sólo con agua fría no ponga agua caliente leche ni ningún otro líquido Tenga en cuenta que el volumen máximo de lle nado es de 1 5 litros No introduzca granos de café congela dos ni caramelizados en el recipiente para café en gran...

Страница 66: ...cción y seca Preste atención a una buena circula ción del aire Atención Si el aparato es llevado desde el frío a un recinto caliente espere aprox 2 horas antes de conectarlo Recomendamos colocar un material adecuado bajo el aparato para evitar daños por salpicaduras 0 Mantenga el recipiente para café en grano con la marca en la posición Desbloqueo del recipiente y coló quelo Fig 4 La abertura infe...

Страница 67: ...l calentamiento el aparato se ajusta Los ruidos produci dos por este proceso son completa mente normales 2 4 Desconexión del aparato Si después de preparar café se desco necta el aparato con la Tecla Conexión Desconexión Fig 3 h se ejecutará otro enjuague y el Indica dor Vaciar recipiente de posos Fig 3 j parpadeará como recordatorio todavía por aprox 1 minuto Si se des conecta el aparato durante ...

Страница 68: ... para café en grano 0 Gire el recipiente hasta la posición Café en grano Fig 10 El meca nismo se ajustará 0 Ajuste el grado de molienda Fig 11 Con ayuda del ajuste del grado de molienda Fig 2 U podrá ajustar el grado de molienda del molinillo 1 Atención Antes de llenar por primera vez el aparato con café en grano podrá realizar el ajuste de una sola vez con el molinillo parado Una vez llenado el m...

Страница 69: ...ón el café en polvo se humedece con un a pequeña cantidad de agua para su erogación previa Tras una pequeña interrupción se realiza la erogación propiamente dicha 0 Podrá interrumpir en cualquier momento la salida de café antes del final pulsando brevemente la tecla de preparación del café que pulsó para preparar el mismo 4 Preparación de café en polvo Con esta función podrá preparar café ya molid...

Страница 70: ...lo active la tobera del vapor sólo cuando la misma esté sumergida en la leche 0 Para crear vapor pulse la Tecla Prese lección de vapor Fig 3 g Se encenderá el indicador y además par padea la Indicador Calentamiento Fig 3 i tras terminar el calenta miento esta indiciación permanecerá encendida y el aparato está preparado para espumar la leche 3 Si la función de vapor no se utiliza durante más de 1 ...

Страница 71: ...do de las tazas El aparato está ajustado de fábrica con cantidades estándar Las cantidades se pueden adaptar y almacenar a sus gustos individuales para cada tamaño de taza 0 Pulse la Tecla Nivel de llenado de tazas Fig 3 d tantas veces como sea necesario hasta que se ilumine el sím bolo de la taza seleccionada 0 Coloque la taza correspondiente bajo la salida del café p ej tipo tazón de café con le...

Страница 72: ... como se describe en el apartado Limpieza del molinillo página 74 10 Ajustar la temperatura del café Podrá escoger entre 5 diferentes nive les de temperatura En el modo Ajus tar la temperatura del café se ilumina el indicador de la regulación de la can tidad de café a moler que en este caso indicará la temperatura Los neveles de temperatura se mues tran como sigue moderadamente templado templado n...

Страница 73: ...la Tecla Descal cificación Fig 3 e y la Tecla Lim pieza Fig 3 f mantenga las dos teclas pulsadas durante unos 3 segun dos hasta que el aparato se apaga un instante y a continuación se vuelve a conectar con los ajustes de fábrica El aparato está ahora listo para funcionar 13 Limpieza y cuidados Mantenga el aparato siempre limpio si desea una calidad contante del café y un funcionamiento sin problem...

Страница 74: ...ste resultaría dañado 0 Desconecte el aparato con la Tecla Conexión Desconexión Fig 3 h y desenchufe la clavija de la red 0 Mantenga el recipiente para café en grano con la marca en la posición Desbloqueo del recipiente y retí relo Fig 23 0 Retire los granos de café restantes uti lizar p ej un aspirador con su tubo o cabezal para uniones 3 Si algún cuerpo extraño no se puede quitar deberá Ud retir...

Страница 75: ...rando la palanca de servicio hacia abajo hasta el tope Fig 32 Los dos filtros son ahora accesibles y la palanca de extracción gira hacia abajo 0 Limpie la unidad de erogación bajo el grifo de agua caliente Especialmente los filtros de acero inoxidable deben de enjuagarse bien y limpiarse de todo resto de café Fig 33 y 34 0 Seque la unidad de erogación y vuelva a girar la palanca de servicio hacia ...

Страница 76: ...ión de la Tecla Limpieza Fig 3 f se enciende y la Indicador Vaciar recipiente de posos Fig 3 j par padea 0 Vacíe el recipiente de los posos y vuelva a colocarlo La indicación se apa gará 0 Gire el recipiente del café en grano hasta la posición deseada y llene el depósito de agua El aparato está ahora listo para funcionar de nuevo 3 Recomendamos tirar la primera taza de café hecha después de ejecut...

Страница 77: ...la tobera 0 Vuelva a girar el Selector giratorio para vapor y agua caliente Fig 1 D hasta la posición Fig 43 y comenzará el proceso automático de descalcificación en la unidad de erogación 3 Durante el proceso de descalcificación permanece encendida la indicación de la Tecla Descalcificación Fig 3 e Preparación del aparato para la Fase 2 La Fase 1 del proceso de descalcifica ción se termina tras u...

Страница 78: ...es y el o el par padean La unidad de erogación está atas cada ver el apartado Limpieza de la unidad de erogación página 75 retirar los restos de café por com pleto de la unidad de erogación y reducir la cantidad de café a moler la unidad de erogación está dema siado llena ver el apartado Lim pieza de la unidad de erogación página 75 retirar los restos de café por completo de la unidad de eroga ció...

Страница 79: ... el embalaje original como protección de transporte Proteger el aparato de los golpes Vaciar los recipientes del aparato y soltar el vapor del sistema Así protege Usted su aparato de los daños por heladas en los meses fríos del año Para soltar el vapor del sistema se selecciona la función vapor pero habiendo antes quitado el depósito de agua Cerrar la válvula de vapor cuando ya no salga éste y des...

Страница 80: ... de espuma de poliestireno PS no contie nen fluorocarbonos Infórmese en la administración de su ayuntamiento sobre el centro de reci claje competente para su zona El café en polvo es excelente como ele mento de compostación una vez usado 18 En caso de requerir la ayuda de nuestro Servicio Oficial En caso de que sea necesaria una repa ración inclusive la sustitución del cable de alimentación diríja...

Страница 81: ...da com um pincel de limpeza Vista de cima Fig 2 P Bandeja das chávenas Q Abertura de enchimento para café moído com tampa abertura de enchimento R Regulação da posição do recipiente de café em grão S Desbloquear a abertura de serviço T Desbloquear para retirar o anel de moagem U Alavanca para regulação do grau de moagem Zona de comando Fig 3 a Botão para 2 chávenas de café com indicador b Botão pa...

Страница 82: ...argo o que o torna muito mais agradável Índice 1 Instruções de segurança 83 2 Antes da primeira colocação em funcionamento 84 2 1 Colocação do aparelho no local pretendido e ligação 84 2 2 Adicionar água 84 2 3 Ligar o aparelho 85 2 4 Desligar o aparelho 85 2 5 Definir a dureza da água 85 3 Preparar cafécom grãos 86 3 1 Encher o recipiente de café em grão 86 3 2 Seleccionar a quantidade de café po...

Страница 83: ...nte ou de vapor quente pode causar queimadu ras Ligar apenas o bico de vapor quando tiver um recipiente por baixo do bico de vapor Não aquecer líquidos inflamáveis com vapor A máquina só pode ser colocada em funcionamento quando existir água no sistema No depósito de água só é permitido colocar água Não colocar água quente leite ou outros líquidos Respeitar a quantidade máxima de enchimento de 1 5...

Страница 84: ...uma boa circulação de ar Atenção Caso o aparelho venha de um lugar frio e seja colocado num local quente aguarde cerca de 2 horas antes de o ligar Recomendamos a utilização de uma base apropriada debaixo do aparelho para evitar danos causados por salpi cos 0 Pare o recipiente de café em grão com a marca na posição Desbloquear recipiente e ligue o Fig 4 Durante este procedimento a abertura inferior...

Страница 85: ... se para funcionar Os ruídos resultantes deste processo são completamente normais 2 4 Desligar o aparelho Quando o aparelho é desligado com a Botão Ligar Desligar Fig 3 h depois da preparação de café segue se ainda um processo de enxaguamento e o Indicador Esvaziar recipiente de bor ras Fig 3 j pisca ainda durante cerca de 1 minuto para o lembrar Quando o aparelho é desligado durante o funcionamen...

Страница 86: ... do grau de moagem Fig 2 U poderá definir o grau de moagem do moinho 1 Atenção Antes de encher o aparelho com grão de café pela primeira vez pode ainda efectuar a regulação uma vez com o moinho parado Depois de o moinho estar uma vez cheio de grãos só pode regular o moinho durante o processo de moagem dado que de outra forma poderá danificar o aparelho 3 O aparelho vem regulado de fábrica com um g...

Страница 87: ...gue se o processo de infusão 0 Poderá terminar a saída de café anteci padamente a qualquer hora premindo por breves instantes o botão de saída de café 4 Preparar café comcafé moído Com esta função pode preparar café moído ou café descafeinado Tenha em atenção que deve utilizar a colher medida que vem incluída e nunca colocar mais do que 2 colheres medida rasas de café moído no com partimento 1 Ate...

Страница 88: ...ador Aquecimento do aparelho Fig 3 i Depois de terminado o processo de aquecimento o indicador acende o aparelho está pronto para a espuma de leite 3 Caso a função de vapor não seja utili zada durante mais de 1 minuto o apa relho volta automaticamente ao modo de preparação de café 0 Coloque cerca de 100 ml de leite magro e frio num jarro pequeno máx 0 5 l de capacidade que caiba debaixo do bico de...

Страница 89: ...chávena de acordo com o seu gosto 0 Prima o Botão Quantidade de café por chávena Fig 3 d tantas vezes até que o símbolo que corresponde à chá vena pretendida acenda 0 Coloque uma chávena do tamanho correspondente debaixo da saída de café como por exemplo uma caneca de café 0 Depois prima o Botão para 1 chávena de café Fig 3 b e mantenha o premido até que apareça a quantidade pretendida por chávena...

Страница 90: ...gem deve desligar o aparelho imediatamente e retirar o corpo estra nho tal como é descrito no capítulo Limpar o moinho página 92 10 Definir a temperatura docafé O aparelho dispõe de 5 níveis de tem peratura para selecção No modo Regular a temperatura do café acende o indicador de regulação da quantidade de café moído que neste caso indica a temperatura do café Os níveis de temperatura do café são ...

Страница 91: ...empo 0 Memorizar com o Botão Limpar Fig 3 f e sair do modo Definir período de tempo 12 Voltar às predefinições do aparelho Reset Com esta função todos os valores alte rados previamente voltarão às predefi nições de fábrica Esta função inclui as seguintes defini ções Quantidades de café por chávena Quantidades de café moído Temperaturas do café 0 Prima ao mesmo tempo o Botão Des calcificar Fig 3 e ...

Страница 92: ...ipiente deve ser esvaziado e limpo 0 Caso utilize o aparelho diariamente deve esvaziar também diariamente o recipiente O indicador irá lembrá lo para executar essa tarefa dado que fica a piscar durante cerca de 1 minuto depois de o aparelho ser desligado 3 Deve esvaziar o recipiente de borras sempre com o aparelho ligado Só assim é que o aparelho reconhece que foi esvaziado 13 3 Limpar o moinho Os...

Страница 93: ... da tampa da abertura de serviço encontra se a unidade de infusão Fig 29 Os 3 elementos de cor vermelha servem para desbloqueio e bloqueio 0 Para retirar a unidade de infusão prima os elementos de bloqueio na seguinte sequência Fig 30 1 Empurrar a alavanca de bloqueio para cima 2 Premir o botão de segurança e mantê lo premido 3 Premir o botão de bloqueio mantê lo premido e retirar a unidade de inf...

Страница 94: ...líquido de limpeza Os tempos de pausa servem para permitir que a pastilha de limpeza faça efeito Em caso de um corte de energia eléctrica ou de interrupção terá que começar um novo programa desde o início O processo de limpeza termina depois de cerca de 8 minutos quando o indi cador do Botão Limpar Fig 3 f se acende e Indicador Esvaziar recipi ente de borras Fig 3 j pisca 0 Esvazie o recipiente de...

Страница 95: ...ar o selector rotativo aberto até que a bomba desligue e já não esteja a sair solução de descalcificação do bico 0 Rode o Selector para vapor e água quente Fig 1 D para a posição novamente Fig 43 e começa então o processo de descalcificação da uni dade de infusão 3 Durante o processo de descalcificação o indicador do Botão Descalcificar Fig 3 e está permanentemente aceso Preparar o aparelho para a...

Страница 96: ... o piscarem a unidade de infusão está entupida consulte o capítulo Limpar a uni dade de infusão página 93 retirar todos os resíduos de café da unidade de infusão e diminuir a quantidade de café moído a unidade de infusão está demasiado cheia consulte o capítulo Limpar a unidade de infusão página 93 reti rar os resíduos de café da unidade de infusão e colocar uma quantidade inferior de café em pó c...

Страница 97: ... infusão o aparelho ter de ser transportado guardar a embalagem original do aparelho para utilizar como protec ção em caso de transporte proteger o aparelho de pancadas esvaziar os depósitos e recipientes do aparelho e retirar o vapor do sis tema Desta forma estará a proteger o seu aparelho de danos causados por geada nas épocas frias do ano O vapor é retirado do sistema selec cionando a função de...

Страница 98: ... de assistência técnica como protecção para transporte Caso existam Entregar sacos de polietileno PE para recliclagem num centro de recolha As peças de reforço de poliestireno PS estão isentas de CFCs Pergunte nos serviços municipalizados pelo local de reciclagem pertencente à sua área O pó de café utilizado é excelente para compostagem 18 Em caso de assistência técnica Em caso de necessidade de u...

Страница 99: ...l Rechnung beizufügen 5 Garantieleistungen bewirken weder eine Verlängerung noch einen Neubeginn der Garantiezeit für dieses Gerät ausgewechselte Teile gehen in unser Eigentum über 6 Mängelansprüche aus dieser Garantie verjähren in zwei 2 Jahren ab dem Zeitpunkt der Übergabe des Geräts vom Händler an den Verbraucher der durch den Original Kauf beleg Kassenzettel Rechnung zu belegen ist wenn dieses...

Страница 100: ...AEG Hausgeräte GmbH Postfach 1036 D 90327 Nürnberg http www aeg hausgeraete de Copyright by AEG 822 949 283 01 0404 ...

Отзывы: