9
9
Do not use this product in any other way as stated for normal use.
CAUTION
Danger of explosion if battery is incorrectly replaced. Replace only
with the same or equivalent type.
OPERATION
WARNING
The product is not waterproof. Do not submerge in liquid. Failure
to heed this warning could result in serious personal injury.
WARNING
Always refer to the manual for any device recommended for use
as an attachment or accessory. Proper use of any device, when
attached to the product, is the sole responsibility of the operator.
Improper use may damage the device or the product.
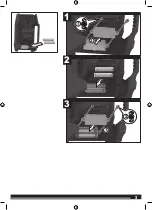
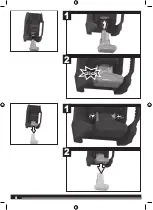
INSTALLING/REMOVING AAA BATTERIES
See page 3.
It is advisable to write down saved channels before replacing the AAA
batteries.
There is a 15-second time frame for replacing the AAA batteries. If
the batteries are not replaced within 15 seconds, the product will
lose all settings previously stored in memory, and they will require
reprogramming.
Always use new alkaline batteries for replacement.
1. Remove the battery pack, if installed.
2. Loosen the screw in the battery cover. Remove the cover and set
aside.
3. Install two new AAA batteries according to polarity indicators
inside the battery compartment.
NOTE:
Do not mix old and new batteries. Do not mix alkaline,
standard (carbon-zinc), or rechargeable (nickel-cadmium)
batteries.
4. Replace the battery cover and tighten screw to secure..
INSTALLING/REMOVING BATTERY PACK
The product can be operated by either an AEG 12V or 18V battery
pack.
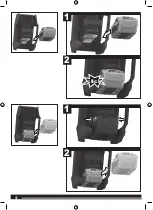
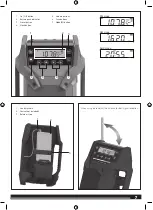
To install 18V battery pack:
See page 4.
1. Place the battery pack in the product, aligning the ribs on the
battery pack with the grooves in the battery port.
2. Make sure the latches on the battery pack snap into place and
the battery pack is secured to the product before beginning
operation.
3. Depress the latches to remove the battery pack.
NOTE:
Always remove the battery pack from radio when not in use.
Leaving the battery pack connected for long periods of time may
drain the battery pack.
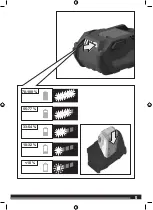
To install 12V battery pack:
See page 6.
1. Place the battery pack in the product, aligning the ribs on the
battery pack with the grooves in the battery port.
2. Make sure the latch on the battery pack snap into place and
the battery pack is secured to the product before beginning
operation.
3. Depress the latch to remove the battery pack.
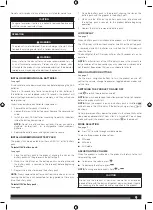
LCD DISPLAY
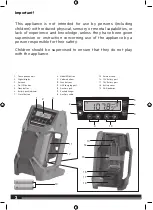
See page 7.
When a battery pack is installed and the product is in the ON position,
the LCD display will show the channel or time. When the battery pack
is removed while AAA batteries are installed, the LCD display will
show the time.
The backlight of the LCD display will dim after 15 seconds of no user
operation.
NOTE:
The illustrations of the LCD display shown in the manual are
only examples of the frequencies you may see on your radio and are
not the exact frequencies that you may choose to listen to.
MENU NAVIGATION BUTTONS
See page 7.
Use the menu navigation buttons to turn the product on and off,
control the volume, change frequencies, toggle between modes and
set the time.
SWITCHING THE PRODUCT ON AND OFF
Hold to switch the product on and off.
NOTE:
You may need to keep the button pressed for up to 3 seconds
before the product will start.
NOTE:
When the product is on and a battery pack is installed,
will be shown in the LCD display. If the battery charge is low,
will
be shown.
To help preserve battery power, the product will automatically enter
sleep mode approximately 1 hour after it is turned off. To exit sleep
mode and restart the product, you must press on the product.
MODE SELECTION
See page 7.
■
Press
to cycle through available modes.
There are three modes to choose from:
■
FM mode
■
AM mode
■
AUX mode
ADJUSTING THE VOLUME
When the product is switched on, the product will return to the last
volume setting used.
■
To increase the volume, press
.
■
To decrease the volume, press
.
NOTE:
To change volume quickly, hold
or
.
CAUTION
Do not use the product at maximum volume for an extended
period of time with the bass and treble at maximum levels. It could
cause damage to the speakers and/or amplifiers in the product.
Содержание BR1218B
Страница 1: ...BR1218B Original instructions ...
Страница 3: ...3 3 1 2 3 1 1 2 2 ...
Страница 4: ...4 4 1 2 1 click 2 ...
Страница 5: ...5 5 78 100 33 54 55 77 10 32 10 ...
Страница 6: ...6 6 1 2 1 click 2 ...


