10
10
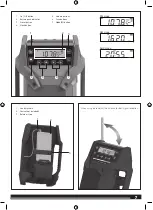
FM TUNING
Use and to tune to the desired radio frequency. The selected
frequency is displayed on the LCD display.
To tune frequency manually:
Briefly push either or (not press and hold) to tune one frequency
step at a time.
1. Press and release to tune to a lower frequency.
2. Press and release to tune to a higher frequency.
To tune frequency automatically:
1. Press and hold or for two to three seconds to tune frequency
automatically.
2. Press or to stop scanning and select a frequency.
To decrease interference or electrical noise, adjust the position of the
antenna or move the product to a higher elevation.
NOTE
: Signal reception may drop due to electronic discharge. Press
and , or restart the radio to improve signal reception.
AM TUNING
Use and to tune to the desired radio frequency. The selected
frequency is displayed on the LCD display.
To tune frequency manually:
Briefly push either or (not press and hold) to tune one frequency
step at a time.
1. Press and release to tune to a lower frequency.
2. Press and release to tune to a higher frequency.
To tune frequency automatically:
1. Press and hold or for two to three seconds to tune frequency
automatically.
2. Press or to stop scanning and select a frequency.
To decrease interference or electrical noise, adjust the position of the
antenna or move the product to a higher elevation.
NOTE
: Signal reception may drop due to electronic discharge. Press
and , or restart the radio to improve signal reception.
STORING A PRESET IN MEMORY
The memory feature saves up to 20 frequencies as presets in the
product’s memory. You can save up to 10 frequencies each for FM
and AM modes.
To store a frequency in memory:
1. Tune to the desired FM or AM frequency.
2. Press and hold
until the preset position number flashes
on the screen.
3. Press or to choose a preset position number.
NOTE:
There are 10 preset positions for FM and 10 for AM. Only
one station can be saved in each preset position.
4. Press
again to store the frequency.
To tune to presets (FM or AM):
■
Press and release
to cycle through each preset position
number and its associated frequency.
EQUALIZER FUNCTION
To adjust the bass and/or treble settings:
1. Hold
to enter Equalizer setting.
2. Press or to adjust the Bass level.
3. Press
to enter the Treble setting.
4. Press or to adjust the Treble level.
5. Press
to exit Equalizer setting.
SETTING THE CLOCK
To set the clock:
1. Press and hold
to enter clock setting
2. The hour time blinks. Press or to adjust the hour.
3. Press clock. The minute time blinks. Press or to adjust the
minute.
4. Press clock again to confirm the time. The clock is now set.
NOTE:
If AAA batteries are removed or lose charge for more than 15
seconds, clock settings will be lost. Settings are not affected by the
removal of the 12V/18V battery.
AUXILIARY MODE
The product can be used as an amplifier for MP3 players, CD players,
smartphones, tablets, and other music devices.
To use the auxiliary mode:
1. Press
until
AUX
mode is displayed.
2. Connect auxiliary cable to the device.
3. Connect the other end of the auxiliary cable to the auxiliary input
port.
NOTE:
–
The external device must be on and in play mode for sound
to be heard through the speakers.
–
All external device controls can be used normally while
connected to radio.
–
Volume for any device connected through the auxiliary cable
can be adjusted using the volume control for that device or by
using
or
of the product.
–
Switching the product off will not switch the external device
off.
–
The auxiliary cable does not provide charging function.
4. For complete operating instructions for the connected device,
always refer to the manual that was included with your device.
The device tray and retainer strap may be used to store your external
device.
NOTE:
The device tray and retainer strap cannot secure external
devices.
USING THE USB DEDICATED CHARGING PORT
The USB dedicated charging port provides charging power of up to
1 Amp for your cell phone, MP3 player, tablet, or other USB devices.
CAUTION
Attempting to charge devices rated more than 1 Amp could
damage the USB dedicated charging port and/or the device.
1. Connect one end of a USB cable (not provided) to your USB
device.
2. Connect the other end of the USB cable (not provided) to the USB
dedicated charging port to begin charging the device.
NOTE:
The USB dedicated charging port provides power only; it
does not provide any data communication capabilities.
Содержание BR1218B
Страница 1: ...BR1218B Original instructions ...
Страница 3: ...3 3 1 2 3 1 1 2 2 ...
Страница 4: ...4 4 1 2 1 click 2 ...
Страница 5: ...5 5 78 100 33 54 55 77 10 32 10 ...
Страница 6: ...6 6 1 2 1 click 2 ...

