background image

2

Contents

Safety instructions ..................................................... 2
Description of the cooker hood ................................... 3
Using the cooker hood ............................................... 4
Maintenance and cleaning .......................................... 6
What to do if .............................................................. 8
Service and Spare Parts ............................................ 9
Customer Care ........................................................... 9
Guarantee Conditions ............................................... 10
Technical data .......................................................... 11
Installation ............................................................... 12

Safety instructions

These warnings are provided in the interest of your safety.Ensure that you
understand them all before installing or using the appliance. Your safety is of
paramount importance. If you are unsure about any of these meanings or
warnings contact the Customer Care department
Please retain this instruction book for future reference, particularly if the
appliance is sold or left to another person.

Installation and service

● 


Any electrical installation of the cooker hood must be carried out by a

qualified electrician and the hood itself must be installed by someone
with  experience. Installation made by an unqualified person can lead to
loss of function of the cooker hood and possible damage to person and
and/or property.

The cooker hood must be at least 50 cm above electric hobs or electric
ranges, or at least 65 cm above gas burners or gas ranges.

Ensure that the power cable is not damaged during installation.

The cooker hood is only in stand by mode unless the plug or the fuse is
disconnected.

The cooker hood cannot be connected to flues of other appliances that
run on energy sources other than electricity. Please, keep to the
provisions of official directives regarding fume discharge.

Содержание 2600 D

Страница 1: ...2600 D Cooker hood Operating and Installation Instructions ...

Страница 2: ...or left to another person Installation and service Any electrical installation of the cooker hood must be carried out by a qualified electrician and the hood itself must be installed by someone with experience Installation made by an unqualified person can lead to loss of function of the cooker hood and possible damage to person and and or property The cooker hood must be at least 50 cm above elec...

Страница 3: ...om the wall socket and cut the power cord at the hood inlet Contact your local authority for information on where to dispose the cooker hood Description of the cooker hood Accessories The following are included with the cooker hood 1 Adaptor 150 125 mm 2 Tube clamps 1 hood canopy complete with controls lighting and fan motor 1 telescopic chimney stack formed by U shaped upper section and U shaped ...

Страница 4: ...etc as the hood will expel air which is required by these other appliances Attend to it by opening a window The negative pressure in the room must not exceed 0 04 mbar to prevent fumes being drawn back into the room by the cooker hood Using the cooker hood Fig 2 A Main switch hood on off B Start and choice of motor speed 1 2 3 1 2 C Indicates speed 1 LED and indication of the grease saturation for...

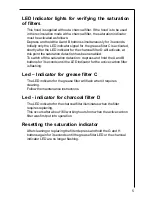
Страница 5: ...e saturation detection depress and hold the A and B buttons for 3 seconds until the LED indicator for the active carbon filter is flashing Led Indicator for grease filter C The LED indicator for the grease filter will flash when it requires cleaning Follow the maintenance instructions Led indicator for charcoal filter D The LED indicator for the charcoal filter illuminates when the filter requires...

Страница 6: ... on which the grease collects Clean thefilterinhotwaterusingadetergent or in a dishwasher Let the filter dry before putting it back Note that a dishwasher may discolour the filter Changing and cleaning the carbon filter Only applicable for recirculation The carbon filters absorb smells and odours Unlike other carbon filters the LONGLIFE carbon filter can be cleaned and reactivated At normal use th...

Страница 7: ...odour reduction capacity will be reduced To remove the filter Fig 4 Remove the grease filters Press the red buttons A lower the front of the carbon filter Remove the carbon filter Replace in reverse order Fig 6 Fig 4 Clean the filters regularly The grease that collects in the filters and the duct could ignite if a hot plate is left on or if overheating occurs A A Remove the upper glass panel The u...

Страница 8: ...traction check that the ducting and outlets are not blocked The cooker hood has switched off The safety cut out device has been duringoperation tripped Turn off the hob and then wait for the device to reset If the hood has been installed below the heights indicated in the installation instructions the motor will cut out frequently which will damagethehood If after all these checks the problem pers...

Страница 9: ...lease note that proof of purchase is required for in guarantee service calls Help us to help you Please determine your type of enquiry before writing or telephoning When you contact us we need to know Your name Address and post code Telephone number Clear and concise details of the fault Name and model of the appliance E number This information can be found on the rating plate which can be seen wh...

Страница 10: ...sed agent AEG reserves the right to stipulate the place of the repair i e the customer s home place of installation or AEG workshop 4 The guarantee or free replacement includes both labour and materials 5 Repairs carried out under guarantee do not extend the guarantee period for the appliance Parts removed during guarantee repairs become the property of AEG 6 The purchaser s statutory rights are n...

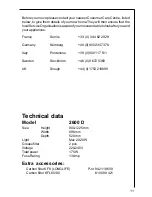
Страница 11: ...18 609 Carbon filter KFL 60 80 610 899 421 Before you move please contact your nearest Customer Care Centre listed below to give them details of your new home They will then ensure that the localServiceOrganisationisawareofyourmoveandabletolookafteryouand yourappliances France Senlis 33 0 3 44 62 29 29 Germany Nürnberg 49 0 800 234 7378 Italy Pordenone 39 0 800 117 511 Sweden Stockholm 46 0 8 672 ...

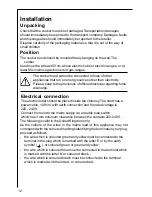
Страница 12: ...connection The electric outlet should be placed inside the chimney The hood has a power cable 100 cm with earth connection and the rated voltage is 220 240 V Connect the hood to the mains supply via a double pole switch which has 3 mm minimum clearance between the contacts 220 240 V The following is valid in the United Kingdom only As the colours of the wires in the mains lead of this appliance ma...

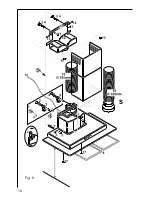
Страница 13: ...awl plugs 9a and the screws 11 Be careful that it is centered over the hood and horizontally aligned Fitting for ducting S Connect a tube between the hood air outlet and the wall or roof exhaust channel Fix it with the tube clamps supplied Fitting for recirculation Mount the recirculation spigot 12 with the two screws 13 supplied Mounting the chimney Place the chimney and fix it to the top chimney...

Страница 14: ...14 Fig 8 a a S ...

Страница 15: ...15 Fig 8a Exhaust tube Power outlet Electric hob 500 mm Gas hob 650 mm Charcoal and oil 700 mm Electric hob 500 mm Gas hob 650 mm Charcoal and oil 700 mm Wall bracket ...

Страница 16: ...AEG Hausgeräte GmbH Postfach 1036 D 90327 Nürnberg http www aeg hausgeraete de Copyright by AEG LI1LLD Ed 05 02 ...

Отзывы: