background image

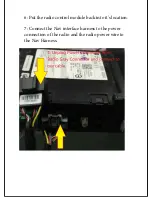
6: Put the radio control module back into it's location.

7: Connect the Nav interface harness to the power 

connection of the radio and the radio power wire to 

the Nav Harness.

Содержание CHVNAV2

Страница 1: ...CHVNAV2 Select Chevrolet Vehicles ...

Страница 2: ......

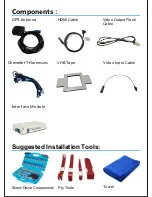
Страница 3: ...Components Chevrolet T Harnesses VHB Tape HDMI Cable Video Output Flash Cable GPS Antenna Video Input Cable Interface Module ScrewDriverComponents Pry Tools Suggested Installation Tools Towel ...

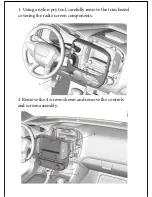
Страница 4: ...1 Using a nylon pry tool carefully remove the trim bezzel covering the radio screen components 2 Remove the 4 screws shown and remove the controls and screen assembly ...

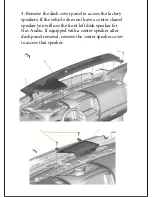
Страница 5: ...the factory speakers If the vehicle does not have a center chanel speaker you will use the front left dash speaker for Nav Audio If equipped with a center speaker after dash panel removal remove the center speaker cover to access that speaker ...

Страница 6: ...n the Nav interface harness up to the area below the dash cover If there is a center speaker unplug the speaker connection and connect the speaker to the harness then connect the speaker harness to the nav harness this is a T Harness and requires both connections If no center channel speaker is present route the cable to the left front speaker and connect the same way ...

Страница 7: ...6 Put the radio control module back into it s location 7 Connect the Nav interface harness to the power connection of the radio and the radio power wire to the Nav Harness ...

Страница 8: ...ion as shown 9 Disconnect the BLUE video connector on the HMI module and connect to the provided extension cable that will run to the Nav interface Connect the provided Video cable from the HMI Blue port to the other port on the Nav interface this completes Video in and out ...

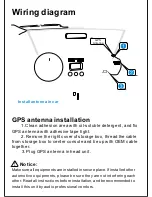
Страница 9: ... to the Nav Module final location 12 Connect the white color connectors to the Nav module 13 Mount the GPS antenna in a location that is not blocked by metal or glass containing a metalic coating then connect to the blue antenna port on the nav module If using a GMANTSP splitter connect per it s instructions to the blue antenna port this allows use of the factory on star antenna Optional ...

Страница 10: ...nstalled The USB will also charge a connected device but is not for media use The HDMI connection will mirror HDMI compatible phones note that most phones require an adapter to connect to an HDMI input Contact the Phone provider or Carrier for an approved adpater 15 Check all connections and then re connect the vehicle battery Test the system before replacing all dash panels The vehicle must be ou...

Страница 11: ...it Notice Make sure all equipments are installed in secure place If installed other automotive equipments please be sure they are not interfering each other Read all instructions before installation and be recommended to install this unit by audio professional vendors Clean adhesion area with oil soluble detergent and fix GPS antenna with adhesive tape tight 2 Install antenna in car GPS Antenna ...

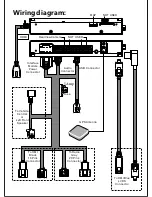
Страница 12: ...w Camera USB Connector HDMI Interface Module Power Connector Audio Connector Fuse To HMI Blue LVDS Connector NOT USED GPS Antenna To Vehicle Central or Left Front Speaker To HMI Black 16 Pins Connector To Radio Gray 20 Pins Connector 5Amp ...

Страница 13: ......

Отзывы: