Advent AMM12N Скачать руководство пользователя страница 36

32

AMM12N

BLUETOOTH OPERATION

About Bluetooth

Bluetooth is a short-range wireless radio connectivity 
technology that is developed as a cable replacement for 
mobile phones, handheld PCs and other devices. Bluetooth 
operates in 2.4 GHz frequency range and transmits voice and 
data at speeds up to 1 megabit per second. Bluetooth was 
launched by a special interest group (SIG) comprised of 
Ericsson Inc., Intel Corp., Nokia Corp., Toshiba and IBM in 
1998, and it is currently developed by nearly 2,000 
companies worldwide. The Bluetooth word mark and logos 
are owned by the Bluetooth SIG, Inc. and any use of such 
marks by Audiovox Corporation is under license. Other 
trademarks and trade names are those of their respective 
owners.

NOTE: The line-of-sight distance between this unit and 
your cellular phone must be 8 meters or less for sending 
and receiving voice and data via Bluetooth wireless 
technology. However, the transmission distance may 
become shorter than the estimated distance, depending 
on the environment in use. 

Before attempting to use the Bluetooth functions on the 
AMM12N, please make sure your mobile phone supports 
Bluetooth functions (Headset or Handsfree profiles or both). 
Adhere to the following guidelines for successful operation.

Before using Bluetooth functions, you must pair your 
mobile phone to the AMM12N head unit (see “Pairing 
the Bluetooth System with Your Mobile Phone and Head 
Unit”). To ensure the best reception for pairing and 
reconnection, please make sure the phone battery is 
fully charged before you begin.

Try to perform pairing within a few minutes of the phone 
being turned on.

Once the unit has been paired with the phone, the unit’s 
model number, “AMM12N”, will be displayed on the 
mobile phone.

To achieve the best performance, always keep the 
mobile phone within


3 meters of the head unit.

Always keep a clear path between the mobile phone 
and the head unit. Never place a metal object or any 
other obstacle between the mobile phone and the head 
unit.

Some mobile phones (like Sony Ericsson) may have a 
"Power Saving Mode" option. PLEASE DO NOT use the 
power saving mode with the AMM12N.

Before accepting or making a call, make sure your 
mobile phone's “Bluetooth function” is turned on.

To ensure the best conversation quality/performance, 
stay within one meter of the head unit when talking. 

To “disconnect” the mobile phone from the head unit, 
turn the Bluetooth connectivity off on the mobile phone.

Phone Book direct searching through the head unit 
is only available if the mobile phone supports Phone 
Book Download. 

If the feature is not supported, the 

head unit will display “Phone book not provided by this 
phone” when an attempt is made to download a phone 
book. 

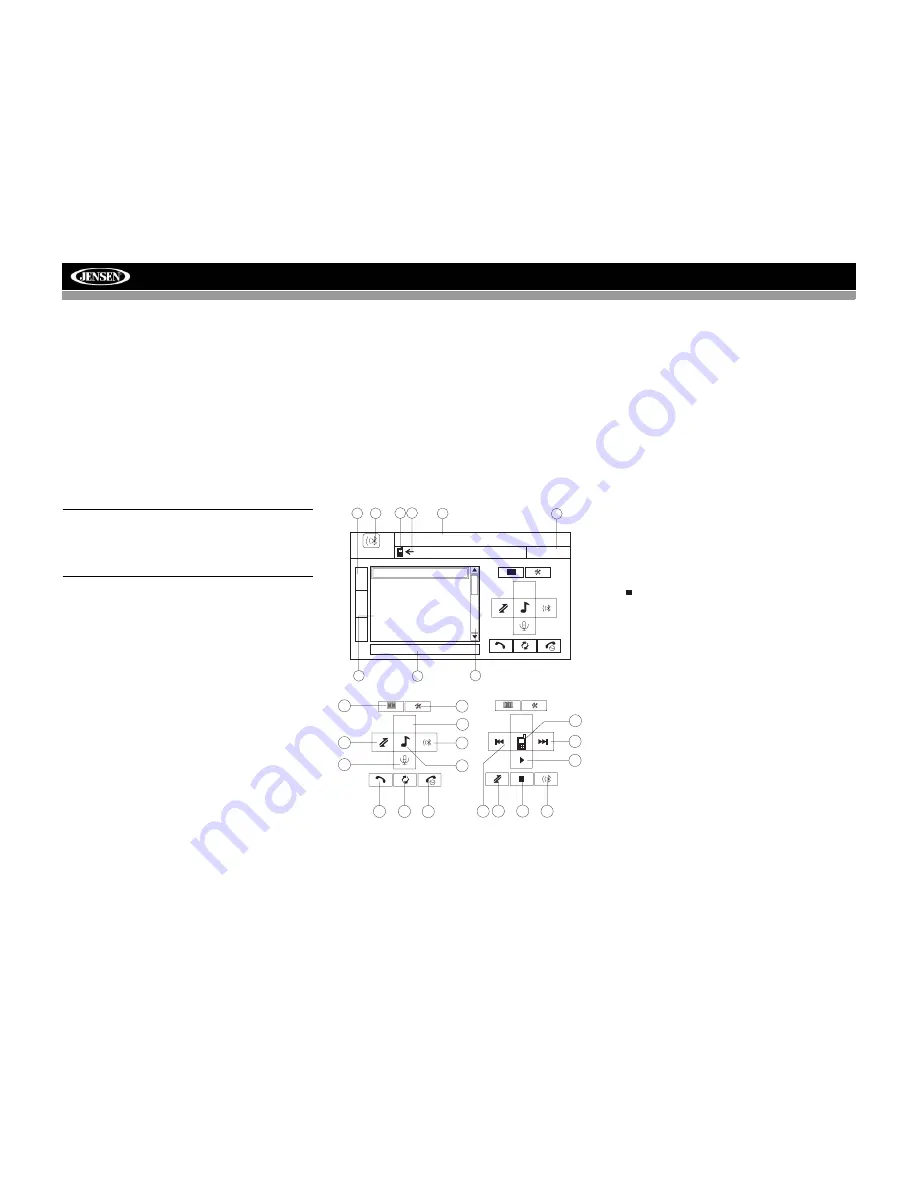
Bluetooth User Interface

The on-screen indicators and touch key areas for Bluetooth 
operation are outlined below.

1.

Current connection status/device connected

2.

Current time

3.

Bluetooth menu

4.

Current operation status

5.

Toggle Music/Phone menu

6.

Transfer active call back to handset

7.

Pair your Bluetooth phone (first time use)

8.

Connect/disconnect Bluetooth device (phone, PDA, 
personal music player, etc.) with hand-free function

9.

Exit call listing display

10. Mute/unmute microphone (located on left side of radio) 

during active call

11.

Answer incoming call/make call

12. Reject incoming call/end call/quit pairing process/quit 

reading phone book or call listing

13. Touch to view the SETUP menu
14. Touch to view Spectrum Analyzer > Equalizer
15. Touch to view the SOURCE MENU and select a new 

playback source

16. Indicates connection/current operation (--> indicates 

incoming call, <-- indicates dialing alert)

17. Touch to access the direct entry screen
18.

: Touch to stop playback

19. Touch the scroll bar and arrows to view the previous/ 

next page of phone book entries

20. Toggle Music/Phone menu/mode
21. Play/Pause selected file
22.

|<<

: Touch to move to the previous file

23.

>>|

: Touch to move to the next file

Hands Free Profile (HFP)

To use a phone wirelessly with this unit, it is necessary to first 
establish a connection using Bluetooth wireless technology. 
Connection is normally established using HFP (Hands Free 
Profile), which gives you full control of functions available on 
the telephone source. However, depending on your phone, 
the connection may be made using HSP (Head Set Profile), 
making some functions unavailable. This is a limitation of 
your phone, not the AMM12N.

Since there are a number of Bluetooth mobile phone 
implementations available on the market, operations with 
your Bluetooth mobile phone using this unit vary greatly. 

Please refer to the instruction manual that came with your 
Bluetooth mobile phone along with this manual while 
operating your phone with this unit.

USER NAME

1

Missed Calls

2

Received Calls

3

Dialed Calls

4

Phone Book

MENU

Menu List

01:53 PM

E

Q

R

E

A

R

P

I

P

BT

1

4

14

2

15

3

17 16

19

18

8

7

10

9

11

5

6

12

13

8

23

7

20

21

22

18

MENU

MENU

PHONE INTERFACE          MUSIC INTERFACE

Содержание AMM12N

Страница 1: ...240 DIV Watts Peak Watts en Cr te Vatios el M ximo 60W x 4 AMM12N Installation and Operation Manual video AMM12N Press Audio Enter...

Страница 2: ......

Страница 3: ...dvent AMM12N Mobile Multimedia Receiver for maximum enjoyment Preparation 1 Installation 5 Anti Theft Feature 7 Controls and Indicators 8 Remote Control 10 Using the TFT Monitor 14 Operating Instructi...

Страница 4: ...ii AMM12N...

Страница 5: ...e Media Devices to be Connected MediaLink4 Includes the Following Connectivity USB Supports Flash Memory and Hard Drives with Audio Files LinkDirect iPod Connectivity 3 5mm Audio Only Input RCA Audio...

Страница 6: ...s to remove existing radio screwdriver socket wrench set or other tools Electrical tape Crimping tool Volt meter test light Crimp connections 18 gauge wire for power connections 16 18 gauge speaker wi...

Страница 7: ...ROUND REAR R SURROUND SUBWOOFER SUBWOOFER CENTER GND GND P CONT MUTE BATT CENTER PRK SW REVERSE ANT CONT ACC REAR R FRONT L REAR L FRONT R NAV Bus Rear View Video Camera BLACK MZ7 TFT Touch Screen Sol...

Страница 8: ...nit VIDEO LEFT RIGHT 3 5mm Audio MediaLink Compatible SAT Tuners 1 XMD1000 requires XMC or XMDJEN100 Cable Kit 2 CNP2000UC 3 SC C1 and SIRJEN2 Requires Gen 5 5 or earlier photo or video iPod iPod Touc...

Страница 9: ...problem is corrected 4 Mount the new radio assembly to the dashboard or center console using the reverse procedure in step 1 CAUTION For proper operation of the CD player the chassis must be mounted...

Страница 10: ...xibility The AMM12N will fit into most import dashes with little or no modification to the dash board cavity Some US domestic vehicle dashes will accept a Double DIN chassis but there is usually a sma...

Страница 11: ...screen to enter the SETUP menu 2 Touch RATING to view the RATING sub menu An open lock icon to the right of the Password field indicates that a user password had not yet been entered 3 Touch the keypa...

Страница 12: ...source during navigation the voice prompts will still be heard although the navigation map cannot be seen The selected source audio will be muted until the navigation voice prompt command is complete...

Страница 13: ...to move the cursor up 16 Press once for disc insertion ejection Press and hold to reset core mechanism position 17 TFT Display 18 REAR Select rear zone source Allows front passengers to listen to the...

Страница 14: ...10 AMM12N REMOTE CONTROL The AMM12N Remote controls both the front and rear zones To switch from front to rear zone move the F R switch 32 located on the right side of the controller...

Страница 15: ...4 5 9 6 7 26 27 15 16 34 33 19 32 23 24 31 30 8 35 1 2 10 13 28 25 11 12 14 20 18 17 22 21 NOTE Your remote control may differ slightly from the one pictured here The above diagram is for illustrative...

Страница 16: ...playing DVD DivX or Photo Zooms in Navigates the preset station list Navigates list window Navigates the preset station list Navigates list window PRESET 12 Zooms out when playing DVD DivX or Photo Z...

Страница 17: ...N EMA or Standby Selects display mode CIN EMA or Standby 1 2 3 4 5 6 7 8 9 0 Numeric Keypad 29 Directly accesses chapter 1 6 selects preset for current band Directly accesses track 1 6 selects preset...

Страница 18: ...on the remote control or press and hold the WIDE PIC button 7 on the monitor 2 Select Item to Set Use the up down joystick buttons to select BRIGHT or CONTRAST 3 Set Parameters Use the left right joy...

Страница 19: ...SAT DISC NAV BT iPod SD USB AUX1 AUX2 and CAMERA The playing mode is displayed on the TFT screen Auxiliary Devices External peripheral devices can be connected to this unit via RCA output AUX IN 2 or...

Страница 20: ...o change the PIP source PIP may also be used to select the NAV or Rear Zone source for transfer to the main TFT screen Touch PIP and then touch the PIP image to select that source for the Front Zone N...

Страница 21: ...ce for the front or rear zone Touch FRONT or REAR to choose the zone for which you would like to specify the source Controlling the Rear Zone Screen s If you have a rear touch screen installed you can...

Страница 22: ...and PM 24 Hour Clock displays 24 hour time up to 23 59 RDS Rating Hardware P VOL TS Cal General Language Audio Back Clock Mode 12 Hour Clock Adjust 04 31 AM Video Input AUTO Beep On Speaker DivX Blue...

Страница 23: ...de or pass key required for Bluetooth connec tion to your mobile phone Not all phones devices require a pairing code The default code is 0000 for many models Setting Options Function RDS On Unit will...

Страница 24: ...touch the BACK button on the screen Setting Options Function Camera Normal Mirror Reverse the camera image as if looking through a rear view mirror TFT Set Open Auto The TFT panel automatically retra...

Страница 25: ...Press the SRC button 6 on the front panel or remote control 8 to switch to the AM FM or RADIO source Select FM AM Band Touch the BAND button 15 on the screen or press the BAND button on the unit 4 or...

Страница 26: ...FM band for a preview of available stations in your particular area press and hold the AS PS button 3 on the control panel or touch the PS button 21 on screen Touch again to stop preview scan Local Ra...

Страница 27: ...o enter preset mode touch the BAND button on the screen or press the BAND button on the unit 14 or remote control 20 to change between the following bands SAT1 SAT2 or SAT3 indicated in the top left c...

Страница 28: ...hile in Search Mode to switch between Channel and Category search modes press the CH or CAT buttons on the touch screen Use the scroll bar and arrows on the touch screen to view the next previous page...

Страница 29: ...button on the screen to fast forward Keep pressing and releasing the button to increase the rate from 2X to 4X 6X and 8X Press the joystick Enter button 18 on the remote control or touch the play butt...

Страница 30: ...to choose a language Changing Subtitle Language If you are watching a disc recorded in multiple languages with subtitles press the SUBTITLE button 9 on the remote control to choose the language in whi...

Страница 31: ...umber of subtitle languages available on the disc maximum of 32 Number of angles provided maximum of 9 Aspect ratios available LB stands for Letter Box and PS stands for Pan Scan In the example on the...

Страница 32: ...mote control or on screen or use the button on the joystick to advance to the next track on the disc Press the button 17 on the remote control or on screen or use the button on the joystick to move to...

Страница 33: ...e setting MP3 Playing Order When selected for play files and folders Folder Search File Search or Folder Select are accessed in the order they were written by the CD writer As a result the order in wh...

Страница 34: ...iability Also use folders when burning large numbers of songs files to a disc for easy music navigation Select the Disc at Once option and close your disc Stopping Playback Touch the button on screen...

Страница 35: ...button on screen to return to the previous menu Fast Forward Fast Reverse Press and hold the or buttons on screen or on the remote control 17 19 for 1 second and continue to hold for fast forward or f...

Страница 36: ...hone from the head unit turn the Bluetooth connectivity off on the mobile phone Phone Book direct searching through the head unit is only available if the mobile phone supports Phone Book Download If...

Страница 37: ...hone functionality Making an Outgoing Call NOTE Press the button from the main Bluetooth screen to automatically dial the last call received 1 Touch the button to open the direct dial screen 2 Use the...

Страница 38: ...ode referring to Bluetooth Sub menu Features on page 19 NOTE Please quit A2DP mode before attempting to make a phone call as unexpected results may occur depending on your mobile phone model The AMM12...

Страница 39: ...shorted Check speaker contact Tel Mute malfunction MUTE wire is grounded Check that the MUTE connection is not grounded and that it s properly insulated Unit resets itself when engine is off Incorrec...

Страница 40: ...files Incorrect playback message displayed Message is longer than screen can display SAT RADIO No Sound Incorrect cable connections Check RCA cables Satellite source not available Incorrect cable conn...

Страница 41: ...maged by foreign objects 5 Do not attempt to use a 3 8 cm CD Single disc in this unit either with or without an adaptor as damage to the player and or disc may occur Such damage is not covered by the...

Страница 42: ...en 6 1 155mm W X 3 51 89 2mm H Screen Type TFT Liquid Crystal Display LCD active matrix Response Time 30mSec rise time 50mSec fall time Resolution 280 800 sub pixels 1200 W X 234 H Viewing angle 60 de...

Страница 43: ...are and Maintenance section of your Installation and Operation Manual for additional information regarding the proper use of your product Limitations THE EXTENT OF THE COMPANY S LIABILITY UNDER THIS W...

Страница 44: ...Audiovox Electronics Corporation Hauppauge NY 11788 Technical Assistance 1 800 645 4994 www audiovox com 2008 Audiovox Ver 042908 Printed in China...

Отзывы: