Advent ADVDLX10 Скачать руководство пользователя страница 6

5

CONTROLS AND INDICATORS DIAGRAM 
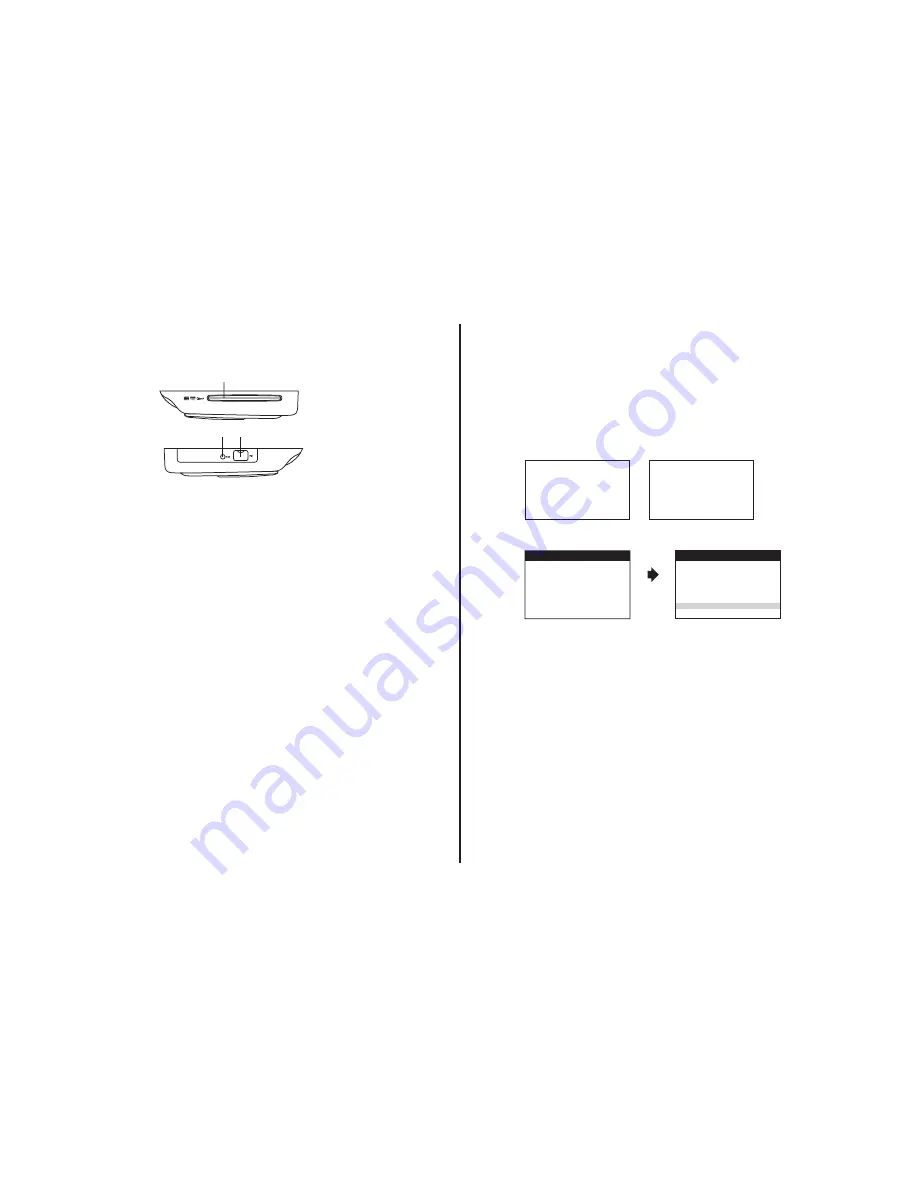
SIDE VIEWS

1.  DVD Disc Insertion Slot


For loading and removing discs. Insert disc with label side facing up.

2.  AUX IN


This jack is used to supply external audio and video inputs to the unit.


Note:  

 In order to connect an external A/V source, the 3.5mm to RCA 

connectors pigtail is required.

3.  USB INPUT 


Allows for the connection of an USB memory device.

ADVDLX9


System

The ADVDLX9 System has an option that allows the user to select from 

two IR transmit and receive codes (M1 or M2). This feature can be used 

when using two ADVDLX9 sytems in the same installation or if the vehicle 

has RSA (Rear Seat Audio) that uses an “A” channel headset. The ADVDLX9 

system comes factory set to M1. When in the M1 mode, the unit will 

respond to remote commands when M1 is selected on the remote control 

and will transmit audio on the A channel. When in the M2 mode, the unit 

will respond to remote commands when M2 is selected on the remote 

control and will transmit audio on the B channel.

Note: 

 Use 2-channel IR headphones set to CH B when the monitor is set to 

M2 mode.

Note:

 M1 will appear on the screen for 4~5 seconds.

Selecting a Monitor Code (M1 or M2)

1.   Power ON the unit and wait until M1 on the OSD appears. M1 will 

appear on the screen for 4~5 seconds. 

2.   To change the monitor code, press the System Menu button.

3.   Use  the 

p

 or 

q

 cursor buttons to select the Monitor Mode menu 

option. Press OK to confirm the setting.

4.   Use the  

p

 or 

q

 cursor buttons to select the desired monitor mode, 

then press OK to confirm the setting.

5.  Press the M2 button on the remote.

6.  Press the System Menu button on the remote to exit.

2 3

1


FMM OFF

M2

DVD

IRT OFF

FMM 88.3MHz

M1

AUX/GAME

IRT ON

SYSTEM MENU

OSD LANGUAGE
DEFAULT DVD ON/OFF
SCREEN MODE

FM MODULATOR 

MONITOR MODE 

WARNING

SETTING THE MONITOR TO THE M2 MODE WILL

REQUIRE USING 2-CHANNEL HEADPHONES.
USE THE DOWN KEY ON THE REMOTE CONTROL

TO SELECT M2 AND PRESS OK TO SET THE 

MONITOR TO M2 MODE
TO REMAIN IN THE M1 MODE PRESS OK
M1

M2

Содержание ADVDLX10

Страница 1: ...ADVDLX9 9 OVERHEAD LED BACKLIT LCD MONITOR WITH DVD PLAYER R OWNER S MANUAL...

Страница 2: ...rence in a residential installation Reorient or relocate the receiving antenna Increase the separation between the equipment and receiver Connect the equipment into an outlet on a circuit different fr...

Страница 3: ...n or navigation If the LCD panel or video monitor is used for television reception video or DVD play the LCD panel or video monitor must be installed so that these features will only function when the...

Страница 4: ...en seat belts to change video media or make any adjustments to the system System adjustments can be accomplished using the remote control while seat belts remain fastened Enjoy your ADVENT entertainme...

Страница 5: ...k from where movie was stopped Press the STOP button twice and then press the PLAY button to start playback from the beginning of the DVD 6 EJECT Button This button is used for ejecting disc from the...

Страница 6: ...nd to remote commands when M2 is selected on the remote control and will transmit audio on the B channel Note Use 2 channel IR headphones set to CH B when the monitor is set to M2 mode Note M1 will ap...

Страница 7: ...o use the remote control Battery Replacement 1 Remove the battery holder 2 Insert one CR2025 battery into the battery holder Be sure to observe the correct polarity 3 Align the battery holder with the...

Страница 8: ...ntrol of the unit in M2 mode 4 SCAN BACKWARD Press to search in a backward direction Press repeatedly to change the search speed from 2 4 8 16 times and normal speed 5 SCAN FORWARD Press to search in...

Страница 9: ...sed to implement a selected setting or menu option 14 SETUP Allows the user to access the Setup Menu when the unit has been placed in DVD mode Use the cursor buttons pqt u to select options such as la...

Страница 10: ...ress the button the language changes Note The available languages vary from disc to disc 21 FM MODULATOR CHANNEL SELECT C The unit has a 100 channel built in wireless FM Modulator The FM Modulator can...

Страница 11: ...the wireless headphones or the FM Modulator output 26 MUTE Press this button to mute the audio for wireless FMM and IR headphones Pressing the button again restores the audio to the previously set le...

Страница 12: ...le the system is in use 3 Press the power button on the unit or the remote control to turn the system on and off When in use the internal backlighting will illuminate the controls 4 After the unit has...

Страница 13: ...he System Menu contains features and options that let the user customize the system For example the user can change the FM Modulator OSD language source default screen mode display and the monitor mod...

Страница 14: ...select a frequency not used by a radio station in the area Press OK to select the highlighted frequency There are a total of 5 FM CHANNEL pages containing frequencies from 88 1 to 107 9 in 0 2 MHz ste...

Страница 15: ...OFF and press OK to access the submenu 3 Use the p or q cursor buttons to select ON or OFF 4 Press the OK to confirm the setting Note The unit is set to source default DVD on as the default mode of op...

Страница 16: ...position the highlight back on the icon side of the setup page to set the other options Repeat steps 1 2 3 Press the SETUP button again to exit the Setup Menu LANGUAGE SETUP DVD Language for On Screen...

Страница 17: ...ed in the disc DVD AUDIO SETUP The Audio Menu allows the user to select the language for audio 1 Press the SETUP button on the remote to enter the Setup Menu 2 Use the p or q cursor buttons to select...

Страница 18: ...Select this type for PAL TV MULTI Select this type for multi system TV 1 Press the SETUP button on the remote to enter the Setup Menu 2 Use the p or q cursor buttons to select the Video menu option 3...

Страница 19: ...ue your own password 1 Press the SETUP button on the remote to enter the Setup Menu 2 Use the p or q cursor buttons to select the Rating menu option 3 Use the u cursor button to select parental submen...

Страница 20: ...ss the SETUP button on the remote to enter the Setup Menu 2 Use the p or q cursor buttons to select the Misc menu option 3 Use the u cursor button to select the screen saver submenu 4 Use the q cursor...

Страница 21: ...omatically 1 Use the p or q cursor buttons to select the desired folder if present on the left side of the menu and press OK The songs in the folder will be displayed on screen 2 Use the p or q cursor...

Страница 22: ...ogram To add the selected songs into Browser view make sure disc playback is off Move the cursor to the Edit mode function and press OK After Edit mode is selected move cursor to songs list and select...

Страница 23: ...ere the DVD player is sold A DVD from a different region cannot be played in this unit and the unit will display WRONG REGION 22 Region 1 USA Canada Region 2 Japan Europe South Africa Middle East Gree...

Страница 24: ...dable DVD formats However due to the variety of disc manufacturers and software playback cannot be guaranteed Loading and Playing Discs Before you load a disc make sure that it is compatible with the...

Страница 25: ...sary to set this unit to M2 mode is if there is an RSA Rear Seat Audio installed in the vehicle or if two of these monitors are installed in one vehicle Press the system menu and highlight monitor mod...

Страница 26: ...ayer to dry out No sound or distorted sound Make sure the DVD is connected properly Make sure all cables are securely inserted into the appropriate jacks If the 2 channel IR headphones are being used...

Страница 27: ...during forward or reverse scan No forward or reverse scan Some discs have sections that prohibit rapid scanning or title and chapter skip If you try to skip through the warning information and credit...

Страница 28: ...20 000 Hours Video Display System NTSC PAL Video Output 1 0 Vp p 75 ohms Power Source 12 VDC Dimensions L x W x H 11 0 x 9 5 x 1 7 Closed 289mm x 243mm x 44mm Closed 11 0 x 9 5 x 8 5 Open 289mm x 243...

Страница 29: ...ical systems This Warranty does not apply to any product or part thereof which in the opinion of the Company has suffered or been damaged through alteration improper installation mishandling misuse ne...

Страница 30: ...NOTES 29...

Страница 31: ......

Страница 32: ...2014 VOXX ELECTRONICS CORP 150 Marcus Blvd Hauppauge NY 11788 128 9219B...

Отзывы: