background image

UNO-410 User Manual

x

Содержание UNO-410

Страница 1: ...User Manual UNO 410 Explosion Proof DIN Rail Gateway...

Страница 2: ...s Cor poration Intel Core and Atom are the trademarks of Intel Corporation Microsoft Windows and MS DOS are registered trademarks of Microsoft Corp All other product names or trademarks are properties...

Страница 3: ...ment mate rials service time and freight Please consult your dealer for more details If you believe your product to be defective follow the steps outlined below 1 Collect all the information about the...

Страница 4: ...mful interference when the equipment is operated in a commercial environment This equipment generates uses and can radiate radio frequency energy and if not installed and used in accordance with the i...

Страница 5: ...ndards Covered IEC 60079 0 Edition 7 IEC 60079 7 Edition 5 1 EN IEC 60079 0 2018 EN IEC 60079 7 2015 A1 2018 5 Electrical Rating Power input 10 36Vdc 7 7 1 31A Digital input 0 to 30 Vdc Digital output...

Страница 6: ...on nel The power cord or plug is damaged Liquid has penetrated the equipment The equipment has been exposed to moisture The equipment is malfunctioning or does not operate according to the user manual...

Страница 7: ...utilisez pas de d tergent liquide ou pulv ris pour le nettoyage 4 Gardez cet quipement l abri de l humidit 5 Placez cet quipement sur une surface fiable pendant l installation Le faire ou bien le lais...

Страница 8: ...se trouvent des enfants 18 Si l quipement est utilis d une mani re non sp cifi e par le fabricant la pro tection fournie par l quipement peut tre alt r 19 L quipement ne contient aucune pi ce r parab...

Страница 9: ...ix UNO 410 User Manual 11 12 13 14 15 40 C 40 F 55 C 131 F 16 17 IEC 704 1 1982 70 18 19 IEC 704 1 20 CCC...

Страница 10: ...UNO 410 User Manual x...

Страница 11: ...10 2 2 3 USB Connector 11 2 2 4 Display Connector 11 2 2 5 COM Connector CN8 11 Table 2 2 COM Connector Pin Assignments 11 2 2 6 Digital Input and Output CN7 12 Figure 2 5 Isolated DI Wet Connection...

Страница 12: ...r CN5 CN6 41 A 3 1 USB 2 0 Connector 41 Table A 3 Connector Pin Assignments 41 A 3 2 USB 3 0 Connector 41 Table A 4 USB 3 0 Connector Pin Assignments 41 A 4 Display Connector CN2 CN3 42 Table A 5 Disp...

Страница 13: ...Chapter 1 1 Overview This chapter overviews specifica tions for UNO 410 Introduction Safety Precautions Accessories Hardware Specifications Dimensions...

Страница 14: ...on A sud den rush of power can damage sensitive electronic components Only experienced electronics personnel should open the chassis Warning Toujours la terre pour liminer toute charge d lectricit st...

Страница 15: ...x Lockable kit 1 x Earth Ground cable 1 x SATA cable It will be installed with 2 5 SSD inside UNO 410 unit in UNO 410 E1HX sku Quick Start Guide Simplified Chinese manual China RoHs sheet Warranty car...

Страница 16: ...ignal 1 x 2 5 SSD SATA connector 1 x 2 5 64G SATA SSD is default in UNO 410 E1HX Expansion 1 x Full size mPCIe slot PCIe USB Signal 1 x M 2 B key 3042 or 3052 Module SATA USB Signal 1 x Nano SIM card...

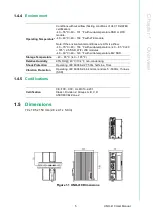
Страница 17: ...40 104 F with LTE module Note If the environmental conditions are 0 7m s airflow 40 70 C 40 158 F with wide temperature 40 85 C 40 185 2 5 SSD WiFi LTE modules 40 60 C 40 140 F with wide temperature M...

Страница 18: ...UNO 410 User Manual 6...

Страница 19: ...lity This chapter details setup instruc tions for UNO 410 s hardware functions It includes connecting peripherals and indicators Introduction External I O Connector Internal I O Connector LED Indicato...

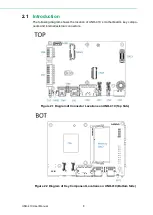
Страница 20: ...following diagram shows the location of UNO 410 s motherboard s key compo nents and internal external connectors Figure 2 1 Diagram of Connector Locations on UNO 410 Top Side Figure 2 2 Diagram of Key...

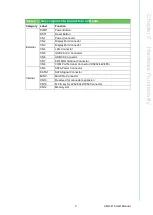
Страница 21: ...tor CN2 DisplayPort Connector CN3 DisplayPort Connector CN4 LAN Connector CN5 USB 2 0 3 0 Connector CN6 USB 3 0 Connector CN7 8DI 8DO Terminal Connector CN8 COM Port Terminal Connector RS232 422 485 I...

Страница 22: ...d lines and power lines Please refer to User Manual Appendix A 1 for pin assignments 2 2 2 LAN Ethernet Connector UNO 410 is equipped with two Gigabit LAN controllers An Intel i210 Ethernet con trolle...

Страница 23: ...assive adapter Please refer to User Manual Appendix A 4 for pin assignments 2 2 5 COM Connector CN8 UNO 410 has 2 COM RS232 422 485 ports of terminal block type They offer trans mission speeds of 50 1...

Страница 24: ...nd GPIO Use SW6 to set wet contact and dry contact for digital input Dry Configure to Setting 1 Default Wet Configure to Setting 3 Digital Input Input channels 8 Input voltage wet contact configure SW...

Страница 25: ...isolated inputs of UNO 410 Figure 2 5 Isolated DI Wet Connection Diagram Figure 2 6 Isolated DI Dry Connection Diagram Isolated Digital Output If the external voltage source 5 30 V is connected to ea...

Страница 26: ...nnectors and Jumper Switches Label Function MINI1 MiniPCIe connector CN15 M 2 B key for 2242 3042 3052 connector CN10 Nano SIM slot connector CN14 iDoor Power connector SATA1 SATA Signal connector CN9...

Страница 27: ...SATA signal co lay with a USB signal It will automatically detect which device you installed and determine the appropriate SATA or USB signal to use Therefore it supports the installation of M 2 2242...

Страница 28: ...nd programma ble LED for user s configurations PWR Power Green indicates normal and orange indicates standby BTR RTC Battery Red indicates a low RTC battery Check the RTC battery RUN Programmable User...

Страница 29: ...roduct offers four antenna mounting holes covered by pre cut holes for users to install an antenna kit for LTE or wireless functions Figure 2 10 Diagram of Maximum OD Value for Antenna Hole Note Pleas...

Страница 30: ...UNO 410 User Manual 18...

Страница 31: ...ins how to Ini tialize the UNO 410 Chassis Grounding Connecting Power Storage Installation Optional Din Rail Installation Wireless Module Installation Optional Expansion Module Installation Optional R...

Страница 32: ...vides good EMI protection and a stable grounding base There is an easy to connect chassis grounding point Figure 3 1 Chassis Grounding Connection Diagram Use the Grounding cable 16 AWG from the access...

Страница 33: ...nto the V and V contacts on the termi nal block connector 2 Tighten the wire clamp screws to prevent the DC wires from coming loose Take the following guidelines into consideration before wiring the d...

Страница 34: ...on optional UNO 410 supports the installation of one 2 5 HDD SDD and one M 2 2242 SSD The installation is demonstrated in the following steps 3 3 1 Installing a 2 5 HDD SSD 2 5 SSD is default in UNO 4...

Страница 35: ...23 UNO 410 User Manual Chapter 3 Initial Setup 2 Disassemble the 1st stack and 2nd stack screws on UNO 410...

Страница 36: ...UNO 410 User Manual 24 3 Detach the HDD bracket from 2nd stack 4 Fix the 2 5 HDD SSD to the HDD bracket with the 4 x M3x4L screws from the accessory bag...

Страница 37: ...25 UNO 410 User Manual Chapter 3 Initial Setup 5 Attach the HDD bracket back to the 2nd stack with the provided screws from step 3...

Страница 38: ...410 User Manual 26 6 Reassemble 1st stack and 2nd stack of UNO 410 1 Plug in SATA cable onto the board of UNO 410 and connect with SSD HDD 2 Fix extension kit with 5 x M3x4L screws from the accessory...

Страница 39: ...al Chapter 3 Initial Setup 7 Return the back cover of UNO 410 3 3 2 Installing M 2 SSD 1 Remove 2 screws from UNO s back cover 2 Disassemble 1st stack and 2nd stack of UNO 410 3 Remove the provided sc...

Страница 40: ...UNO 410 User Manual 28 4 Insert the M 2 card on the location CN15 Secure it with the provided screws from Step 3 3 4 Din Rail Installation 1 Install UNO 410 on the rail and secure it to the rail...

Страница 41: ...29 UNO 410 User Manual Chapter 3 Initial Setup 2 Pull down the Release Latch for disassembly using a screwdriver...

Страница 42: ...s from the back cover of UNO 2 Disassemble 1st stack and 2nd stack of UNO 410 3 Remove the plug of antenna pre cut hole s on the top panel for antenna instal lation 4 Plug the Module onto the board Fo...

Страница 43: ...NO 410 User Manual Chapter 3 Initial Setup 2 Insert the M 2 card to the location CN15 and secure it with the provided screws from Step 4 1 5 Install the SMA connector of Antenna cable to the Antenna h...

Страница 44: ...mbly 1st stack and 2nd stack of UNO 410 8 Assemble the Antenna on the SMA connector of the Antenna cable Wireless Module Antenna cable Antenna are optional Please use the modules that were controlled...

Страница 45: ...0 User Manual Chapter 3 Initial Setup 1 Remove the on board bracket 2 Use the provided screws from Step1 to fix the M 2 3052 module Note If you need to install M 2 3052 Module please follow the follow...

Страница 46: ...ews from back cover of UNO 2 Disassemble 1st stack and 2nd stack of UNO 410 and detach the iDoor dummy cover 3 iDoor Installation 1 Connect the mPCIe connector of iDoor module onto the board of UNO 41...

Страница 47: ...B cables have been secured tightly on the system to prevent unintentional disconnection 3 7 2 Part number UNO 2000 LKAE with 10 sets inside UNO 410 has 2 sets as default package 3 7 3 Lockable kit con...

Страница 48: ...UNO 410 User Manual 36 3 7 4 Assembly with the UNO System Follow the 4 steps to fix the USB cable with the lockable kit 1 Find the lockable hole on UNO System near the USB Port...

Страница 49: ...igure SW8 Bit 2 to on then DI6 can be used for remote power settings and DI7 can be used for remote reset setting 3 9 BIOS Setting With the BIOS Setup program you can modify BIOS settings and control...

Страница 50: ...UNO 410 User Manual 38...

Страница 51: ...Appendix A A System Settings Pin Assignments...

Страница 52: ...r the transmit pair and in MDIX configuration MDI 0 is used for the receive pair 2 MDI0 3 MDI1 In BASE T Media Dependent Interface 1 1000BASE T In MDI configuration MDI 1 corre sponds to BI_DB and in...

Страница 53: ...on 1 VBUS Power 5 0V 2 D USB2 0 differential pair 3 D 4 GND Ground for power return Table A 4 USB 3 0 Connector Pin Assignments Pin Signal Name Description 1 VBUS Power 5 0V 2 D USB 2 0 differential p...

Страница 54: ...ort Adapter cable Pin Assignments Pin Signal Name 1 ML_Lane 0 p 2 GND 3 ML_Lane 0 n 4 ML_Lane 1 p 5 GND 6 ML_Lane 1 n 7 ML_Lane 2 p 8 GND 9 ML_Lane2 2 10 ML_Lane 3 p 11 GND 12 ML_Lane 3 n 13 CONFIG1 1...

Страница 55: ...ATA1 A 5 2 SATA Power Connector CN9 Table A 6 SATA Connector Pin Assignments Pin Signal Name 1 GND 2 SATA0_C_TX 3 SATA0_C_TX 4 GND 5 SATA0_RX 6 SATA0_RX 7 GND Table A 7 SATA Power Connector Pin Assign...

Страница 56: ...hanical notch B 18 Mechanical notch B 19 Mechanical notch B 20 NC 21 NC 22 NC 23 WAKE_ON_WAN 24 NC 25 NC 26 M2_LTE_W2_DISABLE_N 27 GND 28 NC 29 USB_Z_SSRX1 30 M2_SIM1_RESET 31 USB_Z_SSRX1 32 M2_SIM1_C...

Страница 57: ...3 8 NC 9 GND 10 NC 11 CLK_PCIE_mPCIe1 12 NC 13 CLK_PCIE_mPCIe1 14 NC 15 GND 16 NC 17 NC 18 GND 19 NC 20 WIFI_DISABLE 21 NC 22 MINI_PLTRST 23 PCIE_mPCIe_RX4 24 V3 3_MINI 25 PCIE_mPCIe_RX4 26 GND 27 GN...

Страница 58: ...232 422 485 Setting SW1 SW1 Default Description This switch is used to select RS232 422 485 mode settings Default RS232 mode COM1 RS232 Mode Bit 1 ON Bit 2 3 4 5 6 7 8 9 10 OFF RS485 Mode Bit 2 4 5 ON...

Страница 59: ...setting is AT mode See the follow ing table for switch configuration SW1 Termination Resistor setting Description This switch is used to select Termination Resistor 120 ohm for long distance transmis...

Страница 60: ...GND 6 eDP_TX1 7 eDP_TX1 8 GND 9 eDP_AUX 10 eDP_AUX 11 GND 12 PLTRST_B2B 13 PMU_SLP_S3 14 eDP_VDDEN_1V8 15 eDP_BKLTEN_1V8 16 eDP_BKLCTL_1V8 17 EC_LVDS_BKLT_EN 18 EC_LVDS_BKLT_CTL 19 ouch_EN_1V8 20 PCIE...

Страница 61: ...ng The UNO 410 systems support TPM 2 0 functionality This can be enabled or dis abled in the BIOS menu by following the instructions provided below 1 Power on the UNO 410 system and press Delete to en...

Страница 62: ...UNO 410 User Manual 50 3 Then select the Security Device Support item 4 Choose enable disable to enable or disable the TPM 2 0 function The default setting is to enable this function...

Страница 63: ...Mode BIOS Setting The UNO 410 systems support CPU Turbo mode This can be enabled or disabled in the BIOS menu by following the instructions 1 Power on the UNO 410 system and press Delete to enter the...

Страница 64: ...UNO 410 User Manual 52 3 Then select the CPU Power Management item 4 Choose enable disable to enable or disable the CPU Turbo mode The default setting is to enable this function...

Страница 65: ...53 UNO 410 User Manual Appendix A System Settings Pin Assignments...

Страница 66: ...ions are subject to change without notice No part of this publication may be reproduced in any form or by any means electronic photocopying recording or otherwise without prior written permis sion fro...

Отзывы: