background image

iii

TPC-1250H/1550H/1750H User Manual


Product Warranty (2 years)

Advantech warrants to you, the original purchaser, that each of its products will be
free from defects in materials and workmanship for two years from the date of pur-
chase. 
This warranty does not apply to any products which have been repaired or altered by
persons other than repair personnel authorized by Advantech, or which have been
subject to misuse, abuse, accident or improper installation. Advantech assumes no
liability under the terms of this warranty as a consequence of such events.
Because of Advantech’s high quality-control standards and rigorous testing, most of
our customers never need to use our repair service. If an Advantech product is defec-
tive, it will be repaired or replaced at no charge during the warranty period. For out-
of-warranty repairs, you will be billed according to the cost of replacement materials,
service time and freight. Please consult your dealer for more details.
If you think you have a defective product, follow these steps:

1.

Collect all the information about the problem encountered. (For example, CPU 
speed, Advantech products used, other hardware and software used, etc.) Note 
anything abnormal and list any onscreen messages you get when the problem 
occurs.

2.

Call your dealer and describe the problem. Please have your manual, product, 
and any helpful information readily available.

3.

If your product is diagnosed as defective, obtain an RMA (return merchandize 
authorization) number from your dealer. This allows us to process your return 
more quickly.

4.

Carefully pack the defective product, a fully-completed Repair and Replacement 
Order Card and a photocopy proof of purchase date (such as your sales receipt) 
in a shippable container. A product returned without proof of the purchase date 
is not eligible for warranty service.

5.

Write the RMA number visibly on the outside of the package and ship it prepaid 
to your dealer.

Содержание TPC-1250H

Страница 1: ...User Manual TPC 1250H 1550H 1750H Industrial Touch Panel Computers with Intel Atom Processors...

Страница 2: ...written permission of Advantech Co Ltd Information provided in this manual is intended to be accurate and reliable How ever Advantech Co Ltd assumes no responsibility for its use nor for any infringe...

Страница 3: ...to the cost of replacement materials service time and freight Please consult your dealer for more details If you think you have a defective product follow these steps 1 Collect all the information abo...

Страница 4: ...gy and if not installed and used in accordance with the instruction manual may cause harmful interference to radio communications Opera tion of this equipment in a residential area is likely to cause...

Страница 5: ...r safety reasons the equipment should be opened only by qualified service personnel 14 If one of the following situations arises get the equipment checked by service personnel The power cord or plug i...

Страница 6: ...TPC 1250H 1550H 1750H User Manual vi...

Страница 7: ...5 Figure 1 3 TPC 1250H Dimensions 5 Figure 1 4 TPC 1550H Dimensions 6 Figure 1 5 TPC 1750H Dimensions 7 Chapter 2 System Setup 9 2 1 System Setup 10 Figure 2 1 Unpack the Package 10 Figure 2 2 Install...

Страница 8: ...TPC 1250H 1550H 1750H User Manual viii...

Страница 9: ...Chapter 1 1 General Information...

Страница 10: ...Energy Star Approval 1 2 Specifications 1 2 1 System Kernel CPU Intel Atom N270 1 6GHz BIOS Award 4 Mbit flash BIOS System Chipset 945GSE ICH7M Memory 2GB SO DIMM DDR2 667 SDRAM VGA Integrated in 945...

Страница 11: ...750H Typical 24 VDC 1 54 Amp TPC 1250H 1550H 1750H Display Type TFT LCD Size diagonal 12 1 15 17 Maximum Resolution 800 x 600 SVGA 1024 x 768 XGA 1280 x 1024 SXGA Maximum Colors 262K Viewing Angle 160...

Страница 12: ...erproof gasket is in position before installing TPC into the panel opening 1 Install the TPC into the panel opening 2 Find the eight clamps and eight long screws in the accessory pack Hook the clamps...

Страница 13: ...lb Dimensions W x H x D 1250H 311 x 237 x 54 mm 12 24 x 9 33 x 2 12 1550H 383 x 307 x 58 1 mm 15 08 x 12 09 x 2 29 1750H 413 7 x 347 2 x 63 8 16 28 x 13 68 x 2 5 Cutout TPC 1250H 302 5 x 228 5 mm TPC...

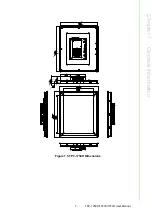
Страница 14: ...TPC 1250H 1550H 1750H User Manual 6 Figure 1 4 TPC 1550H Dimensions 383 0 307 0 306 1 230 1 24 70 4 5 58 5 76 4 140 236 0 7 4 189 25 373 0 297 0 115 115 7 4...

Страница 15: ...7 TPC 1250H 1550H 1750H User Manual Chapter 1 General Information Figure 1 5 TPC 1750H Dimensions 413 7 347 2 272 5 340 63 8 5 5 25 5 89 2 140 399 5 333...

Страница 16: ...TPC 1250H 1550H 1750H User Manual 8...

Страница 17: ...Chapter 2 2 System Setup...

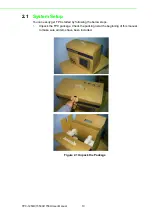
Страница 18: ...10 2 1 System Setup You can easily get TPC started by following the below steps 1 Unpack the TPC package Check the packing list at the beginning of this manual to make sure all items have been includ...

Страница 19: ...ure 2 2 Install CompactFlash Memory Card 3 Connect the power connector to the 24 VDC power lines The power lines can either be of some power adapter or in house power source Figure 2 3 Power Connector...

Страница 20: ...0H which can be found in your accessory box The various drivers in the DVD disc have their own text files which help users install the drivers and understand their functions These files are a very use...

Страница 21: ...Chapter 3 3 Features in Windows XP Embedded...

Страница 22: ...sh all their changes on system such as installing their applications or adjusting system setting Advantech provides a pair of utilities to operate EWF OSLock andOSUnLock Please refer the training slid...

Страница 23: ...Appendix A A Jumper and Dip Switch setting Pin Assignment...

Страница 24: ...TPC 1250H 1550H 1750H User Manual 16 A 1 Jumper and DIP Switch Settings A 1 1 Component Construction A 1 1 1 EAMB 1120 Top side A 1 1 2 EAMB 1120 Bottom side...

Страница 25: ...upply LCD panel Description 1 3 2 4 Enable Clear CMOS 3 5 4 6 Disable SW3 LCD Resolution Select Description This switch is used to select LCD Resolution Default 1280 1024 18bit PWM 2KHz TPC 1750 1024...

Страница 26: ..._CFG Up and Down opposite OFF Pin 2 ON Pin 7 LVDS_SC_CFG Scan direction control OFF Pin 3 ON Pin 6 LVDS_MODE_CFG Select 6 or 8 bits LVDS input OFF Pin 4 ON Pin 5 TPC 1250 TPC 650 Default State Default...

Страница 27: ...Select SW4 Termination Resistor Select Description This switch is used to select Termination Resistor 120 ohm for long distance transmission or device matching Default Bit1 off Bit2 off ISO_COM2_DATA...

Страница 28: ...82 Select SW6 RS232 RS422 RS485 Select Description The serial port CN13 on the TPC 650 1250 1550 1750 is adjust able It can be set to RS 232 RS 422 or RS 485 This port is designed with auto data flow...

Страница 29: ...User Manual Appendix A Jumper and Dip Switch setting Pin Assignment A 2 Pin Assignment COM1 COM2 PIN RS 232 RS 422 RS 485 1 NDCD TX D 2 NRX TX D 3 NTX RX 4 NDTR RX 5 GND GND GND 6 NDSR 7 NRTS 8 NCTS...

Страница 30: ...tions are subject to change without notice No part of this publication may be reproduced in any form or by any means electronic photocopying recording or otherwise without prior written permis sion of...

Отзывы: