background image

PPC-123 User’s Manual

88

11.2  Driver for Resistive or SAW Touchscreen

The touchscreen driver for Windows 95/98 contains a native, 32-bit 
driver and a 32-bit control panel program for the PPC-123 system.
To facilitate installation of the touchscreen driver, you should read the 
instructions in this section carefully before you attempt installation.

11.2.1 Installation for Windows 95/98/Me

1.

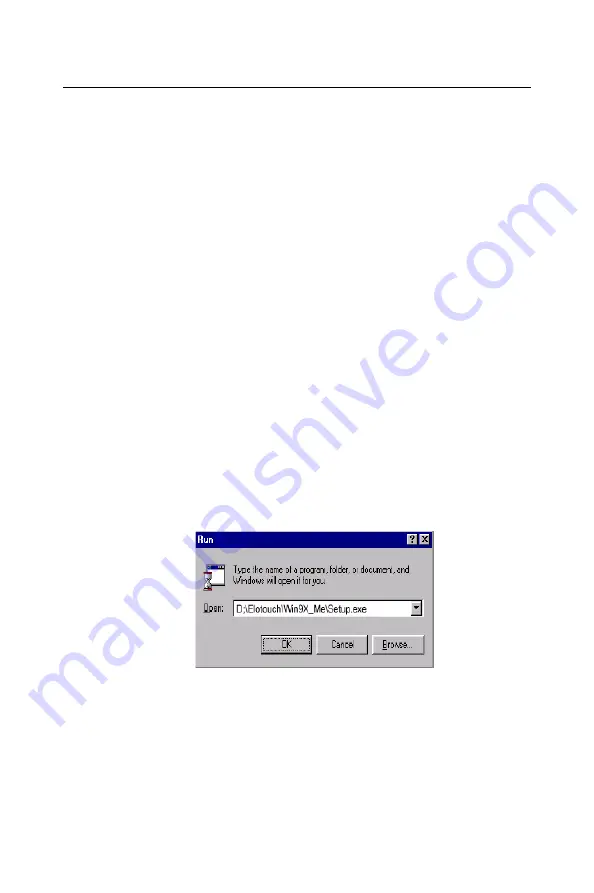
a. Insert the "Drivers and Utilities" CD.
b. Click the "Start" button, and then "Run".
c. Type the path:
"D:\PPC-123&153\TouchScreen\Elotouch\Win9X_Me\Setup.exe”

Important: 1.  The following windows illustrations are exam-

ples only. You must follow the flow chart instruc-
tions and pay attention to the instructions which 
then appear on your screen.

Notes:

1.  The CD-ROM drive is designated as "D" 
throughout this chapter.
2. <Enter> means pressing the "Enter" key on 
the keyboard.

Содержание PPC-123

Страница 1: ...PPC 123 Pentium III processor based panel PC with 12 LCD flat panel display User s Manual...

Страница 2: ...ware International Inc VIA is a trademark of VIA Technologies Inc IBM PC AT PS 2 and VGA are trademarks of International Business Machines Corporation Intel and Pentium are trademarks of Intel Corpora...

Страница 3: ...ill no guarantee that interference will not occur If this equip ment is believed to be causing harmful interference to radio or television reception this can be determined by turning the equipment on...

Страница 4: ...py disk with CD ROM drive driver Drivers and Utilities CD ROM disc Mounting kits and packet of screws Heat sink optional refer to Notes 1 and 2 below If any of these items are missing or damaged conta...

Страница 5: ...your software operating system version application software etc A complete description of the problem The exact wording of any error messages Warning 1 Input voltage rated 100 250 VAC 50 60 Hz 3 A 2 U...

Страница 6: ...y liquid into an opening This may cause fire or electrical shock 13 Never open the equipment For safety reasons the equipment should be opened only by qualified service personnel 14 If one of the foll...

Страница 7: ...eine Besch di gung vermieden 12 Durch die L ftungs ffnungen d rfen niemals Gegenst nde oder Fl ssigkeiten in das Ger t gelangen Dies k nnte einen Brand bzw elektrischen Schlag aus l sen 13 ffnen Sie...

Страница 8: ...PPC 123 User s Manual viii...

Страница 9: ...e power cord 15 Figure 2 5 Connecting the power cord 15 2 3 2 Installing the DC power insulator with hood 16 2 3 3 Connecting the keyboard and mouse 19 Figure 2 6 Connecting the keyboard and mouse 19...

Страница 10: ...5 Figure 4 5 Installing FDD and slim CD ROM drive 46 Chapter 5 Jumper Settings Connectors 48 5 1 Jumpers and Connectors 48 5 1 1 Setting jumpers 48 5 1 2 Jumpers and switch 49 Table 5 1 Jumpers and th...

Страница 11: ...y 72 8 1 3 Display types 72 8 2 Installation of the VGA Driver 73 8 2 1 Installation for Windows 95 98 ME 73 8 2 2 Installation for Windows NT 75 8 3 Further Information 76 Chapter 9 Audio Setup 78 9...

Страница 12: ...ull Disassembly Procedures 130 Figure C 1 Disassembly steps 1 4 131 Figure C 2 Disassembly steps 5 6 132 Figure C 3 Disassembly steps 7 11 134 Appendix D Pin Assignments 136 D 1 AT Power connector J1...

Страница 13: ...2 serial port CN11 149 Table D 19 COM1 RS 232 serial port CN11 149 D 17 COM2 CN12 149 Table D 20 COM2 CN12 149 D 18 COM3 RS 232 serial port CN13 150 Table D 21 COM3 RS 232 serial port CN13 150 D 19 CO...

Страница 14: ...PPC 123 User s Manual xiv...

Страница 15: ...CHAPTER 1 General Information This chapter gives background information on the PPC 123 panel PC Sections include Introduction How to Use This Manual Specifications Dimensions...

Страница 16: ...l applications The panel PC can be placed on a desktop to replace the traditional desktop com puter In addition its fit anywhere design makes it very flexible and able to be used in many different kin...

Страница 17: ...3 Chapter1 Figure 1 1 The panel PC in perspective...

Страница 18: ...ant information about the daily use of the panel PC including using the CD ROM drive floppy drive and enjoying the panel PC s audio capabilities Chapter 4 provides detailed step by step instructions t...

Страница 19: ...arding hardware operation For additional drivers and BIOS setup information you should read Chapters 6 through 12 Chapter 11 is for users who want information about the optional touchscreen If you wan...

Страница 20: ...5 FDD Front panel IP65 protection not for the model with SAW touchscreen Standard PC functions CPU Intel Celeron or Pentium III Tualatin or VIA C3 processor up to 1 26GHz BIOS Award 256 KB Flash BIOS...

Страница 21: ...t VIA TwisterT chip with integrated Savage4 2D 3D video accelerator Display memory Support for 8 MB to 32 MB Frame Buffer SMA Display type Simultaneously supports CRT and flat panel displays EL LCD an...

Страница 22: ...sertion and removal Touchscreen optional Type Analog Resistive Capacitive Resolution Continuous 1024 x 1024 Light Transmission 75 85 Controller RS 232 interface uses COM4 RS 232 interface uses COM4 Po...

Страница 23: ...wo PCMCIA card CardBus slots Two sockets support both a 16 bit PCMCIA card and a 32 bit CardBus simultaneously Hot insertion and removal Environment Temperature 0 45 C 32 122 F Relative humidity 10 95...

Страница 24: ...PPC 123 User s Manual 10 1 4 Dimensions Figure 1 3 Dimensions of the PPC 123 Units mm...

Страница 25: ...apter details system setup on the PPC 123 panel PC Sections include A Quick Tour of the Panel PC Preparing for First time Use Installation Procedures Running the BIOS Setup Program Installing System S...

Страница 26: ...p the panel PC take a moment to become familiar with the locations and purposes of the controls drives connectors and ports which are illustrated in the figures below When you place the panel PC uprig...

Страница 27: ...will find the PCI ISA expansion slot located on the left side This slot is cov ered by a side panel cover The sunken I O section is at the bottom of the panel PC as shown in Fig 2 3 The I O section i...

Страница 28: ...d side view of the panel PC Figure 2 3 Rear view of the panel PC slot cover USB ports Ethernet jack Serial ports jack VGA port jack Game port jack Parallel port jack Main power switch AC inlet PCI exp...

Страница 29: ...etc 2 3 Installation Procedures 2 3 1 Connecting the power cord The panel PC can only be powered by an AC electrical outlet 100 250 volts 50 60 Hz Be sure to always handle the power cords by holding...

Страница 30: ...er insulator with hood then make sure to connect the insulator with the system 1 Connect the three contact pins individually to the negative and pos itive power cables of the power adaptor as well as...

Страница 31: ...cts to the frame ground G and pin 3 should be plugged into the negative DC power input 3 Mount the front part of the male insulator onto the bottom tray 4 Use the metal plate and the two screws to sec...

Страница 32: ...PPC 123 User s Manual 18 5 Attach the upper cap to the bottom tray and secure it with the screws 6 Now that you have completed the assembly of the male insulator plug it into the female insulator...

Страница 33: ...the PS 2 mouse and keyboard to the Y shaped adapter See Fig 2 6 If you use a serial mouse and your panel PC has a touchscreen you can connect the mouse to any COM port except COM4 Figure 2 6 Connectin...

Страница 34: ...nel PC by pressing the Del key on your keyboard immediately after powering on the computer The settings you specify with the setup program are recorded in a special area of memory called CMOS RAM This...

Страница 35: ...o Chapter 12 if you wish to change the BIOS settings Power on your panel PC or reset the system by pressing the Ctrl Alt Del keys simultaneously The panel PC will automati cally load the operating sys...

Страница 36: ...floppy disk can be found in your acces sory box To set up the CD ROM function insert the floppy disk with the CD ROM drive driver into the floppy disk drive and type install after the follow ing promp...

Страница 37: ...derstand their functions These files are a very useful supplement to the information in this man ual Note The drivers and utilities used for the PPC 123 panel PCs are subject to change without notice...

Страница 38: ...PPC 123 User s Manual 24...

Страница 39: ...panel PC hardware Sections include Introduction Floppy Drive CD ROM Drive PCMCIA PS 2 Mouse and Keyboard PCI ISA Bus Expansion Parallel Port Serial COM Ports VGA Port Game Port USB Ports Audio Interfa...

Страница 40: ...and your other fingers and push it toward the drive See Fig 3 1 1 Slide the disk until it clicks into place To eject a floppy disk first make sure that the drive activity light is off and then press t...

Страница 41: ...lign the center hole of the CD ROM disc with the center circle of the CD ROM holding plate Press the transparent ring around the center hole of the CD ROM until you hear a click Push the front panel o...

Страница 42: ...memory cards must be prepared by your operating system before you can use them for data storage See your PCMCIA card manual for details To eject a PCMCIA card first ensure that the panel PC is not ac...

Страница 43: ...29 Chapter3 Figure 3 4 I O interface excluding COM ports Figure 3 5 I O interface excluding COM ports Network USB PS 2 Printer keyboard mouse Headphones CD Microphone Serial Joystick CRT monitor mouse...

Страница 44: ...S 2 mouse to the 6 pin female PS 2 port of the Y shaped adapter 5 Turn on the panel PC 3 6 PCI ISA Bus Expansion The panel PC supports PCI and ISA bus expansion cards To integrate a new PCI or ISA bus...

Страница 45: ...31 Chapter3 Figure 3 6 PCI ISA bus expansion PCI ISA expansion slot cover PCI IAS bus card Metal plate...

Страница 46: ...o configure the parallel port to respond as required by your printer and software operating environment 3 8 Serial COM ports There are four serial COM ports on the bottom of the rear cover You can eas...

Страница 47: ...ected to the system through the 15 pin external port located on the rear of the system unit 1 Be sure the panel PC is turned off 2 Connect the external joystick or game device to the system See Fig 3...

Страница 48: ...connected to the system through the external ethernet port located on the rear side of the system unit 1 Be sure the panel PC is turned off 2 Connect the external device s to the panel PC See Fig 3 4...

Страница 49: ...t your fingertip on the screen to move the cursor You will need to install the touchscreen driver before it will work The touchscreen drivers for various operating systems are stored on the CD ROM dis...

Страница 50: ...PPC 123 User s Manual 36...

Страница 51: ...herals switches and indicators Be sure to read all the safety precautions before you begin the installation proce dures Sections include Jumpers and Connectors Disassembling the Panel PC Installing th...

Страница 52: ...pen dix C 4 2 Disassembling the Panel PC The following are standard procedures for disassembling the panel PC before you upgrade your system All procedures are illustrated in Fig 4 1 1 Unscrew the sev...

Страница 53: ...39 Chapter4 Figure 4 1 Disassembling rear cover of the panel PC Plastic rear cover Side panel PCI ISA expansion PCB CPU fan...

Страница 54: ...ding case See Fig 4 2 Remove the two screws on the metal plate 3 Pull the metal plate toward the outside of the unit and remove it from the two lugs of the shielding case 4 Place the HDD on the metal...

Страница 55: ...de cover of the FDD 6 Push the FDD and slim CD ROM drive toward the outside of the panel PC as far as they will go This will expose the entire CPU assembly underneath 7 Locate the ZIF socket and open...

Страница 56: ...RCE 10 Press the lever down The plate will slide across slightly 11 Place the heat sink on top of the CPU and fasten it with the heat sink clip shown in Fig 4 3 12 Move the FDD and slim CD ROM drive b...

Страница 57: ...43 Chapter4 Figure 4 3 Installing the CPU CPU fan Heat sink clip Heat sink CPU Lever Socket 370...

Страница 58: ...h side of the DIMM outward until they are separated from the black vertical posts See Fig 4 4 3 Insert the memory module into the socket at an angle of 90 degrees 4 Push the two eject levers toward th...

Страница 59: ...de the CD ROM support bracket toward the outside of the panel PC and remove it 5 Place the FDD on the metal plate There are four small screws two on each side of the metal plate Tighten these screws 6...

Страница 60: ...PPC 123 User s Manual 46 Figure 4 5 Installing FDD and slim CD ROM drive 3 5 floppy Metal plate drive A A...

Страница 61: ...s and connecting peripherals switches and indicators Be sure to read all the safety precautions before you begin the installation proce dures Sections include Jumpers and Connectors CPU Installation C...

Страница 62: ...t them To close a jumper you connect the pins with the clip To open a jumper you remove the clip Sometimes a jumper will have three pins labeled 1 2 and 3 In this case you would connect either pins 1...

Страница 63: ...on of each of the board s connectors Table 5 1 Jumpers and their functions Label Function JP1 Internal 12 V source selection setting JP2 LAN power type selection JP3 Watchdog timer action JP4 CMOS cle...

Страница 64: ...rd disk drive connector CN18 CD ROM connector CN27 Touchscreen interface PS 2 connector FAN1 CPU fan power connector FAN2 System fan power connector SLOT1 PCI ISA bus expansion slot CN3 Flat panel dis...

Страница 65: ...informa tion The procedure for clearing CMOS is 1 Turn off system 2 Short pin 2 and pin 3 3 Return jumper to pins 1 and 2 4 Turn on the system The BIOS is now reset to its default setting Warning To a...

Страница 66: ...via JP6 The IRQ and the address ranges for COM1 2 3 and 4 are fixed How ever if you wish to disable the port or change these parameters later you can do this in the system BIOS setup The table overlea...

Страница 67: ...COM3 and COM4 are another set Their selectable function is the same as the COM1 COM2 set 5 4 2 COM1 2 3 4 pin 9 output setting JP5 Table 5 5 Serial port default settings Port Address Range Interrupt...

Страница 68: ...ed to adjust any jumper or switch to select the panel power 5 6 Watchdog Timer Configuration JP3 An onboard watchdog timer reduces the chance of disruptions which EMP electromagnetic pulse interferenc...

Страница 69: ...shown below 5 8 Internal 12 V Source Selection Setting JP1 The panel PC provides an internal 12 V source in an expansion slot available for various expansion card applications Table 5 8 Wake on LAN se...

Страница 70: ...PPC 123 User s Manual 56...

Страница 71: ...CHAPTER 6 VIA Chipset This chapter provides information on VIA chipset configuration Sections include Introduction Installation of VIA 4 in 1 driver for Windows 98 NT 2000 ME Further Information...

Страница 72: ...o supports master mode enhanced IDE controller with dual channel DMA engine includes UltraDMA 33 66 100 and interlaced dual channel commands 6 2 Driver Installation Before installing the Ethernet driv...

Страница 73: ...59 Chapter6 6 2 1 Installation for Windows 98 NT 2000 ME XP 1 a Select Start Run b Enter the driver path D PPC 123 153 VIA4in1 setup exe c Click OK 2 a Press Next to continue the installation...

Страница 74: ...PPC 123 User s Manual 60 3 a Press Yes to accept the agreement 4 Choose all then click Next...

Страница 75: ...61 Chapter6 5 Click Next 6 a Choose if you want to enable the DMA mode or ignore then press Next...

Страница 76: ...PPC 123 User s Manual 62 7 Click Next 8 Click Next...

Страница 77: ...formation For further information about the AGP VGA installation in your PPC 123 including driver updates troubleshooting guides and FAQ lists visit the following web resources VIA website www via com...

Страница 78: ...PPC 123 User s Manual 64...

Страница 79: ...s Ethernet Inter face This chapter provides information on Ethernet configuration Sections include Introduction Installation of Ethernet Driver for Windows 98 2000 ME for Windows NT for Windows XP Fur...

Страница 80: ...hich can be enabled disabled in the BIOS setup 7 2 Installation of Ethernet Driver Before installing the Ethernet driver note the procedures below You must know which operating system you are using in...

Страница 81: ...67 Chapter7 7 2 1 Installation for Windows 98 NT ME 2000 1 a Select Start Run b Enter the path D PPC 123 153 LAN c Click OK 2 a Click Next...

Страница 82: ...PPC 123 User s Manual 68 3 a Select Search for the best driver for your device Recom mended b Click Next 4 a Click Next...

Страница 83: ...69 Chapter7 5 a Click Next 6 a Click Next 7 a Type the path D PPC 123 153 LAN Win98 b Click OK...

Страница 84: ...for Windows 95 please type the path D PPC 123 153 LAN Win95 2 Installation for Windows 95osr2 please type the path D PPC 123 153 LAN Win95osr2 3 Installation for Windows ME please type the path D PPC...

Страница 85: ...CHAPTER 8 VGA Setup This chapter provides information on the VGA setup Sections include Introduction Installation of VGA Drivers for Windows 98 2000 ME for Windows NT for Windows XP Further Informatio...

Страница 86: ...g complete IBM VGA compatibility Digital monitors i e MDA CGA and EGA are NOT supported Multiple frequency multisync monitors are handled as if they were analog monitors 8 1 2 Display memory The Twist...

Страница 87: ...art that apply to the operating system that you are using within your PPC 123 8 2 1 Installation for Windows 95 98 ME 1 a Select Start Run b Enter the path D PPC 123 153 VGA Win9X_Me Notes 1 Installat...

Страница 88: ...PPC 123 User s Manual 74 2 a Click Next 3 Click Next...

Страница 89: ...ay driver diskette into the A drive then click on the OK button 7 From the list of displayed S3 devices select your S3 device 8 From Third party Drivers click on the Yes button to proceed 9 If a messa...

Страница 90: ...8 3 Further Information For further information about the AGP VGA installation in your PPC 123 including driver updates troubleshooting guides and FAQ lists visit the following web resources VIA webs...

Страница 91: ...CHAPTER 9 Audio Setup This chapter provides information on the Audio setup Sections include Introduction Installation of Audio Driver for Windows 98 2000 ME for Windows NT for Windows XP...

Страница 92: ...er is register compatible with the OPL3 and has extended capabili ties 9 2 Installation of the Audio Driver Before installing the audio driver please take note of the procedures detailed below You mus...

Страница 93: ...tart Run b Enter the path F PPC 123 153 Audio Win98_ME_2000__XP Setup exe 2 Click Finish Notes 1 Installation for Windows 95 please Type the path F PPC 123 153 Audio Win95 Setup exe 2 Installation for...

Страница 94: ...PPC 123 User s Manual 80...

Страница 95: ...CHAPTER 10 PCMCIA Sections include Introduction Installation of PCMCIA driver for Win dows 95...

Страница 96: ...il ities CD ROM included with your PPC 123 The installation procedure is shown in the next section in this chapter Other operating systems such as Windows 98 and Windows NT also sup port PCMCIA driver...

Страница 97: ...83 Chapter10 10 2 1 Installation for Windows 95 1 a In Start Run type the path D PPC 123 153 Cardbus win95osr2 Setup exe 2 a Click Next to continue the installation...

Страница 98: ...PPC 123 User s Manual 84 3 a Click Yes 4 Click Finish to reboot the system...

Страница 99: ...ns include Introduction Installation of Driver for Resistive or SAW Touchscreen for Windows 95 for Windows 98 for Windows NT for Windows 2000 for Windows ME Installation of Driver for Capacitive Touch...

Страница 100: ...t All models provide greatly enhanced visual resolution They also have new improved scratch resis tant features The touchscreen is manufactured from UL recognized components When properly installed th...

Страница 101: ...dity 90 RH at 35 C operating 90 RH at 35 C for 240 hours non condensing storage Chemical resistance The active area of the touchscreen is resistant to the following chemicals when exposed for a period...

Страница 102: ...you attempt installation 11 2 1 Installation for Windows 95 98 Me 1 a Insert the Drivers and Utilities CD b Click the Start button and then Run c Type the path D PPC 123 153 TouchScreen Elotouch Win9...

Страница 103: ...the path D PPC 123 153 TouchScreen Elot ouch WinNT SetupElo exe 2 Installation for Windows 2000 please type the path D PPC 123 153 TouchScreen Elot ouch W2K SetupElo exe 3 Installation for Windows XP...

Страница 104: ...PPC 123 User s Manual 90 3 a Select the Smart serial Controller on COM4 item b Press the OK button 4 a Click the Yes button to restart your computer...

Страница 105: ...egistry key If the ConnectMultiplePorts registry key is set to 1 USB devices may not work on the system Also the following errors can be displayed by the System event Log Service Control Management ID...

Страница 106: ...you should read the instructions in this chapter carefully before you attempt installation Important The following windows illustrations are examples only You must follow the flow chart instructions a...

Страница 107: ...1 3 1 Installation for 95 98 NT XP 1 a Select Start button and then Run b Type the path F PPC 123 153 TouchScreen Microt ouch Tware563 Setup exe c Click OK 2 a Follow the installation instructions and...

Страница 108: ...PPC 123 User s Manual 94 3 a If you accept the terms of the License Agreement click on Yes 4 a Select the Serial Default controller b Click Next...

Страница 109: ...95 Chapter11 5 a Select the Express Install item b Click Next 6 a Select the Yes item to reboot the system and finish the touchscreen driver installation...

Страница 110: ...al 96 7 a Click on Calibrate to calibrate the touchscreen b Touch the target point for a moment until the next Touch enable message appears Then touch the next target point 8 a Click on Done to save t...

Страница 111: ...CHAPTER 12 Award BIOS Setup This chapter describes how to set BIOS configu ration data...

Страница 112: ...he configuration settings to be changed This program is executed when the user changes the system configuration when the user changes the system backup battery or when the system detects a configurati...

Страница 113: ...ure 12 1 Standard CMOS features Standard CMOS Features Advanced BIOS Features Advanced Chipset Features Integrated Peripherals Power Management Setup PnP PCI Configurations Frequency Voltage Control L...

Страница 114: ...time format is based on the 24 hour military time clock For exam ple 1 p m is 13 00 00 Press the left or right arrow key to move to desired field Press the PgUp or PgDn key to increment the setting or...

Страница 115: ...tects the correct video type automatically The BIOS supports a secondary video subsystem but you do not select it in setup Halt On During the power on self test POST the computer stops if the BIOS det...

Страница 116: ...al Memory This option shows system memory capacity 3 Press ESC to return to the Main Menu when you finish setting up all items 12 3 Advanced BIOS Features Advanced BIOS Features improves your system p...

Страница 117: ...l Cache External Cache CPU L2 Cache ECC Checking Processor Number Feature Quick Power On Self Test First Boot Device Second Boot Device Third Boot Device Boot Other Device Swap Floppy Drive Boot Up Fl...

Страница 118: ...est POST A quick POST skips certain steps We recommend that you normally enable quick POST First Second Third Other Boot Device The BIOS attempts to load the operating system from the devices in the s...

Страница 119: ...the rate at which character repeats when you hold down a key of 6 8 10 12 15 20 24 or 30 characters per second Typematic Delay Msec Choices 250 500 750 1000 This option sets the time interval for dis...

Страница 120: ...eys DRAM Timing by SPD D RA M Timing b y S P D D isabled Item He lp D RA M C lock S D RA M C ycle Leng th B ank Interleave Memory Hole P 2C C 2P C oncurre nc y S ystem B IOS C acheable V ideo RA M C a...

Страница 121: ...e below 16 MB The choices 15M 16M Disabled P2C C2P Concurrency This item allows you to enable disable the PCI to CPU CPU to PCI con currency The choices Enabled Disabled System BIOS Cacheable selectin...

Страница 122: ...Even when so equipped if you add a higher performance controller you will need to disable this feature The choices Enabled Disabled USB Keyboard Support Enable function when the USB keyboard is being...

Страница 123: ...hoice Enabled Disabled default AGP Master 1 WS Write Leave this field at default The choice Enabled Disabled default AGP Master 1 WS Read Leave this field at default The choice Enabled Disabled defaul...

Страница 124: ...ary Slave PIO Secondary Master PIO Secondary Slave PIO Primary Master UDMA Primary Slave UDMA Secondary Master UDMA Secondary Slave UDMA Init Display First IDE HDD Block Mode Onboard FDD Controller On...

Страница 125: ...DD Block Mode Block mode is also called block transfer multiple commands or multiple sector read write If your IDE hard drive supports block mode most new drives do select Enabled for automatic detect...

Страница 126: ...IRQ5 3BC IRQ7 Disabled Onboard Paralle Mode Select an operating mode for the onboard parallel printer port Select Normal Compatible or SPP unless you are certain your hardware and software both suppor...

Страница 127: ...s operating system supports the Advanced Configuration and Power Interface ACPI specification Cur rently Windows NT 5 0 supports ACPI Power Management When this opinion is chosen the following item a...

Страница 128: ...n enabled this feature allows the VGA adapter to operate in a power saving mode Video Off Method This determines the manner in which the monitor is blanked Max Saving Maximum power savings Only Availa...

Страница 129: ...ary INTR When set to on any event occurring at will awaken a system which has been powered down On default The system can not enter the power saving mode when I O ports or IRQ is activated Off The sys...

Страница 130: ...d options by using PgUp PgDn keys IRQ 3 COM2 Enabled Item Help IRQ 4 COM1 IRQ 5 LPT2 IRQ 6 Floppy Disk IRQ 7 LPT1 IRQ 8 RTC Alarm IRQ 9 IRQ2 Redir IRQ 10 Reserved IRQ 11 Reserved IRQ 12 PS 2 Mouse IRQ...

Страница 131: ...ure all the boot and Plug and Play compatible devices If you select Auto all the interrupt request IRQ and DMA assignment fields disappear as the BIOS auto matically assigns them IRQ Resources Press E...

Страница 132: ...controller select Disabled to free the IRQ resource 3 Press ESC to return to the Main Menu when you finish setting up all items 12 8 PC Health Status This section helps you to get more information abo...

Страница 133: ...g PgUp PgDn keys Auto Detect DIMM PCI CLK To reduce the occurrence of electromagnetic interference EMI the BIOS detects the presence or absence of components in DIMM and PCI slots and turns off system...

Страница 134: ...t display the entered characters 3 After you enter the password the following message appears prompting you to confirm the password Confirm Password 4 Enter the same password exactly the same as you h...

Страница 135: ...Y Y is for Yes and N is for No Press Enter key to save the configuration changes 12 13 Exit Without Saving Exit Without Saving option allows you to exit the Setup Utility without saving the modificat...

Страница 136: ...PPC 123 User s Manual 122...

Страница 137: ...Appendix A LCD Specifications and Selection Settings...

Страница 138: ...ess Simultaneous mode Yes LCD MTBF 50 000 hours Backlight MTBF 25 000 hours The VR control knob is located in the I O section on the rear side of the panel PC Note The color LCD display installed in t...

Страница 139: ...mer The PPC 123 is equipped with a watch dog timer that resets the CPU or gener ates an interrupt if processing comes to a standstill for any reason This feature ensures system reliability in industri...

Страница 140: ...data is a time interval value The value range is from 01 hex to 3E hex and the related time interval is from 1 sec to 62 sec Data Time Interval 01 1 sec 02 2 sec 03 3 sec 04 4 sec 3E 62 sec After dat...

Страница 141: ...tart and restart the watchdog 30 GOSUB 1000 REM Your application task 1 40 OUT H443 data REM Reset the timer 50 GOSUB 2000 REM Your application task 2 60 OUT H443 data REM Reset the timer 70 X INP H44...

Страница 142: ...PPC 123 User s Manual 128...

Страница 143: ...Appendix C Full Disassembly Procedures...

Страница 144: ...sembly proce dures for the CPU HDD CD ROM drive FDD and SRAM all of which can be found in Chapter 4 1 Unscrew the seven screws on the rear cover and remove it The PCI ISA expansion slot cover can be d...

Страница 145: ...131 AppendixC Figure C 1 Disassembly steps 1 4 Step 1 Step 2 Step 4 Step 3...

Страница 146: ...er lies below the I O bracket You can now remove both the bracket and the cover from the I O ports 6 Detach the flat cables of the LCD inverter touchscreen and LCD from the motherboard You can remove...

Страница 147: ...by unscrewing the four screws at the bottom The LCD inverter can also be detached by unscrewing the three screws at the bottom 9 Detach the cables of the LCD touchscreen LCD inverter and speakerfrom...

Страница 148: ...PPC 123 User s Manual 134 Figure C 3 Disassembly steps 7 11 Step 7 Step 8 Step 9 Step 10 Step 11 Power supply Backplane plate LCD Touchscreen Front panel...

Страница 149: ...ont Panel Control Connector J8 Reserved IR Connector J9 Reserved Flat Panel Display Connector CN2 Flat Panel Display Connector CN3 Floppy Drive Connector CN10 EIDE Hard Disk Drive Connector CN16 CD RO...

Страница 150: ...or J1 D 2 TV Output Connector J11 Reserved Table D 1 Table D 1 AT power connector J1 Pin Signal 1 PS_NO 2 5 VSB 3 12 V 4 12 V 5 GND 6 GND 7 GND 8 GND 9 5 V 10 5 V 11 5 V 12 5 V Table D 2 Table D 2 TV...

Страница 151: ...d Table D 3 Inverter power connector J4 Pin Signal 1 12 V 2 GND 3 ENABKL 4 Brightness Adj 5 5 V Table D 4 Internal speaker connector J6 Pin Signal 1 Speaker out_R 2 Speaker out_R 3 Speaker out_L 4 Spe...

Страница 152: ...t panel display connector CN2 Pin Signal Pin Signal 1 VDDSAFE5 2 VDDSAFE5 3 GND 4 GND 5 VDDSAFE3 6 VDDSAFE3 7 Vcon 8 GND 9 P0 10 P1 11 P2 12 P3 13 P4 14 P5 15 P6 16 P7 17 P8 18 P9 19 P10 20 P11 21 P12...

Страница 153: ...in Signal Pin Signal 1 VDDSAFE5 2 VDDSAFE5 3 GND 4 GND 5 VDDSAFE3 6 VDDSAFE3 7 Vcon 8 GND 9 P24 10 P25 11 P26 12 P27 13 P28 14 P29 15 P30 16 P31 17 P32 18 P33 19 P34 20 P35 21 NC 22 NC 23 NC 24 NC 25...

Страница 154: ...CN10 Pin Signal Pin Signal 1 5 V 14 STEP 2 INDEX 15 GND 3 5 V 16 WRITE DATA 4 DRIVE SELECT 17 GND 5 5 V 18 WRITE ENABLE 6 DISK CHANGE 19 GND 7 NC 20 TRACK 0 8 NC 21 GND 9 NC 22 WRITE PRO TECT 10 MOTOR...

Страница 155: ...DATA 5 8 DATA 10 9 DATA 4 10 DATA 11 11 DATA 3 12 DATA 12 13 DATA 2 14 DATA 13 15 DATA 1 16 DATA 14 17 DATA 0 18 DATA 15 19 GND 20 NC 21 HDD DREQ 22 GND 23 IO WRITE 24 GND 25 IO READ 26 GND 27 HDD RE...

Страница 156: ...GND 5 IDE RESET 6 DATA8 7 DATA7 8 DATA9 9 DATA6 10 DATA10 11 DATA5 12 DATA11 13 DATA4 14 DATA12 15 DATA3 16 DATA13 17 DATA2 18 DATA14 19 DATA1 20 DATA15 21 DATA0 22 HDD DREQ 23 GND 24 IO READ 25 IO WR...

Страница 157: ...1 D 14 System Fan Power Connector FAN2 D 13 Fan power connector FAN2 Table D 12 CPU fan power connector FAN1 Pin Signal 1 GND 2 12 V 3 FAN_DET Table D 13 Fan power connector FAN2 Pin Signal 1 GND 2 12...

Страница 158: ...17 E17 A17 F17 B18 E18 A18 F18 B19 E19 A19 F19 B20 E20 A20 F20 B21 E21 A21 F21 B22 E22 A22 F22 B23 E23 A23 F23 B24 E24 A24 F24 B25 A25 B26 E26 A26 F26 B27 E27 A27 F27 B28 E28 A28 F28 B29 E29 A29 F29 B...

Страница 159: ...D0 B9 12 V A10 IORDY B10 GND A11 AEN B11 SMW A12 SA19 B12 SMR A13 SA18 B13 IOW A14 SA17 B14 IOR A15 SA16 B15 DACK3 A16 SA15 B16 DRQ3 A17 SA14 B17 DACk1 A18 SA13 B18 DRQ1 A19 SA12 B19 RFSH A20 SA11 B20...

Страница 160: ...MEM16 C2 LA23 D2 IO16 C3 LA22 D3 IRQ10 C4 LA21 D4 IRQ11 C5 LA20 D5 IRQ12 C6 LA19 D6 IRQ15 C7 LA18 D7 IRQ14 C8 LA17 D8 DACKO C9 MEMR D9 DRQ0 C10 MEMW D10 DACK5 C11 SD8 D11 DRQ5 C12 SD9 D12 DACK6 C13 S...

Страница 161: ...2 E9 GNT1 F9 GND E10 REQ1 F10 GNTX E11 GND F11 GND E12 PCICLK1 F12 REQX E13 GND F13 AD31 E14 AD30 F14 AD29 E15 REQ3 F15 NC E16 F16 E17 GNT3 F17 NC E18 AD28 F18 AD27 E19 AD26 F19 AD25 E20 AD24 F20 C BE...

Страница 162: ...G6 H6 G7 GND H7 GND G8 AD13 H8 AD10 G9 AD11 H9 AD8 G10 AD9 H10 AD7 G11 CBEO H11 AD5 G12 AD6 H12 AD3 G13 AD4 H13 AD1 G14 AD2 H14 AD0 G15 H15 G16 VCC H16 5V G17 VCC H17 5V G18 GND H18 GND G19 GND H19 GN...

Страница 163: ...2 Table D 19 COM1 RS 232 serial port CN11 Pin Signal Pin Signal 1 DCD 2 RXD 3 TxD 4 DTR 5 GND 6 DSR 7 RTS 8 CTS 9 RI RI 5V 12V Table D 20 COM2 CN12 Pin Signal RS 422 RS 485l 1 DCD TX DATA 2 RX TX DATA...

Страница 164: ...l port CN14 Table D 21 COM3 RS 232 serial port CN13 Pin Signal Pin Signal 1 DCD 2 RXD 3 TxD 4 DTR 5 GND 6 DSR 7 RTS 8 CTS 9 RI RI 5V 12V Table D 22 COM1 RS 232 serial port CN14 Pin Signal Pin Signal 1...

Страница 165: ...T 3 GND 4 5 V 5 KB CLK 6 MS CLK Table D 24 Parallel port CN9 Pin Signal Pin Signal 1 Strobe 2 D0 3 D1 4 D2 5 D3 6 D4 7 D5 8 D6 9 D7 10 ACK 11 BUSY 12 PE 13 SLCT 14 AUTOFD 15 ERR 16 INIT 17 SLTCTINI 18...

Страница 166: ...PPC 123 User s Manual 152 D 22 Keyboard PS 2 Mouse connector CN22 Table D 25 USB1 USB2 CN19 CN20 USB1 CN19 USB2 CN20 Pin Signal Pin Signal 1 5 V 1 5 V 2 DATA 2 DATA 3 DATA 3 DATA 4 GND 4 GND...

Страница 167: ...Appendix E Mounting Instructions Introduction Panel Mounting Desktop Stand Mounting Swingarm Stand Mounting...

Страница 168: ...ed on a customized swingarm or desktop stand E 2 Panel Mounting E 2 1 Introduction Panel mounting can help system integrators conveniently integrate the panel PC into their system To construct a suita...

Страница 169: ...l There are ten holes located along the four sides of the panel PC 2 Insert the screws from the front side into the holes and tighten them with the nuts provided See Fig E 2 3 Put the front panel back...

Страница 170: ...PPC 123 User s Manual 156 E 2 3 Cut out area Refer to Figure E 3 below for the locations and dimensions of the cut out area and mounting holes Figure E 3 Dimensions of panel mounting holes...

Страница 171: ...the main body of the stand to the rear cover of the panel PC using the four screws provided 5 Slide the main body of the stand into the stand base Tighten it with the two screws provided 6 Attach the...

Страница 172: ...PPC 123 User s Manual 158 Figure E 4 Desktop stand mounting Rear cover of panel PC Holding plate Top cover Main body Rear cover Cap Base...

Страница 173: ...unted on a unique swingarm This versatile accessory is easy to install and operate and can be rotated through a wide range of angles Its dimensions are shown in Figure E 5 below and it is available fr...

Страница 174: ...PPC 123 User s Manual 160...

Отзывы: