background image

PCI Communication

 User Manual

32

4.4.2

Configuring a Port

You can choose to configure a specific port before running your test. Simply click the
corresponding port tab (

COM1

COM2

, etc.) and then press the 

Port Setup

 button

 on the toolbar or click 

Setup 

on the 

Port

 menu. To configure all ports, press the

All Ports Setup

 button 

 on the toolbar or click 

Setup

 on the 

All Ports

 menu. This

will open the 

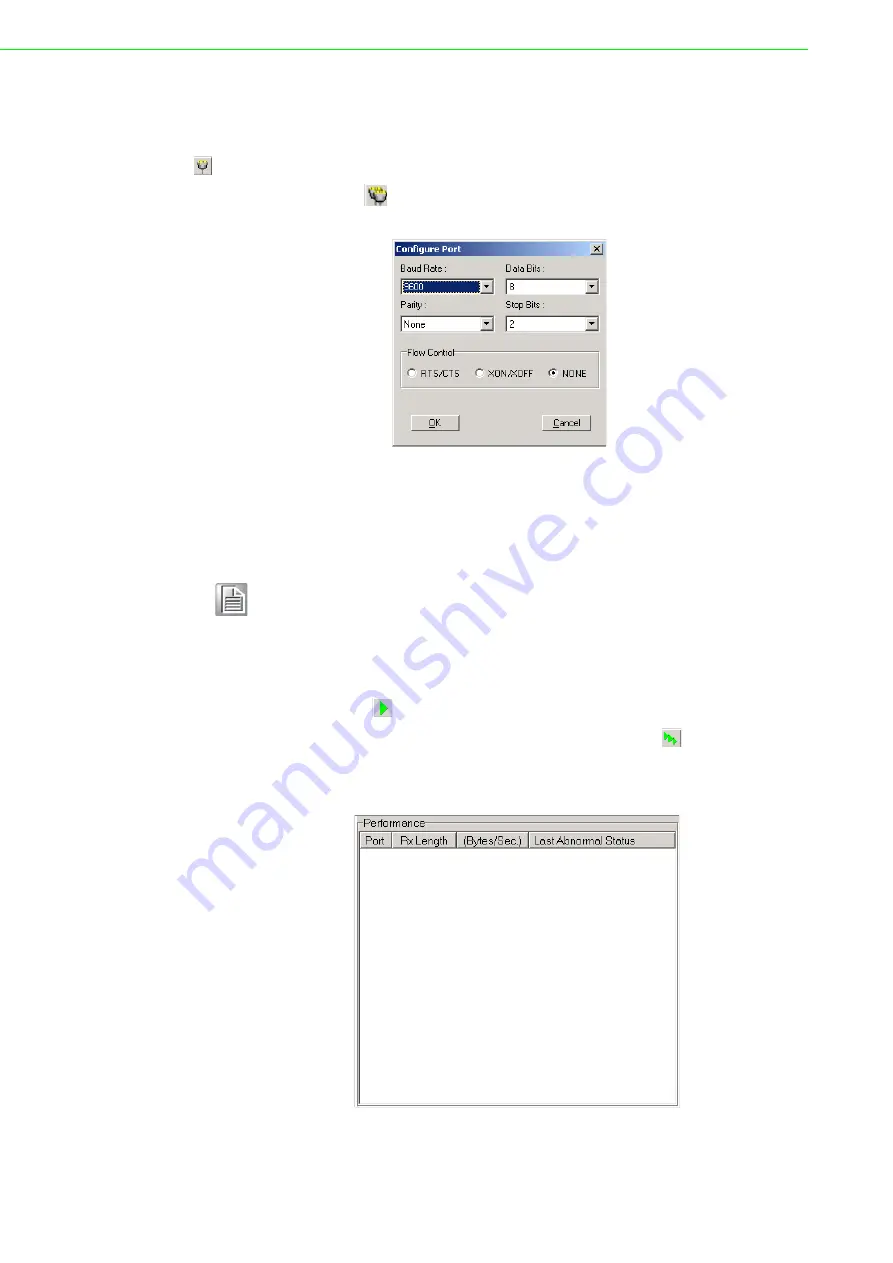
Configure Port

 dialog box (Figure 4.5).

Figure 4.5 Test Information on the Performance Listing Area

In the 

Configure Port 

dialog box, you can configure the baud rate, data bits, parity,

stop bits, and flow control mode for the specified port (or for all ports). Once you have
configured the ports, click

 OK

 to apply the configuration.

Run the Test

After the ports have been configured, you can start the test on the selected port by

pressing the 

Run

 button 

 on the toolbar or by clicking 

Run

 on the 

Port

 menu. Sim-

ilarly, to run the test on all ports, press the 

All Ports Run

 button 

 on the toolbar or

click 

Run

 on the 

All Ports

 menu. Once the test has started, information on port per-

formance will be shown in the 

Performance 

panel.

Figure 4.6 “Performance” Panel

Note!

When setting up all ports, you must stop any ports that are running the 
test or they will not be configured. In other words, you can configure only 
those ports that have been stopped.

Содержание PCI Series

Страница 1: ...User Manual PCI COMM Series User Manual Industrial Serial Communication Cards ...

Страница 2: ...allation Under the terms of this warranty Advantech assumes no liability for consequences arising from such events Because of Advantech s high quality control standards and rigorous testing most of our customers never need to use our repair service If an Advantech product is defec tive it will be repaired or replaced at no charge during the warranty period For out of warranty repairs you will be b...

Страница 3: ...n radiate radio frequency energy and if not installed and used in accordance with the instruc tion manual may cause harmful interference to radio communications Operation of this equipment in a residential area is likely to cause harmful interference in which case the user will be required to correct the interference at his or her own expense Technical Support and Assistance 1 Visit the Advantech ...

Страница 4: ...at the items listed below are included and in good condition Please contact your dealer immediately if there is some discrepancy PCI communication interface board Industrial communication driver utility and user manual CD ROM Warning Warnings indicate conditions which if not observed can cause personal injury Caution Cautions are included to help you avoid damaging hardware or losing data Note Not...

Страница 5: ...quid into the openings This may cause fire or electrical shock 13 Never open the equipment For safety reasons the equipment should be opened only by qualified service personnel 14 If one of the following situations arises get the equipment checked by service personnel The power cord or plug is damaged Liquid has penetrated the equipment The equipment has been exposed to moisture The equipment does...

Страница 6: ...uipment from damage To avoid electrical shock always disconnect the power from your PC chassis before you work on it Do not touch any components on the CPU card or other cards while the PC is on Disconnect the power before making any configuration changes A power spike as you connect a jumper or install a card may damage sensitive electronic com ponents ...

Страница 7: ... Screen 10 2 2 5 PCI 1612C PCI 1610C 11 Figure 2 5 PCI 1612C 1610C Silk Screen 11 2 2 6 PCI 1622B PCI 1620A PCI 1620B 11 Figure 2 6 PCI 1622B PCI 1620A PCI 1620B Silk Screen 11 2 2 7 PCI 1622C 12 Figure 2 7 PCI 1622C Silk Screen 12 2 3 Jumper Settings 13 2 3 1 How to Set Jumpers 13 Figure 2 8 How to Set Jumpers 13 2 3 2 Default Settings 13 2 3 3 Mode Selection by Jumper DIP Settings 14 Figure 2 9 ...

Страница 8: ...n Assignments and Wiring 35 5 1 Pin Assignments 36 5 1 1 PCI 1602B C UP 36 Table 5 1 PCI 1602B C Male DB9 on Bracket 36 5 1 2 PCI 1604B C 36 Table 5 2 PCI 1604C Male DB9 on Bracket 36 5 1 3 PCI 1610B C 37 Table 5 3 PCI 1610B C Male DB9 on Cable 37 Table 5 4 PCI 1610B C Male DB25 on Cable 37 Table 5 5 PCI 1610B C Female DB37 on Bracket 38 5 1 4 PCI 1612B C 39 Table 5 6 PCI 1612B C Male DB9 on Cable...

Страница 9: ... Signal Wiring 47 Figure 5 1 RS 485 Wiring Topology 47 Appendix A Scale of Connectors 49 A 1 Connector Size Comparison 50 Figure A 1 DB9 Male 50 Figure A 2 DB25 Male 50 Figure A 3 DB37 Female 50 Figure A 4 DB62 Female 51 Figure A 5 DB78 Female 51 ...

Страница 10: ...PCI Communication User Manual x ...

Страница 11: ...Chapter 1 1 Introduction ...

Страница 12: ...e all channels may share one PCI interrupt An interrupt status register is available for determining the interrupt source The Advantech PCI communication card applies the RE 232 422 485 standard which provides deeper FIFOs compared to serial ports These upgraded FIFOs greatly reduce the CPU overhead and are ideal for heavy multitasking environments 1 2 Features PCI Card Features PCI Specification ...

Страница 13: ...peed bps PCI Series A level 50 921 6 kbps B level 50 921 6 kbps Table 1 1 Transmission Modes BUS Interface Model Name Ports Communication Interface RS 232 RS 422 RS 485 PCI PCI 1602B 2 V V V PCI 1602C 2 V V V PCI 1602UP 2 V V V PCI 1604B 2 V PCI 1604C 2 V PCI 1610B 4 V PCI 1612B 4 V V V PCI 1612C 4 V V V PCI 1610C 4 V PCI 1620A 8 V PCI 1620B 8 V PCI 1622B 8 V V V PCI 1622C 8 V V V 1 RS 232 TxD RxD...

Страница 14: ...000 m Table 1 2 Power Consumption Model Name Typical Maximum PCI 1602B 260 mA 3 3 V 330 mA 3 3 V PCI 1602C 260 mA 3 3 V 450 mA 3 3 V PCI 1602UP 260 mA 3 3 V 420 mA 3 3 V PCI 1604C 260 mA 3 3 V 450 mA 3 3 V PCI 1610B 260 mA 3 3 V 530 mA 3 3 V PCI 1610C 260 mA 3 3 V 680 mA 3 3 V PCI 1612B 260 mA 3 3 V 530 mA 3 3 V PCI 1612C 260 mA 3 3 V 680 mA 3 3 V PCI 1620A 260 mA 3 3 V 880 mA 3 3 V PCI 1620B 260 ...

Страница 15: ... 4 port RS 232 PCI comm card w surge protection PCI 1610C 4 port RS 232 PCI comm card w surge and isolation protection PCI 1612B 4 port RS 232 422 485 PCI comm card w surge protection PCI 1612C 4 port RS 232 422 485 PCI comm card w surge and isolation protection PCI 1620A 8 port RS 232 PCI comm card PCI 1620B 8 port RS 232 PCI comm Card w surge protection PCI 1622B 8 port RS 232 422 485 PCI comm c...

Страница 16: ...PCI Communication User Manual 6 ...

Страница 17: ...Chapter 2 2 Hardware Configuration ...

Страница 18: ...hipping carton and packing material for further inspections by the carrier After inspection we will arrange either repair or a replacement When you handle the card hold the rear metal panel when removing it from its pro tective packaging Keep the anti vibration packaging for later storage should you need to remove the card from the PC Warning Discharge your body s static electric charge by touchin...

Страница 19: ...I Communication User Manual Chapter 2 Hardware Configuration 2 2 Jumper and Switch Locations 2 2 1 PCI 1602B Figure 2 1 PCI 1602B Silk Screen 2 2 2 PCI 1602C PCI 1604C Figure 2 2 PCI 1602C 1604C Silk Screen ...

Страница 20: ...PCI Communication User Manual 10 2 2 3 PCI 1602UP Figure 2 3 PCI 1602UP Silk Screen 2 2 4 PCI 1612B PCI 1610B Figure 2 4 PCI 1612B 1610B Silk Screen ...

Страница 21: ...mmunication User Manual Chapter 2 Hardware Configuration 2 2 5 PCI 1612C PCI 1610C Figure 2 5 PCI 1612C 1610C Silk Screen 2 2 6 PCI 1622B PCI 1620A PCI 1620B Figure 2 6 PCI 1622B PCI 1620A PCI 1620B Silk Screen ...

Страница 22: ...PCI Communication User Manual 12 2 2 7 PCI 1622C Figure 2 7 PCI 1622C Silk Screen ...

Страница 23: ...ers If you have any doubts about the best hardware configuration for your application contact your local distributor or sales representative before making any changes Figure 2 8 How to Set the Jumpers 2 3 2 Default Settings The card is shipped with default settings If you need to change these settings please refer to the following sections PCI 1600 Series Communication Card Settings Model Specific...

Страница 24: ...oard ID value is 0 disabled To adjust the board ID value configure SW1 according to Table 2 2 After COM ports have been created the COM port number will be linked to the board ID even if the card is moved to a different PCI PCIE slot This is a useful function for maintenance and mass production applications PCI 1620A PCI 1620B PCI 1622B are SW2 Table 2 1 PCI 1600 Series Operating Mode Jumper Posit...

Страница 25: ...eans that the Tx out put is always enabled If a switch is set to OFF the driver will be in Auto Direction Control Mode You must select a mode before beginning any RS 422 applications PCI 1620A PCI 1620B PCI 1622B are SW1 11 OFF ON OFF OFF 12 OFF OFF ON ON 13 OFF OFF ON OFF 14 OFF OFF OFF ON 15 OFF OFF OFF OFF Table 2 2 Board ID Setting Table 2 3 Tx Enable Mode Selection Mode Switch Position Descri...

Страница 26: ...h Figure 2 10 Impedance Selection PCI 1600 Series Note Especially in fields with serious electric noise setting termination resis tors is helpful to stabilize communications Ensure that both sides of the RS 485 bus have termination resistors See Sections 5 2 2 and 5 2 3 for further details Table 2 4 PCI 1600 Series Impedance Selection Jumper Position Model CH1 CH2 CH3 CH4 CH5 CH6 CH7 CH8 PCI 1602B...

Страница 27: ... computer on 8 The the PCI comm card driver will install automatically see Sections 3 3 3 5 9 Test the COM port and verify normal operation see Chapter 4 10 Refer to the pin assignment chart and cabling information see Chapter 5 Note We strongly recommend that you install the software driver before installing the hardware This will guarantee a smooth and trouble free installation process Turn off ...

Страница 28: ...PCI Communication User Manual 18 ...

Страница 29: ...Chapter 3 3 Driver Setup and Installation ...

Страница 30: ...ed features of Windows e g multiprocessing and multithreading Windows 7 8 10 and other versions device drivers that are provided with the PCI comm card all conform to the COMM API standard 3 2 1 Operating System Driver Setup Follow these steps to install your PCI comm card driver on Windows 1 Insert the DVD into your drive 2 The driver setup program will launch automatically If the AutoPlay functi...

Страница 31: ...al Chapter 3 Driver Setup and Installation 4 Click Continue and the catalogue select page will appear Click Installation to view the installation options 5 Choose the driver you want to install then click the corresponding hyperlink ...

Страница 32: ...PCI Communication User Manual 22 ...

Страница 33: ...23 PCI Communication User Manual Chapter 3 Driver Setup and Installation 3 3 Driver Uninstall 1 To remove the ICOM driver click Uninstall inside the Start Menu folder and fol low the prompts ...

Страница 34: ...PCI Communication User Manual 24 ...

Страница 35: ...Chapter 4 4 ICOM Tools ...

Страница 36: ...ion window to launch the ICOM Tools setup program The setup program will copy the program files to a spec ified destination folder or the default installation path i e C Program Files Advan tech ICOM Tools A program folder will be created in your Start Programs menu you can access the program through Start Program Advantech PCI Comm Tools COM Examine Tool 4 3 ICOM Tools User Interface 4 3 1 Menu B...

Страница 37: ...Port Close Closes the port you have selected Port Run Runs the port test on the port you have selected Port Stop Stops the port test on the port you have selected All Ports Setup Sets up the configuration of all ports not running tests All Ports Run Runs the test on all ports All Ports Stop Stops the test on all ports Clear Message Clears messages in the Message Logo panel and the Rx length inform...

Страница 38: ...an check the integrity of the received data and determine whether a transmission error has occurred Active and passive loopback work in tan dem under active loopback mode a port will send data first and then receive data later whereas under passive mode a port will take data received on the Rx line and retransmit it via the Tx line These two modes form a logical loop 4 3 4 Port Status The port sta...

Страница 39: ...ation on the messages that are shown in this panel 4 3 6 Tx Slide Bar The Tx slide bar gives you control of the overall system loading With this the trans mission rate of your port s can be set from 0 to 100 4 3 7 Performance The Performance panel displays information on the Rx length received packet byte length transmission rate B s and last abnormal status of each port being tested ...

Страница 40: ... Programs Advantech PCI Comm Tools COM Examine Tools 4 4 1 Port Selection Follow these steps for port selection 1 Launch ICOM Tools The program window is shown in Figure 4 1 The window will be blank if you have not yet selected a port Figure 4 1 ICOM Tools Program Window 2 There are two ways to select ports 1 on the Port menu click Select or 2 press the Port Select button on the toolbar This will ...

Страница 41: ...31 PCI Communication User Manual Chapter 4 ICOM Tools Figure 4 3 Selected Port Panel Click OK to view the ICOM Tools user interface Figure 4 4 Figure 4 4 ICOM Tools User Interface ...

Страница 42: ... bits parity stop bits and flow control mode for the specified port or for all ports Once you have configured the ports click OK to apply the configuration Run the Test After the ports have been configured you can start the test on the selected port by pressing the Run button on the toolbar or by clicking Run on the Port menu Sim ilarly to run the test on all ports press the All Ports Run button o...

Страница 43: ...orts at once press the All Ports Run button on the toolbar or click Run on the All Ports menu 4 4 3 Close Port If you want to close a port go to the tab for the com port you wish to close and press the Port Close button or click Close on the Port menu 4 4 4 Exit the ICOM Tools Utility To exit the ICOM Tools utility click Exit on the Port menu or press the Close button 4 5 Status Bar and Message Lo...

Страница 44: ... on the port Tx Starting Tx Stopped Transmission has started stopped Rx Starting Rx Stopped Reception has started stopped Break Error A break event has been detected on the port Framing Error A timing error i e from the start bit to the stop bit has been detected on the port Port I O Error An incorrect I O event has been detected on the port Rx Overrun Received data have been overwritten before be...

Страница 45: ...Chapter 5 5 Pin Assignments and Wiring ...

Страница 46: ...des 5 1 2 PCI 1604C The following table shows the pin assignments of two male DB9 connectors on the bracket for the PCI 1604C Table 5 1 PCI 1602B C UP Male DB9 Bracket Pin RS 232 RS 422 RS 485 1 DCD Tx Data 2 RxD Tx Data 3 TxD Rx N A 4 DTR Rx N A 5 GND GND GND 6 DSR RTS N A 7 RTS RTS N A 8 CTS CTS N A 9 RI CTS N A Table 5 2 PCI 1604C Male DB9 Bracket Pin RS 232 1 DCD 2 RxD 3 TxD 4 DTR 5 GND 6 DSR ...

Страница 47: ...able pin assignments for connecting a female DB37 connector bracket to a male DB9 DB25 connector for PCI 1610B cards Table 5 3 PCI 1610B C Male DB9 Cable Pin RS 232 1 DCD 2 RxD 3 TxD 4 DTR 5 GND 6 DSR 7 RTS 8 CTS 9 RI Table 5 4 PCI 1610B C Male DB25 Cable Pin RS 232 2 TxD 3 RxD 4 RTS 5 CTS 6 DSR 7 GND 8 DCD 20 DTR 22 RI ...

Страница 48: ...RI 2 3_DCD 21 3_DTR 3 3_GND 22 3_DSR 4 3_CTS 23 3_RTS 5 3_RxD 24 3_TxD 6 4_RI 25 4_DCD 7 4_DTR 26 4_GND 8 4_DSR 27 4_CTS 9 4_RTS 28 4_RxD 10 4_TxD 29 2_RI 11 2_DCD 30 2_DTR 12 2_GND 31 2_DSR 13 2_CTS 32 2_RTS 14 2_RxD 33 2_TxD 15 1_RI 34 1_DCD 16 1_DTR 35 1_GND 17 1_DSR 36 1_CTS 18 1_RTS 37 1_RxD 19 1_TxD ...

Страница 49: ...e PCI 1612B C cards in RS 232 RS 422 and RS 485 modes Table 5 6 PCI 1612B C Male DB9 Cable Pin RS 232 RS 422 RS 485 1 DCD Tx Data 2 RxD Tx Data 3 TxD Rx 4 DTR Rx 5 GND GND GND 6 DSR RTS 7 RTS RTS 8 CTS CTS 9 RI CTS Table 5 7 PCI 1612B C Male DB25 Cable Pin RS 232 RS 422 RS 485 2 1_TxD 1_RxD 3 1_RxD 1_TxD 1_Data 4 1_RTS 1_RTS 5 1_CTS 1_CTS 6 1_DSR 1_RTS 7 1_GND 1_GND 1_GND 8 1_DCD 1_TxD 1_DATA 20 1...

Страница 50: ..._TxD 3_RxD 6 4_RI 4_CTS 25 4_DCD 4_TxD 4_Data 7 4_DTR 4_RxD 26 4_GND 4_GND 4_GND 8 4_DSR 4_RTS 27 4_CTS 4_CTS 9 4_RTS 4_RTS 28 4_RxD 4_TxD 4_Data 10 4_TxD 4_RxD 29 2_RI 2_CTS 11 2_DCD 2_TxD 2_Data 30 2_DTR 2_RxD 12 2_GND 2_GND 2_GND 31 2_DSR 2_RTS 13 2_CTS 2_CTS 32 2_RTS 2_RTS 14 2_RxD 2_TxD 2_Data 33 2_TxD 2_RxD 15 1_RI 1_CTS 34 1_DCD 1_TxD 1_Data 16 1_DTR 1_RxD 35 1_GND 1_GND 1_GND 17 1_DSR 1_RT...

Страница 51: ..._Data 36 6_DSR 6 3_TX 3_RX 37 6_DCD 6_TX 6_Data 7 3_DTR 3_RX 38 7_TX 7_RX 8 4_RX 4_TX 4_Data 39 7_DTR 7 RX _ 9 4_DSR 40 GND GND GND 10 4_DCD 4_TX 4_Data 41 8_TX 8_RX 11 5_RX 5_TX 5_Data 42 8_DTR 8_RX 12 5_DSR 43 1_CTS 13 5_DCD 5_TX 5_Data 44 1_RTS 14 6_TX 6_RX 45 GND GND GND 15 6_DTR 6_RX 46 2_CTS 16 7_RX 7_TX 7_Data 47 2_RTS 17 7_DSR 48 3_CTS 18 7_DCD 7_TX 7_Data 49 3_RTS 19 8_RX 8_TX 8_Data 50 G...

Страница 52: ... TX Data 3 TxD RX 4 DTR RX 5 GND GND GND 6 DSR 7 RTS 8 CTS Table 5 11 PCI 1620A and PCI 1620B Male DB9 Cable Pin RS 232 1 DCD 2 RxD 3 TxD 4 DTR 5 GND 6 DSR 7 RTS 8 CTS 9 RI Table 5 12 PCI 1622B Male DB25 Cable Pin RS 232 RS 422 RS 485 1 2 TxD RX 3 RxD TX Data 4 RTS 5 CTS 6 DSR 7 GND GND GND 8 DCD TX Data 20 DTR RX ...

Страница 53: ...le pin assignments for connecting a female DB78 connector bracket to a DB9 connector for the PCI 1622C in RS 232 RS 422 and RS 485 modes Table 5 13 PCI 1622C Male DB9 Cable Pin RS 232 RS 422 RS 485 1 DCD Tx Data 2 RxD Tx Data 3 TxD Rx N A 4 DTR Rx N A 5 GND GND GND 6 DSR RTS N A 7 RTS RTS N A 8 CTS CTS N A 9 RI CTS N A ...

Страница 54: ...SR 3_RTS 53 3_DCD 3_TxD 3_Data 15 3_RTS 3_RTS 54 3_RxD 3_TxD 3_Data 16 2_DSR 2_RTS 55 2_DCD 2_TxD 2_Data 17 2_RTS 2_RTS 56 2_RxD 2_TxD 2_Data 18 57 1_GND 1_GND 1_GND 19 1_DSR 1_RTS 58 1_DCD 1_TxD 1_Data 20 1_RTS 1_RTS 59 1_RxD 1_TxD 1_Data 21 8_CTS 8_CTS 60 8_TxD 8_RxD 22 8_RI 8_CTS 61 8_DTR 8_RxD 23 7_CTS 7_CTS 62 7_TxD 7_RxD 24 7_RI 7_CTS 63 7_DTR 7_RxD 25 64 6_GND 6_GND 6_GND 26 6_CTS 6_CTS 65 ...

Страница 55: ...nals and some printers whereas DCE examples include modems digital service units DSUs printers and lab factory equipment In some situations you may be able to get by with just three lines data on TxD a sig nal ground and a handshaking line Examples where this would work are printer or plotter connections troubleshooting and situations where you require only one wire communication Table 5 15 Termin...

Страница 56: ... connect to the receive lines on the other side and vice versa With RS 422 you can transmit and receive data simultaneously full duplex The connections are as follows Termination Resistors Setup Termination resistors are onboard and can be selected by using a jumper for 120 or 300 Ω Each pair of signal lines has a separate resistor RxD TxD Table 5 17 Terminal Without Handshake DB 25 Male Terminal ...

Страница 57: ...itch the transmission accordingly In RS 485 mode PCI 1602 1612 1622 cards automatically sense the direction of the data flow and switch the transmission direc tion meaning that no handshaking is necessary Thus you can build an RS 485 net work with only two wires This RS 485 control is completely transparent to the user The software written for half duplex RS 485 works without modification Figure 5...

Страница 58: ...PCI Communication User Manual 48 ...

Страница 59: ...Appendix A A Scale of Connectors ...

Страница 60: ...PCI Communication User Manual 50 A 1 Connector Size Comparison Figure A 1 DB9 Male Figure A 2 DB25 Male Figure A 3 DB37 Female POSITION A B C 37 Pin 55 42 63 50 69 32 ...

Страница 61: ...Appendix A Scale of Connectors Figure A 4 DB62 Female Figure A 5 DB78 Female POSITION A B C D E F 62 Pin 55 42 63 50 69 32 1 98 8 36 12 55 POSITION A B C D1 D2 E F 78 Pin 67 16 0 38 61 11 0 25 52 40 0 20 2 41 2 08 10 72 0 25 14 1 0 25 ...

Страница 62: ...ns are subject to change without notice No part of this publication may be reproduced in any form e g electronically or by any means e g photocopying recording or otherwise without prior written permission from the publisher All brand and product names are trademarks or registered trademarks of their respective companies Advantech Co Ltd 2018 ...

Отзывы: