background image

MIC-75M11 Startup Manual  3

Note: 


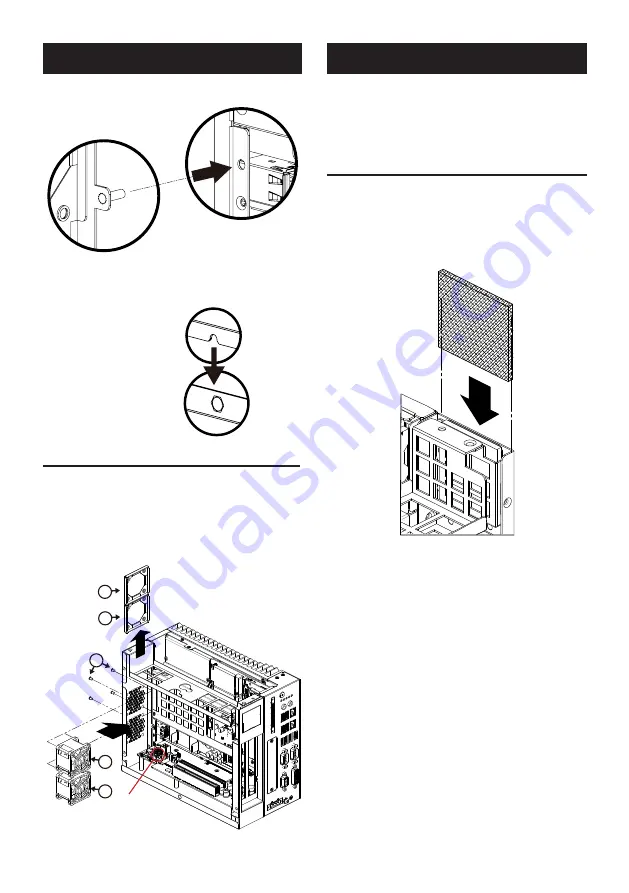
MIC-75M11 has 2 bolts and it must be aligned 
into the holes at device.

5.  Replacee the cover and secure with screws.

Note: 


Chassis cover has designed a notch and it must 

buckle at a hook at chassis.

Chassis Cover

Chassis hook

FAN Installation (Optional)

MIC-75M11 supports two 4x4CM FAN space. If system 

wants to install high perfornamce epxansion cards (For 

example: Graphic or PoE card) or total power consumption 

is over 45W, please install FAN for Thermal issue.
FAN is optional module. If you system needs FAN module, 

please contact your distributor or sales representative.
Fan Module P/N: 98R1752000E.

1

Fan Connector

3

1

2

2

1.  Undo FAN1 & 2 cover.
2.  Secrue FAN protectoin nets with 4 screws.
3.  Assemble and secure FAN in chassis with 4 screws.
4.  Plug the FAN power cable into the connector of    

backplane board.

FAN Filter Installation

If your system has installed FAN, we recommend you to be 

replaced system fan filter at regular intervals to ensure the 

stability of the system cooling.  
You can find one new FAN filter at FAN moudle.
1.  Undo system cover and remove old Fan filter.
2.  Change new fan filter and replace system cover with screws.


Simple Maintain Process 

(Cont.)


Simple Maintain Process (Cont.)

Содержание MIC-75M11

Страница 1: ...to 35W Note 2 For MIC 73 series products ATOM CPU only supports PCIEx4 or PCIEx1 signal 32 bit PCI One 32 Bit 33Mhz PCI socket Note 1 PCI socket suppots 15W power consumption Environment Operation Temperature 20 60 C with 0 7 m sec air flow with 1 x Industrial SSD without PC expansion boards 0 45 C with 0 7 m sec air flow with 1 x 2 5 HDD without PC expansion boards Storage Temperature 40 85 C 40 ...

Страница 2: ...connectors PCIE x 16 Socket PCI Socket 12V Extral Power SATA CON SATA Power CON FAN CON Connectors No Item Function 1 SATAPWR1 4 Pin Power connector 5V 2 PWR2 4 Pin Power connector 12V 3 FAN 1 4 Pin FAN connector 4 FAN 2 4 Pin FAN connector 5 PCI_1 PCI socket 6 PCIEx16_1 PCIEx16 Socket System Installation MIC 7 series i module can assemble with all MIC 7 series IPC system 1 Undo MIC 7 series syste...

Страница 3: ...dule If you system needs FAN module please contact your distributor or sales representative Fan Module P N 98R1752000E 1 Fan Connector 3 1 2 2 1 Undo FAN1 2 cover 2 Secrue FAN protectoin nets with 4 screws 3 Assemble and secure FAN in chassis with 4 screws 4 Plug the FAN power cable into the connector of backplane board FAN Filter Installation If your system has installed FAN we recommend you to b...

Страница 4: ...4 MIC 75M11 Startup Manual PCIE x 16 Socket PCI Socket 12V Extral Power SATA CON SATA Power CON FAN CON 197 20 192 123 230 235 20 123 IO Connectors System Dimensions ...

Страница 5: ...IC 7系列嵌入式系统的PCIE PCI扩展模块 快速入门手册 PCIe插槽 1个PCIex16插槽 注 1 PCIEx16功耗为35W 注 2 对于MIC 73系列产品 ATOM CPU 仅支持 PCIEx4或PCIEx1信号 32 bit PCI 1组32bit 33 MHz PCI插槽 注 1 每个PCI插槽的工号为15 W 环境规格 工作温度 20 60 C 0 7 m sec气流 带1 x 工业级SSD 不带PC扩展板 0 45 C 0 7 m sec气流 带1 x 2 5 HDD 不带PC扩展板 储存温度 40 85 C 40 185 F 相对湿度 95 40 C 非凝结 物理规格 尺寸 W x H x D 92 x 90 x 230 mm 注 1 当附加卡总功率超过45 W时 请安装风扇 产品规格 包装清单 如需了解有关本产品及研华其它产品的详细信息 请访 问研华网站 htt...

Страница 6: ...5M11安装至MIC 7系统 并用4颗螺丝固定 3 3 3 3 下表为每个跳线和接口的功能列表 PCIE x 16插槽 PCI 插槽 12V附加电源 SATA接口 SATA电源接口 风扇接口 接口 编号 标签 功能 1 PWR1 4针电源接口 5 V 2 PWR2 4针电源接口 12 V 3 FAN 1 4针风扇接口 4 FAN 2 4针风扇接口 5 PCI_1 PCI插槽 6 PCIEx16_1 PCIEx16插槽 系统安装 MIC 7系列i模块可安装于全系MIC 7 IPC系统 1 卸下MIC 7系统的螺丝并移除底盖 1 1 1 1 2 简单安装步骤 跳线和接口 简单安装步骤 续 ...

Страница 7: ...M11支持两个4 x 4 CM风扇 若系统需要安装高性能 扩展卡 如显卡或PoE卡 或系统总功率超过45 W 请安装 风扇以解决散热问题 风扇为选配模块 如需安装风扇模块 请联系研华经销商或 销售代表 风扇模块P N 98R1752000E 1 风扇接口 3 1 2 2 1 卸下风扇1 2盖 2 用4颗螺丝固定风扇保护网 3 用4颗螺丝将风扇安装并固定至机箱 4 将风扇电源线连接至背板接口 风扇过滤器安装 如果系统已经安装风扇 建议用户定期更换风扇过滤器 以 确保稳定的冷却性能 选配的风扇模块自带一个全新风扇过滤器 1 移除系统盖并取下原有风扇过滤器 2 更换新的风扇过滤器 然后 放回系统盖并用螺丝固定 简单安装步骤 续 简单安装步骤 续 ...

Страница 8: ...4 MIC 75M11快速入门手册 PCIE x 16插槽 PCI 插槽 12V附加电源 SATA接口 SATA电源接口 风扇接口 197 20 192 123 230 235 20 123 IO接口 系统尺寸 ...

Страница 9: ...IC 7系列嵌入式系统的PCIE PCI扩充模组 快速入门手册 PCIe插槽 1組PCIex16插槽 註 1 PCIEx16功耗為35 W 註 2 對於MIC 73系列產品 ATOM CPU 只支援PCIEx4 或PCIEx1訊號 32 bit PCI 1組32 Bit 33Mhz PCI插槽 註 1 每個PCI插槽的功耗為15 W 環境規格 工作溫度 20 60 C 0 7 m sec氣流 搭載一個工業級SSD 不帶PC擴展板 0 45 C 0 7 m sec氣流 搭載一個2 5 HDD或m SATA 不帶PC擴展板 儲存溫度 40 85 C 40 185 F 相對溼度 95 40 C 非凝結 物理規格 尺寸 W x H x D 92 x 90 x 230 mm 註 1 當擴充卡總功耗超過45W時 請安裝風扇模組 產品規格 包裝清單 如需了解有關本產品及研華其他產品的詳細訊息 請訪 問研...

Страница 10: ...並用4顆螺絲固定 3 3 3 3 下圖為每個跳線和接口的功能列表 PCIE x 16 Socket PCI Socket 12V Extral Power SATA CON SATA Power CON FAN CON 接口 編號 項目 功能 1 PWR1 4針電源接口 5 V 2 PWR2 4針電源接口 12 V 3 FAN 1 4針風扇接口 4 FAN 2 4針風扇接口 5 PCI_1 PCI插槽 6 PCIEx16_1 PCIEx16插槽 系统安裝 MIC 7系列模組可安裝於全系MIC 7 IPC系统 1 卸下MIC 7系统的螺絲並移除底蓋 1 1 1 1 2 簡單安裝步驟 跳線與接口 簡單安裝步驟 續 ...

Страница 11: ...IC 75M11支持兩個4 x 4 cm風扇 若系统需要安裝高性能 擴充卡 如顯卡或PoE卡 或系统總功率超過45 W 請安裝 風扇以解決散熱問題 風扇為選配模組 如需安裝風扇模組 請聯繫研華經銷商或 業務代表 風扇模組P N 98R1752000E 1 Fan Connector 3 1 2 2 1 卸下風扇1 2蓋 2 用4顆螺絲固定風扇保護網 3 用4顆螺絲將風扇安裝並固定至機箱 4 將風扇電源線連接至背板上接口 風扇過濾網安裝 如果系統已經安裝風扇 建議用戶定期更換風扇過濾網 以 確保穩的冷卻效能 選配的風扇模組有配一塊全新的風扇過濾網 1 移除系統蓋並取下原有風扇過濾網 2 更換新的風扇過濾網 然後 裝回系統蓋並用螺絲固定 簡單安裝步驟 續 簡單安裝步驟 續 ...

Страница 12: ...4 MIC 75M11快速入門手冊 PCIE x 16 Socket PCI Socket 12V Extral Power SATA CON SATA Power CON FAN CON 197 20 192 123 230 235 20 123 IO接口 系統尺寸 ...

Отзывы: