background image


  Installation and Operation Manual 

11 


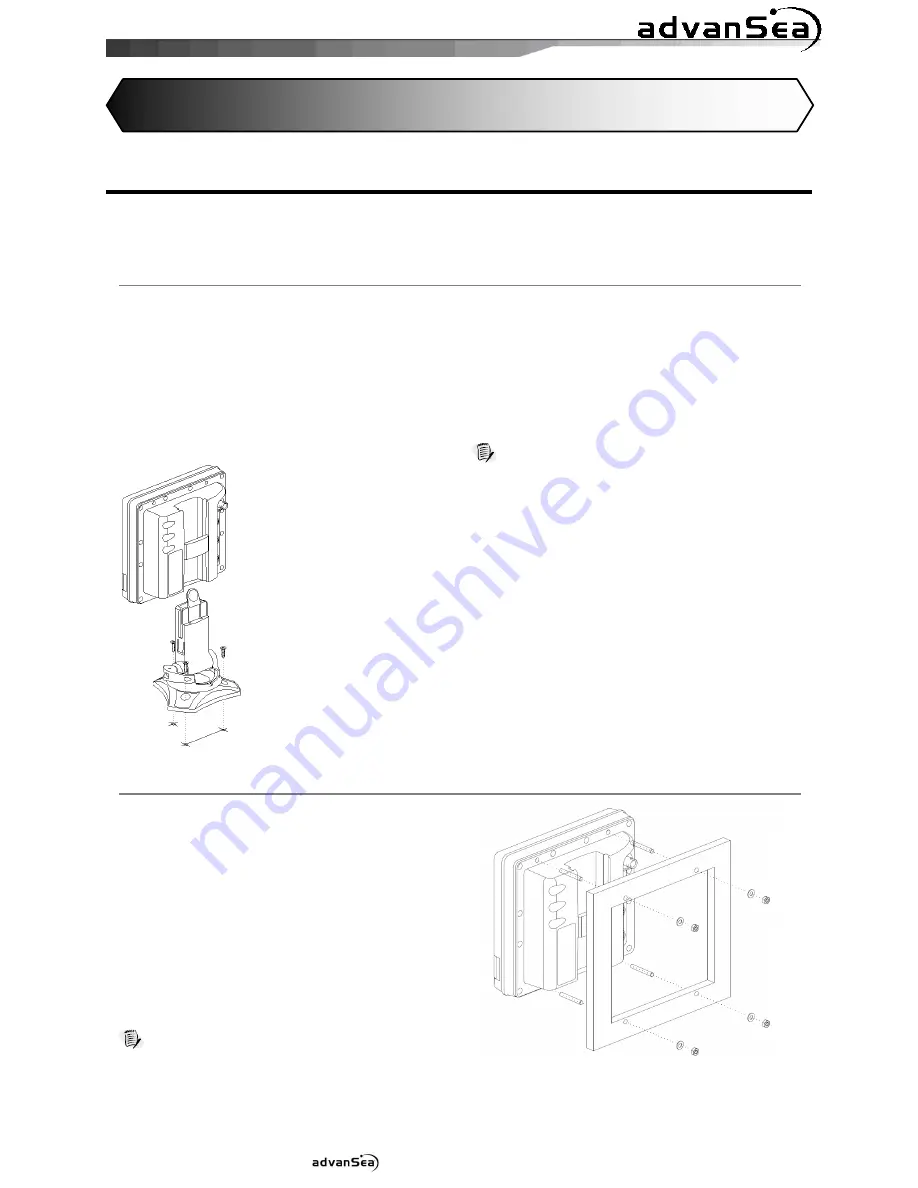
2-1 Mounting the Unit 

The AdvanSea is supplied with 

patented quick release 

bracket. You can choose a method of 

installation according to your preference.     


2-1-1 Bracket Mounting                                                                                                                           

Before installing ensure the area the bracket is mounted to is strong enough to support the 
weight of the GPS chart plotter. After the location is found, attach the mounting base to the 
area using the supplied hardware. 

Mounting the display Unit: 

1 Hold the display unit and find a groove 

joint between the display unit and bracket.   

2 Gently push the display unit into the 

groove of bracket; push the display unit as 
far as it can go.   


Removing the display unit: 

1 Turn the unit off   
2 Push the top side of bracket out.   
3 Pull the display unit out.   
 

Note


The AdvanSea chart plotter with internal GPS 
antenna is designed to be bracket mounting and 
flush mounting. However, if you flush mount inside of 
your boat, GPS performance can be reduced. 


2-1-2 Flush Mounting                                                                                                                                 

1 Find a location for flush mounting. 
2 Drill a hole in the area of the cutout area 

for the blade of jig saw.   

3 insert and cut out the area on the panel 

using the jig saw 

4 Drill four holes for mounting studs.   
5 Install the mounting studs on the chart 

plotter and insert them into the mounting 
hole.   

6 Attach the chart plotter to the mounting 

location by attaching the supplied 
hardware to the mounting studs.   

Note


1 If you flush mount, you need the optional external 

GPS antenna. 

2 Before Drilling holes make sure there is enough 

space to mount the chart plotter there is no 
obstructions.   


2 Getting Started 

Содержание C-56

Страница 1: ...C 56 T 56 T 50 USER MANUAL English version Other languages available on the CD Rom or at www advansea com C 56 T 56 T 50 USER MANUAL Ref 58108 MARCH 2009 Rev 1 ...

Страница 2: ...nd use the unit in a manner that will not cause accidents personal injury or property damage The user of this product is solely responsible for observing safe boating practices Global Positioning System The Global Positioning System GPS is operated by the US government which is solely responsible for its operation accuracy and maintenance The GPS system is subject to changes which could affect the...

Страница 3: ...s must handle Exposure of the display to UV rays may shorten the life of the liquid crystals used in you plotter This limitation is due to the current technology of the LCD display Avoid overheating which may cause loss of contrast and in extreme case a darkening of the screen Problems which occur from over heating are reversible when temperature decreases Screen Cleaning Precautions Cleaning your...

Страница 4: ...w 21 3 4 2 Perspective view 21 3 4 3 Latitude and longitude 22 3 4 4 Chart scale 22 3 4 5 Finding a chart symbol 22 3 4 6 Chart symbols and information 23 3 4 7 Introduction to navigating 23 3 4 8 Going to a waypoint or to a point on the chart 23 3 4 9 Following a route 24 3 4 10 Goto Key 24 3 4 11 Distance and bearing calculator 25 3 4 12 Projected course 25 3 5 Sonar Combine introduction and Win...

Страница 5: ...13 DSC 40 3 13 1 distress 41 3 13 2 Poll 42 3 14 Navtex 43 3 15 Engine Faults 43 4 Advance Settings 4 1 System Configuration Settings 44 4 1 1 Language 44 4 1 2 Beep volume 44 4 1 3 Auto power 44 4 1 4 Features 44 4 1 5 Factory reset 44 4 1 6 About 44 4 2 Chart Settings 45 4 2 1 Rotation 45 4 2 2 Palette 45 4 2 3 General 45 4 2 4 Land Sea 46 4 2 5 Map datum 46 4 2 6 NMEA datum offset 46 4 2 7 Map ...

Страница 6: ... 52 4 8 Alarms 53 4 8 1 Fish 53 4 8 2 Deep 53 4 8 3 Shallow 53 4 8 4 Temperature 53 4 8 5 Temperature rate 53 4 8 6 Low battery 53 4 8 7 Navigation alarms 53 4 8 8 AIS 53 4 8 9 DGPS 53 4 8 10 Restore default 53 4 9 Others 54 4 9 1 Simulate 54 4 9 2 Waypoint 54 4 9 3 GPS 54 4 9 4 Units 54 4 9 5 Comms 54 4 9 6 Calibrate 54 4 9 7 Time 54 4 9 8 Restore default 54 5 INSTALLATION 5 1 Options and Accesso...

Страница 7: ...max full backlighting External beeper or light output Switched to ground to sound alarm 30V DC 200 mA maxmum Operating temperature 10 to 50 C ALARMS User set Arrival radius anchor XTE danger too shallow too deep temperature temperature rate low battery loss of DGPS fix dangerous AIS vessels GPS NAVIGATION Chart card C MAP SD Card NT MAX NT or NT User card SD Card Waypoints Up to 5000 with default ...

Страница 8: ...chart chart dependent down to 0 005 nm in plotter mode COMMUNICATIONS NMEA NMEA 0183 4800 9600 38400 baud NMEA 2000 NMEA 0183 Inputs from compatible instruments DBK DBS DBT DPT GGA GLL GNS GGA GSV HDG HDT MDA MTA MTW MWD MWV RMC RPM VHW VTG VWT ZDA NMEA 2000 Inputs from compatible instruments System date and time PGN126992 Vessel Heading PGN127250 Engine parameters Rapid Update PGN127488 Engine pa...

Страница 9: ...3 Inputs from compatible instruments DBK DBS DBT DPT GGA GLL GNS GGA GSV HDG HDT MDA MTA MTW MWD MWV RMC RPM VHW VTG VWT ZDA NMEA 2000 Inputs from compatible instruments System date and time PGN126992 Vessel Heading PGN127250 Engine parameters Rapid Update PGN127488 Engine parameters Dynamic PGN127489 Trip parameters Engine PGN127497 Engine parameters Static PGN127498 Fluid level PGN127505 Water S...

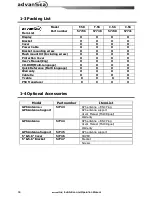
Страница 10: ... Eng Ο Ο Ο Ο CD ROM Multi language Ο Ο Ο Ο Quick Reference Multi language Ο Ο Ο Ο Warranty Ο Ο Ο Ο Cable tie Ο Ο Ο Ο Y cable X X X Ο P58 Transducer X X Ο Ο 1 4 Optional Accessories Model Part number Item List GPS antenna BNC Plug GPS antenna support User s Manual Multilingual GPS Antenna GPS Antenna Support 57743 Warranty GPS antenna BNC Plug User s Manual Multilingual GPS Antenna 57744 Warranty G...

Страница 11: ...it off 2 Push the top side of bracket out 3 Pull the display unit out Note The AdvanSea chart plotter with internal GPS antenna is designed to be bracket mounting and flush mounting However if you flush mount inside of your boat GPS performance can be reduced 2 1 2 Flush Mounting 1 Find a location for flush mounting 2 Drill a hole in the area of the cutout area for the blade of jig saw 3 insert an...

Страница 12: ... review sonar history menu Access to setting menu Show available options of current window Zoom in and zoom out to multiple chart level goto Start navigating to a destination point such as a MOB waypoint waypoint power Turns power on off Opens display Brightness Night mode and background settings SD Card Open the cover to install SD card mob Places a MOB waypoint on the chart window under the boat...

Страница 13: ...emove SD card during reading and writing 2 4 Simulate Mode Simulate Mode is great for practicing the actual use of a product when the satellites signals and internal alarms are not available In the simulate mode the unit turns the GPS receiver off and ignores data from all optional devices Two simulate modes are available as below Normal Allows a user to practicing the actual use of a product with...

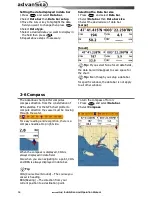
Страница 14: ...ve space for the chart Tip Even though you setup a data bar for specific window the data bar is not apply to all other window 2 6 Compass The AdvanSea chart plotter computes compass direction from the constellation of GPS satellites For the GPS chart plotter to compute direction the vessel must be moving through the water For easy reading and recognition there is a compass needle at top right side...

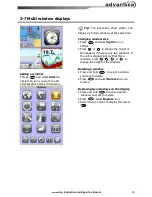
Страница 15: ...d select Split icon on bottom 2 Press or to change the height of the windows if there is only two windows If the unit is displaying more that three windows press or to change the height of the windows Deleting a window 1 Press and hold to select a window you want to delete 2 Press and select Remove icon to remove Replacing two windows on the display 1 Press and hold to active desired window you wa...

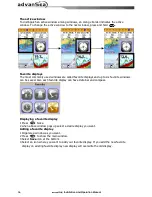
Страница 16: ...p to six favorite windows can be saved Also each favorite display can have data bar and compass Displaying a favorite display 1 Press twice 2 when above window pops up select a desire display you want Adding a favorite display 1 Organize a window as you want 2 Press to show the main window 3 Select Save icon at the bottom 4 Select an icon where you want to add your favorite display If you add the ...

Страница 17: ...MOB point efficiently MOB will not work if the unit does not have a GPS fix 1 When you press a MOB waypoint is created 2 When is pushed not in the Chart window the screen automatically is changed to Chart window and MOB waypoint is at the center of the chart 3 If autopilot is connected the unit sets the MOB waypoint to be the destination and start to navigate This might result in a sudden and dang...

Страница 18: ...nition is turned off To turn off you need to turn off the unit manually 3 2 Brightness night mode and Background You can change the screen setting for the display To change settings shortly press Brightness To change the brightness select Brightness and press to dim or to brighten Press to return to the previous screen Night mode The AdvanSea chart plotter has preprogrammed settings allowing you t...

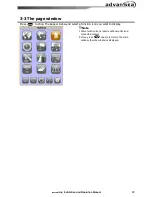
Страница 19: ... The page window Press to show the page window and select a function icon you want to display Note 1 Some function icons require optional units and connected sensors 2 If you press one more time in the main window favorite window is displayed ...

Страница 20: ...Installation and Operation Manual 20 Chart Sonar Highway Data Waypoints Routes Satellite Tides AIS DSC Navtex Engine Faults ...

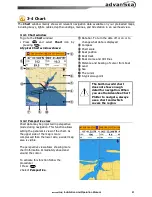
Страница 21: ...CDI lines Distance and bearing of cursor from boat Land Sea The cursor A typical waypoint The built in world chart does not show enough detail for navigation When you use the AdvanSea Chart Plotter to navigate always use a chart card which covers the region 3 4 2 Perspective view Chart data may be projected in perspective mode during navigation This function allows setting the panoramic view of th...

Страница 22: ...o 90 When reading the boat position make sure the position is not the cursor position 3 4 4 Chart scale The chart scale change by pressing to show more detail information of chart and by to show wider view of the chart When you press or the scale of chart is display in the chart on top left corner 3 4 5 Finding a chart symbol To find a port by name 1 Press 2 Select Find then Port by name 3 Press o...

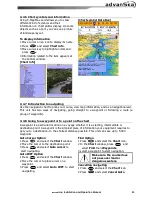
Страница 23: ...nts 3 4 8 Going to a waypoint or to a point on the chart A waypoint is a particular location on a voyage whether it is a starting intermediate or destination point A waypoint is the simplest piece of information your equipment requires to get you to a destination In the shortest distance possible This unit can save up to 5 000 waypoints Goto Cursor Option 1 Press and select the Chart window 2 Move...

Страница 24: ...ndow mover the cursor to highlight a route you want to start navigating to 3 Press and select start 4 Select Forward or Reverse to decide which direction you want to navigate Create Route Option 1 Press and select the chart window 2 Select New route 3 Name a route name 4 Move cursor keys to select a waypoint Repeat this step as much as you need 5 Press and select Add 6 Press 7 Repeat 2 4 steps of ...

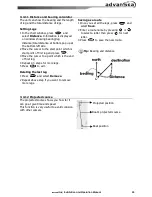
Страница 25: ...e the cursor to a point which is the end of first leg 4 Repeat 2 3 steps for more legs 5 Press to exit Deleting the last leg 1 Press and select Remove 2 Repeat above step if you want to remove more legs Saving as a route 1 Once you set all the legs press and select Save 2 Enter a route name by pressing or to select a letter then press for next letter 3 Press to save the new route Tip Bearing and d...

Страница 26: ...mud weed and sand show as narrow bands Range of display Color bar The window scrolls from right recent sonar record to left old sonar record 3 5 2 Mode The unit operates in two different modes You can choose a mode depending on the condition Auto mode This is the most commonly used option In this mode settings are automatically adjusted for the best display of fish and bottom according to environm...

Страница 27: ...ow The 50kHz picture appears on the left and the 200kHz picture on the right The display is useful for comparing the same picture with two different frequencies High Frequency 200 kHz Low Frequency 50 kHz 3 5 4 Range Range is the depth of water displayed on the sonar window The basic range may be chosen in Auto or manual mode Auto When the mode is set to Auto the unit adjusts the depth automatical...

Страница 28: ... is ignored by a set value When you use the manual mode and threshold the values of gain and threshold need to be set very carefully In the Gain window you can set for a gain mode and threshold To change a mode 1 Press select Gain 2 Select a mode 3 If you select a Manual mode adjust each frequency gain value by pressing or Even though you select the Auto mode it will be changed to manual mode if y...

Страница 29: ...e 200 kHz sonar history on the right This display is useful for comparing the same history with two different frequencies see section 3 5 10 Split A Scope Display Sonar history and echo strength see section 3 5 11 You can change the split ratio if the window is split 1 Press and select Window split 2 Press or to adjust the ratio 3 Press 3 5 7 No split No split window displays a sonar history at a ...

Страница 30: ...e zoom section is adjusted automatically so that the bottom is always displayed in the zoom section To turn Bottom lock on or off press Full Screen Zoom Full screen zoom displays only the zoom section of split zoom Split Zoon Bottom Lock Full screen zoom 3 5 9 Split bottom Split bottom display provides a normal picture on the right half and a selectable range over and below the bottom line is expa...

Страница 31: ...wo different frequencies 3 5 11 Split A Scope This display shows echoes at each transmission with amplitudes and colors proportional to their intensities on the right of the screen it is useful for estimating the kind of fish schools and bottom nature Echo strength color code varies from weakest blue to strongest red Echoes from fish and the bottom Unwanted noise echoes The strongest echo usually ...

Страница 32: ...or 3 7 Gauges The Gauges window displays all the information you need during navigation such as water engine fuel related information etc To select the Gauges window press and select Data icon Selecting a Gauges layout The Gauges window can show one of seven gauge layouts To select a layout from the Gauges window 1 Press and select Gauge Layout 2 Select one layout Changing a gauge in one selected ...

Страница 33: ...s and display option 3 Select Save 3 8 2 Moving a waypoint To move a waypoint from the chart window 1 Move the cursor to place it on the waypoint you want to move If you move the cursor on the waypoint correctly waypoint information will be displayed at the bottom left 2 Press and select Move 3 Move the cursor to a point where you want to move and press To Move a waypoint from the waypoints window...

Страница 34: ...e final destination of navigation is the waypoint 3 8 5 Find a waypoint To find a waypoint from the chart window Finding waypoints from the chart window is a simplified function 1 Press and select Find 2 Select Waypoints 3 Move cursor key to highlight a waypoint you want to find and press To find a waypoint from the waypoint window Finding waypoints from the waypoint window is provided by a full f...

Страница 35: ...d press 5 Repeat step 4 to enter more waypoints 6 Once you entered the last waypoint in the route press and select End Editing a waypoint in route while creating a route 1 Move the cursor to the waypoint you want to move 2 Press and select Move 3 Move cursor to a position where you wan to move the waypoint and press Deleting a last waypoint from the route while creating a route 1 Press and select ...

Страница 36: ...elect Edit 2 Highlight a leg where you want to insert a waypoint 3 Press and select insert 4 Highlight a waypoint and press 5 Press to exit Editing a route in the chart window 1 In the route list press and select Edit on chart 2 Follow the procedure of Editing a waypoint in route while creating a route Deleting a waypoint in the waypoint list 1 Highlight a waypoint you want to delete in the waypoi...

Страница 37: ...ation about the GPS satellites and GPS position as below To go to the satellite window press and select Satellite icon The satellite window shows Ship s Coordinates Time received GPS satellites Date received GPS satellites HDOP Horizontal Dilution of Precision It is a parameter indicating the accuracy of the GPS Location of GPS Satellites GPS signal strengths status in graph Press to display GPS s...

Страница 38: ...ormation 3 Press to exit Tip The unit only displays the tide information nearest your boat in the tides windows Choosing the date of the tide information 1 In the Tides window Press and select one of the following options Set date manually set a date Today automatically set the date of today Next day automatically set the date of today Prev day automatically set the date of yesterday 2 Press to re...

Страница 39: ...e equipped with AIS unit on the screen To check AIS information place the cursor on the AIS object then AIS information displays at the bottom of window AIS equipped vessel Dangerous Vessel Projected Course AIS equipped vessel Data Box Range Rings 3 12 2 AIS Windows To display the AIS windows 1 Press and select AIS icon 2 Press and hold to select one of the two tabs Vessels or Messages tab Vessel ...

Страница 40: ...ssel List AIS Vessel Safety message 3 13 DSC This feature requires connection to optional DSC VHF radio DSC window shows the distress and poll information received from other vessel through DSC VHF radio To go to the DSC windows 1 Press select DSC icon 2 Select one of two tabs Distress or Poll ...

Страница 41: ...eceived distress call you want to navigate to 2 Press and select Goto Editing a distress waypoint 1 Highlight a received distress call you want to edit 2 Press and select Edit Waypoint 3 Change data field and select Save Tip When receiving a Distress call from other vessel it creates a distress waypoint automatically However the waypoint you edit in option menu is a different waypoint from the dis...

Страница 42: ...t a poll you want to display 2 Press and select Display Going to the poll vessel position 1 Highlight a poll you want to go 2 Press and select Goto Edit a distress waypoint 1 Highlight a poll you want to edit 2 Press and select Edit Waypoint 3 Change data field and select Save Tip When receiving a poll from other vessel it does not create a waypoint as a distress call Deleting a poll 1 Highlight a...

Страница 43: ...elect the NAVTEX icon Reloading NAVTEX messages NAVTEX messages need to be loaded from NAVTEX receiver manually Up to 50 messages 1 Press and select Reload all Deleting a message 1 Move the cursor to a message you want to delete 2 Press and select Delete 3 15 Engine Faults When connected to a compatible engine through NMEA2000 T 56 and C 56 can repeat fuel data and collect engine status Engine fau...

Страница 44: ...on 1 Press and hold 2 Select the system configuration icon 4 1 1 Language Change the language for menus and data screens 4 1 2 Beep volume Select the level of beep sound 4 1 3 Auto power See section 3 1 4 1 4 Features When external devices are connected to the unit the corresponding options need to be set 4 1 5 Factory reset When this option is selected All settings of this unit returns to default...

Страница 45: ...may redraw 2 to 3 times to show all the detail AntiClutter when this option is selected less important information names icons are hiden when they are overlapped Value added data The Value Added Data VAD is a collection of additional cartographic objects which are not present on the original paper chart These objects have been obtained from other sources and then merged to the electronic charts in...

Страница 46: ... chart system and this option allows you to select a map datum The default datum is WGS84 as C MAP cartography has been compiled using the WGS84 datum 4 2 6 NMEA datum offset When you select other Map datum different from WGS84 latitude and longitude will be different from WGS84 S coordinates and this might confuse other device such as VHF radio if connected to the unit If this option is applied l...

Страница 47: ... or off Fish depth labels Turn the fish depth value on or off Fish filter Select a minimum fish size that will be displayed as a fish symbol Fish sensitivity Select the minimum strength fish echo that will be displayed as a fish symbol 4 3 6 Advance Settings Interference filter Interference from other equipment operating nearby or on your boat may show itself on the display Use this option to remo...

Страница 48: ...vigation This option is very useful when the boat stops or moves very slowly This option allows you to set a minimum speed at which movement is assumed The value range is from 0 00 to 9 99 4 4 4 Speed Filter and Course Filter Occasional waves and wind at sea affect the boat speed and course In order to have stable boat speed and course the unit calculates these factors to give the value of stable ...

Страница 49: ...urse Display Off Display no track on the chart 1 to 5 select a track number Display a selected track on the chart Record color Select the color of recording track Thickness Select the thickness of recorded track Plotting Interval Select the method of plotting interval between time and distance Distance Select the distance of plotting interval Time Select the time of plotting interval Delete track ...

Страница 50: ...or save data and press 4 6 2 Save Select a data type you want to save in the user card then the data will be saved in the user card automatically 1 If you select waypoint for saving data enter the file name and press 2 If you select routes for saving data enter the file name and press 3 If you select tracks for saving data enter the file name and press Waypoints Tracks 4 6 3 Load Select a data you...

Страница 51: ...feature require an optional AIS receiver To go to the AIS settings 1 Press and hold 2 Select the AIS icon 4 7 1 Display filter There are a couple of methods to filter AIS vessel in this unit as below Filter by Type The type of vessel which is selected will not be displayed on the chart Filter by distance Vessels outside the radius of selected distance from own ship is filtered Filter by speed Vess...

Страница 52: ...proach limit CPA Limit Set the Closet Point of Approach limit Proximity alarm Trigger an alarm when any AIS equipped vessel is within a set proximity radius Proximity radius Set a radius for proximity alarm 4 7 3 Display options Projected course Set a time for projected course The project course show the estimate course of vessel base on the given time Range rings Select a number of Range rings 4 ...

Страница 53: ...set value 4 8 4 Temperature Trigger an alarm when the reported temperature from the transducer is same as a set value 4 8 5 Temperature rate Trigger an alarm when the rate of temperature change from the transducer is same as a set value 4 8 6 Low battery Trigger an alarm when battery voltage is lower than a set value 4 8 7 Navigation alarms Arrival radius Trigger an alarm when your boat is approac...

Страница 54: ...rate the boat speed Travel at a constant known speed and press or to calibrate the speed Speed filter Set this option when removing effects from waves and wind which affect the speed of boat by averaging Temperature Calibrate the water temperature Measure the water temperature with thermometer then press or to calibrate the temperature Temperature filter Set this option when removing effects form ...

Страница 55: ...s DSC VHF radio NMEA 2000 The Advansea chart plotter can display engine data and Other instruments The Advansea chart plotter can receive data from other instruments and send data to other instruments by NMEA Connections Pin number Sonar Pin number Detail 1 SONAR 2 SPEED TEMP GND 3 SPEED SUPPLY 4 TEMP 5 SONAR 6 SONAR GND Power Data ALARM Auto power Pin number Detail 1 Ground power in NMEA ground 2...

Страница 56: ... the power supply GPS antenna and to NMEA devices such as VHF s AIS receivers digital instruments and autopilots 5 3 Power data cable Basic power Wire the AdvanSea display unit for basic power as below picture Auto power Wire the AdvanSea display unit for auto power as below picture During setup set up Auto power off ...

Страница 57: ...rt plotter have a internal GPS antenna you can use it without the input of the external signal 5 5 2 External antenna Reception of internal GPS antenna is affected by the location to be installed the display unit If GPS signal is weak or to receive enhanced GPS signal you can connect external GPS antenna to the unit The connector is BNC type Installing a external antenna If an external antenna is ...

Страница 58: ...eacon receiver and it automatically applies the beacon correction to the GPS position To set the DGPS options None or WAAS EGNOS Connect the GPS directly to the input Set the option The new setting will be displayed if it was successfully applied Note The AdvanSea chart plotter can apply the WAAS and EGNOS DGPS corrections to any GPS antenna For more information contact Plastimo 5 6 NMEA 0183 The ...

Страница 59: ...mo During setup to send NMEA data to other instruments set NMEA out and specify the NMEA data to send 5 7 NMEA 2000 NMEA 2000 interface standard was introduced for communications network to interconnect marine electronic equipments such as navigation chart plotter engine tank level sensor and others on vessels The standard is regulated by The National Marine Electroincs Association in USA The Adva...

Страница 60: ...l speed temperature transducer provide more enhanced performance Contact PLASTIMO for more information Connect the transducer to the AdvanSea chart plotter At the system configuration window set Sonar to and set up the sonar options If you use Y Cable the AdvanSea chart plotter can display water temperature and water speed from the compatible devices and receive and display the depth from transduc...

Страница 61: ...isplay unit is bracket mounted adjust tilt and rotation for best viewing and hand tighten the knob 3 Insert any required C MAP chart card 4 Enter setup data to set up the AdvanSea chart plotter to your requirements and to set up any optional sensors or instruments 5 At the satellite display check that it picks up GPS satellites Wait for the GPS receiver to start up and the GPS satellite to change ...

Страница 62: ...Installation and Operation Manual 62 ...

Страница 63: ...vägen 2 473 31 HENÅN SWEDEN Ph 46 0 304 360 60 Fax 46 0 304 307 43 E mail info navimo se NETHERLANDS BELGIUM Navimo Holland Bv Industrieweg 4 2871 JE SCHOONHOVEN THE NETHERLANDS Ph 31 0 182 320522 Fax 31 0 182 320519 E mail info plastimo nl SPAIN Navimo España SA Polígono industrial de Cabrera Calle Industria s n 08349 CABRERA DE MAR Barcelona Ph 34 93 750 75 04 Fax 34 93 750 75 34 E mail plastimo...

Страница 64: ...Operation Manual 64 Discover the S 400 Series sailing instruments at www advansea com or ask your dealer for any information AdvanseaTM is a registered trademark of C 56 T 56 T 50 USER MANUAL Ref 58108 MARCH 2009 Rev 1 ...

Отзывы: