background image

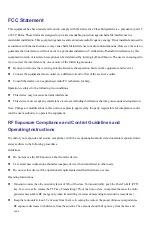
FCC Statement

This equipment has been tested and found to comply with the limits for a Class B digital device, pursuant to part 15 

of FCC Rules. These limits are designed to provide reasonable protection against harmful interference in a 

residential installation. This equipment generates and can radiate radio frequency energy. If not installed and used in 

accordance with the instructions, it may cause harmful interference to radio communications. However, there is no 

guarantee that interference will not occur in a particular installation. Verification of harmful interference by this 

equipment to radio or television reception can be determined by turning it off and then on. The user is encouraged to 

try to correct the interference by one or more of the following measures: 

Reorient or relocate the receiving antenna. Increase the separation between the equipment and receiver. 

Connect the equipment into an outlet on a different circuit to that of the receiver's outlet. 

Consult the dealer or an experienced radio/TV technician for help. 

Operation is subject to the following two conditions:   

This device may not cause harmful interference. 

This device must accept any interference received, including interference that may cause undesired operation. 

Note: Changes or modifications to this unit not expressly approved by the party responsible for compliance could 

void the user's authority to operate the equipment. 

RF Exposure Compliance and Control Guidelines and

Operating Instructions

To control your exposure and  ensure  compliance  with  the occupational/controlled environmental exposure limits, 

always adhere to the following procedures. 

Guidelines: 

Do not remove the RF Exposure Label from the device. 

User awareness instructions should accompany device when transferred to other users. 

Do not use this device if the operational requirements described herein are not met. 

Operating Instructions: 

Transmit no more than the rated duty factor of 50% of the time. To transmit (talk), push the Push-To-Talk (PTT) 

key. To receive calls, release the PTT key. Transmitting 50% of the time, or less, is important because the radio 

generates measurable RF energy only when transmitting (in terms of measuring for standards compliance). 

Keep the radio unit at least 2.5 cm away from the face. Keeping the radio at the proper distance is important as 

RF exposure decreases with distance from the antenna. The antenna should be kept away from the face and 

eyes. 

Содержание AWR-D7000

Страница 1: ...User Manual AWR D7000 Digital Portable Radio ...

Страница 2: ... FCC IC EU and advanced international standards Our products are tested using strict and rigorous test procedures with advanced test instruments and equipment to internationally recognized standards Thank you This manual should be read to ensure that the user understands the operation of the AWR D7000 Please read the Safety Information Manual before use ...

Страница 3: ...as of high dust or excessive moisture Users may experience signal interference if the unit is used near devices such as TV or electric generators If the unit emits smoke or you notice a strange smell immediately turn off the power and send it to the closest repair station The radios are small but contain high power components It is not uncommon to notice slight warming of the handset This is norma...

Страница 4: ...ar a continuous beep and turn the volume power knob to adjust Three way to choose channel 1 Channel knob rotate the channel control to choose the needed channel 2 Channel button choose the channel you need Transmit and receive Press PTT button the radio will enter the transmit state the red light will turn on the LCD display if equipped will indicate transmit Release PTT button the radio will ente...

Страница 5: ...r tampering or adjustment 4 Warranty does not extend to cosmetic scratches or damages as a result of normal use or misuse 5 This warranty is void if a The product information label on the back aluminum case is removed or if the serial number is tampered with changed or cannot be identified b If the battery case is damage tampered with or unsealed General Items This warranty policy establishes the ...

Страница 6: ...semble the belt clip 5 Insert the earphone 5 Function key 6 Charging the battery 7 Charger indicator 7 LED indicator of transceiver 7 Function and basic operation 8 Turning your radio on and off 8 Switch channel 8 Push to talk operation 8 Digital channel information 12 Time out timer TOT 12 Single call group call all call 13 CTCSS CDCSS 13 Tail tone elimination 14 Power 14 Digital mode setting 15 ...

Страница 7: ...ck the accessories according to the following list If any part is lost or damaged please request a claim latter from the shipper or supplier Accessories Items Quantity Antenna 1 Belt clip 1 Power supply 1 Battery 1 Charger 1 Lanyard 1 Instruction manual Available at www advancedwireless com Warranty card Available at www advancedwireless com 1 ...

Страница 8: ...rly 4 New batteries need to be fully charged before use 5 Use only the battery charger and power supply specified by AWC Use of non authorized charging systems will void the warranty of both the battery and the equipment 6 Avoid extreme temperatures as this will effect capacity of the battery 7 The battery cannot be stored in hot or cold places otherwise it will reduce battery capacity and useful ...

Страница 9: ...mes but they will age with use Aging will occur quicker when batteries are used for short periods and then recharged Batteries should be allowed to fully discharge before charging to prolong battery life 4 Batteries that are stored and unused discharge over time Battery charge 1 The battery may be installed in the charger on the radio or alone Please use the provided charger power supply with the ...

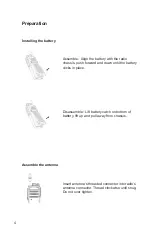
Страница 10: ... with the radio chassis push forward and down until the battery clicks in place Disassemble Lift battery catch on bottom of battery lift up and pull away from chassis Insert antenna s threaded connector into radio s antenna connector Thread clockwise until snug Do not over tighten 4 ...

Страница 11: ...lip Insert the earphone Assembly Attach belt clip using the provided screws by aligning screws with threaded holes in chassis Disassemble Unscrew the screws holding the belt clip and remove belt clip from chassis Open the rubber cover to insert the Earphone 5 ...

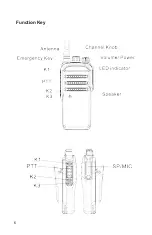
Страница 12: ...Function Key 6 ...

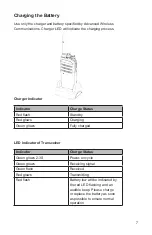
Страница 13: ...Red flash Standby Red glows Charging Green glows Fully charged LED Indicator of Transceiver Indicator Charge Status Green glows 2 3S Power on cycle Green glows Receiving signal Green flash Received Red glows Transmitting Red flash Battery low will be indicated by the red LED flashing and an audible beep Please charge or replace the battery as soon as possible to ensure normal operation 7 ...

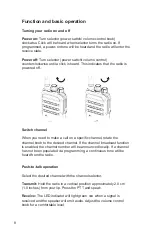
Страница 14: ...need to make a call on a specific channel rotate the channel knob to the desired channel If the channel broadcast function is enabled the channel number will be announced locally If a channel has not been populated via programming a continuous tone will be heard from the radio Push to talk operation Select the desired channel with the channel selector Transmit Hold the radio in a vertical position...

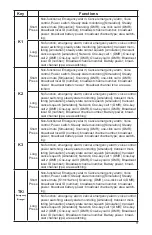
Страница 15: ...aat local ID number Broadcaat channel number Battery power broad cast channel type area switching K3 Short Press Non functional Emergency alarm Cancel emergency alarm Voice control Power switch Steady state monitoring Simulation Steady cancel mute Simulation Scanning DMR one click call 4 DMR broadcaet local ID number broadcast channel number broadcast power broadcast battery power broadcast channe...

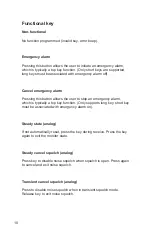
Страница 16: ... the user to stop an emergency alarm which is typically a top key function Only supports long key short key must be associated with emergency alarm on Steady state analog If not automatically reset press the key during receive Press the key again to exit the monitor state Steady cancel squelch analog Press key to disable noise squelch when squelch is open Press again to cancel and exit noise squel...

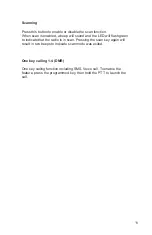
Страница 17: ...the LED will flash green to indicate that the radio is in scan Pressing the scan key again will result in two beeps to indicate scan mode was exited One key calling 1 4 DMR One key calling function including SMS Voice call To enable the feature press the programmed key then hold the PT T to launch the call 11 ...

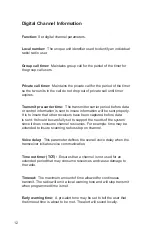
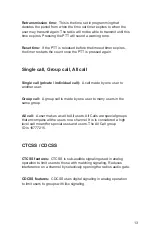
Страница 18: ...ther receivers have been captured before data is sent It should be carefully set to support the needs of the system since it does consume channel resources For example time may be extended to insure scanning radios stop on channel Voice delay This parameter defines the overall voice delay when the transceiver initiates voice communication Time out timer TOT Ensures that a channel is not used for a...

Страница 19: ...A call made by one user to another user Group call A group call is made by one user to many users in the same group All call A user makes a call to All users All Calls are special groups that encompass all the users on a channel It is is considered a high level call meant for special uses and users The All Call group ID is 16777215 CTCSS CDCSS CTCSS features CTCSS is sub audible signaling used in ...

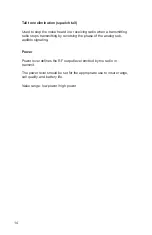
Страница 20: ...ing radio stops transmitting by reversing the phase of the analog sub audible signaling Power Power level defines the RF output level emitted by the radio in transmit The power level should be set for the appropriate use to insure range call quality and battery life Value range low power high power 14 ...

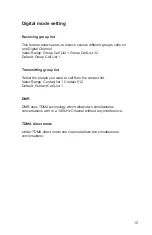
Страница 21: ...ault Group Call List 1 Transmitting group list Select the people you want to call from the contact list Value Range Contact list 1 Contact 512 Default Contact Call List 1 DMR DMR uses TDMA technology which allows two simultaneous conversations with in a 12 5kHz Channel without any interference TDMA direct mode Under TDMA direct mode one channel allows two simultaneous conversations 15 ...

Страница 22: ...ered off aboard aircraft and the user shall adhere to the any and all airline requirements for RF emitters Operation warning Radios including mobiles and portables shall not be mounted permanently or temporarily in areas of vehicles that use air bag safety restraint systems Placing devices on or near air bags during deployment pose a safety hazard to the occupants of the vehicle Environment with e...

Страница 23: ...should be exercised to insure that the battery contacts are not allowed to touch other objects Radio s maintenance 1 Chemicals such as alcohol cleaning fluids and petroleum based products will damage the radio surfaces 2 Do not pick up the radio using the antenna or purposely stress the housing and belt clip 3 Please close the dust proof cover to protect the Microphone speaker jack while not using...

Страница 24: ...ause harmful interference This device must accept any interference received including interference that may cause undesired operation Note Changes or modifications to this unit not expressly approved by the party responsible for compliance could void the user s authority to operate the equipment RF Exposure Compliance and Control Guidelines and Operating Instructions To control your exposure and e...

Страница 25: ...ux limites d intensité de champ RF les utilisateurs peuvent sur l exposition aux radiofréquences et la conformité and compliance d acquérir les informations correspondantes This device complies with Innovation Science and Economic Development Canada Compliance license exempt RSS standard s Operation is subject to the following two conditions This device may not cause harmful interference This devi...

Страница 26: ... 2019 Advanced Wireless Communications All rights reserved 501171 ...

Отзывы: