


2.1 Unpacking & Setup
The US-4000 is shipped with the scale head and other components removed. The load cell will be
secured with breather screws closed. The breather screw must be opened (turn screw counterclockwise)
before use. See Dwg 4.5.
2.2 Operating Environment
When you choose a location for installation, make sure the area is free of excess dust, dirt and moisture.
To ensure the highest production possible, consider product flow from baggers or counters and ensure
that finished (packaged) product can easily flow from the system.
Note: For suggested system layouts, please contact an APPI technical sales person for layout drawings.
2.3 Machine Setup
Position the US-4000 in an environment free from vibrations, air flow or other conditions that may affect
the stability of the scale or cause incorrect readings from the load cell.
When the scale is in its operating location, level the scale by adjusting the leveling pads. Place a level
across the stand and along the stand legs to level the scale.
Before mounting the rotary drum assembly, the load cell breather screw must be turned counterclockwise
3-4 turns. See Dwg. 4.5 Once the breather screw is opened, the scale should not be moved.
Install the rotary drum assembly onto the load cell and tighten the four screws that fasten the rotary drum
assembly to the load cell plate. Then, remove the front panel to gain access to the load cell and connect
the stepper drive cable. Secure the load cell cable with strain relief ties so that the cable has no stress
between the upper “U” channel and the lower “U” channel. Reinstall the front plate to enclose the load
cell area.
Note: Ensure that the stepper cable is not wedged between the upper and lower “U” channel.
2.4 Hookups and Connections
The side of the US-4000 electrical panel, located beneath the rotary drum, there is a port that connects to
infeed systems to halt the operation of the system if a scale fault condition exists. Connection to this port
is optional. If not connected, the scale can operate in a standalone operation mode.
A 12’ power cord is supplied to connect to a standard 115V/60hz grounded outlet (US voltage).
Note: Power outlets should be checked by qualified electricians to ensure the proper voltages are
supplied.
Connect a 1/4” airline to the regulator to operate the accumulator gates and set the air pressure between
35 and 45 psi or lower to allow the gates to open and close quickly and freely.
Connect the product sensor photo eye cable to photo eye mounted above the accumulator assembly.
2.5 Turning on the Power
The power switch is located on the side of the electrical panel, beneath the rotary drum assembly. In the
"On" or "Up" position, the switch is illuminated indicating that power is supplied to the unit.
Содержание US-4000
Страница 2: ...This page intentionally left blank ...
Страница 6: ...This page intentionally left blank ...
Страница 8: ...Chapter 5 Maintenance Trouble Shooting 5 1 Troubleshooting Checklist Chapter 6 Parts Drawings ...
Страница 12: ...This page intentionally left blank ...
Страница 15: ......
Страница 16: ...This page intentionally left blank ...
Страница 20: ...FIG 3 1 FIG 3 2 FIG 3 3 FIG 3 4 FIG 3 4A FIG 3 5 ...
Страница 21: ...FIG 3 6 FIG 3 7 FIG 3 8 FIG 3 9 FIG 3 10 FIG 3 11 ...
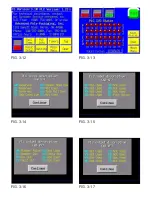
Страница 27: ...FIG 3 12 FIG 3 13 FIG 3 14 FIG 3 15 FIG 3 16 FIG 3 17 ...
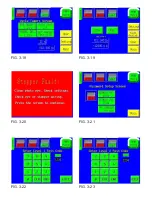
Страница 28: ...FIG 3 18 FIG 3 19 FIG 3 20 FIG 3 21 FIG 3 22 FIG 3 23 ...
Страница 30: ...This page intentionally left blank ...
Страница 31: ...Chapter 4 Machine Adjustment Settings Rotary Drum Positioning Sensor Settings Accumulating Funnel Adjustments ...
Страница 33: ......
Страница 34: ......
Страница 35: ......
Страница 36: ......
Страница 37: ...Chapter 5 Trouble shooting Troubleshooting Checklist ...
Страница 39: ...Chapter 6 Replacement Parts Components Lists with Drawings ...
Страница 41: ......
Страница 43: ......
Страница 45: ......
Страница 47: ......
Страница 49: ......
Страница 51: ......
Страница 53: ......
Страница 54: ......


